The Auto Sampler plugins (generator and recorder) work together to automatically create a collection of samples from sounds you have created in Gig Performer using one or more synth and effect plugins connected together. The samples can then be loaded into various samplers giving you a lightweight solution to play back sounds that might otherwise be too CPU intensive to be used live. External synth sounds can also be captured.
The Auto Sampler Generator plugin produces a sequence of MIDI note messages, tailored according to the options you selected in this plugin block such as highest and lowest note, highest and lowest velocity and others that will be described in this chapter. The generated Note messages will be then processed by your plugins or a hardware synth and recorded with the Auto Sampler Recorder block. This plugin provides one MIDI output pin:
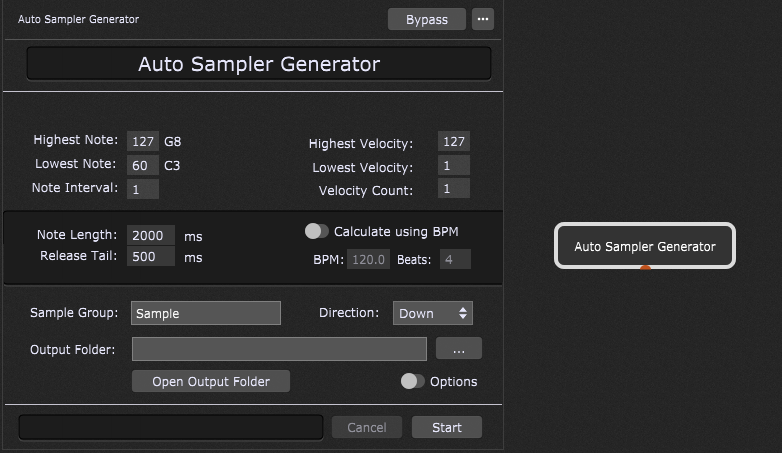
The Auto Sampler Generator block allows you to specify the following options:
Highest and lowest note - allows you to enter the desired highest and lowest note; type in numbers from 0 to 127 that corresponds to notes from C-2 to G8 respectively. Depending on your use case, you may want to sample only a range of notes and not the complete set. Provided that you connected this block to a plugin and afterwards the plugin to the Audio Out block, clicking on a note name will produce the corresponding sound.
Important note: In trial mode, you cannot change any of these values. You can continue to evaluate the usefulness of this plugin but you will not be able create arbitrary sets of samples.
Note interval - you can select whether you want to sample every note (1) or every second note (2) or every third note (3), and so on. Depending on the sound, you may not need to sample every single note and instead let your sampler downsample single notes.
Highest and lowest velocity - allows you to select the desired values (from 1 to 127) for the highest and lowest velocities for each note.
Velocity count - some sounds sound quite different depending on the played velocity, so you have the ability to create separate samples for different velocity ranges (e.g, use one sample for velocities between 1 and 10, another sample for velocities between 11 and 20, etc). The upside is that you get more accurate samples for different velocities. The downside is that you create multiple wave files (in fact this is why some sample banks are so huge, they have each note sampled at almost every velocity value). Most modern samplers support multiple velocities for the same note.
Note length - choosing the right value (from 250 ms to 60000 ms) depends on the sound — if the sound doesn't change, then a short length may work if your sampler provides you with tools to loop the sample. If the sound does change, or you don't want to deal with loops, then you would want a larger note length. Note that longer note lengths also means longer files.
Release tail - determines how long the release portion of the sound should persist (from 20 ms to 20000 ms).
Calculate using BPM - turn on this toggle button if you want to calculate the required note length using BPM and beats.
BPM and beats - if the Calculate using BPM toggle button is turned on, you can define BPM and number of beats to calculate the required note length automatically.
Sample group - allows you to define the group name for the sample collection. It is optional.
Direction - suppose you're only sampling every 5th note (Note Interval = 5). Now suppose you have the range: C C# D D# E. If you sample Down, the Auto Sampler will create the wave file for E and the sampler will down-sample that note to produce the other four notes below. If you sample Up, the Auto Sampler will create the wave file for C and the sampler will have to up-sample to create the notes at higher frequencies. That requires it to interpolate missing information whereas down-sampling lets you essentially just discard some information. Therefore, generally you will want to use the Down direction.
Output folder - click on the "..." button to select the desired output folder for your samples. If you want to open that folder, click on the Open Output Folder button.
Options - clicking on this toggle button shows sampler specific options:
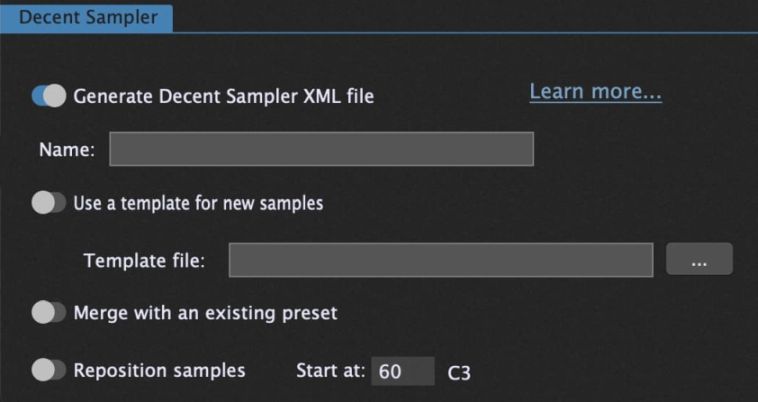
Generate Decent Sampler XML file - turn on this toggle button to create a Decent Sampler preset (XML file) using the just generated samples.
Name - allows you to provide a name for the preset.
Use a template for new samples - if you have created a template XML file for Decent Sampler presets, the Auto Sampler will make a copy of that template and insert a reference to the newly created samples. It will be stored in the same location as the samples (check out the Output Folder above).
Merge with an existing preset - if you have already created a preset, you can have the Auto Sampler modify that preset to insert the sample group. In conjunction with "Reposition samples" this gives you the ability to create multiple groups of samples spread out to different locations on the keyboard.
Reposition samples - by default, Decent Sampler will place the samples using the note numbers from Lowest Note to Highest note. However, if you want those samples to be placed somewhere else, specify a new location for them.
Start at - allows you to set the starting note.
Once you are finished with setting the desired options, click on the Start button to start the sampling process.
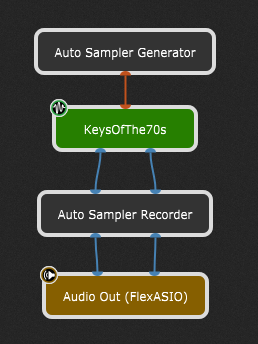
The screenshot below shows a simple setup that allows you to sample the sounds from the KeysOfThe70s plugin:
If you would like to sample an external synth, this is an example setup in the Wiring view:
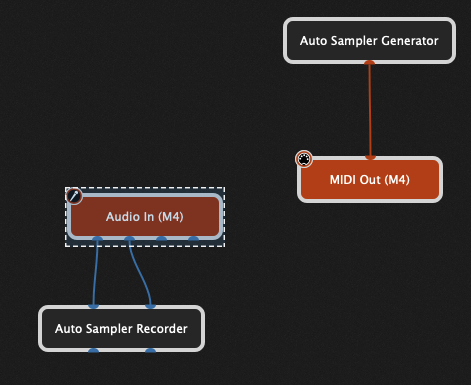
First, connect audio outputs of the external synth to inputs of your audio interface and then connect the Audio In block with the Auto Sampler Recorder. Afterwards, connect the Auto Sampler Generator block with the corresponding MIDI Out block. Set the desired options in the Auto Sampler Generator and then click on the Start button to start the sampling process.
Check out this YouTube video to see the Auto Sampler in action.
Auto Sampler Generator parameters
Apart from the common parameter Open/Close Plugin Editor, the Auto Sampler Generator plugin provides no other parameters.