The Audio Input Recorder is a simple means of capturing audio arriving at your audio interface’s inputs, before it has passed through any of the plugins. By capturing the audio and saving your gig, you can replicate the performance and modify it in post-production. To access the Audio Input Recorder, just click the Recorder button in the bottom toolbar.
Files are recorded in WAV format. Each time you start the recorder, a folder is created within the target folder and named with the date of the recording. All files from that recording are placed within that folder. This makes it very easy to keep straight recordings made at different performances.
A delayed start feature lets you set a time for recording to automatically begin, so that the recorder can be configured and tested at soundcheck, then set to start recording at the proper time.

1.Record MIDI Input – When checked, MIDI input from all sources is recorded at the same time as audio. Each MIDI In block is recorded as a separate track in a multitrack (Type 1) Standard MIDI File. These files are easily imported into just about any DAW with MIDI capabilities or other MIDI sequencing software.
2.Target folder display – All files are recorded into this folder.
3.Available space display – Shows the amount of recording space available on the disk on which the target folder is located.
4.Clear All button – Clicking this button deselects all inputs, so that no channels will be recorded. When you only need to record a few channels, it can be quickest to deselect all and then select only the ones you need. Similarly, when setting up recording for a new situation, it may be most efficient to deselect all inputs and enable those you need.
5.Select All button– Clicking this button enables all channels for recording. When you want to record most or all channels, it can be quickest to select all channels and then deselect the ones you do not need.
6.Set target folder button– Clicking this brings up a file navigator that enables you to choose a target folder.
7.Bit depth field– Click this to select 8, 16, 24, or 32-bit (floating point) depth for recording.
8.Recording space required display– Shows the amount of disk space required to record the selected channels per minute or per hour. This display adjusts as you select or deselect channels.
9.Record Start mode field – Click on this and choose Start immediately to begin recording as soon as the red Start button is clicked, or choose Delayed start and enter a start time in the minutes and seconds fields, as seen below.

10.Channel record enable checkboxes – Click a checkbox to enable a channel for recording. A channel is record-enabled when the box is blue and checked; recording is disabled for the channel when the button is gray and unchecked.

11.Record Start button –Clicking this button immediately begins recording of record-enabled channels. The button changes state when recording:
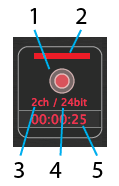
1.Stop button – Click this to stop recording.
2.Recording beacon – Flashes red while Gig Performer is recording audio.
3.Number of channels being recorded
4.Bit depth (resolution) of recording
5.Elapsed recording time