For Gig Performer and an OSC application to work with one another, make sure that both your computer and the device running the OSC application are connected to the same local network.
Launch Gig Performer and then click Options -> OSC Setup:

Enable OSC by clicking on the Enable OSC button. Type in the IP address and the port of the device running the OSC application in the Remote client IP address and Remote client port boxes respectively. Alternatively, click on the Select... button to easily select an OSC target from the list that must be previously set by clicking on the Manage OSC Targets... button. Check the OSC Options to learn more.
Note that the Gig Performer IP address value cannot be changed, as this is defined by your computer's network configuration. The address is displayed to make it easier for you to configure your remote device to connect to Gig Performer. The Gig Performer listening port can be changed to a custom value. Note: make sure that Gig Performer is not blocked by any kind of software firewall.
When you perform live, you might want your FoH engineer to have access to your controls, too. In cases when OSC applications are running on multiple devices (i.e. a tablet, a smartphone or another computer) and you want to use multiple devices onstage, there is a simple way to accomplish that; if you simply set three last digits of the OSC applications IP address to 255 (i.e. 192.168.0.255) then Broadcast Mode is activated. Broadcast Mode enables Gig Performer to send OSC messages and communicate simultaneously with all listening clients on the specified port (i.e. 4252) on the same local network. Click here to access our Knowledge Base article with more information.
If you are using an OSC application such as Lemur or another OSC application that allows detailed control, turn on the Use Lemur augmented OSC messages toggle button.
Other advanced options include MIDI In OSC Patchbay and Direct Addressable OSC. Check the OSC Options chapter for more information.
The Sync section is dedicated to synchronize rackspace or song changes between multiple instances of Gig Performer. Requirements are that rackspaces and songs have the same names across instances. Under this section there are two toggle buttons:
- Send rackspace or song changes (Tx) - allows you to send messages to other instances of Gig Performer to switch rackspaces or songs.
- Respond to incoming rackspace or song changes (Rx) - allows you to set this instance of Gig Performer to respond to incoming requests to change rackspaces or songs from another instance of Gig Performer.
In the example screenshot below are shown OSC options of the main Gig Performer instance and the "OSCtest" instance:
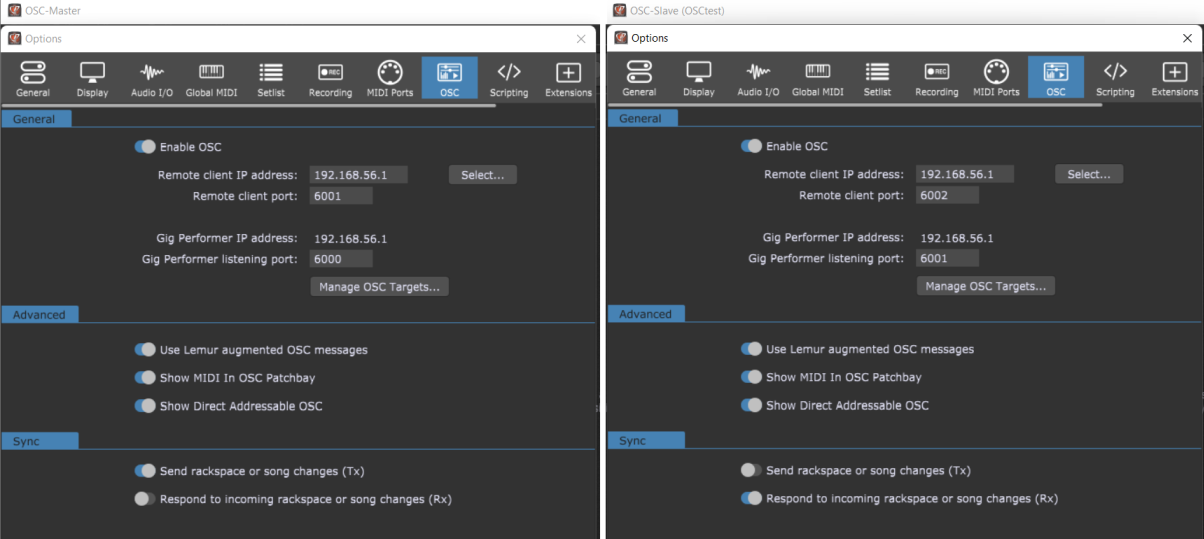
In this example, these two instances are on the same computer. Provided that rackspace names are the same (variation names don't need to be the same, as their index number is used for the sync), clicking on the desired rackspace in the main instance will automatically change to the corresponding rackspace in the "OSCtest" instance.
Gig Performer's supplied MIDI In (OSC) plugin is designed to receive MIDI messages from remote OSC sources. One of the requirements of OSC is that each object in both the host computer and remote device must have matching unique case-sensitive names comprised of characters only (no spaces). These names must be unique within a single Gig Performer rackspace, although they can be reused in different rackspaces. To see an example how to use MIDI OSC blocks, refer to this blog article.
Further reading:
 How to control your guitar or keyboard effects from a web browser using OSC
Use your mobile phone to control your guitar or keyboard effects using OSC
Using Touch OSC app as a remote display and a touch control surface with Gig Performer
Using Lemur with Gig Performer