The Streaming Audio File Player streams audio files from disk, allowing you to have hundreds of songs in the player and with minimum computer resources. Supported audio files are: MP3, WAV, OGG, FLAC, BWF, AIFF, AIF, ASF, WMV, WM, and WMA. The Streaming Audio File Player plugin provides two audio output pins. Double-clicking the plugin block opens its editor window, which provides controls that enable the following operations:
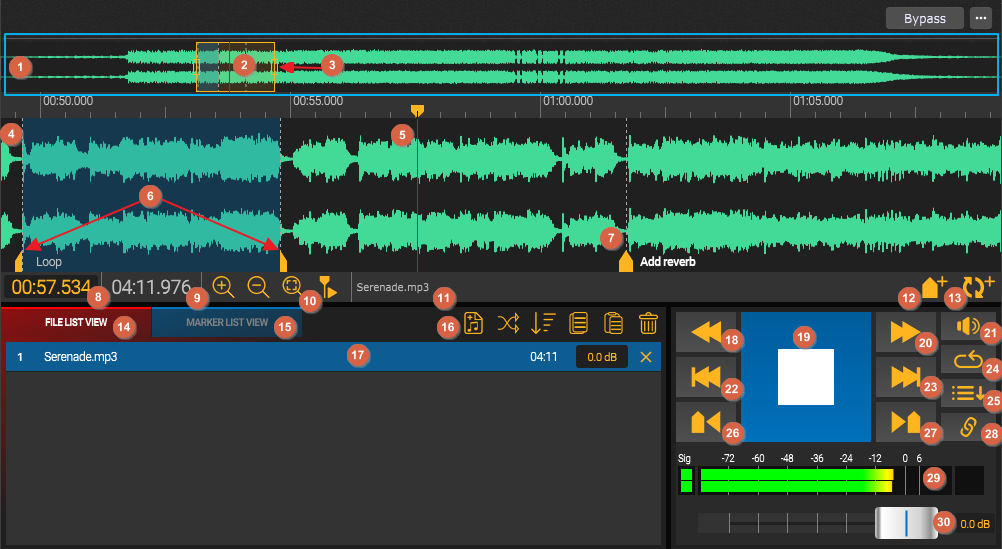
1.Mini display - represents a small display of the Timeline, along with loops, markers, and the playhead position.
2.Current section - represents the currently visible portion of the Timeline indicated with (4). Scrolling up or down with your mouse will move this selection to the right or left respectively. If you hold down the Ctrl key (or the Command key on Mac) while scrolling up or down, then the selection will be zoomed in or out respectively. Alternatively, you can set the zoom level using the buttons indicated with (10). Click on any part of the Mini Display (1) or simply drag it to move the current selection.
3.Handles - by clicking on the right or left handle and dragging right or left, you can adjust the displayed portion of the Timeline indicated with (4).
4.Visible portion of the timeline - in this area you can create markers and loop points. The size of this portion depends on the current selection, indicated with (2).
5.Playhead - indicates the playhead of the Streaming Audio File Player. The Playhead can be moved across the timeline when the track is not playing. The Playhead position is indicated with (8). To change the playhead position you can:
a.click anywhere on the Timeline; right-clicking on the timeline will have the same effect and also open a menu allowing you to add a marker or a loop point at the playhead's position.
b.drag the playhead across the timeline.
c.enter the playhead position manually (see (8)).
6.Loop selection - this area represents the loop selection and is defined by two loop points (indicated with two red arrows). You can change the loop selection by dragging the loop points. Alternatively, you can edit the loop point values manually in the Marker List View. Clicking on a loop point switches the view to the Marker List View (15).
7.Marker - indicates a marker, a point in the timeline that can contain multiple Timeline Actions, that are triggered when the playhead reaches the marker. Clicking on a marker switches the view to the Marker List View (15). Double-clicking a marker opens the Timeline Actions Tool which allows you to define the desired actions for that marker. To change the marker's position, you can drag the marker across the timeline or edit the marker's position manually in the Marker List View. Double-clicking a marker while holding down the Shift key allows you to execute all actions defined for that marker. Right-clicking the marker opens the contextual menu that allows you to Copy marker actions, Paste marker actions, and Duplicate marker.
8.Playhead position - displays the current position of the playhead (5). You can click on this display and change the playhead position in the minutes:seconds.milliseconds format.
9.Total track length - displays the total track length.
10.Zooming and following the playhead - this section contains four buttons that allow you to:
a.Zoom In - zooms in the Timeline display.
b.Zoom Out - zooms out the Timeline display.
c.Zoom 100% - zooms the Timeline so the entire Timeline is displayed on the screen.
d.Follow playhead position - allows you to automatically scroll the Timeline window by following the playhead when a track is playing.
11.Track name display - displays the name of the currently loaded track.
12.Add marker at playhead - clicking this button adds a new marker at the playhead's position. Note: markers at the same location are not allowed.
13.Add loop point at playhead - clicking this button adds a new loop point at the playhead's position. Currently it is only possible to define one loop area (i.e. to create two loop points). Simply click on this button to add the first loop point; click on this button again to add the second loop point. You can manually edit the time of loop points in the Marker List view (see (15)).
14.File List View - this view allows you to see the list of all audio files added to the player. To add files you can drag and drop audio files onto this window section or click on the Add new audio files button (see 16)). You can drag added tracks to re-order them. Double-click a track to load it.
15.Marker List View - this view allows you to see the list of all markers and loop points. The marker symbol is indicated with the light green rectangle and the loop symbol is indicated with the light blue rectangle.
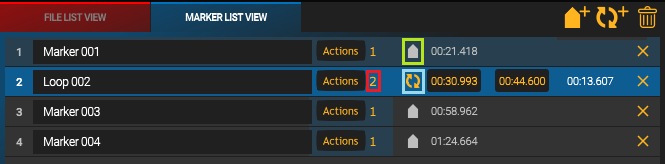
Click on a marker or a loop to select it (alternatively, click on the marker's name on the timeline). Clicking on an already selected marker or loop will allow you to rename it. Double-clicking a marker or a loop will position the playhead at the marker's/loop's position. You can drag a marker/loop to change the order of markers. Clicking on the Actions button opens the Timeline Actions Tool which allows you to define the desired actions for each marker. The number of defined actions for each marker is indicated with the red rectangle. You can manually type in the position of each marker, and the loop points for the defined loop (the third value for the loop displays the loop duration). Clicking on the X button removes a marker/loop.
16.View-specific buttons - the button layout in this area depends on the current view.
If the File List view is active then the following buttons are available:
- Add new audio files - click this button to add new audio files to the player.
- Shuffle track list - allows you to randomly rearrange the track list.
- Sort by name - allows you to sort the track list by name in ascending or descending order.
- Copy all markers to clipboard - the main use for this feature is to copy all markers from one track to another or to copy the markers, delete the track and replace it with an updated version of the same track and then put the markers back.
- Paste all markers from clipboard - pastes all markers from the clipboard.
- Remove all tracks - click this button to remove all tracks from the player.
If the Marker List view is active then the following buttons are available:
- Add marker at playhead - allows you to add a new marker at the playhead's position.
- Add loop point at playhead - allows you to add a new loop point at the playhead's position.
- Remove all markers - click this button to remove all markers from the list.
17.Track - the currently loaded track. You can see the duration for this track, edit the dB (volume) value or remove the track from this player by clicking on the X button.
18.Rewind - clicking on this button allows you to rewind the track by 10 seconds. Hold down the Shift key to rewind to the beginning.
19.Play/Stop - clicking this button allows you start or stop playing the currently loaded audio track. This button is disabled when the Sync with host feature is enabled.
20.Fast Forward - allows you to fast forward the track by 10 seconds.
21.Mute - click this button to mute the current track.
22.Previous Track - click on this button to load the previous track in the player. When the first track is reached, clicking this button will load the last track in the player.
23.Next Track - click on this button to load the next track in the player. When the last track is reached, clicking this button will load the first track in the player.
24.Play Loop - when this button is turned on, clicking on the Play button will start playing the defined loop.
25.Auto Play Next Track - click this button if you want the next track to play automatically when the current track ends.
26.Previous Marker - clicking this button allows you to position the playhead to the previous marker.
27.Next Marker - clicking this button allows you to position the playhead to the next marker.
28.Sync with host - clicking on this button synchronizes the playhead with Gig Performer's Global playhead. When this button is enabled, the player's playhead is disabled and the Global playhead controls play/stop operations.
29.Level meters - allows you to see the audio levels in real time.
30.Volume slider - use this slider to set the desired volume value in dB. Double click this slider to reset to 0 dB.
Streaming Audio File Player parameters
The following parameters are available for the Streaming Audio File Player plugin:
•Mute - allows you to mute and unmute the audio playback.
•Loop - allows you to play the loop specified by selected loop points.
•Auto Play Next - allows you to automatically play the next track when the current track finishes.
•Play - starts playing an audio file or pauses playing an audio file.
•Next Track - goes to the next track. When the last track is reached, it goes to the first track in the player.
•Previous Track - goes to the previous track. When the first track is reached, it goes to the last track in the player.
•Rewind - rewinds the audio file by 10 seconds.
•Rewind To The Beginning - rewinds the audio file to the beginning.
•Fast Forward - goes forward by 10 seconds.
•Volume - controls the volume.
•Notify Playhead Position - this parameter is implemented for cases where you don’t need to track the position of the playhead. If you don’t need the player to be sending out the position on every process block call (for example, every 2.9 milliseconds if you’re running at 44.1 kHz with a 128 sample buffer size) you can turn it off.
•Position - allows you to control the position of the player’s playhead. If you need to track the position explicitly (i.e. so it is synced with the playhead), make sure that the Notify Position parameter is On.
•Track Number - allows you to select the desired track in the player, up to 1000 tracks; the widget value 0 corresponds to the first track, 0.1 to the second track, and the maximum value 100 corresponds to the 1000th track.
•Track Name - shows the name of a currently loaded track. Attach it to a label widget.
•Number Of Tracks - displays the current number of loaded tracks in the player, up to 1000 tracks.
•Sync to Host - allows you to sync the player's playhead to the Gig Performer's Global playhead.
•Next Marker - goes to the next marker on the time line relative to the current playhead position.
•Previous Marker - goes to the previous marker on the time line relative to the current playhead position.
•Triggered Marker Number - displays the number of a currently triggered marker.
•Go To Marker - allows you to go to the desired marker, up to 1000 markers; the widget value 0 corresponds to the first marker, 0.1 to the second marker, and the maximum value 100 corresponds to the 1000th marker.
•Trigger Marker Actions - allows you to manually execute the actions defined for the desired marker number. The widget value 0 corresponds to the first marker, 0.1 to the second marker, and the maximum value 100 corresponds to the 1000th marker. Even if you are not playing an audio track, this is a convenient way to trigger an arbitrary sequence of actions.
•Number Of Markers - displays the current number of markers for a track, up to 1000 tracks.
Use parameters such as Mute, Loop, Auto Play Next, Play and Notify Position with button widgets. Parameters such as Volume and Position should typically be mapped to knobs or sliders. Finally, parameters such as Number Of Tracks and Number Of Markers should typically be mapped to label widgets.