When you click on the Record button, the following dialog opens:
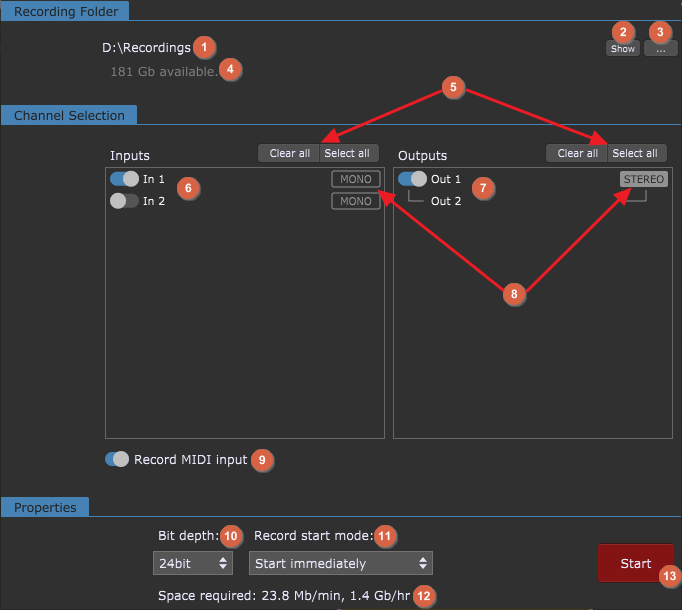
1.Recording folder - all files are recorded into subfolders of this recording folder. Subfolders are named with the date of the recording.
2.Show button - clicking this button opens the recording folder.
3.Set master folder button - clicking this button brings up a file browser that enables you to choose the (master) folder for your recordings.
4.Available space display - shows the amount of recording space available on the drive where the master folder is located.
5.Clear All and Select all buttons - clicking the Clear All button deselects all inputs (or outputs) so that no channels will be recorded. When you only need to record a few channels, it will be quicker to Clear all and then select only the ones you need. Clicking the Select All button enables all input or output channels for recording. When you want to record most or all channels, it will be quicker to select all channels and then deselect the ones you do not need.
6.Input channels - click a toggle button to select an input channel for recording. On the screenshot above, one channel is selected for recording ("In 1").
7.Output channels - click a toggle button to select an output channel for recording. On the screenshot above, both channels are selected for stereo recording.
8.Mono/Stereo buttons - you can record either in mono or stereo. To create a stereo pair, click on the first of two consecutive mono channels.
9.Record MIDI Input - when checked, MIDI input from all physical MIDI devices is recorded at the same time as audio. A separate track is created for each device. The resulting MIDI file contains all the MIDI events separated into tracks by device name. These files are easily imported into any DAW with MIDI capabilities or other MIDI sequencing software.
10.Bit depth field - click this to select 8, 16, 24, or 32-bit (floating point) depth for recording. Note that choosing a higher bit depth results in larger files.
11.Record Start mode - see the next section for more information about this option.
12.Space required - shows the amount of disk space required to record the selected channels per minute or per hour. This display adjusts as you select or deselect channels.
13.Start button - clicking this button immediately starts recording all selected input and/or output channels.
This dialog is similar to the Recording Options window where settings for recording can be configured.