To record your performance:
- First make sure that there is enough free space on the drive where the (master) recording folder is located,
- Select the audio input and/or output channels that you want to record; if you also want to record MIDI input, turn on that option in Recorder settings,
- Select the desired bit depth and check again if space required for an hour (or couple of hours) of your gig can fit onto your drive,
- Choose the record start mode: Start immediately or Delayed start; the Start immediately mode allows you to begin recording as soon as the red Start button is clicked. The Delayed start mode activates some extra options and allows you to enter a start time in the minutes and seconds fields, as seen below:

This feature is useful if you want to configure and test the Recorder at soundcheck and then set it to start recording just before the performance begins.
- Click on the Start button; note how the record button changes depending on the Record start mode:
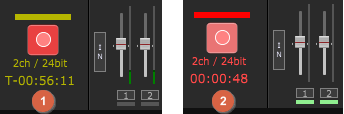
If Record start mode is set to Delayed start, it will blink yellow and show you how much time is remaining until the recording process starts (1). If the Start immediately mode is selected, it will blink red and show you elapsed time (2).
- Clicking on the Recorder button will either stop the recording process, or cancel the scheduled recording countdown.
- To access your recording, navigate to your master folder (see default locations on Windows and Mac here) and then enter the subfolder with the same name as your gig file (or Untitled, if you didn't save your gig); note another subfolder (or subfolders if you made multiple recordings) automatically named with date and time, i.e. "2021-11-17 at 2330":

The name of each WAV file matches the name of each selected audio input and/or output. Note: "Out 1-Out 2.wav" implies that outputs are recorded stereo.
Note: incoming MIDI events from all MIDI devices known to Gig Performer are recorded, each device to its own track in a Type 1 Standard MIDI File. Generally, each MIDI device corresponds to a physical MIDI port. Incoming messages are recorded using a resolution of 480 ppq (ticks per quarter note).
All real-time Gig Performer tempo changes are captured as Meta Tempo events in the MIDI file.
Note: the System Actions block has a parameter called RecordAudio and it allows you to easily start or stop recording. Attach it to (say) the LED Button Red in the Global rackspace and optionally learn a MIDI control on your MIDI device or surface.