A widget is added to a panel by either dragging the desired widget from the widget list to that panel, or by copying and pasting (or duplicating) an existing widget:

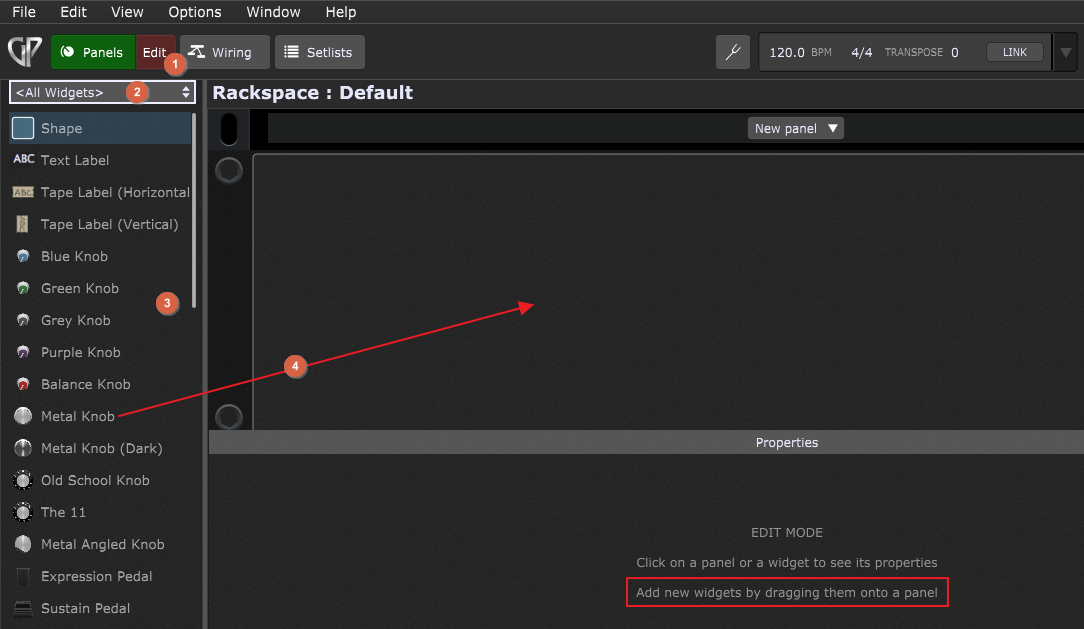
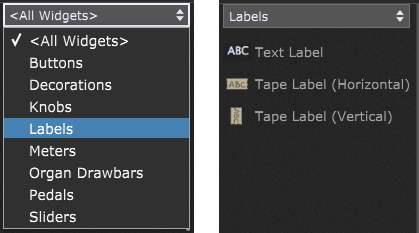
To add a widget to a panel, first make sure that you are in Edit mode (1). Once you enter into Edit mode, you can either immediately drag a widget (4) from the widgets list (3) onto a panel (also note the tip indicated with the red rectangle), or click on the Widget types list (2) to restrict the list to a particular class of widgets:

For example, if you want to add a label widget, simply select Labels from the drop-down box and then simply drag the desired label widget from this list to the panel.
To add multiple copies of a widget at once, drag a widget onto the surface, but don't release the mouse button (1); while holding the mouse button, type the number of copies (up to 9) you want onto the panel (2). A message will flash at the top of the window (indicated with the red rectangle) to confirm the number of copies that will be made:

Then release the mouse button. Note: press the desired number again, e.g. 3 while dragging to drop 3 widgets vertically.
Tip: if you add 9 drawbars at once, you will get the perfect combination of black, white and brown 9 drawbars set.
Existing widgets that are already placed onto the panel can be easily duplicated, copied or pasted by clicking on the Edit menu and selecting the Duplicate, Copy or Paste menu items respectively. Alternatively, use key combinations Ctrl+D (or Cmd+D), Ctrl+C (or Cmd+C) or Ctrl+V (or Cmd+V) respectively.
Note: A confirmation message also flashes when you copy a widget or panel. MIDI associations are preserved whenever you copy and paste a widget or a panel.
You can resize a widget by dragging any of the corner points (the smaller section directly beneath the white rectangle displays a caption for the widget).
As you may notice, a name of more than a few characters may not display properly within the default caption space; as mentioned earlier, the white rectangle that appears around the selected widget (and caption below) in Edit mode allows you resize it (and the accompanying caption) by dragging any of the corner points.
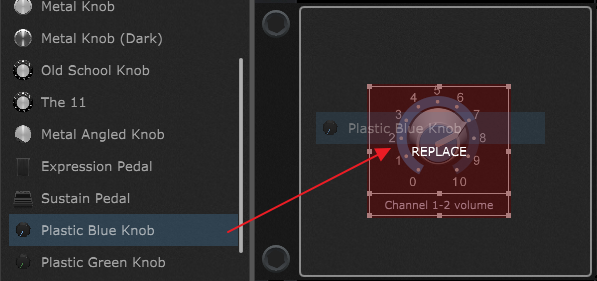
To replace an existing widget with another one, simply drag the widget over the existing one and when the REPLACE label appears, release the mouse button:

In the screenshot above the Blue Knob (the existing widget) is being replaced by the Plastic Blue Knob. Note that you cannot replace knob widgets with buttons, switches etc. If the replace operation is not supported, the REPLACE label will not appear.
When replacing a widget, all MIDI and Parameter mappings and other widget settings are saved.
Note: moving a widget across the panels is also supported. While in Edit mode, simply drag a widget from one panel to another. This feature works currently only for single widgets and all assignments to parameters are kept.