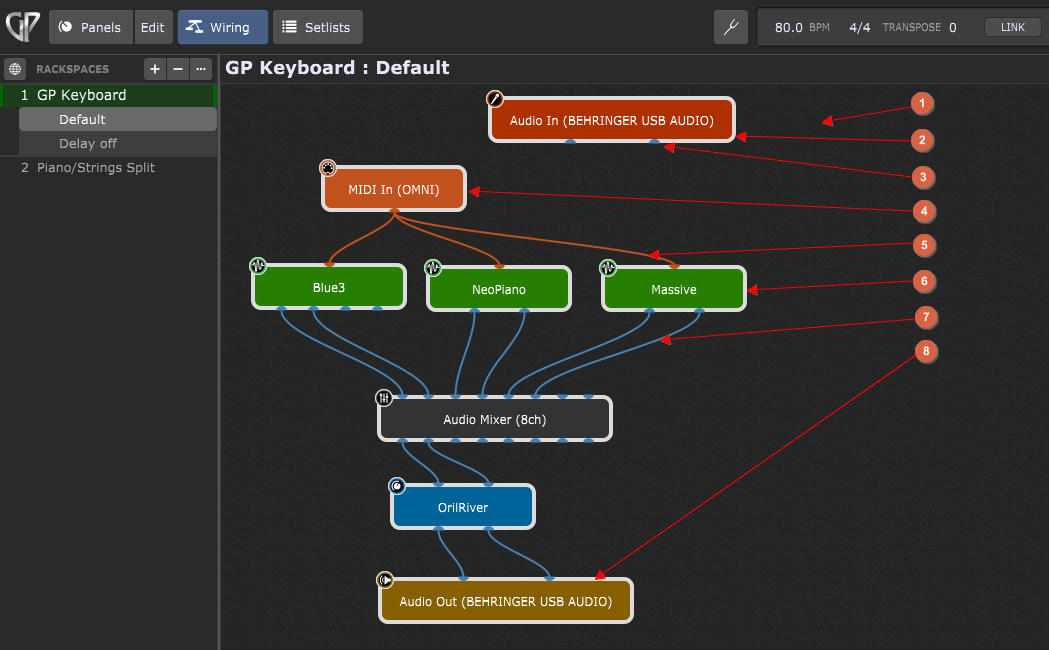
The Wiring view enables you to insert your plugins and connect them with virtual wires. Look at this example of a plugins layout in the screenshot below:

1.Wiring view design surface - this large area of the screen is used to display your plugins and their interconnections. Drag a plugin to move or reposition it. Double-clicking a plugin opens its plugin editor. Refer to the Improvements to the Wiring view to learn more about new features in Gig Performer 4 such as zooming, scrolling, and selecting multiple plugins.
2.Audio interface input block - Gig Performer automatically shows inputs for audio interface device(s) known to the operating system.
3.Plugin port - plugins are interconnected by virtual wires, where an output port (or pin) of one plugin is connected to an input port of another plugin. Blue ports indicate audio ports and orange ports indicate MIDI ports. Note that audio ports cannot be connected to MIDI ports (and vice versa).
4.MIDI In (OMNI) block - Gig Performer inserts the built-in MIDI In (OMNI) plugin by default. Other MIDI devices can be added in the same fashion as any other plugin. MIDI plugins are colored orange. Note that you can connect the MIDI output ports to multiple MIDI plugin input ports (the same applies to audio ports). Refer to the chapter MIDI Inputs to learn about these built-in plugins.
5.MIDI connections - shown as orange wires between from MIDI Out ports to MIDI In ports.
6.Audio plugin - virtual instruments are colored green, audio processors are colored blue, and some of Gig Performer integrated plugins, such as Audio Mixer (8ch) are colored black. Also note the mini-icon located at the upper-left corner of a plugin, that visually indicates the plugin type.
7.Audio connections - shown as blue wires from audio output ports to audio input ports.
8.Audio interface output block - Gig Performer automatically shows outputs for audio interface device(s) known to the operating system.
Hovering cursor over a plugin brings up a tooltip with basic information about that plugin:

Gig Performer 4 introduces a new detail in plugin tooltips - Latency; this way you can easily check how much latency your plugins introduce to your setup. The tooltip can be disabled by turning off the Show information on plugin hover option in the Display Options.
More in this chapter:
![]() Wiring view contextual menu
Wiring view contextual menu