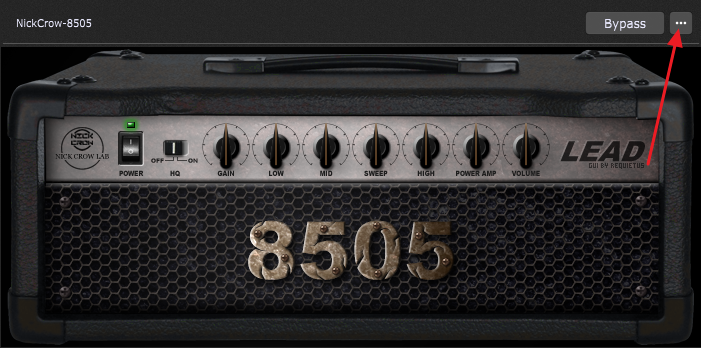
Double-clicking a plugin opens its plugin editor:

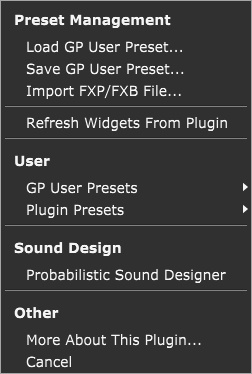
Clicking on the "..." button (indicated with the red arrow) opens the More menu:

Load GP User Preset… - loads a Gig Performer user preset file (gpp_audiounit, gpp_vst or gpp_vst3).
Save GP User Preset… - saves a Gig Performer user preset file (gpp_audiounit or gpp_vst or gpp_vst3, where the extension depends on the plugin type). User presets are saved in corresponding subfolders under the Presets folder based on their manufacturer name and the actual plugin name (refer to the File locations in Gig Performer chapter for more information). The resulting subfolder where user preset files are saved is in the following folder tree: Presets\Plugin_Manufacturer_Name\Plugin_Name. Tip: to easily access your Presets folder, click Window -> Open Content Folders; open the Presets folder and browse its sub-folders (organized by plugin manufacturers' names) to find preset files and to perform other file operations on them (rename, delete, etc.).
Import FXP/FXB File… - imports an FXP/FXB preset file. FXP is an individual preset, FXB is a bank of presets. This feature is for legacy support and may disappear in a future version of Gig Performer. Not all VST plugins are compatible with the FXP/FXB format. Most of those that are compatible are audio plugins.
Refresh Widgets From Plugin - use this command to refresh all widgets that are mapped to this plugin. This feature is useful for a small number of plugins that do not notify their host when a new preset is loaded. If you notice that widgets in your rackspace are not updated when you change this plugin's preset, you can manually refresh widgets mapped to this plugin with this command. Check out this blog article to see this feature in action.
GP User Presets - this menu item is disabled if you have not previously saved any user presets for the current plugin. It will list the names of your saved user presets if it is available.
Plugin Presets - some plugins include predefined presets, most commonly factory presets. If a plugin has any such built-in presets, then they will show up in this sub-menu.
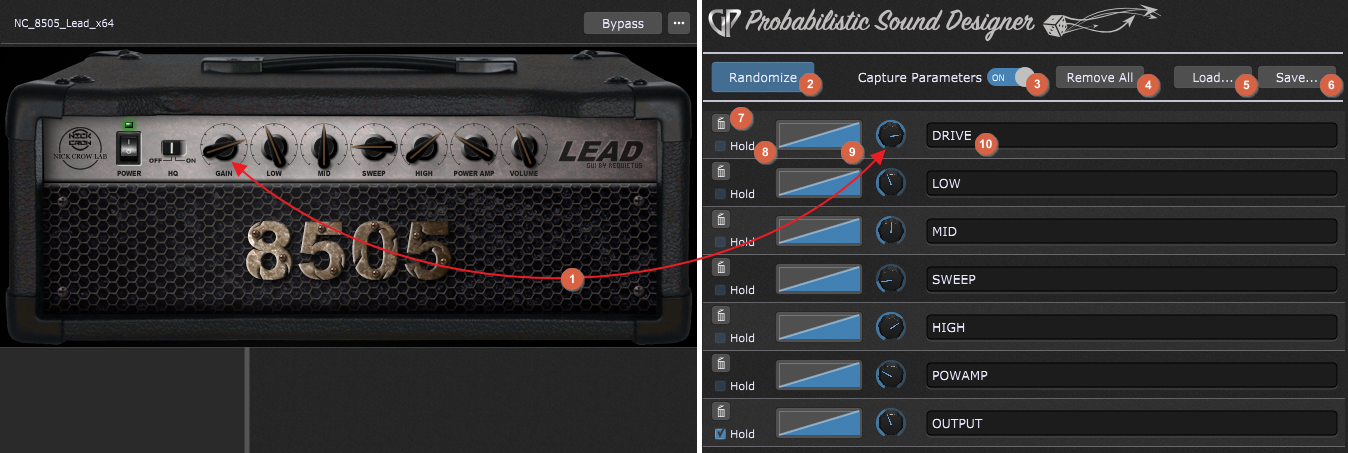
Probabilistic Sound Designer - this feature, available in Gig Performer Pro, randomizes selected plugin parameters values to generate random patches:

1.Choose the desired parameters - simply click on a desired control in the plugin editor window (i.e. Gain, Low, or other) and move it, and the corresponding parameter will be automatically recognized and captured (make sure that the Capture Parameters toggle button is turned on). The knob's positions in the plugin editor and the Probabilistic Sound Designer will be automatically synchronized.
2.Randomize - when you select the desired parameters, click the Randomize button to generate random values for the chosen parameters. Every time you click this button, it creates new values for the chosen parameters. Note: if the Hold check box is ticked, a random value for that parameter will not be generated (e.g. the last parameter in this list will not be randomized).
3.Capture Parameters - this toggle button is turned on by default; if you turn it off, new parameters will not be captured.
4.Remove All - removes all listed parameters.
5.Load... - clicking on this button allows you to load a previously saved Probabilistic Sound Designer configuration (gppsd_audiounit, gppsd_vst or gppsd_vst3).
6.Save... - clicking on this button allows you to save the current Probabilistic Sound Designer configuration to a file (gppsd_audiounit, gppsd_vst or gpp_vst3, where the actual extension depends on the plugin type). By default, these files are saved in corresponding subfolders in the PSD folder (refer to the File locations in Gig Performer chapter for more information).
7.Remove button - clicking this button will remove the current parameter from the list.
8.Hold - check this checkbox if you don't want the corresponding parameter to get a random value. In the screenshot above, all knobs will get the random value except the output volume.
9.Curve - allows you to control the range of possible values and the probability of particular values for the parameter. Refer to this chapter for more information on curves.
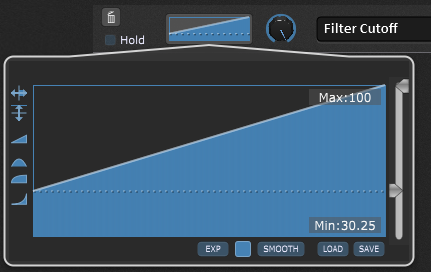
For example, if you're randomizing a low-pass filter cutoff and there is no other modulator (e.g. no ADSR applied), then it's useful to prevent the filter from getting too low a value as that will just block all audio:

So the graph above says, produce any value equally likely from within the range of 30.25 to 100. The filter value, therefore, will never be set lower than about 1/3 from the bottom.
10.Parameter name - displays the name of the captured parameter.
More about this plugin... - opens the homepage of a plugin's manufacturer in the default Web browser.
Cancel - this menu item simply closes the menu.