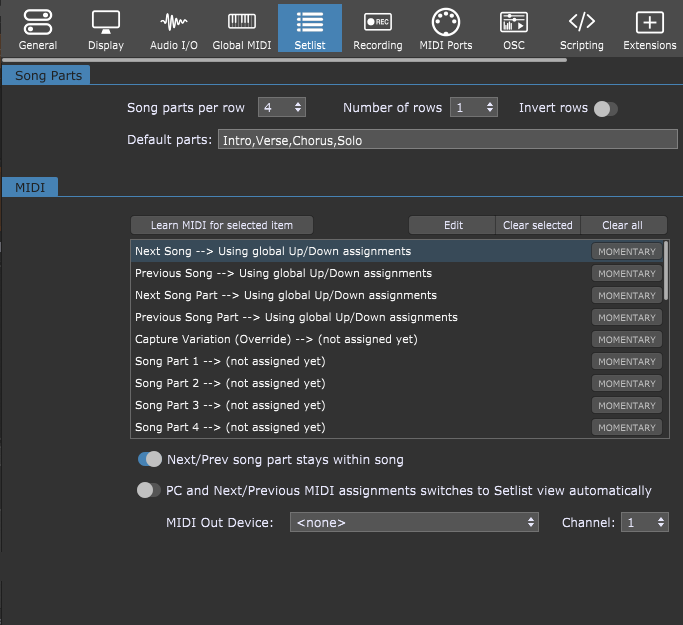
The Setlist tab appears when the Setlists/Songs... menu item is chosen in the Options menu:

Song parts per row - choose a value (between 3 and 8) from the drop-down menu to set the number of tiles per row in the song part bar (see the Setlist view chapter for more information).
Number of rows - choose a value (between 0 and 3) from the drop-down menu to set the number of rows of tiles in the song part bar. Selecting 0 removes the song part bar.
Invert rows - flips the vertical order of the rows of tiles in the song part bar; instead of 1-2-3, when this toggle button is enabled the bar shows the rows 3-2-1.
Default parts - a semicolon or comma-separated list of song part names that will be added automatically when a new song is created. If no names are defined here, a single part called "Part 1" will appear instead.
Learn MIDI for selected item button - setlist operations (i.e. Next Song or Next Song Part) in the MIDI list can be mapped to MIDI controllers. Select the item in the list, click on this button, and use the MIDI controller you want mapped to it. Clicking on this button while holding the Shift key clears the selected assignment.
Momentary button - if the physical control you are mapping is a momentary switch (rather than a latching/toggle switch), click on this button.
Setlist operation --> MIDI controls list - this list shows setlist operations that can be externally controlled and the MIDI events they are mapped to. To map a control, select it in the list and click the Learn MIDI for selected item button. Double-clicking a setlist operation activates the Learn mode; Double-clicking a setlist operation while holding the Shift key (or clicking on the Edit button) opens the Edit MIDI message dialog where you can manually select the desired device and the desired MIDI message.
Clear Selected button - clicking this button removes the MIDI mapping from a selected setlist operation.
Clear All button - clicking this button removes MIDI mappings from all setlist operations.
Next/Prev song part stays within song - with this toggle button is enabled, the MIDI controller assigned to Next and Previous operations will never move to a different song. When the first song part in a song is reached, the Previous operation has no further effect; when the last song part is reached, the Next operation has no further effect. Note: this checkbox has no effect when using arrow keys on the computer keyboard to move between song parts; they will still move to the next or previous song.
PC and Next/Previous MIDI assignments switches to setlist view automatically - when this toggle button is enabled, any incoming MIDI program change (PC) messages or Next/Previous Song Part or Song commands cause Gig Performer to switch to Setlist view immediately. Note: enabling this option will prevent you from switching your rackspaces directly using MIDI controllers; if such a MIDI message arrives - Gig Performer will switch to the Setlist view automatically.
MIDI Out Device and Channel - these settings define a single MIDI Output device to where program change messages are sent on song changes. Choose a MIDI device from the drop-down menu and a corresponding Channel from its drop-down menu. If you need to send multiple MIDI messages to different physical devices or plugins via any MIDI In block when you select a song part, you can do this from the Song Part Properties dialog.