This chapter naturally builds on the previous chapter. When you insert plugins, create widgets, and connect them to plugins' parameters, the next step is to control those widgets by your MIDI controller or remotely via OSC commands.
To associate a widget with a MIDI device, first enter into the Panels view, Edit mode, and click on the desired widget (e.g. a Plastic Blue Knob, if you followed the example from the previous chapter; if you created a new empty gig, drag the Plastic Blue Knob widget onto a panel surface and click on it):
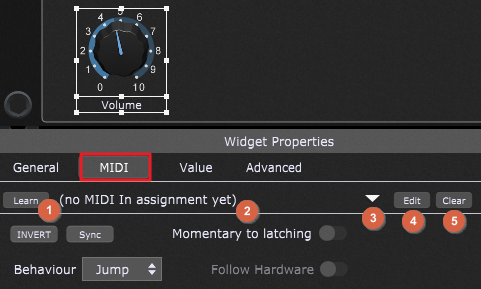
Click on the MIDI tab (indicated with the red rectangle) in the Widget Properties inspector and note that no MIDI assignment has been made yet (2). If you defined MIDI control aliases in the Rig Manager, you can easily click on the drop-down menu (3) and select the desired alias:
Note how the "(no MIDI In assignment yet)" message changes to match the name of the selected alias.
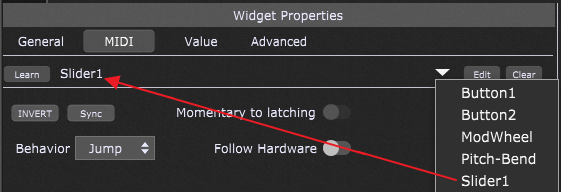
To have Gig Performer learn the physical controller you want to associate with the widget, click on the Learn button (1); when actively in Learn Mode, the button is lit red. While in Learn mode, move the physical controller. If you already have an alias defined in the Rig Manager for that control, that alias will display; if you didn't define an alias (such as "Slider1" in the screenshot above), then the name of your MIDI device will show up, as well as the associated MIDI controller and the channel:

Make sure that you exit the Learn Mode by clicking on the Learn button again (1) and it will return to its normal gray color.
If you already know what MIDI message you need and/or don't have immediate access to your controller so as to use Learn mode, you can define your message manually by clicking on the Edit button (4):
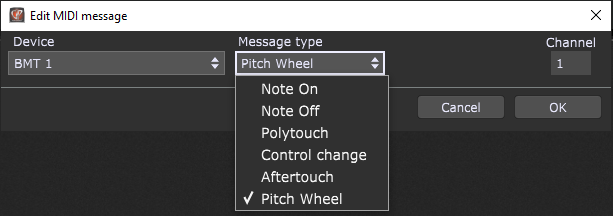
Simply select a MIDI device, MIDI message type and other parameters (depending on the message type, e.g. Note, Channel, CC number) and click on the OK button to confirm.
Clicking the Clear button (5) clears the current controller assignment.
Note: if you assign a MIDI message to a widget in the Global rackspace, and you assign the same MIDI message to a widget in a local rackspace, the local rackspace will override the Global rackspace which will not respond to the particular message while the local rackspace is active. If you then switch to a different rackspace that does not use that MIDI message - the Global rackspace assignment will work again.