This tutorial describes how to add effect plugins to vocals and/or guitar.
1.Launch Gig Performer. If you have previously created a .gig file, it will automatically load (unless you have unchecked “Load last GIG file on startup” on the Options tab). If so, go to to start with a clean slate.
2.Create a signal chain for voice. We’ll start by constructing a typical signal chain for live vocals. Since we won’t be using a MIDI controller for this tutorial, start by right-clicking on the MIDI In (Omni) block, then selecting “Delete” from the popup menu that appears. Then turn off all speakers and connect a microphone to an input of your audio interface, then enter Connections View and, using the procedures described in the previous tutorial, add the compressor plugin of your choice(because it is an effects processor, its block will be colored blue, as opposed to sound generating plugins, which are colored orange), rename it “Compressor,” and make audio connections to the red and brown interface blocks. Slowly turn up the volume of your sound system (to avoid feedback), then double-click on the plugin to open its editor and adjust its parameters until you are satisfied with the degree of compression. Close the editor to return to Connections View. The main area of the screen should look something like this:
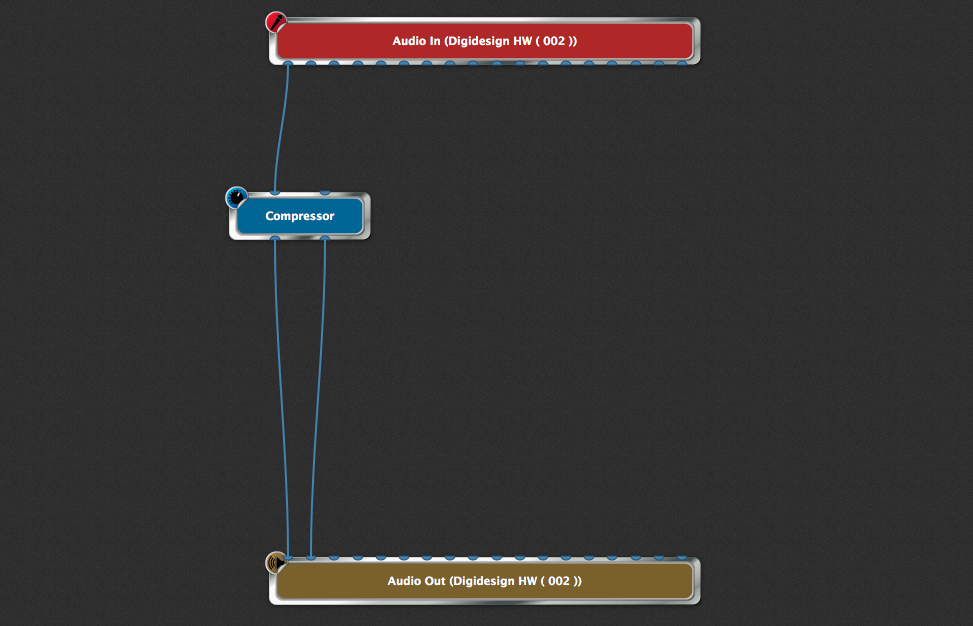
(Your screen may look slightly different, since the audio input and output blocks will reflect the name of your connected audio interface as well as the number of inputs and outputs it provides.)
Tip: If you’re running Gig Performer on a Mac OSX system, the Audio MIDI Setup utility allows you to create Aggregate Devices, each consisting of multiple audio interfaces. Click here for more information.
Note: If you have multiple audio interfaces connected to your system and you want to use an interface other than the one being displayed, choose the Options>Audio setup command and select the desired interface on the Audio I/O tab. You can even specify different interfaces for input and output.
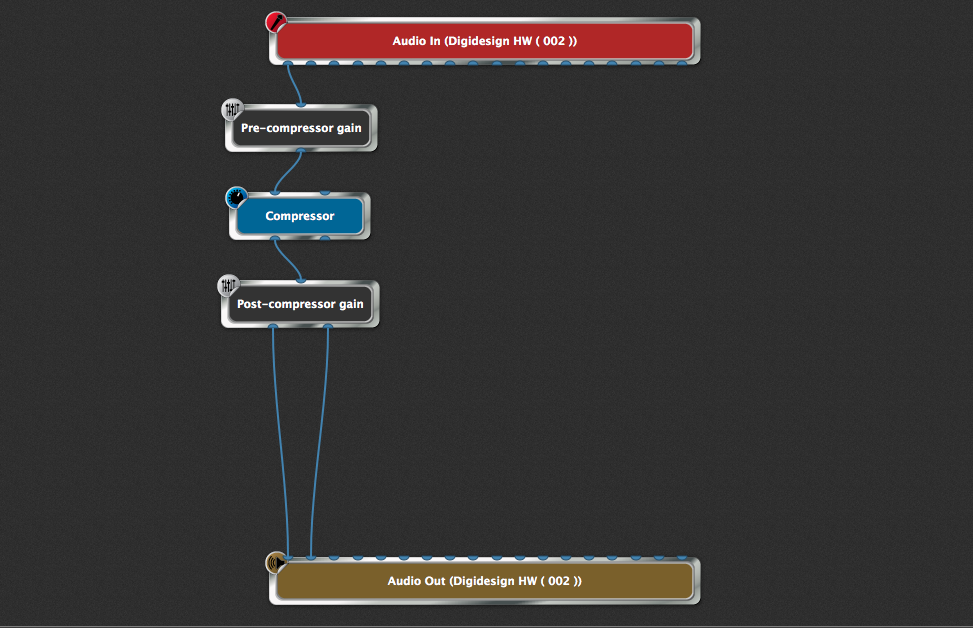
3.Add gain controls. Next, for metering purposes, we’ll add two bundled Gig Performer plugins. Insert a “Gain Control (mono)”plugin before the compressor and rename it “Pre-compressor gain,” then insert a “Gain and Balance Control (mono to stereo)” plugin after the compressor and rename it “Post-compressor gain.”(The latter has the benefit of converting a mono source such as a microphone to stereo, which will allow us to add stereo reverb and echo effects.) The main area of the Connections View screen should now look like this:
Tip: There are two ways to modify connections: You can delete an existing connection by right-clicking on it and selecting “Remove this connection” (or by dragging it to any empty space) and then create a new connection. Alternatively, you can click near one end of a connection and drag it to a new pin.
4.Add delay and reverb. Let’s complete the signal chain with the reverb and echo/delay plugins of your choice. Rename the two plugins “Reverb” and “Echo,” respectively. The main area of the Connections View screen should now look like this:
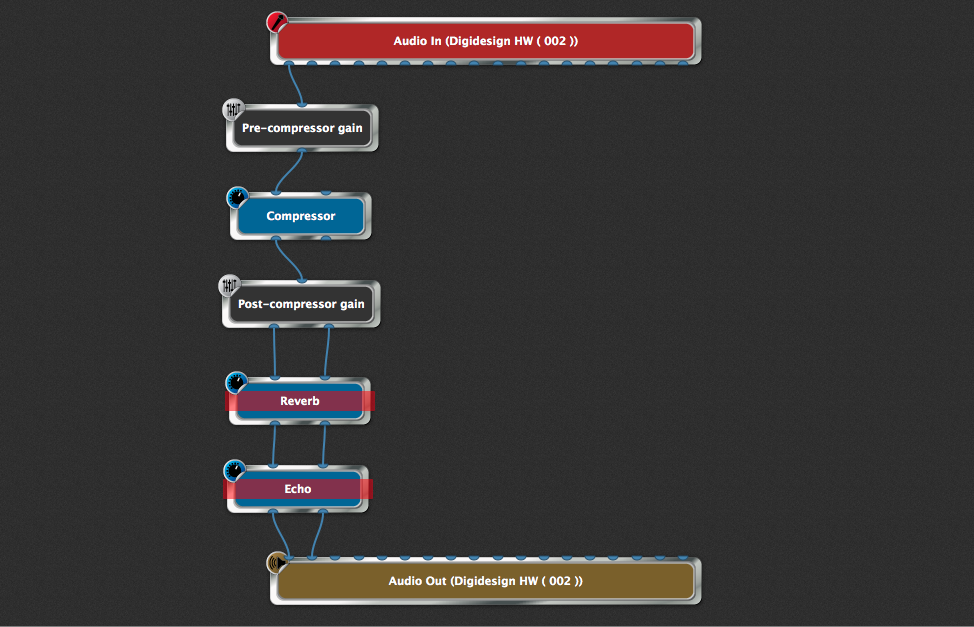
Note: Plugin blocks that are bypassed are overlaid with a red see-through rectangle, as shown in the illustration above.
Important note: There is a difference between bypassing a plugin and muting it.
For virtual instrument plugins, bypassing actually turns off processing for that plugin, thus stopping the sound from being generated. Muting, which is accomplished by inserting a Gain Control, Gain and Balance, Gain and Balance (m->s), or one of the audio mixer plugins and clicking the Mute button or setting its volume slider to 0, causes an audio signal to continue to be generated, but with the output silenced. If you’re playing back a loop or click track during live performance but you don’t want the audience to hear it for a period of time, mute the plugin instead of bypassing it. That way, it will continue to play (in your headphones, if so routed) until you’re ready for the audience to hear it again.
In contrast, bypassing an effects plugin allows signals to pass through the plugin, but without modification.
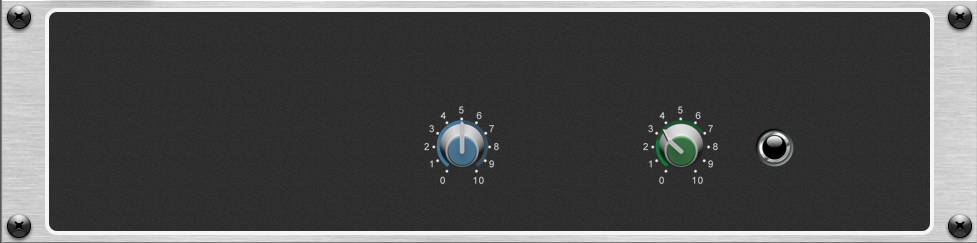
5.Add widgets to control the vocal sound. It can be very helpful to be able to adjust the amount of reverb added to singers’ voices during live performance, and you almost certainly will want to be able to bring echo in and out as needed. Accordingly, go to Performer View and click on the Widget Layout Designer icon to enter Edit mode. Drag a blue knob, a green knob, and a red LED into the panel and arrange them roughly this way:
Add captions and assignments to these widgets as follows:
•Blue knob
oCaption: “Dry/Wet mix”
oAssignment: Dry/Wet parameter of your reverb plugin.
•Green knob
oCaption: “# of repeats”
oAssignment: Feedback parameter of your echo plugin.
(This determines the number of repeats you hear.)
•Red LED
oCaption: “On/Off”
oAssignment: “Bypass plugin” parameter for your echo plugin.
(Click on “Invert value” so that the plugin is bypassed when the LED is unlit and active when it is lit.)
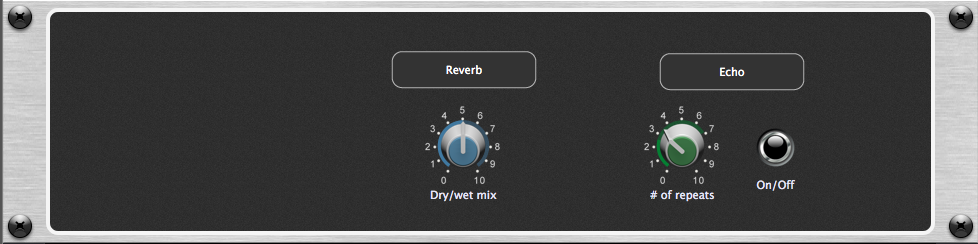
Finally, for purely cosmetic reasons, drag two Text label widgets into the panel. Position one over the blue knob and caption it “Reverb,” then position the other over the green knob and red LED and caption it “Echo.” Exit Edit mode and return to Performer View. Your panel should now look like this:
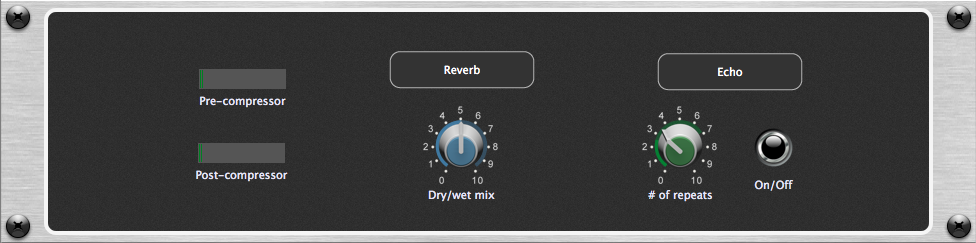
6.Add metering. Metering can be very helpful to verify proper gain structure and ensure that a signal is not being overloaded and distorted. The meter widgets provided by Gig Performer (available in both vertical and horizontal configurations) give you the ability to visuallymonitor levels at any point in the signal chain. To add metering, simply insert Gain Control (or Gain and Balance Control) plugins wherever you want to be able to view signal (as we did in step # 2 above) and assign meter widget(s) to their “Magnitude” parameter. Accordingly, drag two horizontal meter widgets into the left-hand side of the panel and add captions and assignments as follows:
•Top horizontal level meter
oCaption: “Pre-compressor”
oAssignment: “Magnitude” parameter for the Pre-compressor gain plugin.
•Bottom horizontal level meter
oCaption: “Post-compressor”
oAssignment: “Magnitude” parameter for the Post-compressor gain plugin.
Your panel should now look like this:
7.Add scaling. Most singers like to have at least some reverb on their voice at all times, but rarely will they want their sound to be swimming in reverb. This is where Gig Performer’s scaling control comes in handy. It allows you to specify a minimum and maximum range for each widget, while still allowing full range of motion. To demonstrate, take your Reverb plugin out of bypass, then go back into Edit mode and click on the blue knob to select it. In the Properties section of the inspector, you’ll see an area labeled “Parameter range and control” (circled):
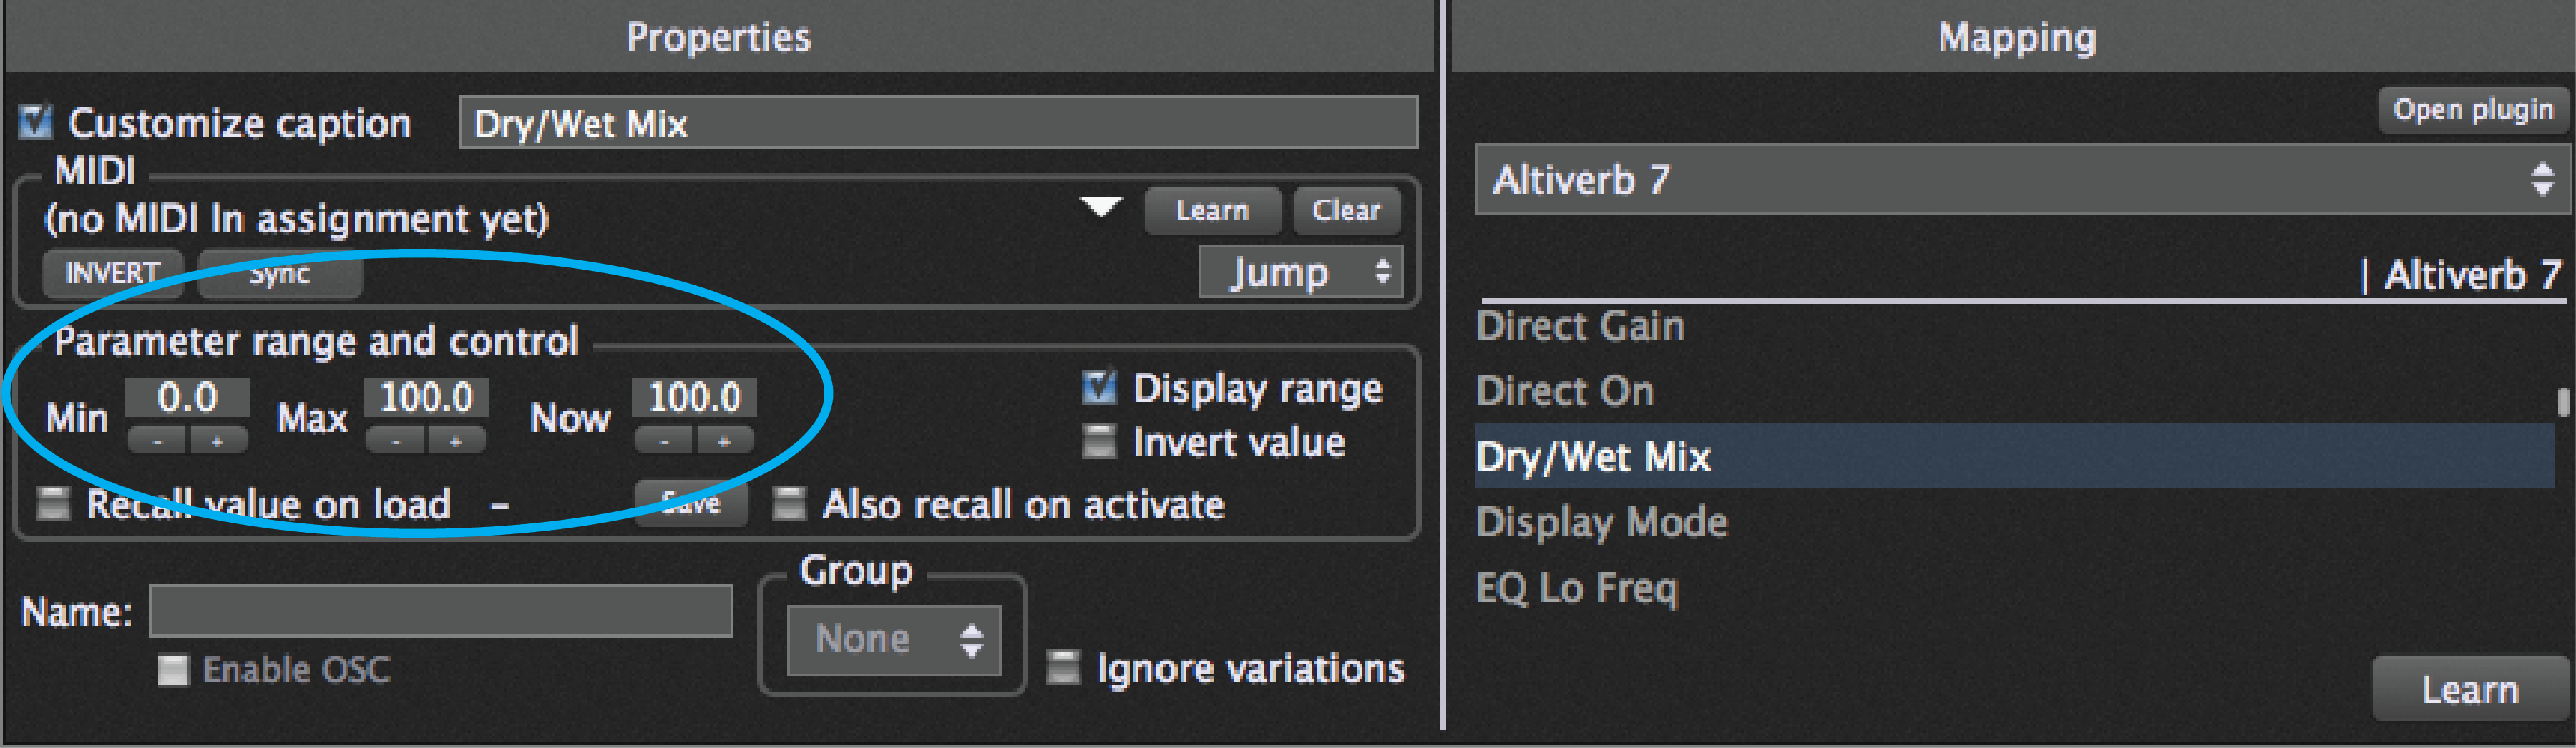
Enter a Min(minimum) value of 30 and Max (maximum) value of 60. (The numbers can be typed in directly, or you can use the + and – buttons below to increment or decrement the value.) Now, when the blue knob widget is at its fully counterclockwise “0” position, you’ll hear a dry/wet mix of 30% (which, for most plugins, will result in a small amount of reverb), while at its fully clockwise “10” position, you’ll hear a dry/wet mix of 60% (which, for most plugins, will result in a significant, but not overwhelming amount of reverb. (Feel free to adjust the Min and Max values to taste!)
Similarly, an infinite number of echo repeats can be a very unpleasant thing—the sound can quickly spiral out of control—so set the Max value for the green knob widget to 70. That way, when the green knob is at its fully counterclockwise “0”position, you’ll hear a single echo, while at its fully clockwise “10” position, you’ll hear several—but not too many—echoes. Again, feel free to adjust to taste.
8.Test, tweak, and save. Test that all is working as expected by moving the blue and green knob widgets manually with mouse-dragging operations and turning the red LED on and off by clicking on it. (Take your echo plugin out of bypass before doing so.) If you have a MIDI controller or pedalboard connected to your system, you can associate each of these three widgets with physical devices such as knobs, sliders, buttons, and pads on your controller. Obviously the two knob widgets are best controlled from knobs and sliders, but the echo on/off widget (the red LED) can be controlled from buttons, pads, a pedal, or even a note being played! For example, you can assign it to the highest note on your keyboard—one which is probably rarely played in normal circumstances—and the echo will turn on only when that key is depressed.(Click here for an important note about using keys to control widgets.) Again, thanks to the flexibility of Gig Performer, the only limit here is your imagination. When you’ve got everything tweaked to your satisfaction, add any variations you want and name your rackspace—for the purposes of this tutorial, we’ll call it “Vocal.” Finally, be sure to save your work.
9.Create a new instance. Next, we’re going to be constructing a signal chain for guitar, but before we do so, we’ll be placing it in a separate instance. Instances are simply multiple copies of Gig Performer running simultaneously in the same computer. Their use allows each member of a band to have independent control over his or her own rackspaces without affecting the rack spaces of other band members.For example, a guitarist can freely switch between rhythm and lead settings without affecting the reverb and echo settings being applied to vocals.
Go to and make sure the “Enable multi-instance support” option is checked. (For more information, click here.) Then go to File>Create New Instance and type in a name. For the purposes of this tutorial, let’s call the new instance “Guitar.” A dialog box will appear informing you that you have created a new instance.
Click OK to close the dialog and your new instance will appear—a complete new iteration of Gig Performer with no plugins, no connections, and no widgets.
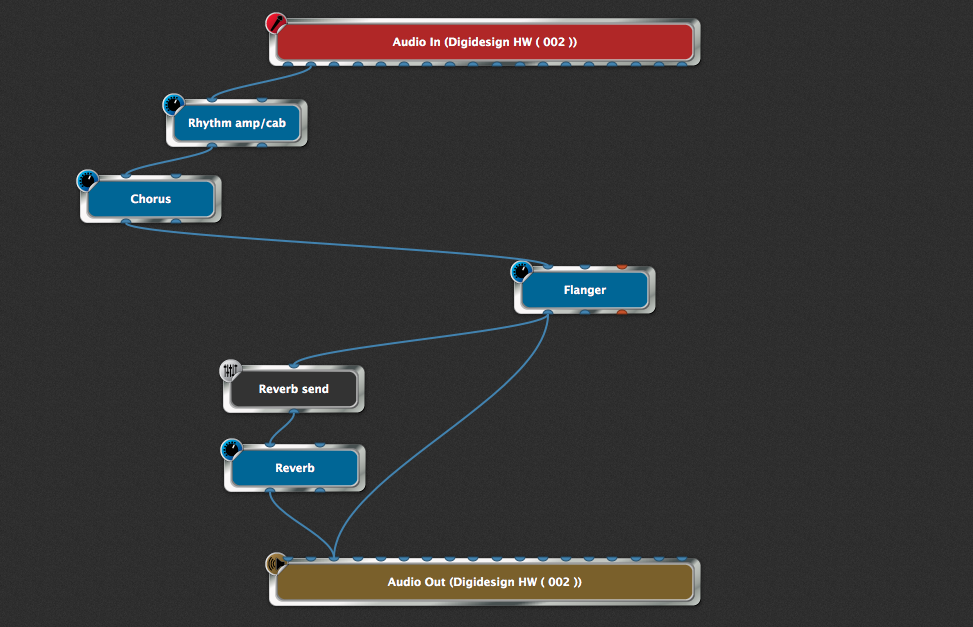
10.Create signal chains for guitar. Now it’s time to build a typical signal chain for guitar—actually, two of them. Begin by once again deleting the MIDI In (OMNI) block and then connecting a guitar (via a DI box if necessary) to an input of your audio interface other than the one used for the microphone earlier in this tutorial.Enter Connections View and connect that input to an amp/cabinet model plugin, followed by chorusing and flanging plugins. Add a Gain Control plugin and the reverb plugin of your choice. Rename the amp/cabinet plugin “Rhythm amp/cab,” the chorusing plugin “Chorus,” the flanging plugin “Flanger,” the Gain Control plugin “Reverb Send” (since it’s taking on that function; see the text box below) and the reverb plug-in “Reverb.” Connect the output of the Flanger plugin to the “Reverb send” plugin, and the output of the the “Reverb send” plugin to the Reverb plugin. Finally, connect an output from both the Flanger and Reverb plugins to one of your audio interface’s outputs (choose an output other than the one being used for the microphone signal), as shown in the illustration below:
Tweak the parameters in the various plugin editors until you get a sound you like (use the Gain Control to set the desired amount of reverb), then double-click on the rackspace name. In the Rackspace Properties dialog that appears, rename the rackspace “Rhythm,” then click on Apply to close the dialog.
Gig Performer makes it easy to create reverb sends, where signal is routed to a reverb (or other type of signal processing plugin) from multiple sources: Simply insert a Gain plugin between the output of each source and the reverb plugin. The volume of each Gain plugin provides independent control over how much signal is sent to the reverb.
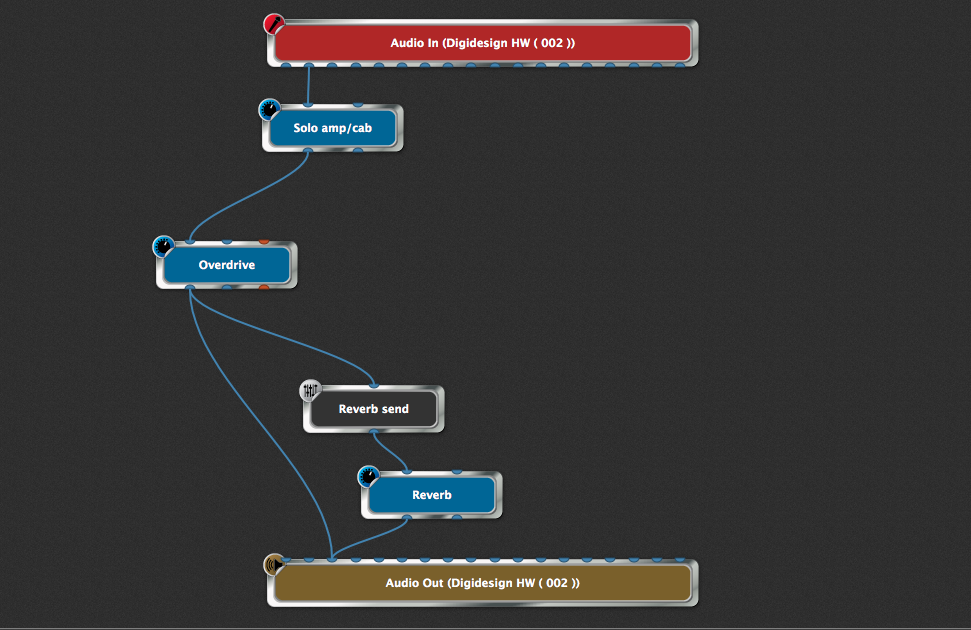
Next, we’ll create a second rackspace for soloing. Since we’re going to use the same audio connections (although we’ll be substituting different plugins), choose command (Cmd-Shift-D/Ctrl-Shift-D) to adda new rackspace, then double-click on its name. In the Rackspace Properties dialog that appears, change the name of this new rackspace from “Rhythm_1” to “Solo”. In Connections View, substitute an amp/cabinet model if you prefer (you can also opt to simply use the same one you used for the Rhythm sound—Gig Performer allows you to use the same plugin multiple times, up to the limits of your RAM and CPU resources), followed by the distortion/overdrive plugin of your choice, then delete the flanging plugin. Rename the amp/cabinet plugin “Solo amp/cab” and rename the distortion/overdrive plugin “Overdrive.” Your main Connections View screen should now look like this:
Guitarists especially will appreciate the handy full-screen chromatic tuner provided in Gig Performer, available at any time with the click of a mouse or the press of a MIDI footswitch — even with the touch of a button on a smartphone or tablet running an OSC app. Click here for more information.
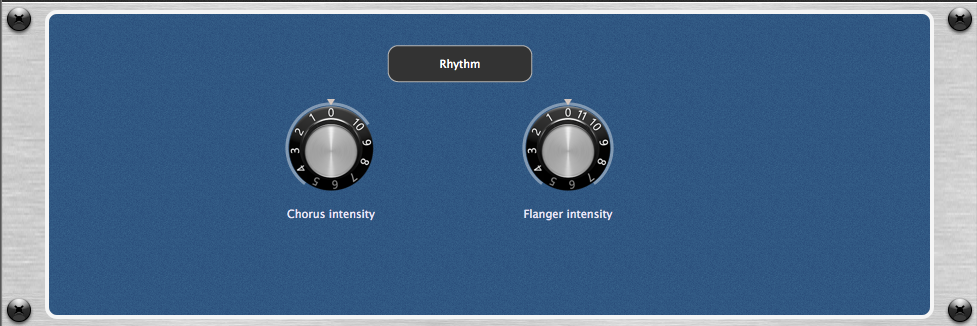
11.Add widgets to control the guitar sounds. Go to Performer View and select the Rhythm rackspace, then click on the Widget Layout Designer icon to enter Edit mode. Drag an “Old school” knob and a “The 11” knob (our Spinal Tap version of the “Old school” knob—it goes to 11!) into the panel.
Add captions and assignments to these as follows:
•“Old school” knob
oCaption: “Chorus intensity”
oAssignment: Effect level parameter of your Chorus plugin.
•“The 11” knob
oCaption: “Flanger intensity”
oAssignment: Dry/Wet parameter of your Flanger plugin.
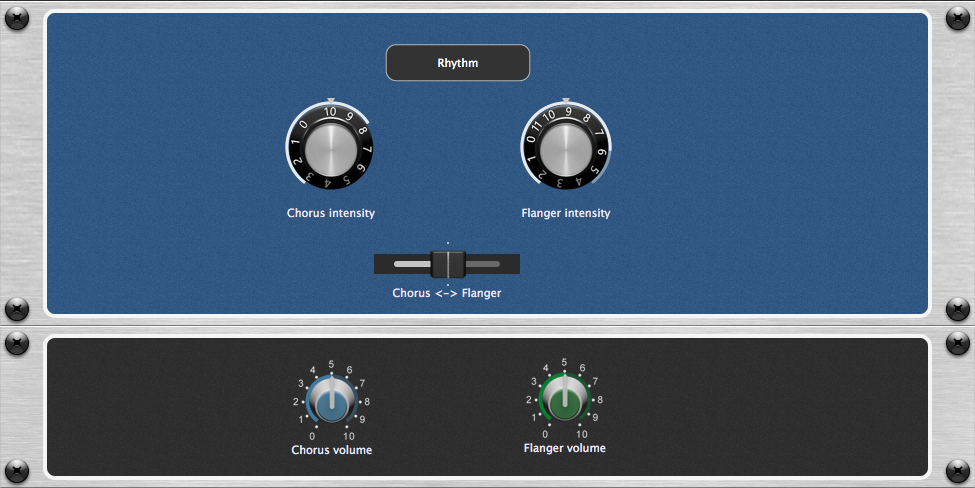
Apply widget scaling and MIDI controller assignments to taste, then, purely for cosmetic reasons, add a text label widget and caption it “Rhythm,” then double-click on the panel and in the Rack Unit Properties menu that appears, change its “Style”(actually, its color) to blue. It should now look like this:
Now go to the Solo rackspace and drag a text label widget and an “11 knob” widget into the panel. Caption the “11” knob “Overdrive” and assign it to the Drive parameter of your Overdrive plugin. Apply widget scaling and MIDI controller assignments to taste, then caption the text label widget “Solo” and change the rack panel “Style” (color) to green. It should now look like this:

The advantage to putting different sounds into different rackspaces (as opposed to creating one complex rackspace with multiple signal chains and complicated switching) is that you can go from one to the other, glitch-free, with the use of simple MIDI program change messages transmitted via a MIDI controller, such as up-and-down switches on a pedalboard — or even via a smartphone or tablet running an OSC app. What’s more, Gig Performer’s Tail length function allows you to set the maximum time before a sound is cut off—up to 5 seconds—when you switch rackspaces — something that’s particularly useful in situations like this, where reverb or echo is being applied to a sound. Try it!
12.Create a widget group to crossfade between the chorus and flanging effects. Now it’s time to explore Gig Performer’s powerful widget feature. The concept behind it is simple: Any widget assigned to a group can be controlled by any or all other widgets assigned to the same group. This enables you to change multiple parameters together.
(There are two other ways to control multiple parameters simultaneously: one is to assign the same MIDI control to multiple widgets, the other is using GP Script to control any number of parameters with a single widget.)
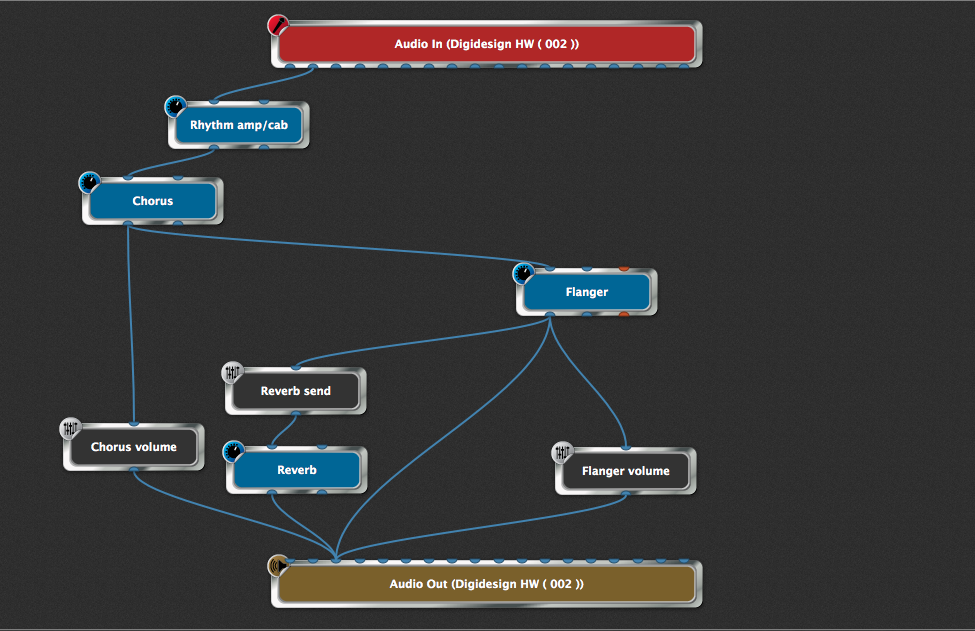
To demonstrate, go to Connections View, select the Rhythm rackspace, and add two Gain Controls, renaming one of them “Chorus volume” and the other one “Flanger volume.” Connect the output of the “Chorus” plugin to the input of the “Chorus volume” plugin and the output of the “Flanger” plugin to the input of the “Flanger volume” plugin. Then connect the outputs of both the “Chorus volume” and “Flanger volume” plugins to the same output of your audio interface that you’ve been using for both the Rhythm and Solo rackspaces. Your main Connections View screen should now look like this:
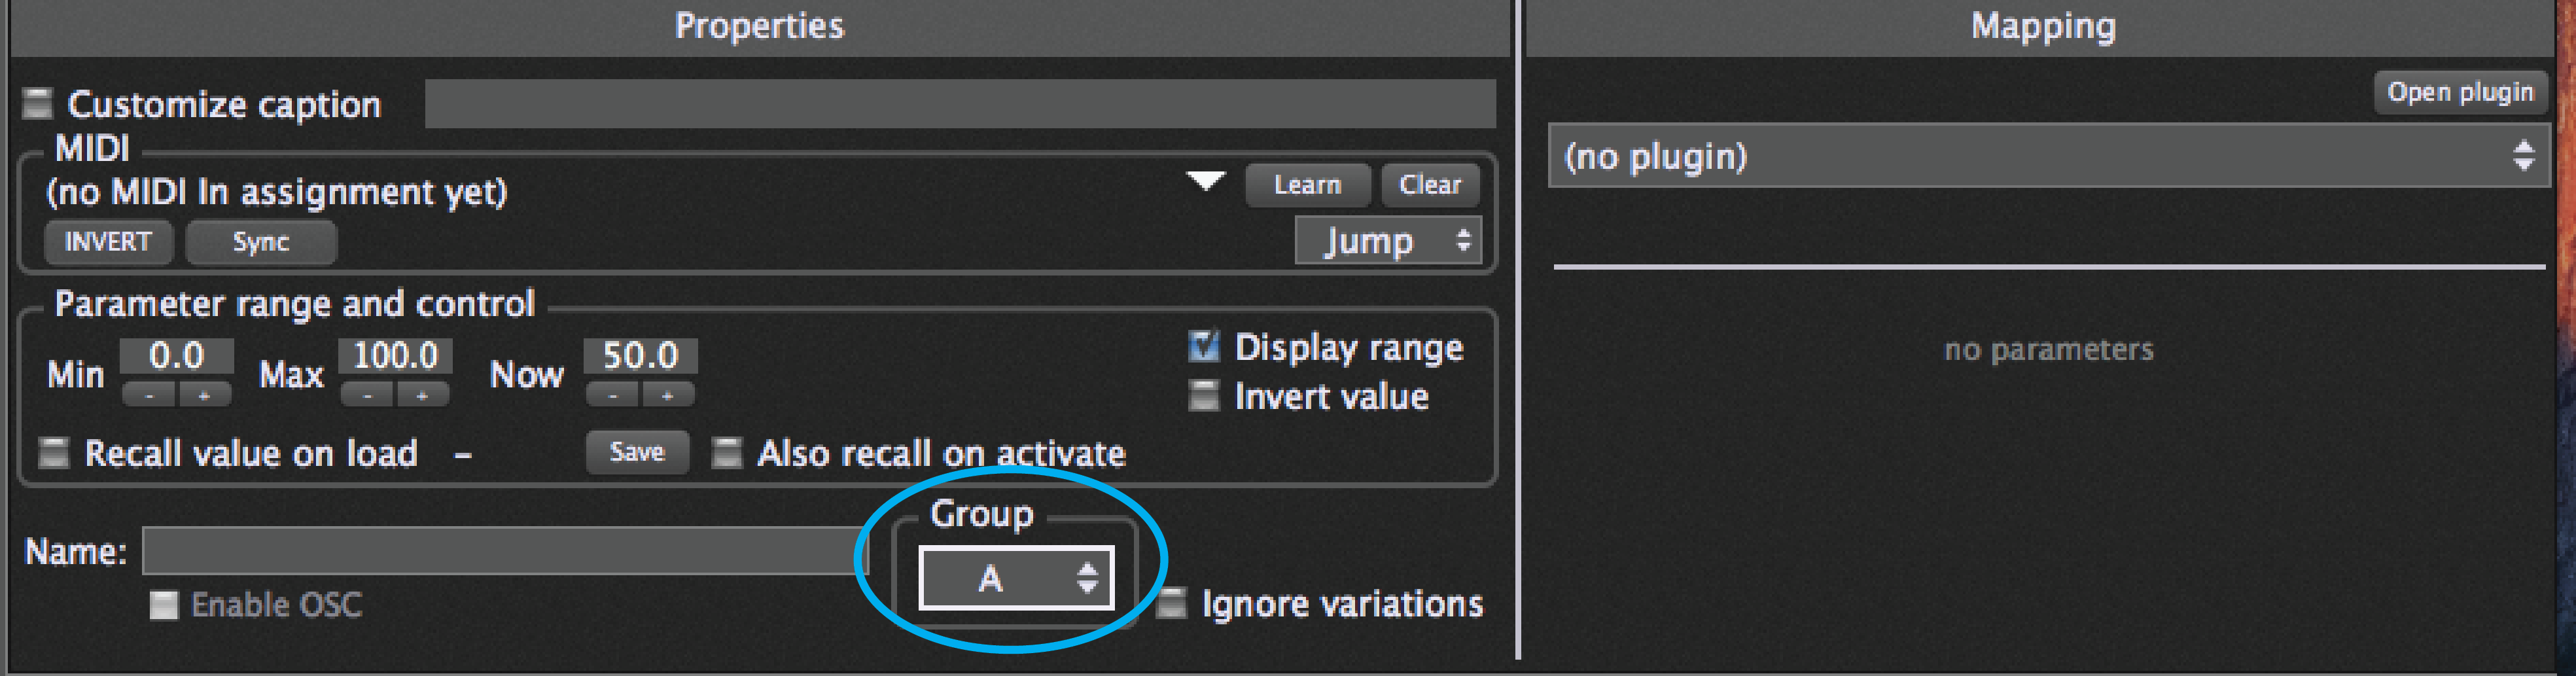
Next, go to Performer View and move the two knob widgets to set moderate amounts of both Chorus intensity and Flanger intensity. Then go into Edit mode and drag a horizontal slider widget into the same panel, positioning it below the two knob widgets. Next, in the Properties section of the inspector, click on the dropdown menu below for the widget group (circled below) and select Group A. (Gig Performer provides 26 widget groups, lettered A through Z.)
Caption the widget “Chorus <-> Flanger” but don’t assign it to any plugin; that’s because we’re going to use it as the “master” to control two other widgets we’ll be placing in a separate panel. Accordingly, click on the New Panel button beneath the current panel (depending on the screen size of your laptop, you may need to scroll down or resize the window to see this button). From the dropdown menu that appears, click on “Create a new 1U panel”. This is the smallest size panel provided by Gig Performer, but it will work fine for our purposes since we won’t actually need to see its widgets during live performance. Drag a blue knob widget into the left side of the new panel and a green knob widget into the right side. Caption the blue knob “Chorus volume” and assign it to the Gain parameter for the “Chorus volume” plugin. Then caption the blue knob “Flanger volume” and assign it to the Gain parameter for the “Flanger volume” plugin. Next — and this is important — click on Invert Value (in the Properties section of the inspector) for the blue knob widget only.
Finally, assign both knob widgets to Widget Group A—the same group as the horizontal slider in the panel above. Because all three widgets are assigned to the same group, they will all move together. When the green knob widget is turned up, it will, as expected, cause the volume of the flanging effect to increase, but turning up the blue knob widget will do the opposite because it is set to “Invert Value”: it will cause the volume of the chorus effect to decrease, and vice versa.
(Another method of achieving inversion of the blue knob’s action that provides greater precision is to use scaling: instead of clicking “Invert Value,” simply enter the maximum value in the Min field in the Parameter range and control (for example, set it to 84), and the minimum value in the Max field (say, 10). In this example, the blue knob will now go from a value of 84 when it is all the way down to a value of 10 when it is turned all the way up.)
As a result, when you move the horizontal slider from left to right, you’ll hear the chorusing effect crossfade into the flanging effect, and vice versa. Try it! If you want visual evidence that all is working correctly, go momentarily to Connections View and double-click on the “Chorus volume” and “Flanger volume” plugin blocks to open their editors, then return to Performer View. The editors will remain open and you’ll be able to see the effect of moving the horizontal slider.
Your final Rhythm rackspace should look like this:
If you find the two knobs in the small bottom panel visually distracting, Edit mode provides a couple of easy ways to fix that:
a) Right-click on the top panel, then select the “Convert to 4U panel” option from the drop-down menu. This will enlarge its size, thus hiding the panel below from view.
OR
b) Create one or more new panels and move them in-between your “master” blue panel and the small panel containing the blue and green knob widgets.
13.Test, tweak, and save. Test that all is working as expected by moving widgets manually with mouse-dragging operations or from your MIDI controller. When you’re satisfied with all settings, be sure to save your work by choosing the command and typing in a filename. Like all Gig Performer files, those saved when working within an instance are given the extension .gig and contain complete information about all rackspaces and variations. Bear in mind also that, because we created them in separate instances, the vocal signal chain created earlier in this tutorial continues to be completely active along with the guitar signal chain just created, and that making changes in one instance does not in any way affect other instances.
Important note: When multiple instances are open, be sure to exit from each one separately.