A plugin is a separate piece of software that can be loaded into a DAW or a live performance host such as Gig Performer. Some plugins (called "virtual instruments") generate audio, for example, emulations of musical instruments and synthesizers, while effects plugins alter incoming audio signals, such as from a microphone, electric guitar, or virtual instrument, offering pro-cesses like equalization, filtering, compression, limiting, reverb, delay, flanging, chorusing, phasing, and the like. Many thousands of plugins are available in the audio/music marketplace, both free and commercial. Many free plugins are of extremely high quality.
In Gig Performer, a plugin is also referred to as a plugin block or just "block".
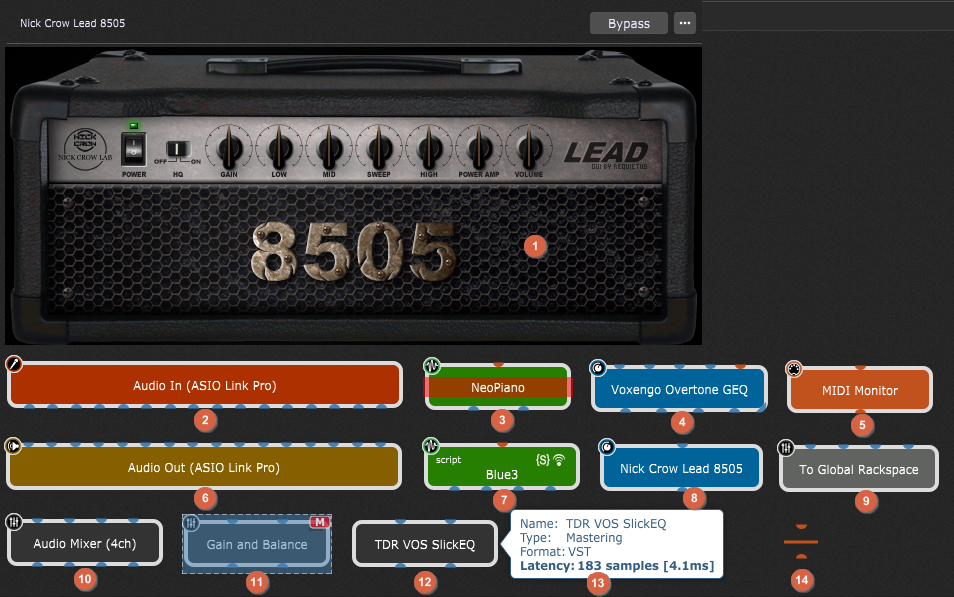
Some of the blocks and their elements in Gig Performer are depicted in the screenshot below:

Double-clicking a plugin opens its editor (1), e.g. here is a third-party plugin called Nick Crow Lead 8505, as indicated in (8). When you insert a plugin it opens its editor by default; this setting can be changed by turning off the Show plugin editor when inserted setting in Display options.
The Audio input block is colored dark orange (2) and audio output block is colored dark yellow (6); the actual audio inputs and outputs depend on your audio setup. You can review your settings under Audio I/O Options.
Virtual instruments, such as (3) and (7) are colored green. The third party-plugin called NeoPiano is bypassed. Learn more about bypassing a plugin in the Plugin contextual menu section.
Audio processors, such as effects plugins (4) and (8) are colored blue. Note the blue line located at the lower-right corner of plugin (4); hovering a mouse pointer over this line will show a tooltip that states This plugin has more audio channels. Click to adjust visibility. Refer to the Plugin contextual menu section to find out more about limiting pins (or plugin ports). To find out more about wiring your plugins and ports, refer to the Wiring view and Inserting and wiring your plugins sections.
MIDI plugins such as MIDI Monitor (5) are colored orange.
A plugin may have an OSC/GPScript handle assigned to them. Note the Blue3 plugin (7) and its handle name "script" located at the upper-left corner of the plugin. Two symbols {S} and "wireless icon" are located at the upper-right corner of the plugin, indicating that the defined handle will be used as a GPScript handle and a OSC handle respectively. Refer to the Plugin contextual menu section for more information on setting up a handle.
As previously mentioned in the chapter Global Rackspace, the gray-colored plugin To Global Rackspace (9) is used to send audio signals to the Global rackspace.
When you click on a plugin block it becomes selected (11) (NB: when you mute a Gain Control plugin, the "M" indicator will appear in the upper-right corner of the plugin). Many integrated Gig Performer's plugins are colored black, such as Audio Mixer (10). A plugin is also colored black if it doesn't report its type or if it represents a utility plugin, such as some mastering plugins (12). If you hover with your mouse over any plugin, a tooltip pops up, showing the plugin's name, type, format and latency (13) (note: the tooltip can be disabled by turning off the Show information on plugin hover toggle box in the Display Options).
An exception to the common rectangular shape of plugins in Gig Performer is the MIDI Channel Constrainer plugin (14) (to learn more about this plugin and set it to block all MIDI traffic, refer to the MIDI Channel Constrainer chapter).
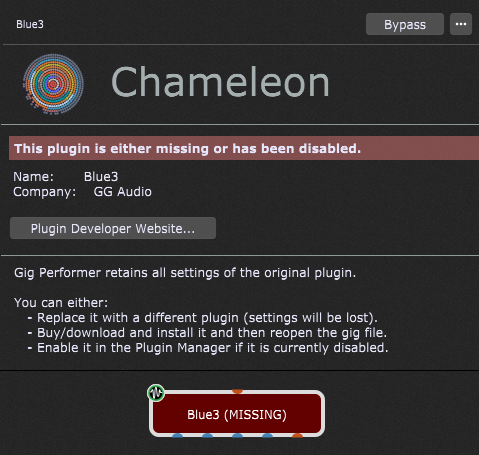
If the computer you're using to access the gig file is missing some of the plugins that were present when the original file was created, Gig Performer will create a "chameleon" plugin that mimics all the properties of the original plugin except the actual processing. This will allow you to modify the file, save it and later re-open it on a computer that has all of the required plugins installed:

The chameleon plugin is colored dark red and reports the name of the real plugin followed by the word "(MISSING)". If you double-click this plugin, its window opens and states that this plugin is either missing or disabled on this system. This feature is extremely useful if someone sends you a gig file that includes a reverb plugin (say) which you don't have currently installed. You simply open that gig file and see which plugin is missing. Afterward, you can either install the missing plugin or replace it with your own reverb plugin – right click on the chameleon block, then select Replace plugin and choose the existing alternative reverb plugin on your machine.
Gig Performer allows you to see the list of used plugins for the loaded gig file. Refer to this chapter to learn more.
If you disable your plugin through the Plugin Manager, it becomes a chameleon plugin. This feature is also useful for troubleshooting; check this blog article to find out how you can identify a plugin that crashed.
To learn more about the plugins that are integrated in Gig Performer, refer to the Built-in plugins chapter.
More in this chapter:
![]() Plugin Manager
Plugin Manager
![]() Plugin contextual menu
Plugin contextual menu
![]() Selected blocks contextual menu
Selected blocks contextual menu
![]() Plugin Editor More menu
Plugin Editor More menu