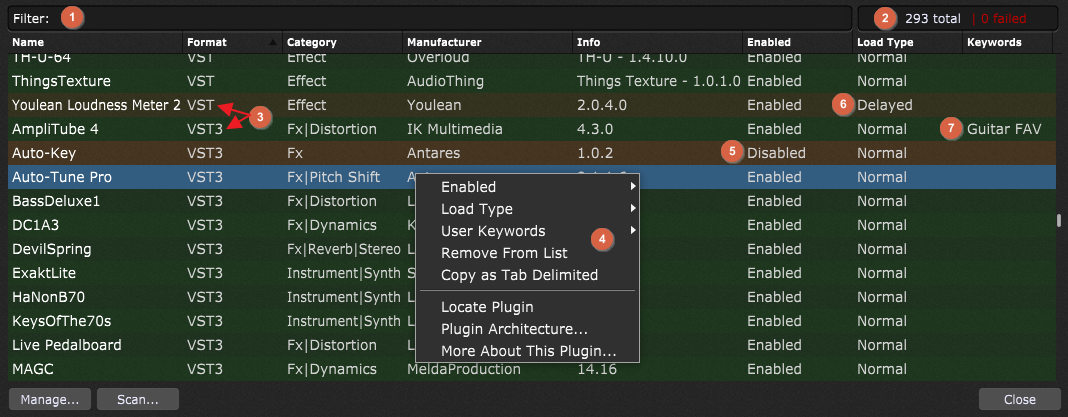
The Plugin Manager lets you view all of the plugins installed in your system, and can be sorted by name, format (VST, VST3 or AudioUnit), category (Effect, Mastering, Synth, Distortion, etc.), manufacturer name, enabled status, load type or user defined keywords:
To access the Plugin Manager, press Ctrl+Shift+P (Cmd+Shift+P on Mac) or choose Plugin Manager from the Window menu. Click on the column name, such as "Name" or "Format" to sort the column alphabetically by that category. Click that category a second time to reverse the alphabetical order of the column.
The Filter field (1) allows you to filter the plugins list by the desired query:
With (2) is represented the total number of plugins, following by the number of failed plugins.
Note: Windows users can install and use VST and VST3 plugins; examples of those are indicated with (3). MacOS users can install and use VST, VST3 or AudioUnit plugins.
Do however be aware that a plugin's manufacturer might report the wrong category or even not report it at all.
Right-clicking on any plugin name opens a pop-up menu (4) that allows you to:
•Enable or Disable any plugin; alternatively, right-click on the plugin entry, the Enabled column and select Enabled or Disabled, indicated with (5). Note: when you disable a plugin, you will need to reload your gig file for the changes to take effect.
•specify its Loading type - "Normal" or "Delayed"; alternatively, right-click on the plugin entry, the Load Type column and select the desired option, as indicated with (6). If you encounter third-party plugins that regularly fail to reinitialize successfully (i.e. they don't launch or display with the last saved value when recalling a .gig file), try designating them here as "Delayed" (they will be overlaid with a dark brown see-through bar). Gig Performer will then slightly delay their loading time the next time it is launched, which may help solve the problem.
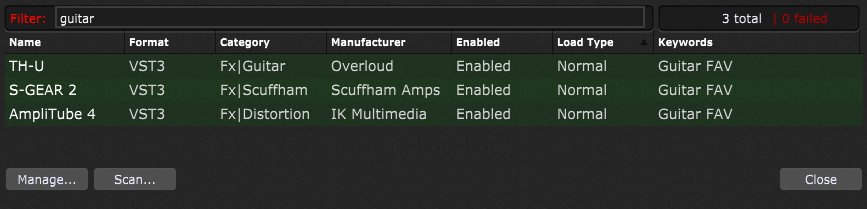
•Define custom user keywords; alternatively, right-click on the plugin entry, the Keywords column (or simply double-click the Keywords area) and type in the desired keyword (7). You can filter your plugin list by these keywords, as shown in the screenshot above.
•Remove the plugin entry from the list.
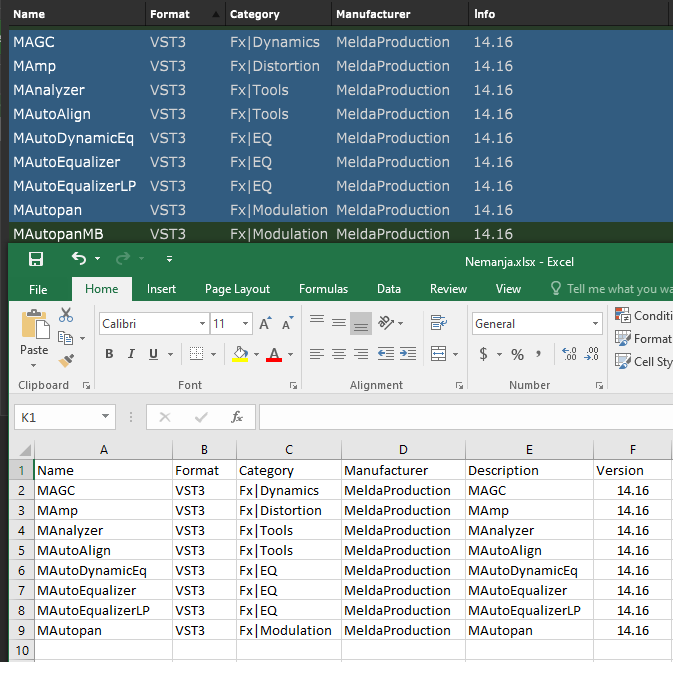
•Copy as tab delimited, if you want to copy all column values of the entry as tab delimited values, which can be easily pasted into a spreadsheet program. You will usually use this feature on several plugins or all plugins from the list.
•Locate plugin, i.e. open its containing folder. If you see duplicates of your VST plugins in the list, use this feature and review your duplicates locations to determine where they are installed. Afterwards, remove the unnecessary plugins.
•Determine the plugin architecture (Windows only), which is useful for troubleshooting purposes, i.e. determining whether the failed plugin is 32-bit.
•And finally, see more information about the selected plugin, i.e. visit plugin developer's website.
Plugins labeled as "Disabled" in the Plugin Manager are overlaid with a brown see-through bar and will not appear in the list of available plugins when you right-click in the Wiring view surface area. This enables you to reduce clutter if you are sure you won't need to access particular plugins when creating a rackspace.
At the bottom of the Plugin Manager window are two buttons named Manage... and Scan... :
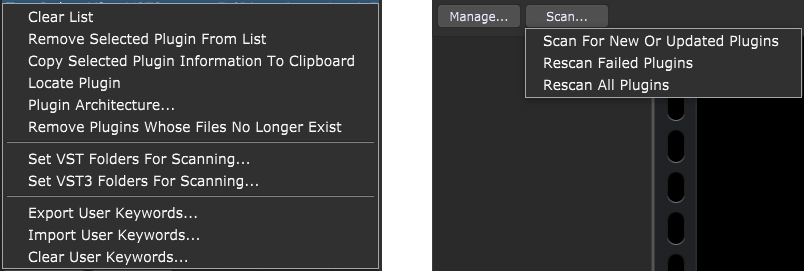
Clicking on the Manage... button allows you to:
•Clear list - clears all plugins from Gig Performer's Plugin Manager. Note: this operation will not actually erase any plugins from your computer, it simply makes them unavailable to Gig Performer until you perform a new scan. Click on the Scan -> Scan for new or updated plugins menu item to begin the scan.
•Remove selected plugin from list - removes the plugin from the Plugin Manager list (note: select a plugin first to make this option operational). This menu item does not remove the plugin (and its files) from your operating system. Note: to remove a plugin from the list permanently, find the desired plugin that you want to remove and then delete its files (you can use the Locate Plugin contextual menu item) from your drive (alternatively, move them to another folder location that is not already specified in the Plugin Manager) and then select the Remove Plugins Whose Files No Longer Exist option.
•Copy selected plugin information to clipboard - clicking this menu item copies selected entries in the Plugin Manager to the clipboard in the tab-delimited format. Afterwards, simply paste the clipboard contents into a (say) spreadsheet application to create a nicely formatted list of validated plugins on your computer.
The latest version of Gig Performer also copies custom keywords (if defined) and the file information (i.e. plugin file path) to the Clipboard.
Note: the keyboard shortcut Ctrl+C (or Cmd+C on Mac) also works to copy selected plugin information to the clipboard in CSV format. To select all plugins and then copy plugin information for all validated plugins, you can press Ctrl+A and then Ctrl+C (Cmd+A and then Cmd+C on Mac).
Note: in the Plugin Manager window, the Info column also contains version numbers of plugins.
•Locate plugin - opens the folder containing the selected plugin (note: select a plugin first to make this operational - this only works for VST plugins).
•Plugin Architecture... (Windows only) - allows you to easily see not only whether the plugin is 32-bit or 64-bit, but also the plugin file path. This feature is useful for troubleshooting failed plugins and determine their architecture - as already mentioned in this chapter, only 64-bit plugins are supported.
•Remove plugins whose files no longer exist - use this option to update the Plugin Manager so that it reflects accuracy what plugins are actually available.
•Set VST folders for scanning... - opens the window which allows you to change, add, or delete the VST plugin folders to be scanned (see the Troubleshooting section for more information).
•Set VST3 folders for scanning... - opens a window that allows you to change, add, or delete the folders to be scanned for VST3 plugins (see the Troubleshooting section for more information).
•Export user keywords - allows you to easily export all your defined keywords into a .userkeywords file. The best practice is to occasionally create a backup of your keywords.
•Import user keywords - allows you to import a .userkeywords file, which contains all your defined keywords.
•Clear user keywords - clears all defined user keywords.
Clicking on the Scan... button allows you to:
•Scan for new or updated plugins - this causes Gig Performer to immediately scan your system for any newly installed or updated plugins; any plugins found will be added to the Plugin Manager list.
•Rescan failed plugins - rescans any failed plugins. Note that Gig Performer supports only 64-bit plugins; any 32-bit plugin found will fail to initialize.
•Rescan all plugins - this option will go through your drive again, looking for all plugins in specified folders.
For more information on how to download and use plugins in Gig Performer, check this blog article: Top websites for free audio plugins and how to use them in Gig Performer.
Note: double-clicking a plugin in the Plugin Manager inserts that plugin in the Wiring view.
To see a detailed list of plugins that are used in the current gig file, refer to the chapter Plugins in Use.