ChordPro is a file format that allows you to represent lyrics and chords using text markup that can then be displayed in a form suitable for performing musicians. Although initially intended for guitarists, it can be used for all kinds of musical purposes.
Gig Performer supports the ChordPro lead sheet file format and ChordPro files can be created, edited, saved, and imported in Gig Performer. A ChordPro file can be linked to a song in the Song Lyrics/Chords Editor. The assigned ChordPro file can be seen in the Song Properties dialog (it also allows you to clear the association to the ChordPro file).
For more information on ChordPro, please visit www.chordpro.org. For more information on its file format specification click here.
Note: any text editor can be used to create and maintain ChordPro files. These files may have arbitrary types (extensions), and common file name extensions for ChordPro files are .cho, .crd, .chopro, .chord and .pro. Gig Performer will also list and import the most common .txt file extension, so you don't have to change the extension of your ChordPro files that you save with your editor.
In Gig Performer, ChordPro files are created and modified in the Song Lyrics/Chords Editor:
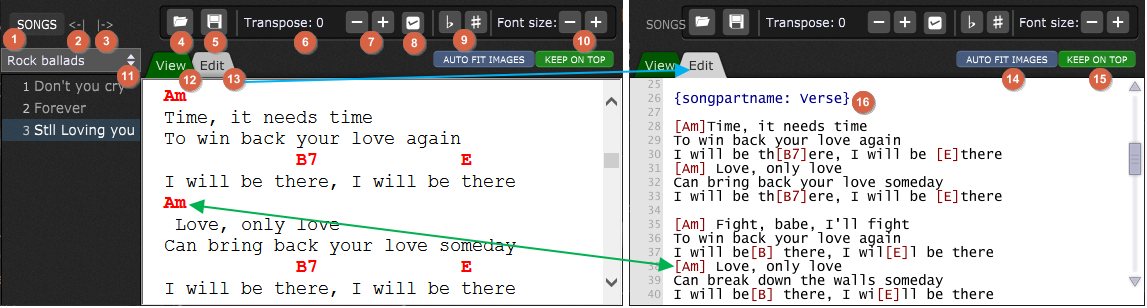
1.Song list button - click this to show the current setlist (indicated with (11)) and its songs. When the song list button is clicked, a song browser appears to allow selecting the song for which you want to work on a ChordPro document. Click the Songs button again to close the song list.
2.Make the song list narrower button - allows you to reduce the width of the song browser pane.
3.Make the song list wider button - allows you to widen the song browser pane.
4.Load from a file button - clicking this button brings up an Open dialog for loading Chord Pro files. Note: files can only be opened if they are in the root folder named Gig Performer Song Lyrics-Chords by default; you can specify a different root folder in the Setlist/Song Options. Refer to the File locations in Gig Performer chapter to see the default location for this folder.
5.Save to a file button - saves the current contents of the editor to a ChordPro file. Files can be saved anywhere, but can only be opened directly from the root directory.
6.Transpose amount - this display shows the current transposition in semitones. It is not editable. Transposition only affects the display of chord names in the ChordPro document.
7.Increase/decrease transposition amount buttons - use these buttons to set the transposition amount for chord display in the ChordPro document.
8.Save transposition button - clicking this button commits the transposition and makes it permanent in the ChordPro file.
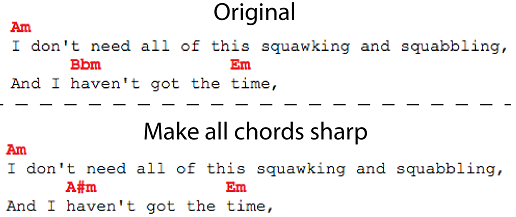
9.Make all chords sharp/flat buttons - when there are chords whose root contains an accidental, choosing one of these commands causes those chords to be displayed enharmonically.
10.Font size larger/smaller buttons - these buttons enlarge or shrink the font size on everything in the View mode. Clicking this button when you are in Edit mode will switch you to View mode, where you can size the font.
11.Setlist chooser - a drop-down menu for choosing a setlist. Below are included all the songs in the active setlist. Clicking on a song displays the linked ChordPro file, if one is assigned.
12.View tab - this tab enters the View mode, which interprets the code from the Edit mode and displays the result.
13.Edit tab - this tab (indicated with the blue arrow) enters the Edit mode, where ChordPro coding is done.
14.Auto Fit Images - clicking this button automatically fits images to the dimensions of the Song Lyrics/Chords Editor window.
15.Keep on top button - when this button is clicked the Song Lyrics-Chords Editor window is always in the foreground and cannot be obscured by another window. When engaged, the button turns green.
16.Editing area - a simple text editor for entering lyrics, chords, and ChordPro directives (read more about ChordPro directives here). The chords representation in the Edit mode and the View mode is indicated with the green arrow. Tip: to place a chord over the middle of a word, simply insert the chord in its brackets in the middle of the word, immediately in front of the letter you want the chord to appear over, with no spaces. For example, see the word "th[B7]ere" in the first screenshot.
A special directive named songpartname is introduced in Gig Performer 4 and is used to link a part in the ChordPro file with a corresponding song part. For more information, refer to the Improvements to the Song Lyrics/Chords Editor chapter.
Note: a ChordPro file can be loaded into the song lyrics/chords editor ONLY from the root directory; to load a ChordPro file not made by Gig Performer, or not stored in the root directory, use the File -> Import ChordPro files... command.
The Song Lyrics/Chords Editor supports automatic scrolling to song parts:

For example, if you have a song with three song parts - Intro, Verse, and Chorus - as in the screenshot above, simply open the Song Lyrics/Chords Editor, click on the Edit tab and enter the corresponding directives:
- for the Intro song part enter {songpartname: Intro}
- for the Verse song part enter {songpartname: Verse}
- for the Chorus song part enter {songpartname: Chorus}
Next, click on the View tab and click on one of the song parts - you will notice that your lyrics file automatically scrolls to that part.
Note: if you don't have a ChordPro file linked to your song, you have to find it or create your own ChordPro file.
There are many chord-oriented web sites for musicians that support ChordPro files. Refer to this blog article How to use ChordPro files in Gig Performer for more information on how to obtain ChordPro files from these web sites or create your own ChordPro files and how to use them in Gig Performer.
For PDF support, please visit this chapter to learn about the free PDFToGPChordPro utility to make your PDF usable in ChordPro.