These plugins are used to receive incoming MIDI messages and pass them on to other plugins; they provide a single MIDI output pin:

The image above will be different for your setup as it depends on the currently connected MIDI devices and aliases that you might have configured for your currently connected MIDI devices.
1.MIDI In (OMNI) - receives MIDI messages coming from any MIDI Input port on your system. The MIDI In (OMNI) is a generic plugin that "listens" to all incoming MIDI messages coming from all connected controllers, on all channels and on all ports. It is the default MIDI input block in any new rackspace. You can delete it if you don't need it (for example, if you are using plugins to process incoming audio signal only, from a guitar or a microphone) and add it later if you need it. You can also duplicate this plugin if needed. This block is designed for simple setups - use this when you're getting started. Once you start working with multiple keyboards and/or control surfaces, you should switch to MIDI In blocks associated specifically with each device so that you can route MIDI appropriately.
Note: if you are using a virtual MIDI Port (such as the built-in IAC port in Mac), then you must not use OMNI blocks as you will get feedback (click here to learn more).
2.MIDI In (Controls left) - "Controls left" is a custom alias that this author defined in the Rig Manager for the specific MIDI input device. This alias is tied to the specific MIDI Input port on this author's computer and this block receives MIDI events only from the that input port. Refer to the Rig Manager chapter to find out more about aliases.
3.MIDI In (CASIO CT-X5000) - for this connected MIDI input device an alias has not been defined. The text in brackets is the full name of the MIDI device and it depends on the MIDI device's manufacturer. This block receives MIDI events only from the specific input port where this MIDI device is connected.
4.MIDI in (OSC) - receives MIDI messages only from OSC sources. For more information on OSC, click here.
5.Local GP Port - this block is intended for very advanced setups. Check the Local GP Port chapter to learn more.
If you connect one or more MIDI controllers to your system, Gig Performer automatically generates additional controller-specific MIDI In blocks; right click on the empty surface in the Wiring view to open the contextual menu:
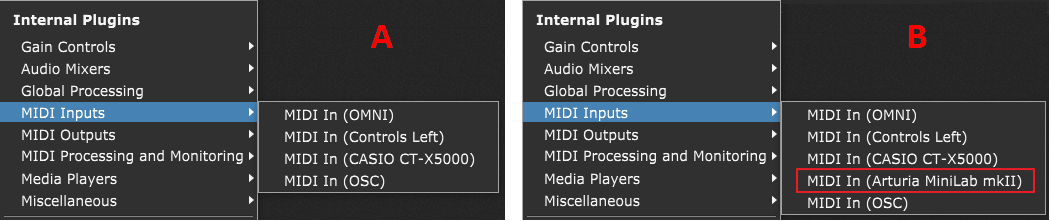
Then expand the MIDI Inputs sub-menu to see the list of all connected MIDI In devices. On the screenshot above note the state before (A) and after (B) connecting your MIDI device. The actual name of your connected MIDI device (indicated with the red rectangle) depends on the device's manufacturer.
These can (and, in most cases, should) be substituted for the generic MIDI In (OMNI) plugin. Because they "listen" to specific MIDI controllers and/or ports, their usage is generally preferable, especially if your rig contains multiple keyboards or controllers. Using specific MIDI In blocks makes it easy for you to route incoming MIDI from each device to different plugins.
Double-clicking a MIDI in plugin opens its editor window:
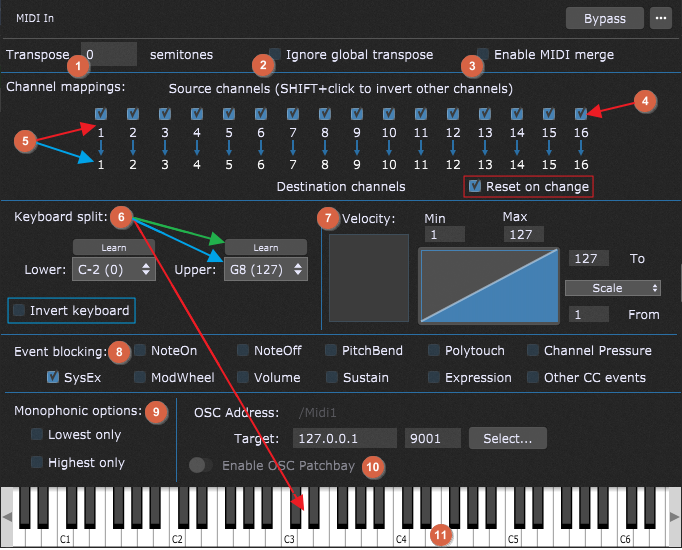
The MIDI In plugin editors provide the following functionality:
1. Key transposition - transpose incoming note messages over a range of +/- 127 semitones. Each MIDI In block can set its own transpose value. This is particularly useful when you use keyboard splits where you want to position (say) a piano at the bottom two octaves of your keyboard but obviously you want the actual notes to be pitched at higher octaves. Normally the MIDI In block's transpose value is added to the global transpose since you generally want to transpose all your instruments by the same amount.
2. Ignore global transpose - checking this option ignores the global transpose that is set in the upper toolbar of the main Gig Performer window (refer to The main Gig Performer window chapter, bullet item 8 for more information). For example, if you are using a particular MIDI In block to control percussion or sound effects in a sampler, you generally do not want the transpose to be changed and so you can configure individual MIDI In blocks to ignore the global transpose value.
3. Enable MIDI merge - this option has a very specialized purpose as it lets you feed in MIDI events from other plugins that produce MIDI (arpeggiators, MIDI file players, MIDI sequencers etc.) after which point they can be processed by other parameters available here as well as by GPScript, for example.
After you enable this option, a MIDI input block (e.g. the MIDI In (OMNI) in the screenshot below) will display the MIDI input pin:
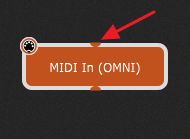
This way you can leverage some of the MIDI In block's functionality. For example, it's an easy way to do channel remapping (instead of using multiple MIDI Channel Constrainer plugins) and you can use it to block certain kinds of events, etc.
4. Channel blocking - specified MIDI channels can be blocked by simply unchecking the box above the desired source channel. Hold the Shift key and click on a channel to disable/enable all other channels.
5. Channel mapping - a source channel (indicated with the red arrow) can be mapped to a different destination channel (indicated with the blue arrow); click on the destination channel and type in a number to map to the different destination channel. The Reset on change checkbox (indicated with the red rectangle) is checked by default and allows you to stop all pending notes after any channel change.
6. Keyboard split - enables you to create keyboard splits by specifying lower and upper note of the split. Notes below the Lower value and/or above the Upper value are blocked; only notes between those values are allowed through. The Lower and Upper values can be entered in one of these ways:
a) click on the Lower note or Upper note field and choose the desired note from the corresponding drop-down menu (indicated with the blue arrow).
b) click on the Learn button (indicated with the green arrow) above the Lower note or Upper note field and play the desired note on your MIDI controller. Click the Learn button again to complete the setting.
c) click on the Learn button above the Lower note field and click on the desired low note on the plugin's virtual keyboard (indicated with the red arrow); then click the Learn button above the Upper note field and click the desired high note on the plugin's virtual keyboard. Remember to click the Learn button again after the note is learned to exit Learn mode.
It is easy to see the valid split range because notes below the Lower note and above the Upper note are grayed out. Check out our blog article How to create keyboard and velocity splits for in-depth guidelines.
Note: the keyboard in the MIDI In block plugin shows the physical key being pressed when you play your controller, rather than the output value, which might be transposed.
Ticking the Invert keyboard checkbox (indicated with the blue rectangle) allows you to produce lower notes when playing higher up the keyboard (and vice-versa). This is a nod to Joe Zawinul who famously inverted the ARP 2600 keyboard when he performed Black Market. It makes it easy to do certain counterpoint as you can use the same fingering on both hands.
7. Velocity - the old Velocity Layering and Scaling options have been replaced by the Velocity Curve which gives you much more flexibility to map your input velocities. You can implement the following features:
a) Velocity layering - velocities below the MIN value and/or above the MAX value are blocked; only velocities between those values are allowed through. If the same value is entered for MIN and MAX, all incoming notes will have their velocity changed to that value. This allows you to create velocity layers by specifying whether notes are heard depending on how hard (or soft) you press a key.
b) Velocity scaling - by selecting "Scale" in the drop-down box and entering "From" and "To" values, the velocity of all incoming note messages is adjusted so as to reduce their dynamic range (i.e. softer notes will be heard louder, or louder notes will be heard more softly).
c) Velocity constraining - by selecting "Constrain" in the drop-down box, any incoming note messages with a velocity below the "From" value are given that value exactly; at the same time, any incoming note messages with a velocity above the "To" value are given that value exactly. For example, if you enter a "From" value of 60, and a "To" value of 80, all incoming note messages with velocities of 60 or less are given a velocity of 60 exactly, while all incoming messages with velocities of 80 or more are given a velocity of 80 exactly; only velocity values from 61 - 79 are preserved. Constraining allows you to create hard velocity splits.
The MIDI In plugin editor's velocity range control is particularly useful if you want to have multiple sounds available but hear only some when you play softly and others when you play harder. If connected to a piano plugin, for example, you can opt to only hear the piano sound when you play the keyboard forcefully.
Tip: after you have defined a velocity range, you may want to change the actual velocities that are sent to your sound-generating plugin. For example, you may have created a piano sound that you only want to be heard if the velocity value is greater than 80. However, you may still want the piano to respond as if it was being played quietly. In such a case, set the Min/Max velocity values to 80 and 127 respectively so that you only hear the piano when you hit the keys hard. Then choose Scale and set the From/To values to 1 and 50 respectively. As a result, notes received with a velocity of 80 will produce notes with velocity of 1, while notes received with a velocity of 127 will produce notes with a velocity of 50. Notes in-between those values will be mapped somewhere in between.
8. Event Blocking - sometimes it is desirable to block certain note or continuous controller messages coming from a controller. Although the MIDI Filter plugin is capable of this kind of filtering and much more, MIDI In blocks include an event blocking section that conveniently provides basic blocking capabilities to reduce the number of situations requiring the MIDI Filter plugin.
A common scenario is that your controller has one or more knob, button, or other physical controls that are not being used, and so not assigned to a plugin parameter. If this unassigned control accidentally gets nudged, it could create an unintentional change to a plugin value. Blocking the MIDI messages coming from that control prevents this accidental modification. You might also want to use the Sustain pedal associated with another physical keyboard but you do not want notes played on that other keyboard to come through (you'll route them to some other synth).
The Other CC events box, when checked, blocks all continuous controller messages except for the ones that have their own boxes (i.e. ModWheel (CC1), Volume (CC7), and Sustain (CC64)). SysEx (System Exclusive) messages are blocked by default. Uncheck this box if you want to pass these messages to the MIDI In block.
9. Monophonic options - this area at the bottom of the editor filters the note messages from the controller down to a monophonic stream of notes.
- The Lowest only box, when checked, produces a mono part extracted from the lowest note as played on the instrument.
- The Highest only box, unsurprisingly, produces a mono part extracted from the highest note as played on the instrument.
These options can be useful for doubling melodies, or extracting a bass part from what might have been written as a piano part. Most often, users choose to check one or the other of these boxes, but you could check both, in which case you would be extracting lines from both the top and bottom of what is being played. Check out this blog article to see an example using Monophonic options.
10. Enable OSC Patchbay (this section shows up when the Enable MIDI In OSC Patchbay option is enabled in OSC Options) - turn on this toggle button if want to send out incoming MIDI messages as OSC messages to another application to be modified. The external application must send back modified messages otherwise no sound will be produced from the MIDI In block. Type in the OSC address prefix for this patchbay and IP address and port for the remote device (target) to which you want to send the message (alternatively, click on the Select... button to easily select an OSC target from the list that must be previously set in OSC Options). This is an advanced option and not required for normal use.
Warning: if you enable the OSC Patchbay and you do not have an external application that is sending back modified messages, no MIDI messages will be sent to connected plugin blocks.
11. Virtual keyboard - the virtual keyboard is used to help you set and display the current keyboard split and to let you generate Note messages allowing instrument plugins to be played even when an external MIDI controller is not connected. You can click on this virtual keyboard to play a key or use the computer keyboard instead. The MIDI channel used for these note messages is determined by the lower field associated with channel 1 in the Channel Mapping section.
MIDI In parameters
The following parameters for MIDI In plugins are available:
•Channel 1-16 Output - allows you to change MIDI channel blocking or remapping in real time.
•MinNote - allows you to change the keyboard split minimum (lower) note setting.
•MaxNote - allows you to change the keyboard split maximum (upper) note setting.
•Transpose - allows you to alter the key transposition. Caution: do not change this setting while holding notes, or stuck notes may result. If you do get a stuck note, don't panic - just click on the Panic icon to turn all notes off.
•StopAllNotes - issues a "turn all notes off" message, along with a sustain OFF message and a Center PitchBend message, same as the Panic button except that it only applies to the specific MIDI In block.
•StickyNoteChannel - determines the MIDI channel for the sticky note. Sticky notes allow you to trigger loops or sample playback from a widget. It works by sending Note On events only, as if you played a note but didn't release it. To use sticky notes, create an on-off widget (i.e. a switch or a button) and assign it to the MIDI In plugin and a Note On parameter. Then add a second continuous (knob or slider) widget and assign it to the MIDI In plugin as well, but to the StickyNoteVelocity parameter. When you activate the switch or button widget, a note will play continuously in the connected sound-generating plugin, with the knob widget determining the velocity of the MIDI note message.
•StickyNoteVelocity - determines the velocity of the sticky note.
•Note On C-2 through G8 (MIDI note numbers 0 - 127) - toggles On/Off (SendNoteOn/SendNoteOff); default velocity is 64.
•MinNoteVelocity - allows you to pass through only notes with velocities equal or greater than the minimum note velocity.
•MaxNoteVelocity - allows you to pass through only notes with velocities equal or less than the maximum note velocity.
•MinScaledNoteVelocity - the lowest actual velocity will be adjusted to the minimum scaled velocity.
•MaxScaledNoteVelocity - the highest actual velocity will be adjusted to the maximum scaled velocity. All notes between are scaled according to the scale curve.
•OutputVelocityMode - allows you to change between Scaled and Constrained velocity (to scale or constrain incoming velocity values; the latter puts a hard min/max limit).
•PC (Program Change) - allows widget movements to send MIDI program change messages to plugins to call up different presets - note that not all plugins support this and some require initial configuration to be able to respond to PC events.
Important note: sending PC events prevents Patch Persist from working and can result in stuck notes depending on the plugin implementation. For those reasons, this feature is not recommended for normal use.
•CC 0-127 - sends out CC (Continuous Controller) message with the value controlled by a widget.
•Pitchbend - sends a pitch-wheel message.
•Aftertouch - sends an aftertouch (also known as channel pressure) messages.
•MonoLowestOnly - allows only the lowest note of a chord to pass through.
•MonoHighestOnly - allows only the highest note of a chord to pass through.
•BlockNoteOn - blocks incoming Note On messages.
•BlockNoteOff - blocks incoming Note Off messages.
•BlockPitchbend - blocks incoming Pitchbend messages.
•BlockAftertouch - blocks incoming aftertouch messages.
•BlockPolytouch - blocks incoming polytouch messages.
•BlockAllOtherControllers - blocks all CC messages not covered by listed parameters.
•BlockModWheel - blocks CC1 messages.
•BlockVolume - blocks CC7 messages.
•BlockSustain - blocks CC64 messages.
•BlockExpression - blocks CC11 messages.
•BlockSysex - blocks incoming SysEx messages (these messages are blocked by default for compatibility with Gig Performer 3).
•NoteFollow - toggles the NoteFollowValue Off/On.
•NoteFollowValue - when on, sets the note number to the most recently played note. Attach a widget to this parameter and then group a second widget attached to an arbitrary plugin parameter which will then follow the note being played.
•VelocityFollow - toggles the VelocityFollowValue Off/On.
•VelocityFollowValue - when on, sets the velocity to whatever was last played. Use this in a similar manner as NoteFollow.
•ReleaseFollow - toggles the ReleaseFollowValue Off/On.
•ReleaseFollowValue - when on, sets the release value to whatever was last played. Not all keyboard controllers support Release values.
•OSCPatchbay - toggles Off/On the OSC Patch bay (must be enabled in OSC options)
•IgnoreGlobalTranspose - enables you to not transpose incoming MIDI notes based on global transpose (useful when playing drums or effects samples).
•TransposeUp - increments the transpose by one step.
•TransposeDown - decrements the transpose by one step.
•InvertKeyboard - inverts the keyboard: higher incoming MIDI notes produce lower outgoing MIDI notes.
•StopAfterChannelChange - sends all notes off whenever you change a channel (to prevent stuck notes).
Note: the MIDI Controller plugin right-click menu is the same as other plugins, but with the addition of the sub-menu; this menu allows you to reassign the MIDI In or MIDI Out block to the MIDI controller chosen from the menu.