In this article we’ll show you how to create keyboard splits and velocity splits in Gig Performer.
Gig Performer is an audio plugin host for live performance that allows musicians to create sophisticated setups and fully express their artistic needs. Whether you want to tie together soft and hard synths, create multiple keyboard splits, perform advanced MIDI processing, or just wire your plugins, you get an intuitive, visual, and streamlined experience.
This article will gradually introduce you to Gig Performer’s paradigm starting from the time you attach your MIDI device to your computer. There is also a gig file with this example below available for download.
Creating a new gig and connecting your keyboard
.
Starting with a clean slate
Open Gig Performer and create a New Empty Gig. Connect your MIDI keyboard to your computer:
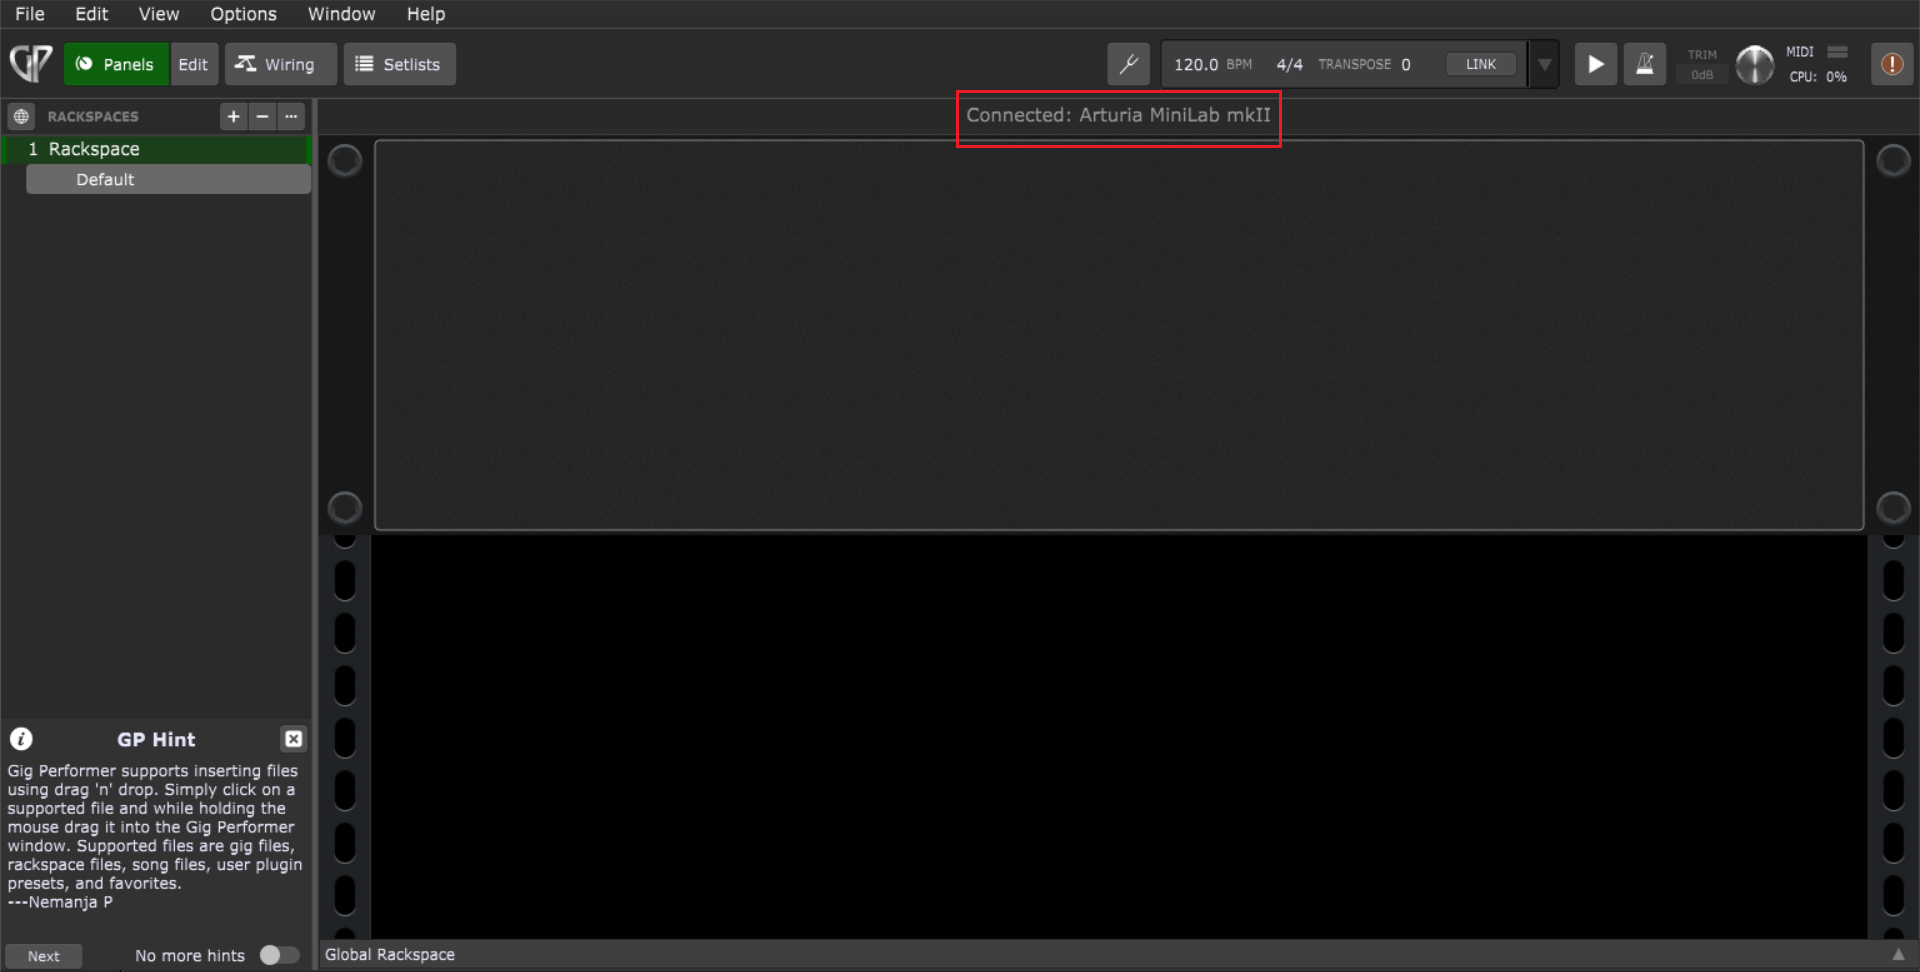
Immediately after you connect your MIDI device to the computer, Gig Performer will display a message that your MIDI device is connected (as shown with the red rectangle). Click on the Wiring view; we’ll create a simple setup using one of the bundled LostIn70s plugins (of course, feel free to use any synth plugin you like).
Add a synth
Right-click on the empty Wiring view area to open the contextual menu, expand the LostIn70s menu item and then click KeysOfThe70s. If the KeysOfThe70 plugin editor opens (it opens by default, but this option can be changed), close it – as we’ll get to that part later – and then connect its MIDI input port to the output port of the MIDI In (OMNI) block and connect its audio output ports to your audio interface outputs, as shown in the screenshot below:
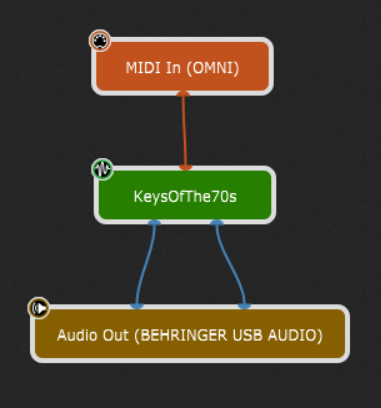
Check this user manual page for more information on inserting and wiring plugins. Play a key on your MIDI keyboard and you should be able to hear the sound.
The MIDI In (OMNI) block
The MIDI In (OMNI) block receives MIDI messages coming from any MIDI Input port on your system. Click here to learn more about this block. In this article, we’ll use this block for creating splits. If you don’t want to use this generic block, simply change your MIDI input device:
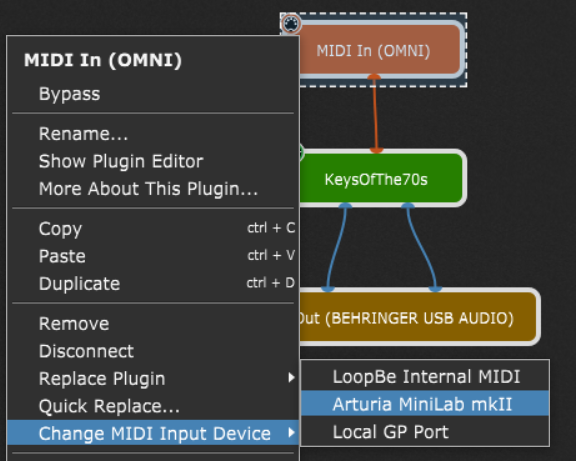
So, right click on the MIDI In (OMNI) block and click on Change MIDI Input Device. Afterward, select the desired MIDI device (i.e. Arturia MiniLab mkII).
Click File -> Save to save your current progress.
How to create a keyboard split
.
Suppose you want a piano on the left side of your keyboard and a vibraphone on the right side. NB: sample libraries for both of these are included with the KeysOfThe70s plugin.
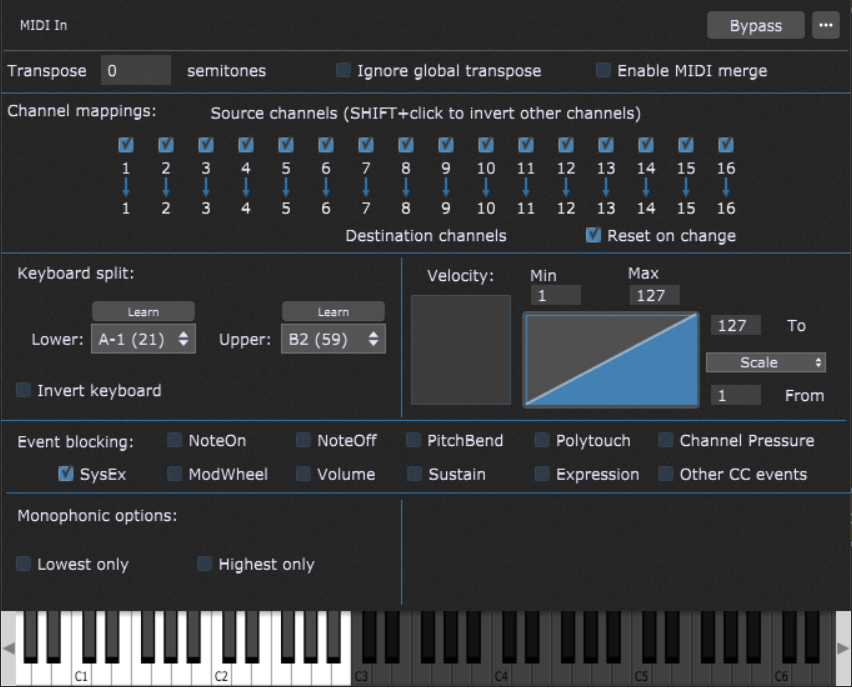
Double-click the MIDI In (OMNI) block to open its plugin editor and note the section called Keyboard split:
How to create a keyboard split
There are three ways to create a keyboard split:
First way: Click on the combo boxes and select the lower and upper values for the split you want (e.g. A-1 and B2 on the screenshot above).
Second way: Click the Learn buttons (one at a time) and simply play the lower and upper notes respectively.
Third way: Click the Learn buttons (one at a time) and click on the desired lower and upper notes on the virtual keyboard (see the screenshot above).
Make sure you disable the Learn button again after you have selected the desired lower or upper note respectively.
Test the results
To test if your split is successful, simply play C3. You should not hear any sound, because the C3 key and above are dimmed.
Tip: if you play keys A-1 to B2, the output notes will be far too low in pitch; therefore, you can simply use the Transpose field of the MIDI In block to define the desired octave range.
Note: the MIDI In block’s transpose value is usually added to the global transpose (you generally want to transpose all your instruments by the same amount). Check Ignore global transpose if you’re using a MIDI In block to control percussion or sound effects in a sampler (you generally don’t want the transpose to be changed in that case).
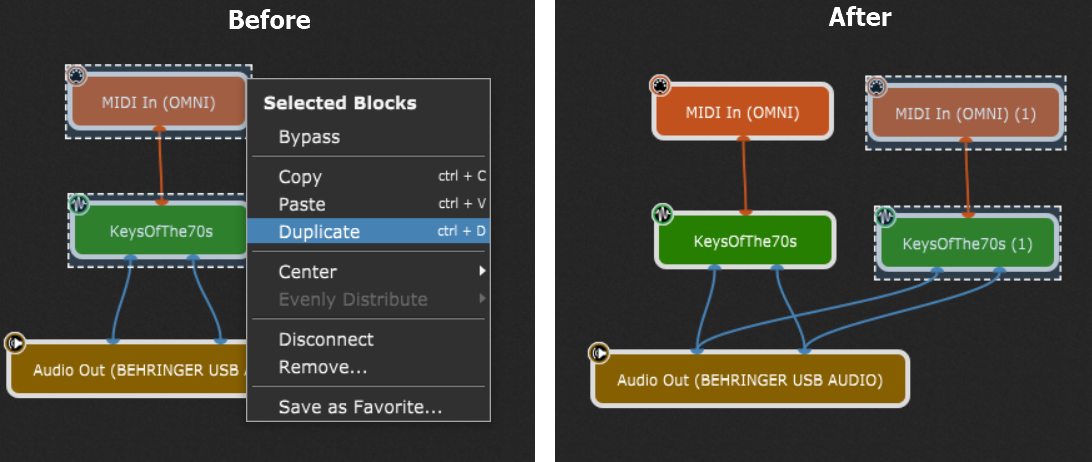
Duplicate the MIDI input and the synth
The next step is to duplicate these two blocks; select them and then right-click on one of them to open the Selected Blocks contextual menu and click Duplicate:
Double-click the new MIDI In (OMNI) (1) block to open its plugin editor and modify the lower/upper values, for example:

The last step is to select the corresponding sample libraries from KeysOfThe70s plugins:
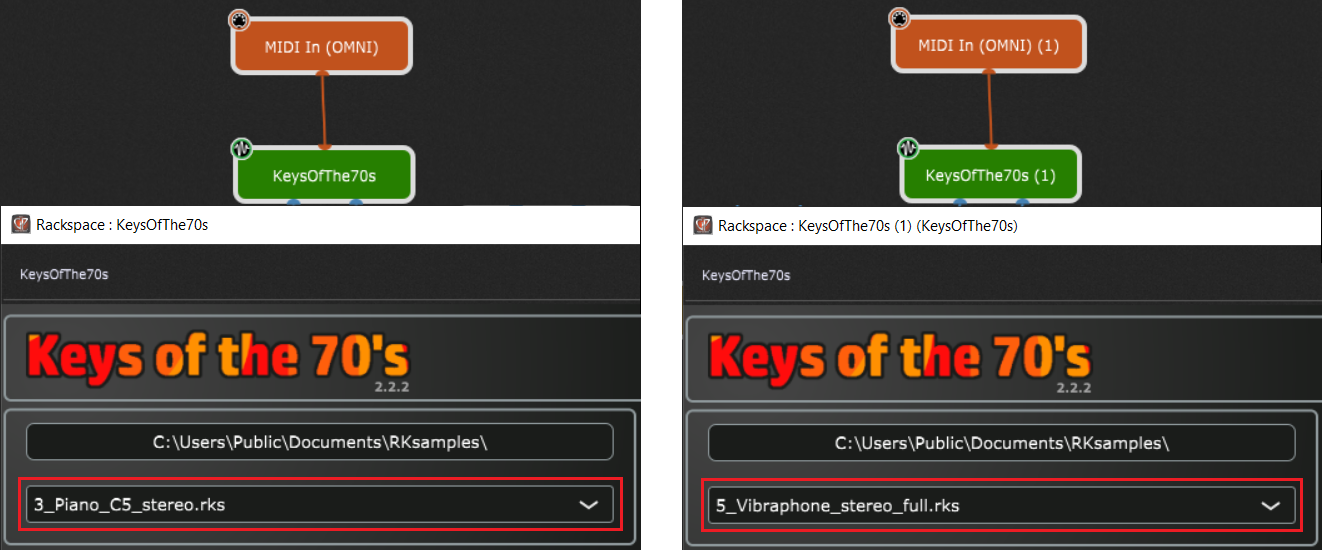
Double-click on each KeysOfThe70s block (one at a time) to open its plugin editor and select the piano and vibraphone RK samples respectively as shown in the screenshot above.
Test and experiment
Test your splits. Optionally rename the blocks to your preference, or insert an Audio Mixer to have more control over volume and balance (check the many Audio Mixer applications in the user guide).
Each block (piano and vibraphone) receives all incoming MIDI events but will only pass through note messages within the defined split. By setting the keyboard split range of the second MIDI In (OMNI) block to start above B2, notes you play above B2 will go to the vibraphone instrument and notes you play at or below B2 will go to the piano.
Feel free to replace the KeysOfThe70s plugins with any other installed instrument plugin, and create more splits if desired.
Can I use multiple MIDI In blocks for the same MIDI Input device?
Yes, multiple MIDI In blocks from the same underlying MIDI device can cover many use cases.
Here are a few examples:
a) If you have a multi-timbral synth plugin (such as Kontakt or Omnisphere), you could connect separate MIDI In blocks to each one, all receiving MIDI messages from the same keyboard but sending on different MIDI channels.
b) You can connect (say) three MIDI In blocks to the same synth plugin and change the transpose amount on two of them to produce chords or notes that are octaves apart.
Manage keyboard split range through variations
.
Gig Performer enables you to change the split points dynamically if needed, using variations. The MIDI In block provides parameters MinNote and MaxNote so you can easily set the lower and upper notes for the split respectively.
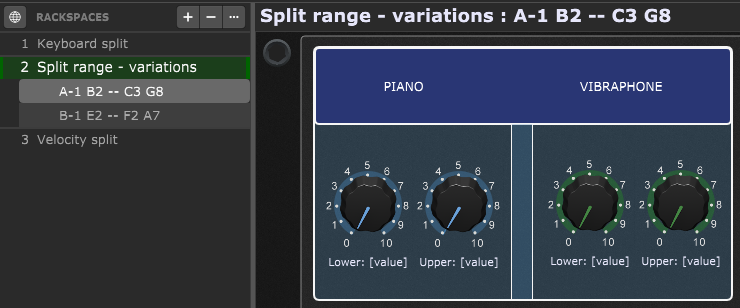
Duplicate the current rackspace, create a new variation and then double click each variation to change their names to “A-1 B2 — C3 G8” and “B-1 E2 — F2 A7” respectively. Then click on the Panels view, edit mode and insert four knobs (two knobs are for the piano split and other two for the vibraphone split):
Make sure to check the blog article Designing panels and widgets for tips on how to design a panel.
Change the split points dynamically
The next step is to map the corresponding MinNote and MaxNote parameters to knobs:
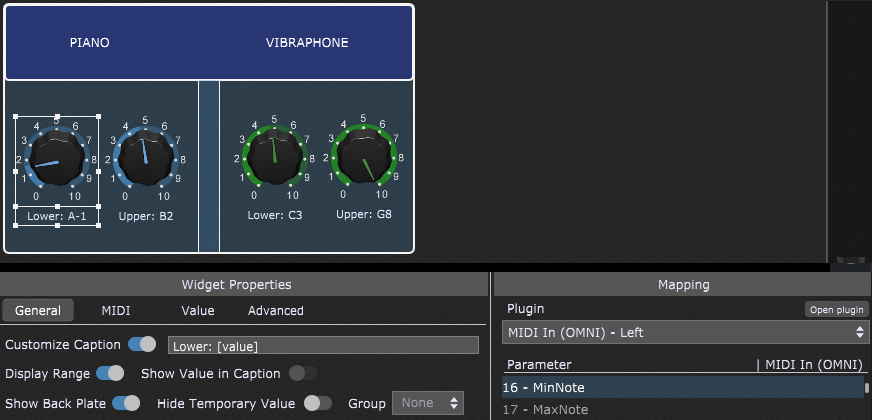
Check the user manual if you need help mapping parameters. Afterwards, you can change the desired note by simply moving the knobs to match the desired note or double click on each widget (if you’re still in Edit mode) to open the plugin editor window and then select the desired split note (as already described in the previous section).
Now when you switch variations, the split range also changes.
How to create a velocity split
.
As I already wrote in this Community thread – With widget curves, there can be miracles.
In this section, we’ll use the new widget scaling mechanism to create a velocity split. That means you’ll hear different instruments depending on how hard you press a key on your MIDI keyboard.
First, if you’re building your gig file from scratch, duplicate the first rackspace. Alternatively, you can take a look at the third rackspace in the gig file that we posted at the bottom of this article.
Afterward, double-click the first MIDI In (OMNI) block to open its plugin editor. See A on the screenshot below:
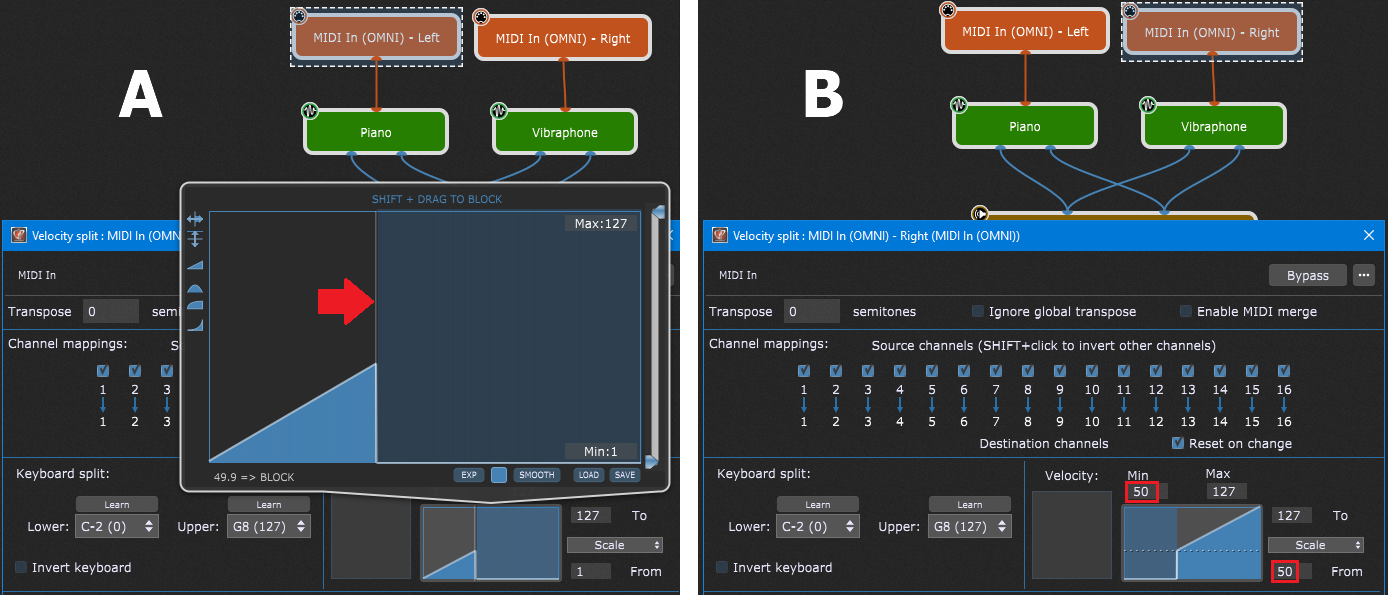
Make sure that keyboard splits are set to C-2 (0) and G8 (127) for keyboard splits like in the screenshot above.
Configure the scaling
Afterward, click on the scaling window where initially the linear curve is displayed. When the larger display shows up, move the cursor until you see 49.9 at the bottom of the window and then hold the Shift key and drag your mouse to the far right (you should get the curve shape like shown in A). This way we cover all velocities until 50 and higher velocities are blocked.
For the second MIDI In (OMNI) block (see B), we’ll use a different technique. Enter 50 in the Min and From fields (as indicated with the red rectangles). This way we cover all velocities before 50 are blocked, and higher velocities are allowed.
As the result, when you play softly, you’ll hear the piano sound. Further, when you play harder, you’ll hear the Vibraphone sound.
Tip: using scaling curves, you can also introduce different kinds of layering with velocity-based cross fading. For example, in the first MIDI In block select the default linear curve. In the second MIDI In block also select the linear curve and then reverse it. With this curve, notes pressed very softly will result in large velocity values and vice versa. Now, as you play, the volume of one instrument is loud when the other is soft.
Download gig file
Click here to download the gig file: Keyboard-and-velocity-splits
To see more tips or share your feedback, check out this community thread.
.
If you like this article, please share it and spread the word about Gig Performer.
Own the Stage® with Gig Performer®.
Nemanja Pudar
.
Related topics:
– The hidden power of the MIDI In block
– How to separate your sustain pedal from your controller
