In this chapter you will learn how to configure global and local widgets so that changing widgets values in a local rackspace also change widgets values in the Global rackspace (and vice versa).
First, create a simple layout in the Wiring view in the Global rackspace; for this example we assume that you will use an Audio Mixer (4ch) in your configuration. While you are still in the Global rackspace, open the Edit mode in the Panels View and insert two knobs (e.g. a Green knob and a Blue knob):

Click on the Green knob; note that the Widget Properties inspector includes one additional setting for the global widgets: Global Parameter Assignment. Select a value from the drop-down menu (from Param 0 to Param 127), e.g. Param 1 (as indicated with the red rectangle). In the mapping section choose the Audio Mixer (4ch) plugin (as indicated with the blue rectangle) and select the Channel 1-2 volume parameter.
Click on the Blue knob; in the Widget Properties inspector select a different Global Parameter assignment, e.g. Param 127. In the mapping section choose the Audio Mixer (4ch) plugin and select the Channel 3-4 volume parameter.
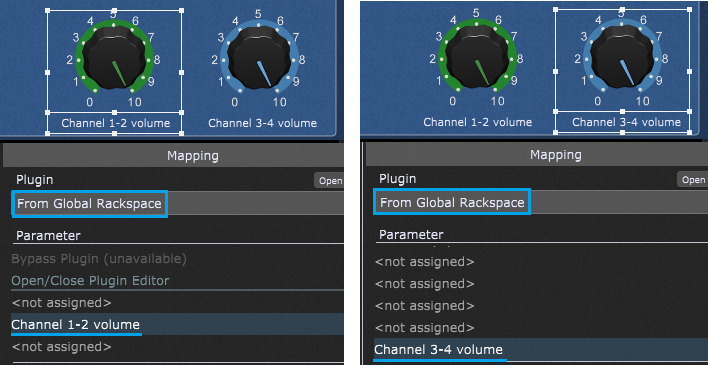
Now switch to a local rackspace (click on View -> Show/Hide Global Rackspace) and in the Wiring view insert the From Global Rackspace block. Then switch to the Panels view, Edit mode and insert two knobs (e.g. a Plastic Green knob and a Plastic Blue knob):

Global parameters are exposed to a local rackspace as parameters of the From Global Rackspace plugin (alternatively, you can also use the To Global Rackspace block, provided that you had inserted it in the Wiring view). Therefore, in the Mapping section for both knobs select "From Global Rackspace" (as indicated with the blue rectangle).
Select the Channel 1-2 volume parameter for the Plastic Green knob and the Channel 3-4 volume for the Plastic Blue knob.
Note: the actual parameter position in this list depends on what you selected in the above-mentioned Global Parameter Assignment setting. Since Param 1 and Param 127 were selected for the green and blue knob respectively, these positions become available in the From Global Rackspace plugin. If you want to prefix parameter positions in these parameter lists, enable the Show parameter numbers in widget parameter selection list toggle button in Display Options.
Finally, switch to the Panels view and move local knobs - the corresponding global knobs will move, as well (and vice versa).
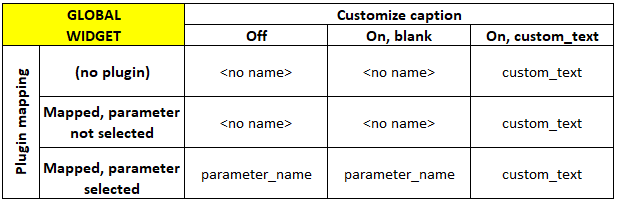
Note: if the Global Parameter Assignment parameter position (e.g. Param 126) is not assigned to a global widget, the From Global Rackspace block will display "<not assigned>" for that position (see the screenshot above). If a global parameter position is assigned, the parameter name that you will see in the From Global Rackspace block depends on the global widget settings in the Widget Properties Inspector:

Tip: You can already copy widgets from the Global rackspace and then paste them into a local rackspace using the Copy and Paste menu options. However, if a global widget is mapped to a parameter in the plugin in the Global rackspace, then if you hold down the Shift key while performing the paste into a local rackspace, (e.g. right mouse click on a panel → Paste or click on the Edit menu → Paste), the pasted widget will be automatically mapped to the actual parameter values of the widgets in the Global rackspace. If it doesn’t already exist, this action will automatically insert a "To Global Rackspace" plugin into the local rackspace.