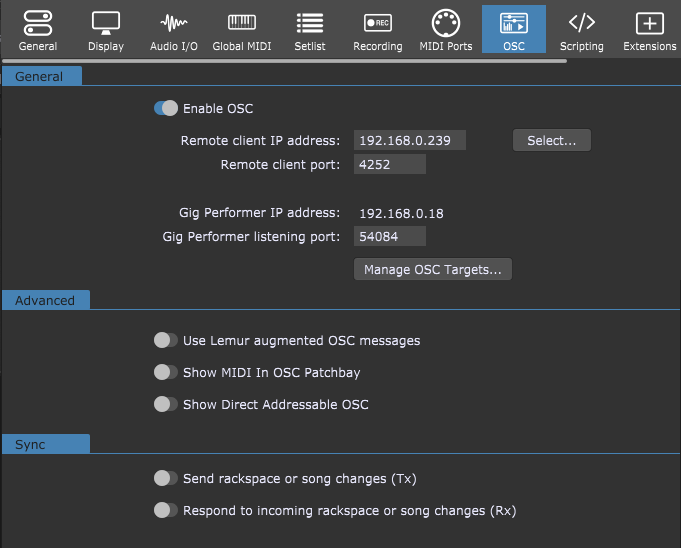
The OSC tab appears when the OSC Setup... menu item is chosen in the Options menu.
Note: this feature is available in Gig Performer Pro.

Enable OSC - click on this toggle button to turn on the OSC functionality.
Remote client IP address - the address of the remote device that is running an OSC application.
Remote client port - the port on the remote device that is listening for OSC messages over UDP (User Datagram Protocol).
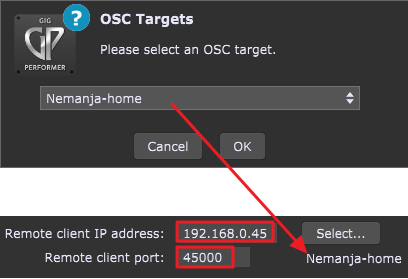
Select... - instead of typing the Remote client IP address and port, you can click on this button to select one of the previously defined OSC targets:

Simply select the desired OSC target from the list and click on OK. Note that Remote client IP address (as indicated in the red rectangles) and port changed to match the selected target. Additionally, the name of the selected target will appear under the Select... button (as indicated with the red arrow).
Gig Performer IP address - the address of the computer on which is Gig Performer running. Configure your remote device to use this IP address to connect to Gig Performer.
Gig Performer listening port - the port on which Gig Performer is listening for incoming OSC messages over UDP (User Datagram Protocol).
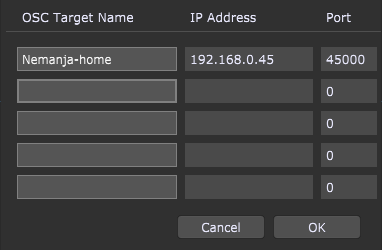
Manage OSC Targets... - click on this button to create new OSC targets:

Type in the name of a target and then its IP address and port. Click on OK to save the changes. Afterward, the defined OSC targets will be available when you click on the Select... button (not only in this window, but also in other locations that provide a selection of an OSC target).
Use Lemur augmented OSC messages - if you are using Lemur or another OSC application that supports scripting, enable this option to cause Gig Performer to transmit parameterized OSC messages. Disable this option if you are using TouchOSC or other applications that are not programmable.
Show MIDI In OSC Patchbay - this concept leverages applications like MaxMSP to modify incoming MIDI events. So, if the patchbay is enabled, an incoming MIDI message will not be sent out. Instead, it will be wrapped as an OSC message and sent to some remote listener (like MaxMSP, Ableton, or another OSC-supporting application). A remote listener application could then examine the incoming message, modify it and/or create new MIDI messages, which would then be wrapped up in OSC and sent back to the MIDI In Block patchbay in Gig Performer, which would then extract the MIDI from the OSC wrapper and send it on. Unless you have experience using and configuring OSC in other applications, you should not enable this feature as misconfiguration will cause incoming MIDI events to get lost.
Show Direct Addressable OSC - widget direct OSC enables support for the individual OSC devices which are bound to the specific IP address/port that can be set up for each widget. It is not bidirectional at this point. Refer to the Widget Properties inspector chapter for more details.
The Sync section is dedicated to synchronizing rackspace or song changes between multiple instances of Gig Performer. The requirements is that rackspaces and songs have the same names across instances.
Send rackspace or song changes (Tx) - allows you to send messages to other instances of Gig Performer to switch rackspaces or songs.
Respond to incoming rackspace or song changes (Rx) - allows you to set this instance of Gig Performer to respond to incoming requests to change rackspaces or songs from another instance of Gig Performer.
Check out the How to set up OSC chapter to see an example of the sync setup.