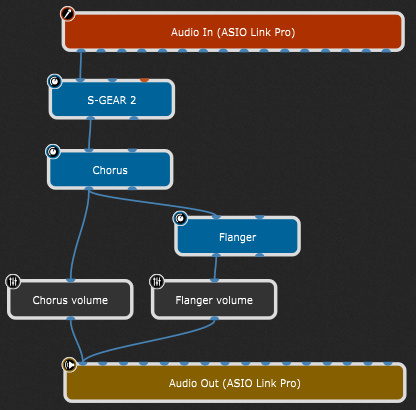
The concept behind Widget Link groups is simple: any widget assigned to a Link group can be controlled by any or all other widgets assigned to the same group. This enables you to change multiple plugin parameters together. For example, take a look at this simple layout (refer to this chapter for more information on how to insert and connect plugins):

Chorus volume and Flanger volume are Gain Control (mono) plugins. You can easily create a Widget Link group to crossfade between the chorus and flanging effects.
First, we insert three widgets: a Plastic Blue Knob, a Plastic Green Knob and a Black Slider (Horizontal) and then map the Plastic Blue Knob to the Gain parameter in the Chorus volume plugin and map the Plastic Green Knob to the Gain parameter in the Flanger volume plugin. The Black Slider (Horizontal) will not be mapped to any of the plugins, and serves only to display the chorus/flanger ratio better (see this chapter for more information on how to map a widget to a plugin parameter). Note: you can assign a widget to a Widget Link group without mapping it to a plugin parameter; you can add the mapping later.
Customize the caption of the Plastic Blue Knob, the Plastic Green Knob and the Black Slider (Horizontal) widgets to "Chorus intensity", "Flanger intensity" and "Chorus <-> Flanger" respectively (see this chapter for more information).
Make sure that you click on the Reverse button in the Value tab in the Widget Properties inspector for the Plastic Blue Knob widget.
There are 26 different Widget Link groups available in each rackspace (A-Z); to quickly assign all the widgets to the Widget Link group "N", select all the widgets and then press the keyboard key N while holding the Alt key (or Option on Mac). Alternatively, select the desired widgets and add them to a link group using the Widget Contextual Menu. You can set the Widget Link group for each widget in the Widget Properties inspector separately. If you move the black slider (or any other widget in this group), you'll notice how the widgets' values change:

Note: we inverted values for the Plastic Blue Knob, but you can select a different curve for each widget in a group to scale their values (see this chapter for more information).
Because all three widgets are assigned to the same Link group, they will all move together. When the green knob widget is turned up, it will, as expected, cause the volume of the flanging effect to increase, but turning up the blue knob widget will do the opposite because it is set to reverse value: it will cause the volume of the chorus effect to decrease, and vice versa.
As a result, when you move the horizontal slider from left to right, you'll hear the chorusing effect crossfade into the flanging effect, and vice versa.
There are two other ways to control multiple plugin parameters simultaneously:
- one is to assign the same MIDI control to multiple widgets,
- the other is using GPScript to control any number of parameters with a single widget. (available in Gig Performer Pro)