
These plugins provide a single MIDI output pin and are used to receive incoming MIDI messages and pass them on to other plugins. They are identical, except in one respect: the MIDI In (OMNI) block receives messages from all external MIDI devices such as connected MIDI controllers, while the MIDI In (OSC) block receives MIDI messages only from OSC sources. (For more information on OSC, click here.)
MIDI In (OMNI) is a generic plugin that “listens” to all incoming MIDI messages coming from all connected controllers, on all channels and on all ports. It is the default MIDI input block in any new rackspace, although it can be deleted if not needed (for example, if you are using plugins to process incoming audio signal only). If one or more MIDI controllers are connected to your system, Gig Performer automatically generates additional controller-specific MIDI In blocks when you right-click in the Plugin connections area and select “MIDI Inputs,” as shown below:
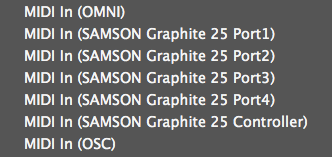
These can (and, in most cases, should) be substituted for the generic MIDI In (OMNI) plugin. Because they “listen” to specific MIDI controllers and/or ports, their usage is generally preferable, especially if your rig contains multiple keyboards or controllers.
Like other plugins, a MIDI In block has numerous parameters that can be controlled by widgets. These parameters include any MIDI note or continuous controller message. This makes it possible to remap MIDI messages coming from a physical controller without using the MIDI Filter plugin, like this:
1.In Rack Edit mode, create a new widget.
2.In the widget properties area, choose a MIDI In block for the plugin in the Mapping section.
3.Choose a note or continuous controller from the Parameter list in the Mapping section.
4.Click the Learn button in the MIDI section and move the physical controller.
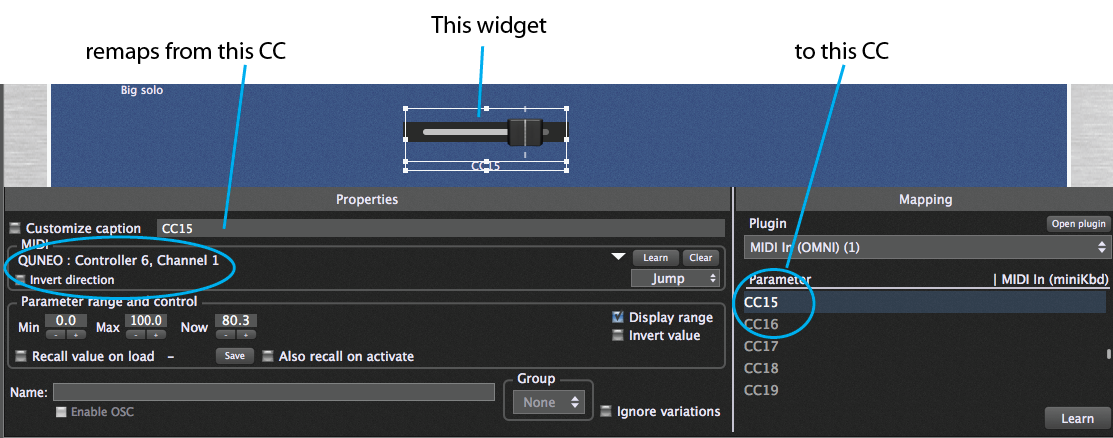
Incoming messages from the physical controller will now get remapped to the note or continuous controller you chose. Of course, this incoming CC could as easily be remapped to pitchbend, aftertouch, or mod wheel messages.
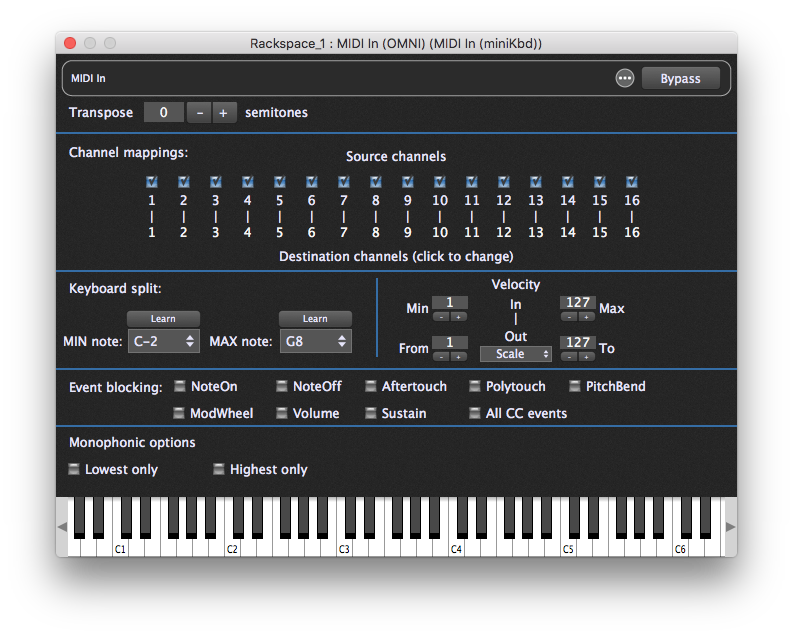
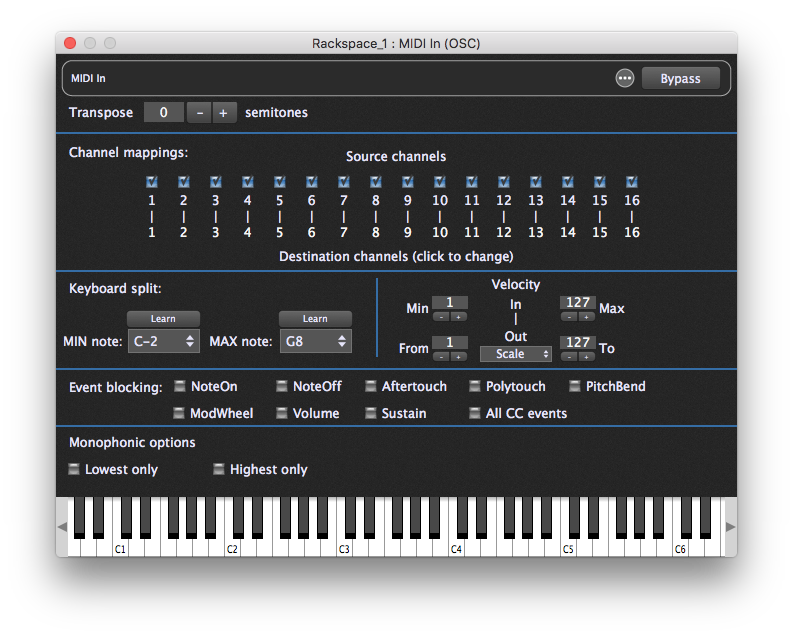
The MIDI In plugin editors provide controls that enable the following advanced operations:
Key transposition
Transpose incoming note messages over a range of +/- 48 semitones.
Channel blocking and mapping
Specified MIDI channels can be blocked (uncheck the box) or rerouted to a different channel (click on the destination channel and enter a different number).
Keyboard splits
Create keyboard splits by specifying MIN and MAX note range values. Notes below the MIN value and/or above the MAX valueare blocked; only notes between those values are allowed through. The MIN and MAX values can be entered in one of these ways:
•Click on the MIN note or MAX note field and choose the desired note from the dropdown menu, OR
•Click the Learn button above the MIN note or MAX note field and play the desired note on your controller. Click the Learn button again to complete the setting.
•Click the Learn button above the MIN note field and shift-click the desired low note on the plugin’s keyboard, or click the Learn button above the MAX note field and option/alt-click the desired high note on the plugin’s keyboard. Remember to click the Learn button again after the note is learned to exit Learn mode.
It is easy to see the valid split range because the keyboard in the MIDI In block plugin shows the physical key being pressed when you play your controller, rather than the output value, which might be transposed.
Velocity layering
Velocities below the MIN value and/or above the MAX value are blocked; only velocities between those values are allowed through. If the same value is entered for MIN and MAX, all incoming notes will have their velocity changed to that value. This allows you to create velocity layers by specifying whether notes are heard depending on how hard (or soft) you press a key.
Velocity scaling
By selecting “Scale” in the dropdown box and entering “From” and “To” values, the velocity of all incoming note messages areadjusted so as to reduce their dynamic range (i.e., softer notes will be heard louder, or louder noteswill be heard more softly).
Using velocity layering with velocity scaling
The MIDI In plugin editor’s velocity range control is particularly useful if you want to have multiple sounds available but hear only some when you play softly and others when you play harder. If connected to a piano plugin, for example, you can opt to only hear the piano sound when you play the keyboard forcefully.
In addition, after you have defined a velocity range, you may want to change the actual velocities that are sent to your sound-generating plugin. For example, you may have created a piano sound that you only want to be heard if the velocity value is greater than 80. However, you may still want the piano to respond as if it was being played quietly. In such a case, set the Min/Max velocity values to 80 and 127 respectively so that you only hear the piano when you hit the keys hard. Then choose Scale and set the From/To values to 1 and 50 respectively. As a result, notes received with a velocity of 80 will produce notes with velocity of 1, while notes received with a velocity of 127 will produce notes with a velocity of 50. Notes in-between those values will be mapped somewhere in between.
Velocity constraining
By selecting “Constrain” in the dropdown box, any incoming note messages with a velocity below the “From” value are given that value exactly; at the same time, any incoming note messages with a velocity above the “To” value are given that value exactly. For example, if you enter a “From” value of 60, and a “To” value of “80,” all incoming note messages with velocities of 60 or less are given a velocity of 60 exactly, while all incoming messages with velocities of 80 or more are given a velocity of 80 exactly; only velocity values from 61 – 79 are preserved. Constraining allows you to create hard velocity splits.
Event Blocking: Note and CC blocking
Sometimes it is desirable to block certain note or continuous controller messages coming from a controller. Although the MIDI Filter plugin is capable of this kind of filtering and much more, MIDI In blocks include an event blocking section that conveniently provides basic blocking capabilities to reduce the number of situations requiring the MIDI Filter plugin.
A common scenario is your controller has one or more knob, button, or other physical controls that are not being used, and so not assigned to a plugin parameter. If this unassigned control accidentally gets nudged, it could create an unintentional change to a plugin value. Blocking the MIDI messages coming from that control prevents this accidental modification.

The Other CC events box, when checked, blocks all continuous controller messages except for the three that have their own boxes: ModWheel (CC1), Volume (CC7), and Sustain (CC64).
Monophonic options
The Monophonic options area at the bottom of the editor filters the note messages from the controller down to a monophonic stream of notes.
The Lowest only box, when checked, produces a mono part extracted from the lowest note as played on the instrumemt.
The Highest only box, unsurprisingly, produces a mono part extracted from the highest note as played on the instrumemt.
These options can be useful for doubling melodies, or extracting a bass part from what might have been written as a piano part.Most often, users choose to check one or the other of these boxees, but you could check both, in which case you would be extracting lines from both the top and bottom of what is being played.
Playing plugins without an external MIDI controller
A virtual keyboard is provided to allow sound-generating plugins to be played even when an external MIDI controller is not connected.
MIDI In widget control
The following parameters for MIDI In plugins can be widget-controlled:
•Bypass plugin
•Channel 1 – 16 Output
•MinNote (minimum note)
•MaxNote (maximum note)
•Transpose
•StopAllNotes
•StickyNoteChannel
•StickyNoteVelocity
•Note On C-2 through G8 (MIDI note numbers 0 – 127)
•MinNoteVelocity (minimum note velocity)
•MaxNoteVelocity (maximum note velocity)
•MinScaledNoteVelocity (minimum note velocity)
•MaxScaledNoteVelocity (maximum note velocity)
•OutputVelocityMode
•PC (Program Change)
•Continuous controller (CC) 0-127
•Pitchbend
•Aftertouch
•MonoLowestOnly
•MonoHighestOnly
•BlockNoteOn
•BlockNoteOff
•BlockPitchbend
•BlockAftertouch
•BlockPolytouch
•BlockControllers
•BlockModWheel
•BlockVolume
•BlockSustain
Channel 1 – 16 Output allows you to change MIDI channel blocking or remapping in real time.
MinNote/MaxNote allow altering the MinNote or MaxNote settings in real time.
Transpose allows you to alter the key transposition in real time.
Caution: Do not change this setting while holding notes, or stuck notes may result. If you do get a stuck note, don’t panic—just click on the Panic icon to turn all notes off.
“StopAllNotes” issues a “turn all notes off” message, along with a sustain OFF message and a Center PitchBend message, same as the Panic icon. One usage is to turn off MIDI notes when switching variations. Although you normally wouldn’t do this (because the whole point of variations is to allow you to continue holding notes down while changing plugin parameter values), it is useful if you want to use variations to actually change the underlying sound you’re creating, in which case any notes from the previous sound need to stop immediately once you change variations. Just associate this parameter with a widget (typically, a button), and it will trigger automatically when you change variations.
Sticky notes allow you to trigger loops or sample playback from a widget. It works by sending Note On events only, as if you played a note but didn’t release it. To use sticky notes, create an on-off widget (a switch or button) and assign it to the MIDI In plugin and a Note On parameter. Then add a second continuous (knob or slider) widget and assign it to the MIDI In plugin as well, but to the StickyNoteVelocity parameter. When you activate the switch or button widget, a note will play continuously in the connected sound-generating plugin, with the knob widget determining the velocity of the MIDI note message. (You can also add a widget assigned to StickyNoteChannel to select the MIDI channel.) When the button widget is turned off, an appropriate note off event will be sent to the plugin to stop the sound.
MinNoteVelocity/MaxNoteVelocity and MinScaledNoteVelocity/ MaxScaledNoteVelocity allow you to alter these settings, respectively, in real time.
OutputVelocityMode allows you to change between Scaled and Constrained velocity.
PC (Program Change)allows widget movements to send MIDI program change messages to plugins to call up different presets. Note that doing so prevents Patch Persist from working and can result in stuck notes depending on the plugin implementation. For those reasons, this feature is not recommended for normal use.
Continuous controller (CC) 0-127 – Incoming MIDI messages to the widget are remapped to the specified CC number.
Pitchbend – Incoming MIDI messages to the widget are remapped to pitchbend messages
Aftertouch – Incoming MIDI messages to the widget are remapped to mono aftertouch messages.
The following parameters switch the indicated checkboxes:
Monophonic options
MonoLowestOnly
MonoHighestOnly
Event blocking
BlockNoteOn
BlockNoteOff
BlockPitchbend
BlockAftertouch
BlockPolytouch
BlockControllers
BlockModWheel
BlockVolume
BlockSustain
Note: If you have an audio interface or MIDI controller connected to your system that provides a MIDI output, Gig Performer will expose that output with a corresponding MIDI Out block. Click here for more information.