This tutorial will show you how to use Gig Performer to play plugins from your MIDI controller.
1.Launch Gig Performer, then click on the Connections View icon (circled in blue) to enter Connections View:
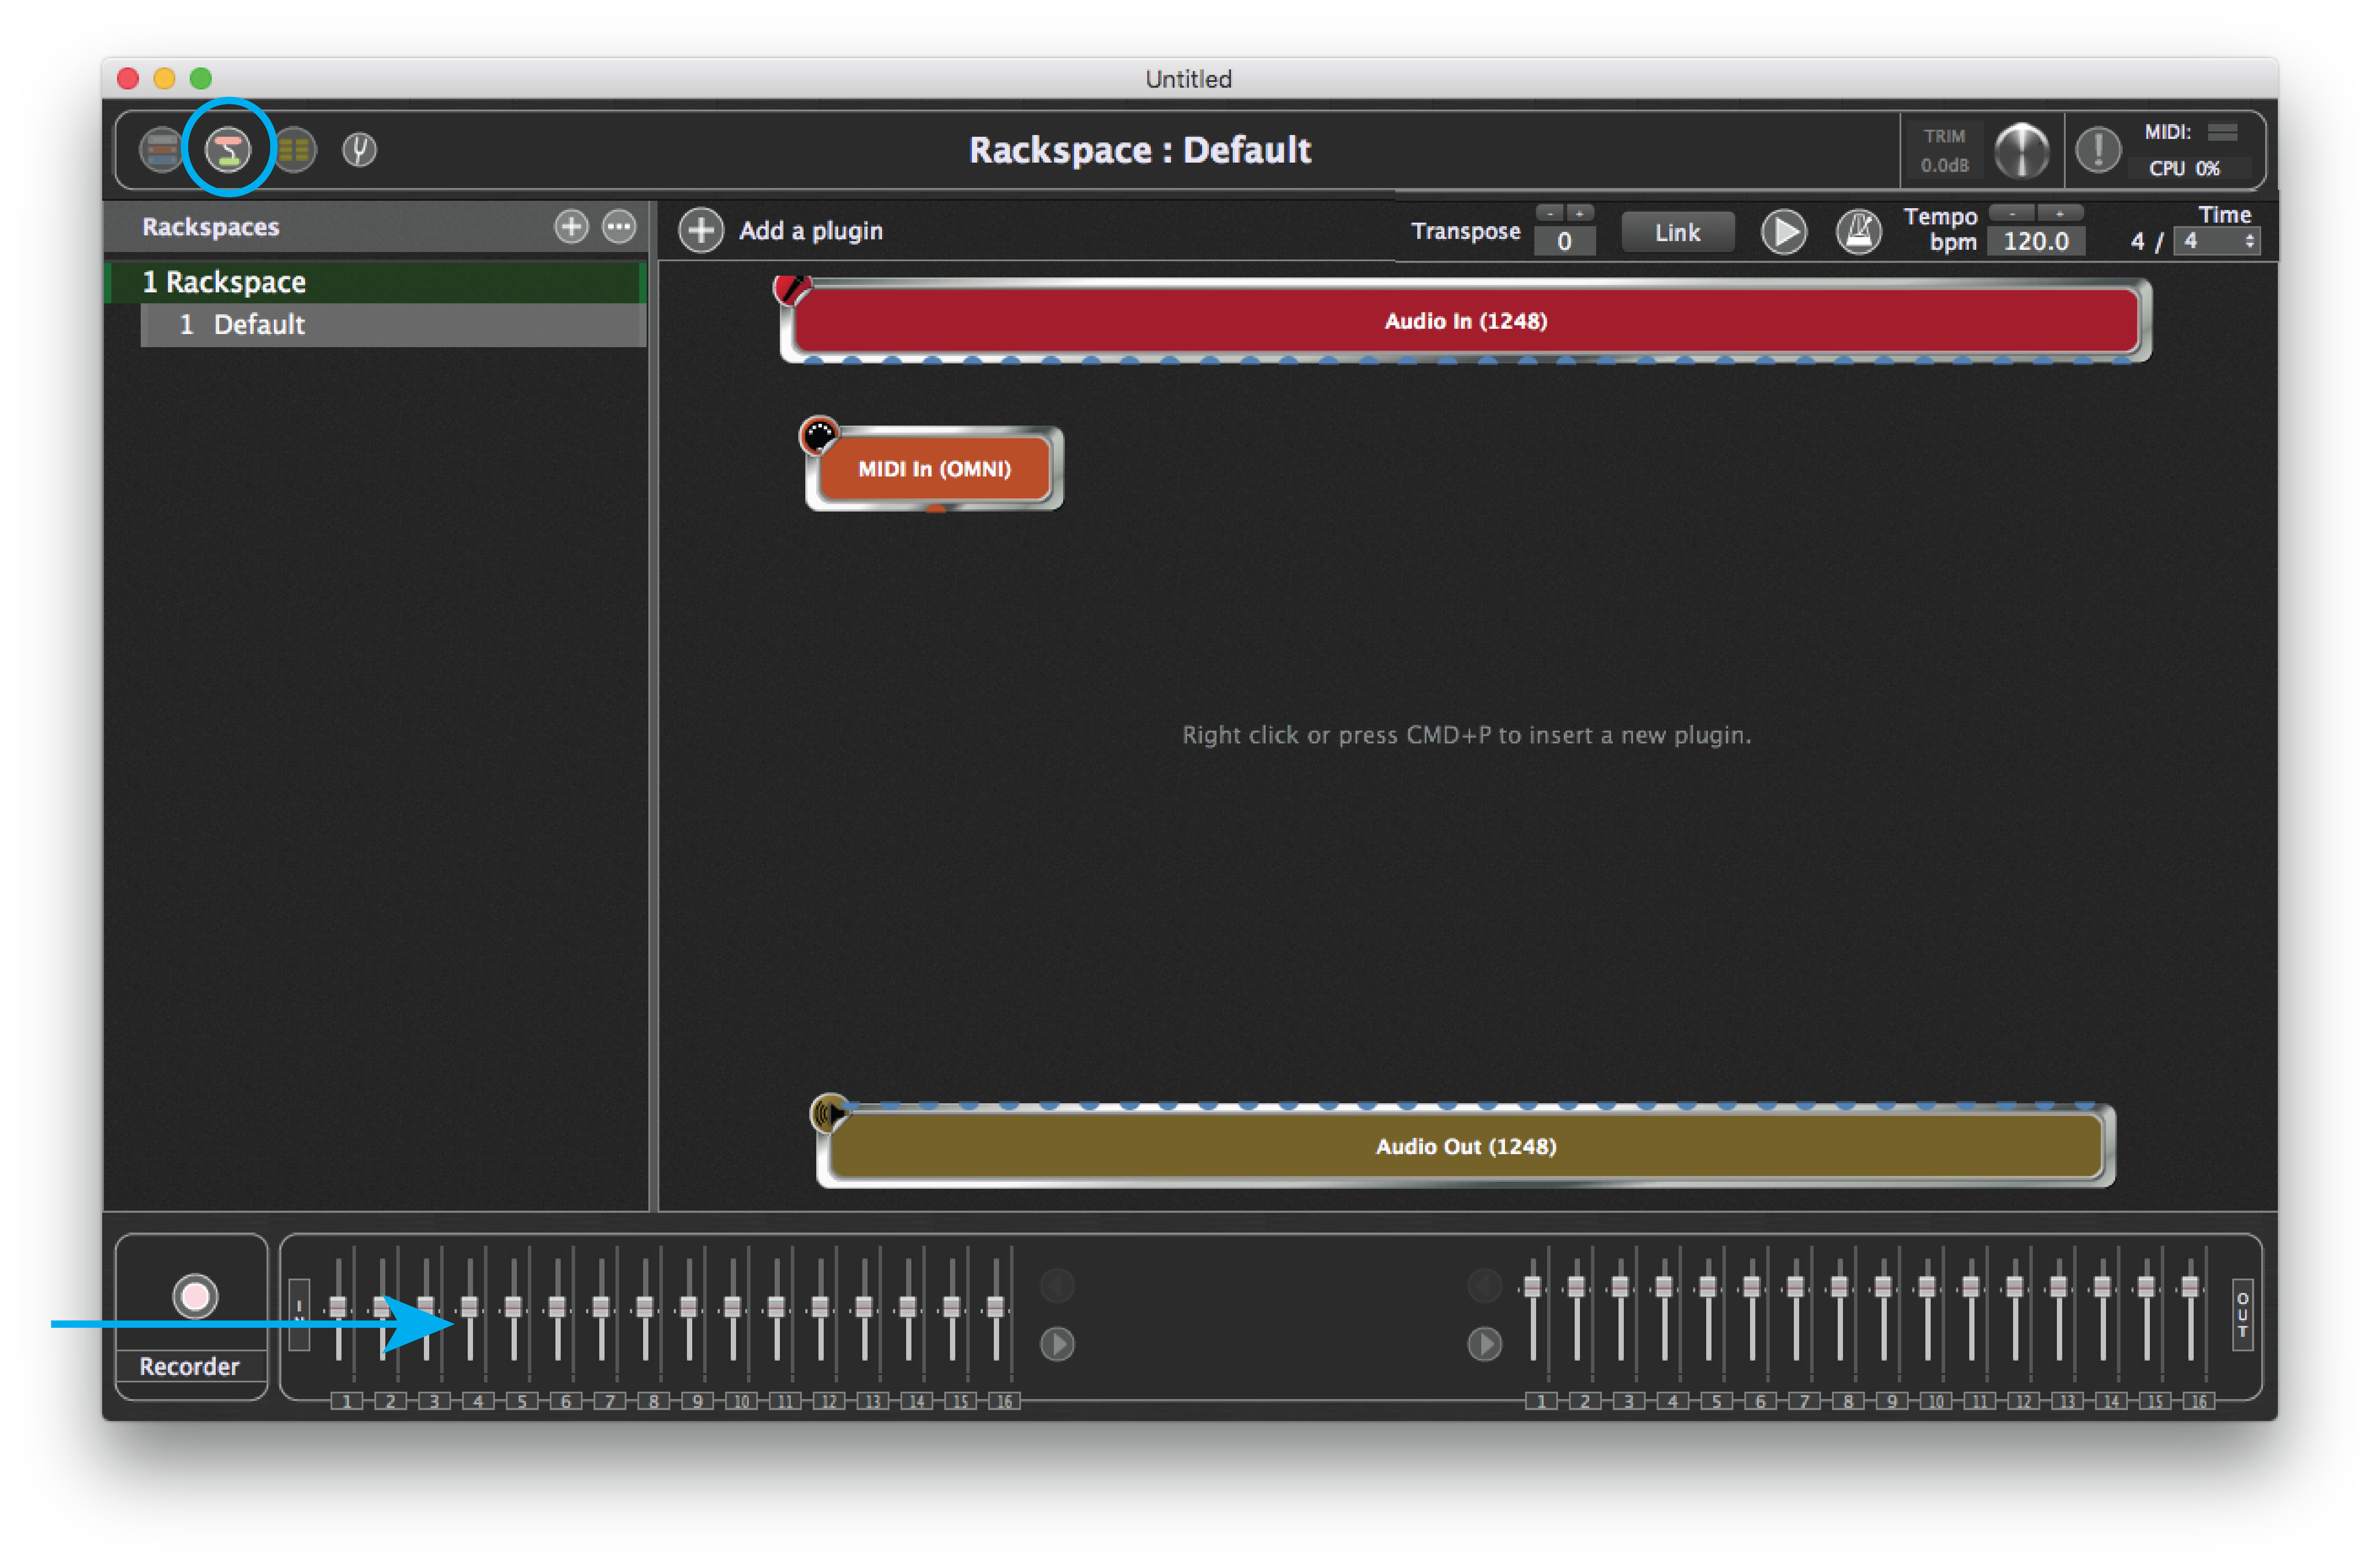
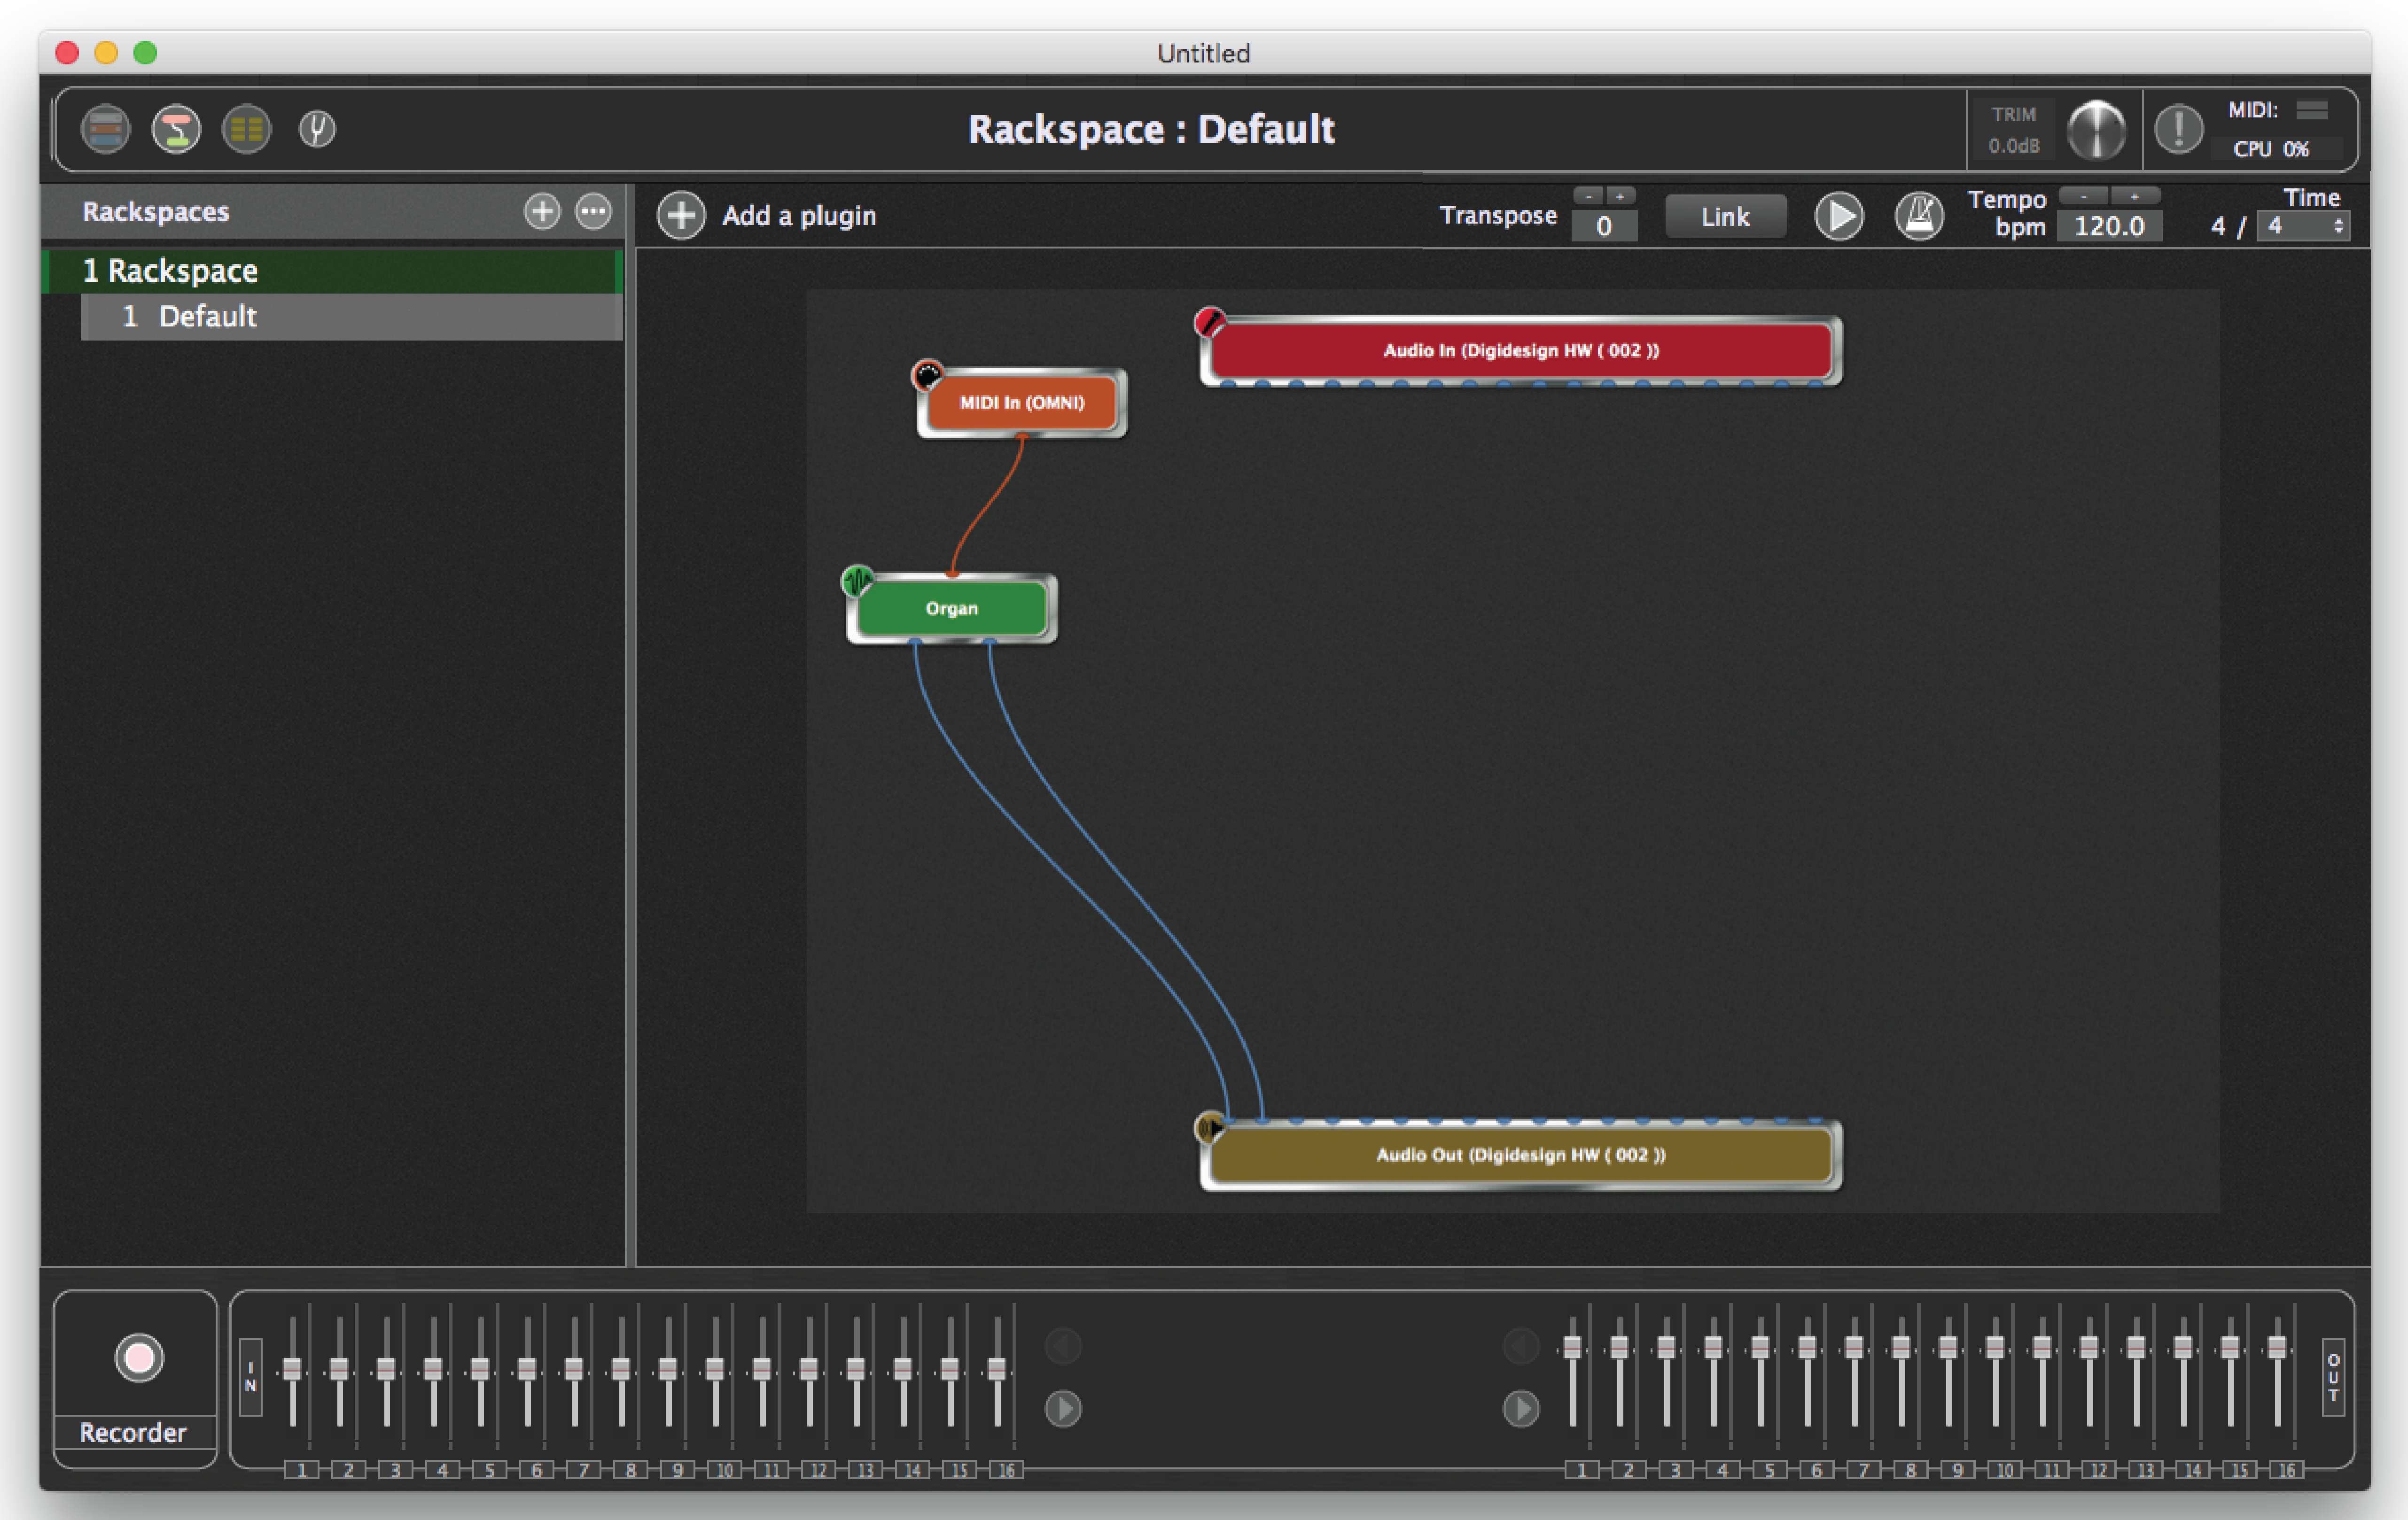
This screen allows you to insert plugins and connect them to other plugins any way you like.
NOTE: Your screen may look slightly different from the one shown above, since the audio input and output blocks will reflect the name of your connected audio interface as well as the number of inputs and outputs it provides.
The orange block at top left represents the MIDI input to your system, typically from a MIDI keyboard or other MIDI controller. The red block at the top represents the input of your audio interface, typically from microphones, instruments connected via DI (such as electric guitars), and line-level sources. The brown block at the bottom represents the output of your audio interface, and the panel beneath it (indicated by the arrow) provides metering and virtual faders for each of your audio interface’s inputs and outputs. (Flickering in the input meters indicates presence of signal.) If no audio interface is connected, Gig Performer will use your computer’s built-in input and output. If an audio interface is connected but does not appear, see the “Troubleshooting“ section in this User Guide.
2.Choose a plugin. Right-click (or two-finger tap if you’re using a trackpad) anywhere in the main screen to bring up the plugin selector menu, which allows you to choose the plugin you want to access.The built-in Gig Performer plugins (including MIDI In and MIDI Out blocks for each connected MIDI controller) appear above the line separator (indicated by the arrow), grouped together by category: Gain Controls, Audio Mixers, MIDI Inputs, MIDI Outputs, MIDI Processors, and Media Players. All other plugins appear under the separator, arranged alphabetically by the name of the plugin manufacturer:
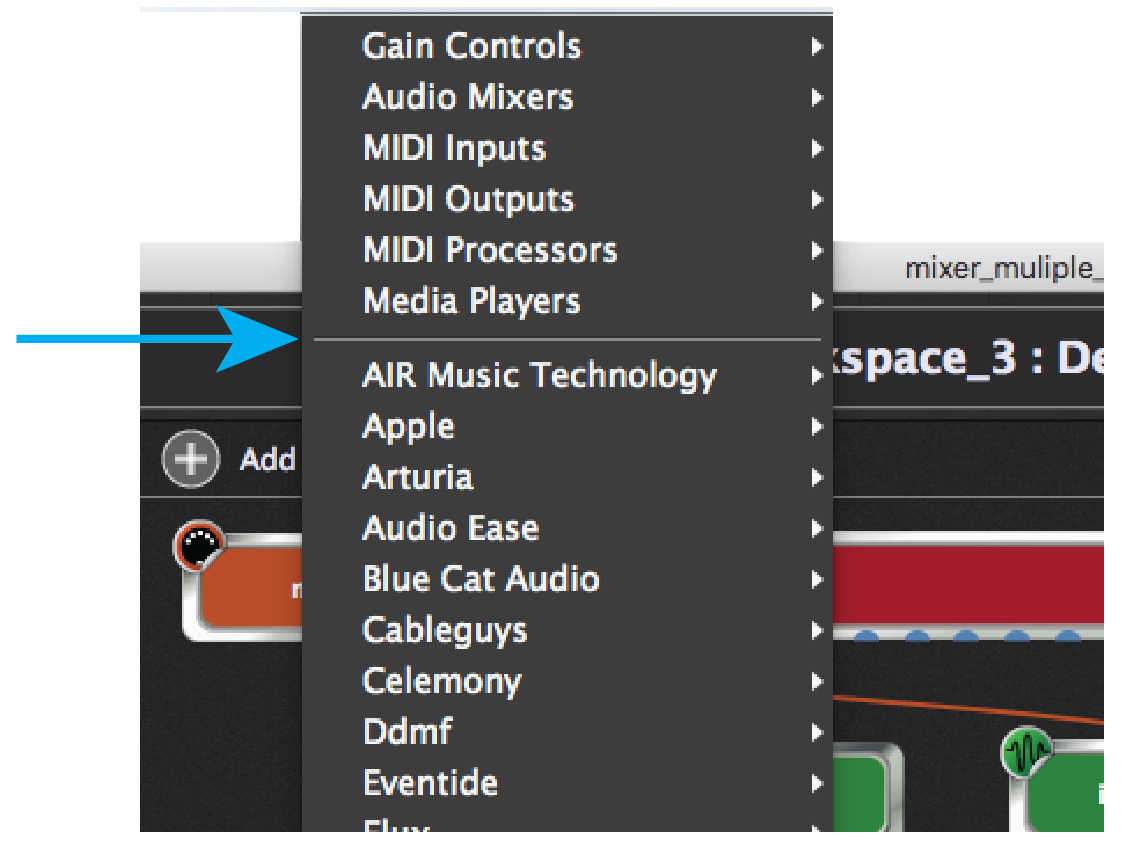
TIP: You can also insert a plug-in by using the Cmd-P keyboard shortcut. This option is actually preferable since it opens a “Quick plugin finder” window that allows you to search for a particular plugin by part or all of its name. Click here for more information.
As soon as you select a plugin block (or double-click on it), Gig Performer opens the editor window for that plugin, allowing you to alter the sound. (You can disable the “open on selection action” with an option in the Preferences dialog.) Let’s start with a Hammond organ plugin. For this example, we have selected“C3 Blues” from Native Instruments’ Kontakt 5 Player (you can choose your favorite). Its editor window is shown below:

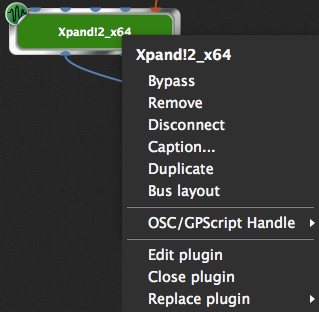
3.Give your plugin a custom name. Close the plugin editor window to return to Connections View. Sound-generating plugins such as the one you selected appear as green blocks. (Effects processing plugins, as we will see in the next tutorial, appear as blue blocks.) By default, the name of the plugin is displayed,but you can easily rename it with something that represents the actual sound—very useful for distinguishing among multiple copies of the same plugin. Accordingly, right-click on the green block and select the Caption... option, then type in the name “Organ.”
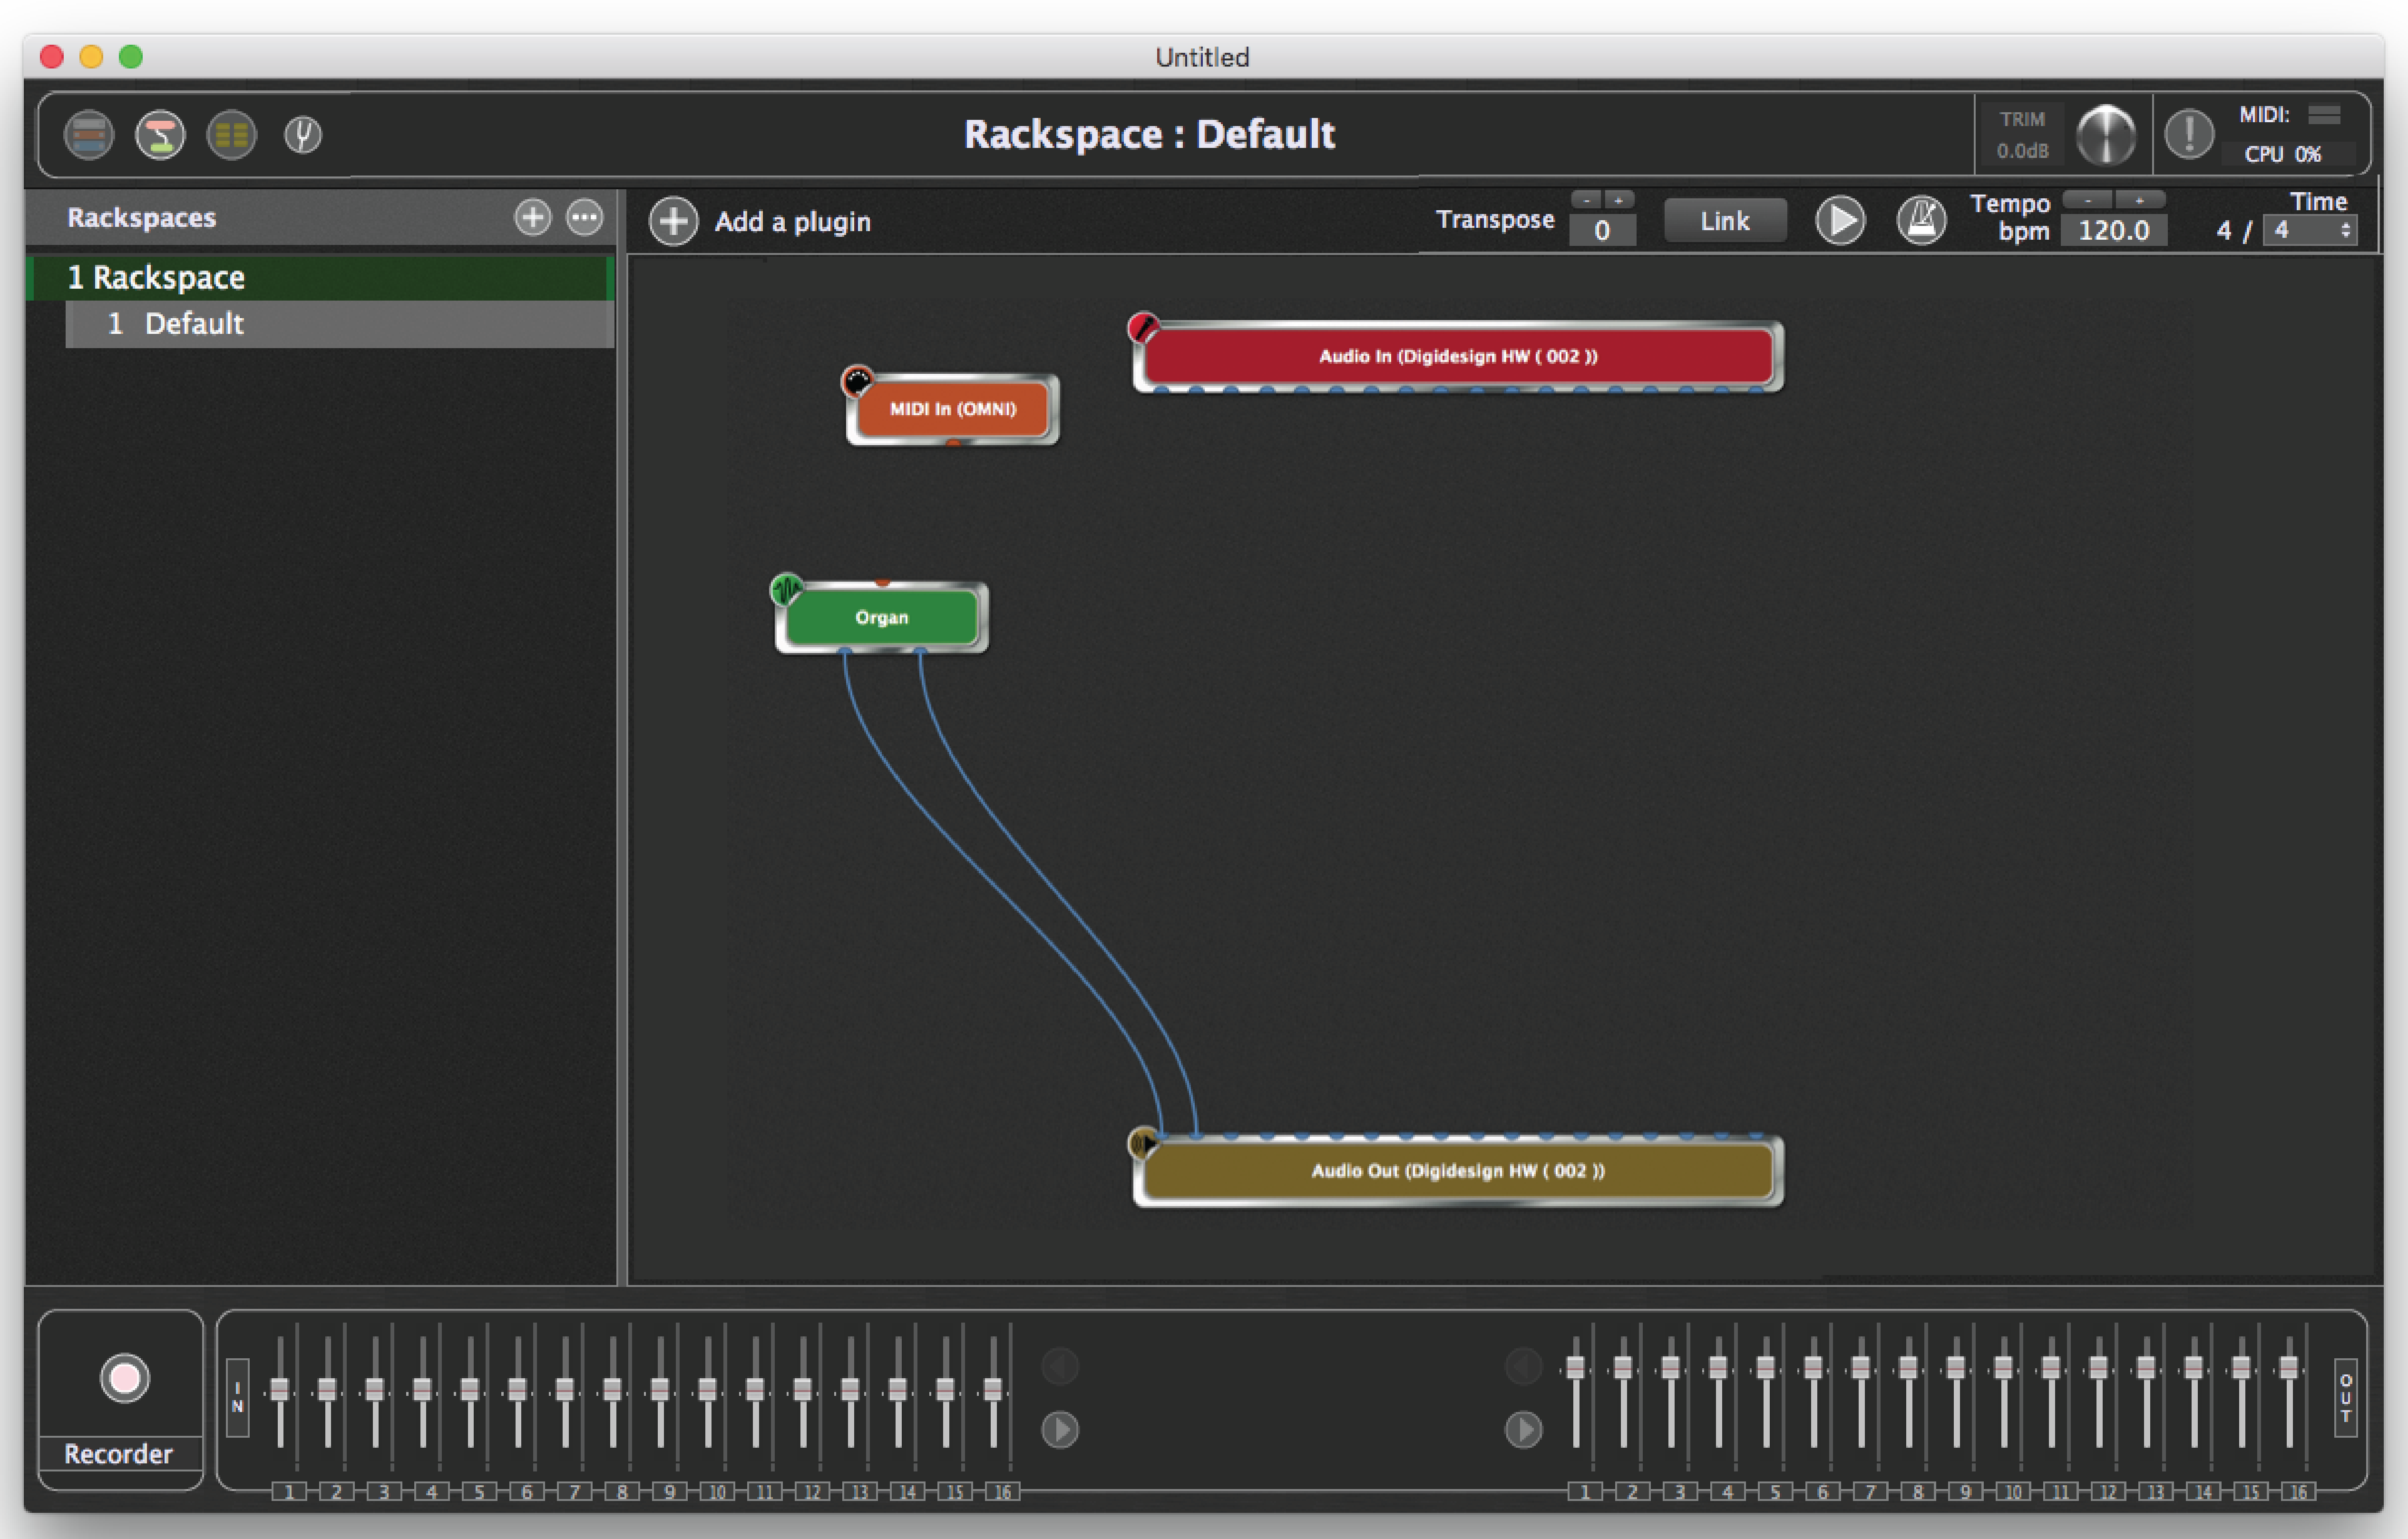
4.Set the audio output. Every plugin block has several pins both above and below it. These pins are used to make connections—both MIDI and audio — to other plugin blocks. Orange pins are for MIDI signals and blue pins are for audio signals. Pins at the top provide input to the plugin, while pins at the bottom send output from the plugin. If you connect the outputs of multiple plugins to the input of another plugin, the signals will be mixed automatically.
Kontakt 5 Player creates a stereo audio signal, so there are two blue pins on the bottom. To be able to hear its sound, we need to connect its output to two inputs of the audio interface. To make these connections, simply click on an output pin and, while holding down the mouse button (or keeping your finger on the trackpad), drag the cursor over the desired input pin and then release the mouse button. (Click here for a shortcut method of making stereo connections.) Audio connections between plugins are represented by blue lines.
TIP: Connections and plugin blocks can be moved anywhere in the screen by clicking and dragging on them. To remove (disconnect) a connection, right-click on it and select “Remove this connection” or simply click and drag the connection until it detaches from a plugin and then let go. To remove a plugin block, right-click on it and select “Delete.” To remove all connections from a plugin block, right-click on the block and select “Disconnect.”
5.Set the MIDI input and play your sound. Using the same click-and-drag technique, make a connection between the orange output pin on the bottom of the “MIDI In (OMNI)” block and the orange input pin on the top of your plugin. MIDI connections between plugins are represented by orange lines.
The “MIDI In (OMNI)” plugin is included with Gig Performer and is the default MIDI input until you specify a controller-specific one (see below). In addition to passing MIDI messages generated by any connected MIDI controller, it also provides a virtual keyboard, so you can play your plugins even if you are not using an external MIDI controller.

At this point, if you play a few notes on your controller (assuming your audio system is turned up), you should be hearing an organ sound coming from your connected audio interface. Alternatively, you can double-click on the “MIDI In (OMNI)” block to open its editor, then “play” the organ sound by clicking notes on the virtual keyboard. You can also opt to substitute a plugin representing your particular MIDI controller (thus allowing the plugin to be played only by that controller and/or via a specific MIDI port offered by that controller) by right-clicking on the “MIDI In (OMNI)” block and selecting the “Replace Plugin” option.
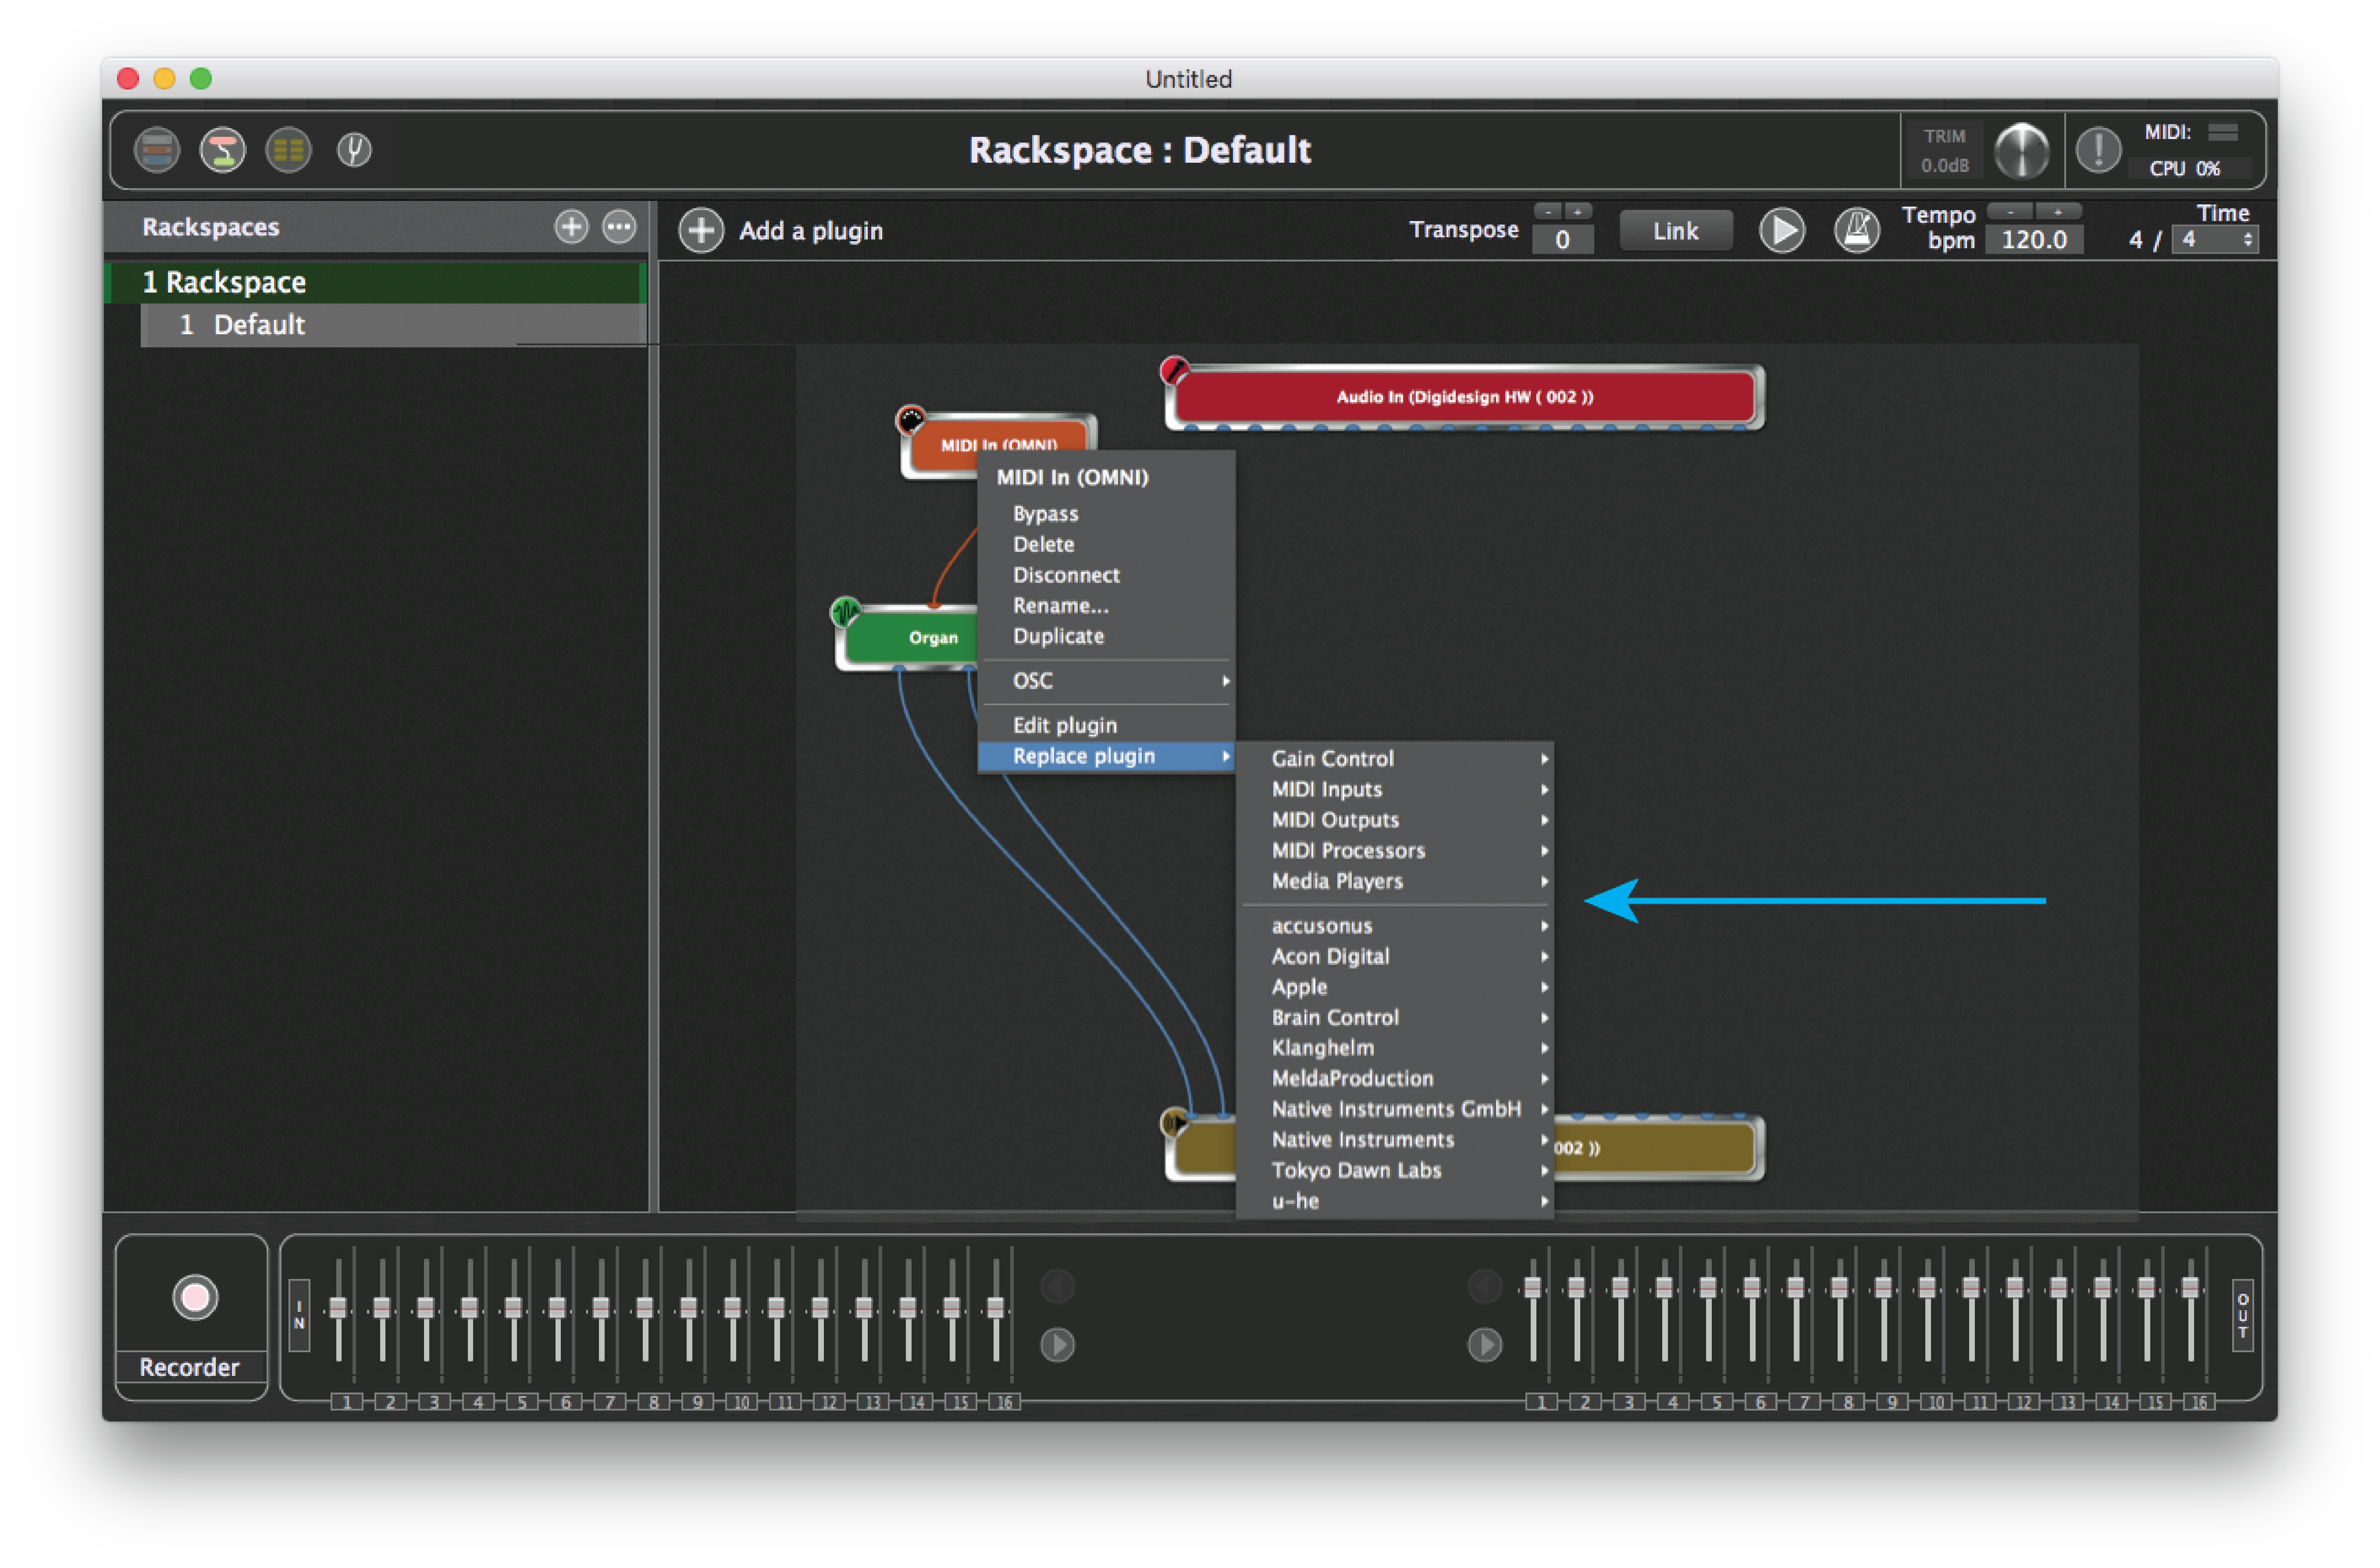
Again, all built-in Gig Performer plugins (including “MIDI In (OMNI),” as well as MIDI In and MIDI Out blocks for each connected MIDI controller) appear above the line separator (indicated by the arrow), grouped together by category: Gain Control, MIDI Inputs, MIDI Outputs, MIDI Processors, and Media Players.
6.Go to Performer View. Click on the top left icon (circled) to switch Gig Performer to Performer View.
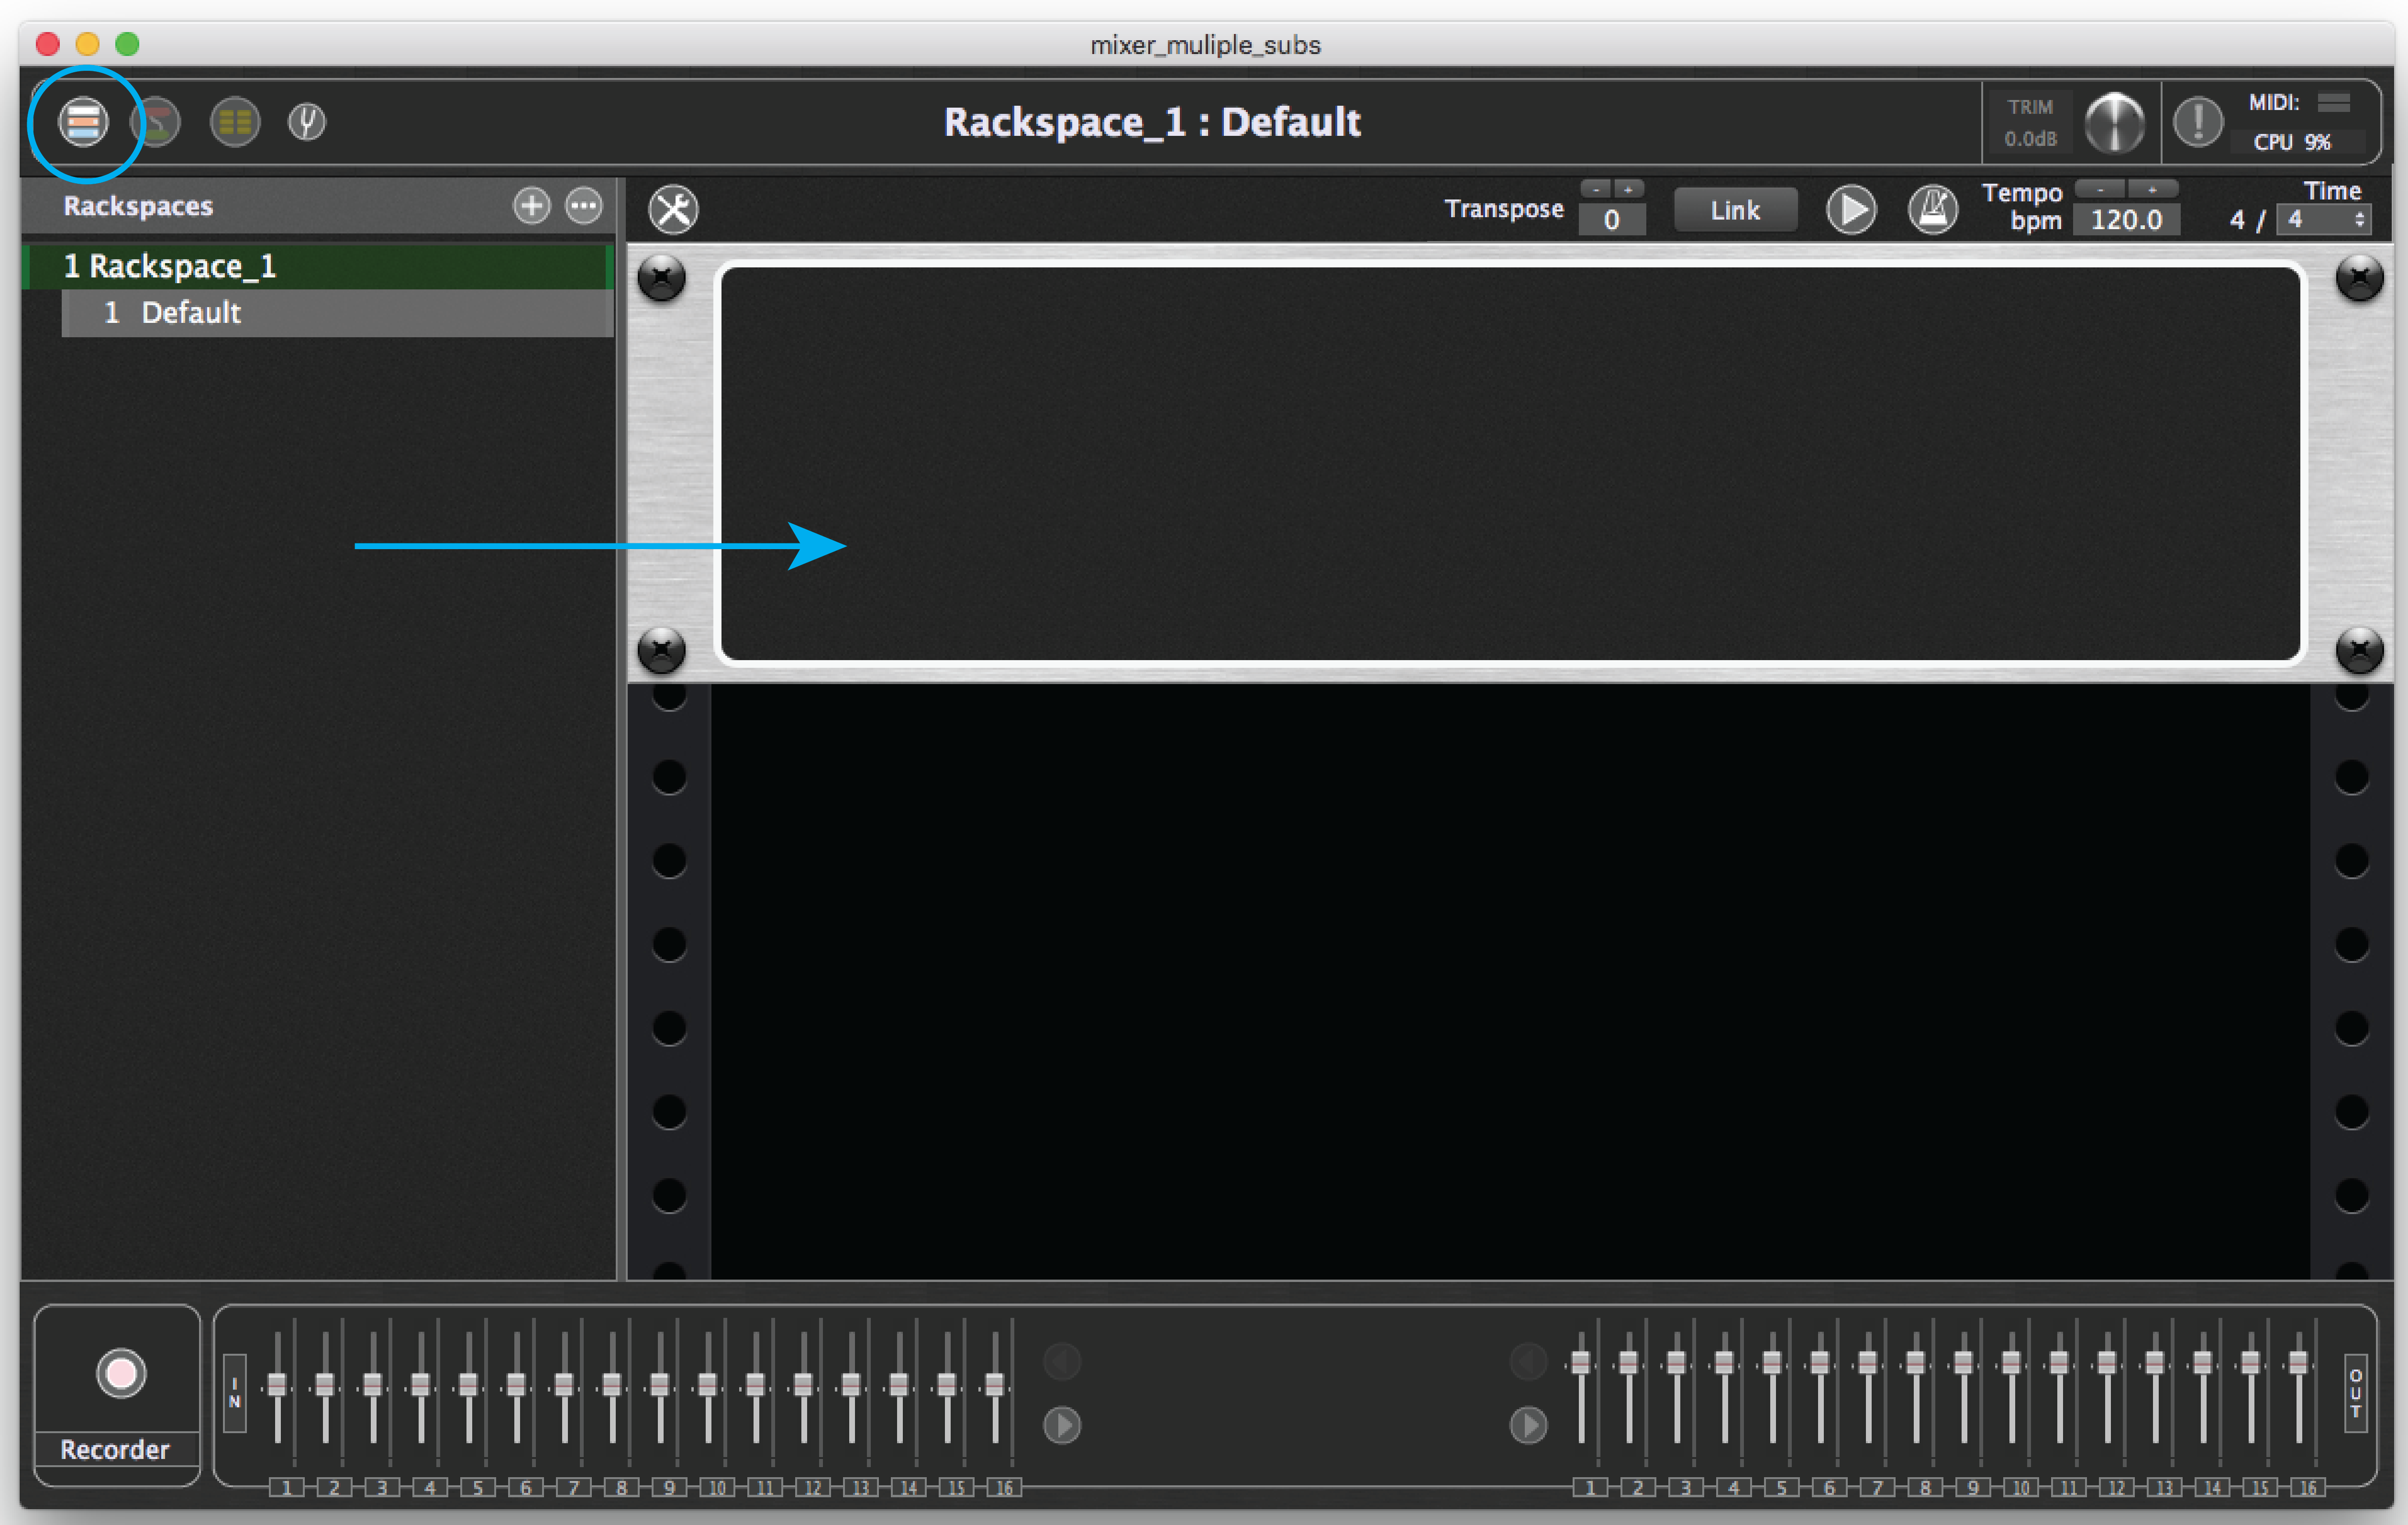
This screen, which is designed to look like a rack of one or more devices, allows you to create widgets (virtual knobs, sliders, buttons, etc.) that can be used to control various aspects of the sound created by your plugins. These widgets can be adjusted manually from your laptop and/or via physical controls (such as real knobs, sliders, and buttons) on your MIDI controller; with the use of an OSC app, they can also be adjusted remotely from iOS / Android tablets or smartphones. (See the OSC tutorial in this user guide for more information.)
When you switch to Performer View for the first time, you will see a rackspace containing a single empty panel (indicated by the arrow) into which you can insert widgets. (Extra panels can be added to group your widgets as desired; more about this below). You can create multiple rackspaces—each representing a collection of interconnected plugins—and you can switch from one rackspace to another manually from your laptop or via MIDI program change messages (with optional bank switching messages), or by using UP/DOWN commands from a MIDI pedalboard controller. You can also switch rackspaces with OSC commands (see Appendix A in this User Guide for more information).
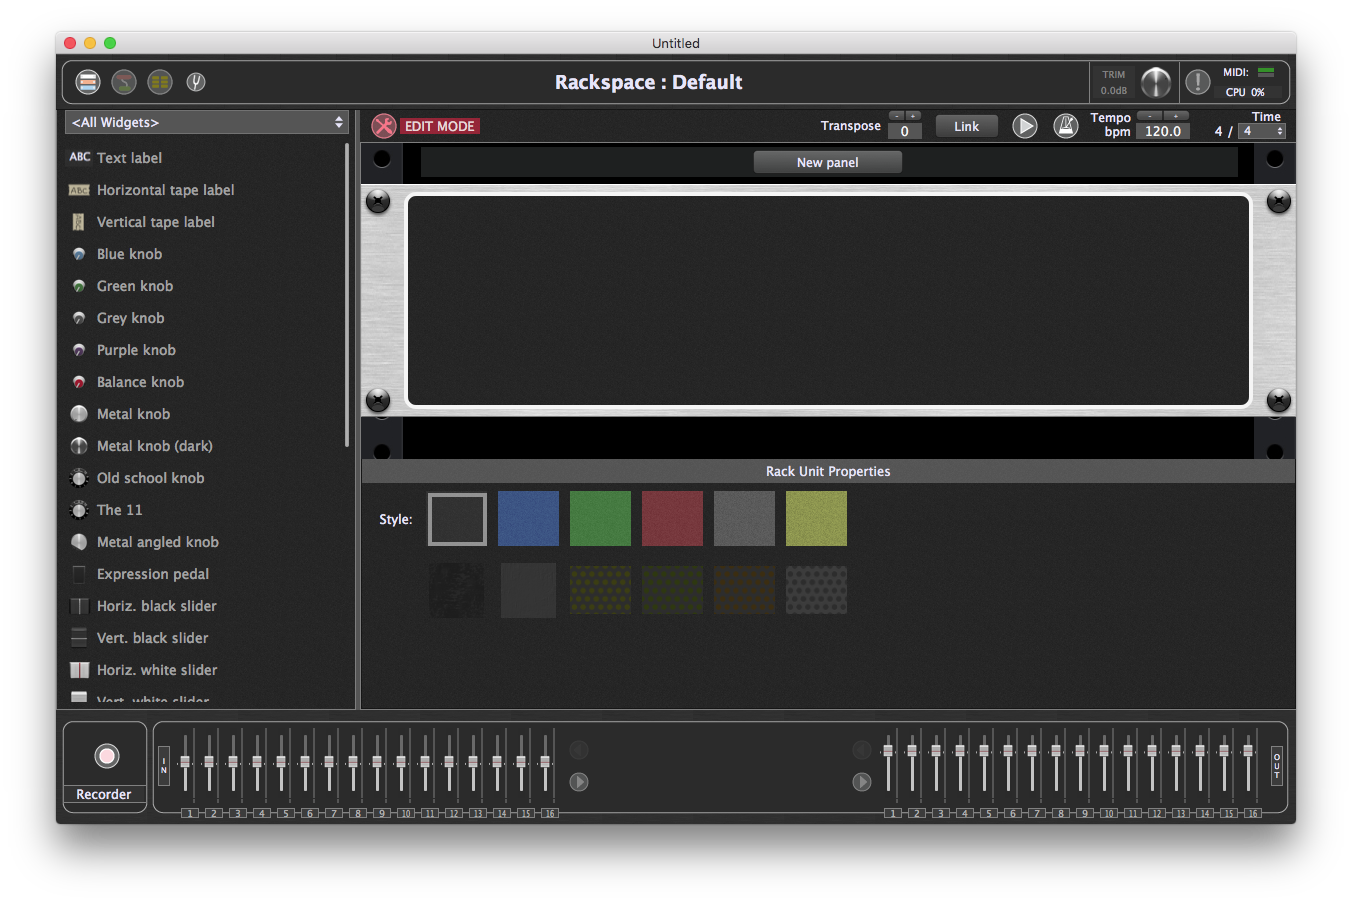
7.Create a widget. Click on the Widget Layout Designer icon (circled) to enter Edit mode.

In the screen shown below, the list of rackspaces on the left is replaced by a list of Gig Performer widgets, including virtual knobs and sliders of different shapes and colors, along with text labels, meters, buttons, and toggle switches.
Widgets can be placed anywhere in a panel by simply dragging them to the desired location. To start, scroll down the list of widgets and drag a toggle switch from the left column somewhere into the panel. It will appear highlighted within a white rectangle and you can resize it by dragging any of the corner points. (The smaller section directly beneath the white rectangle displays a caption for the widget.)
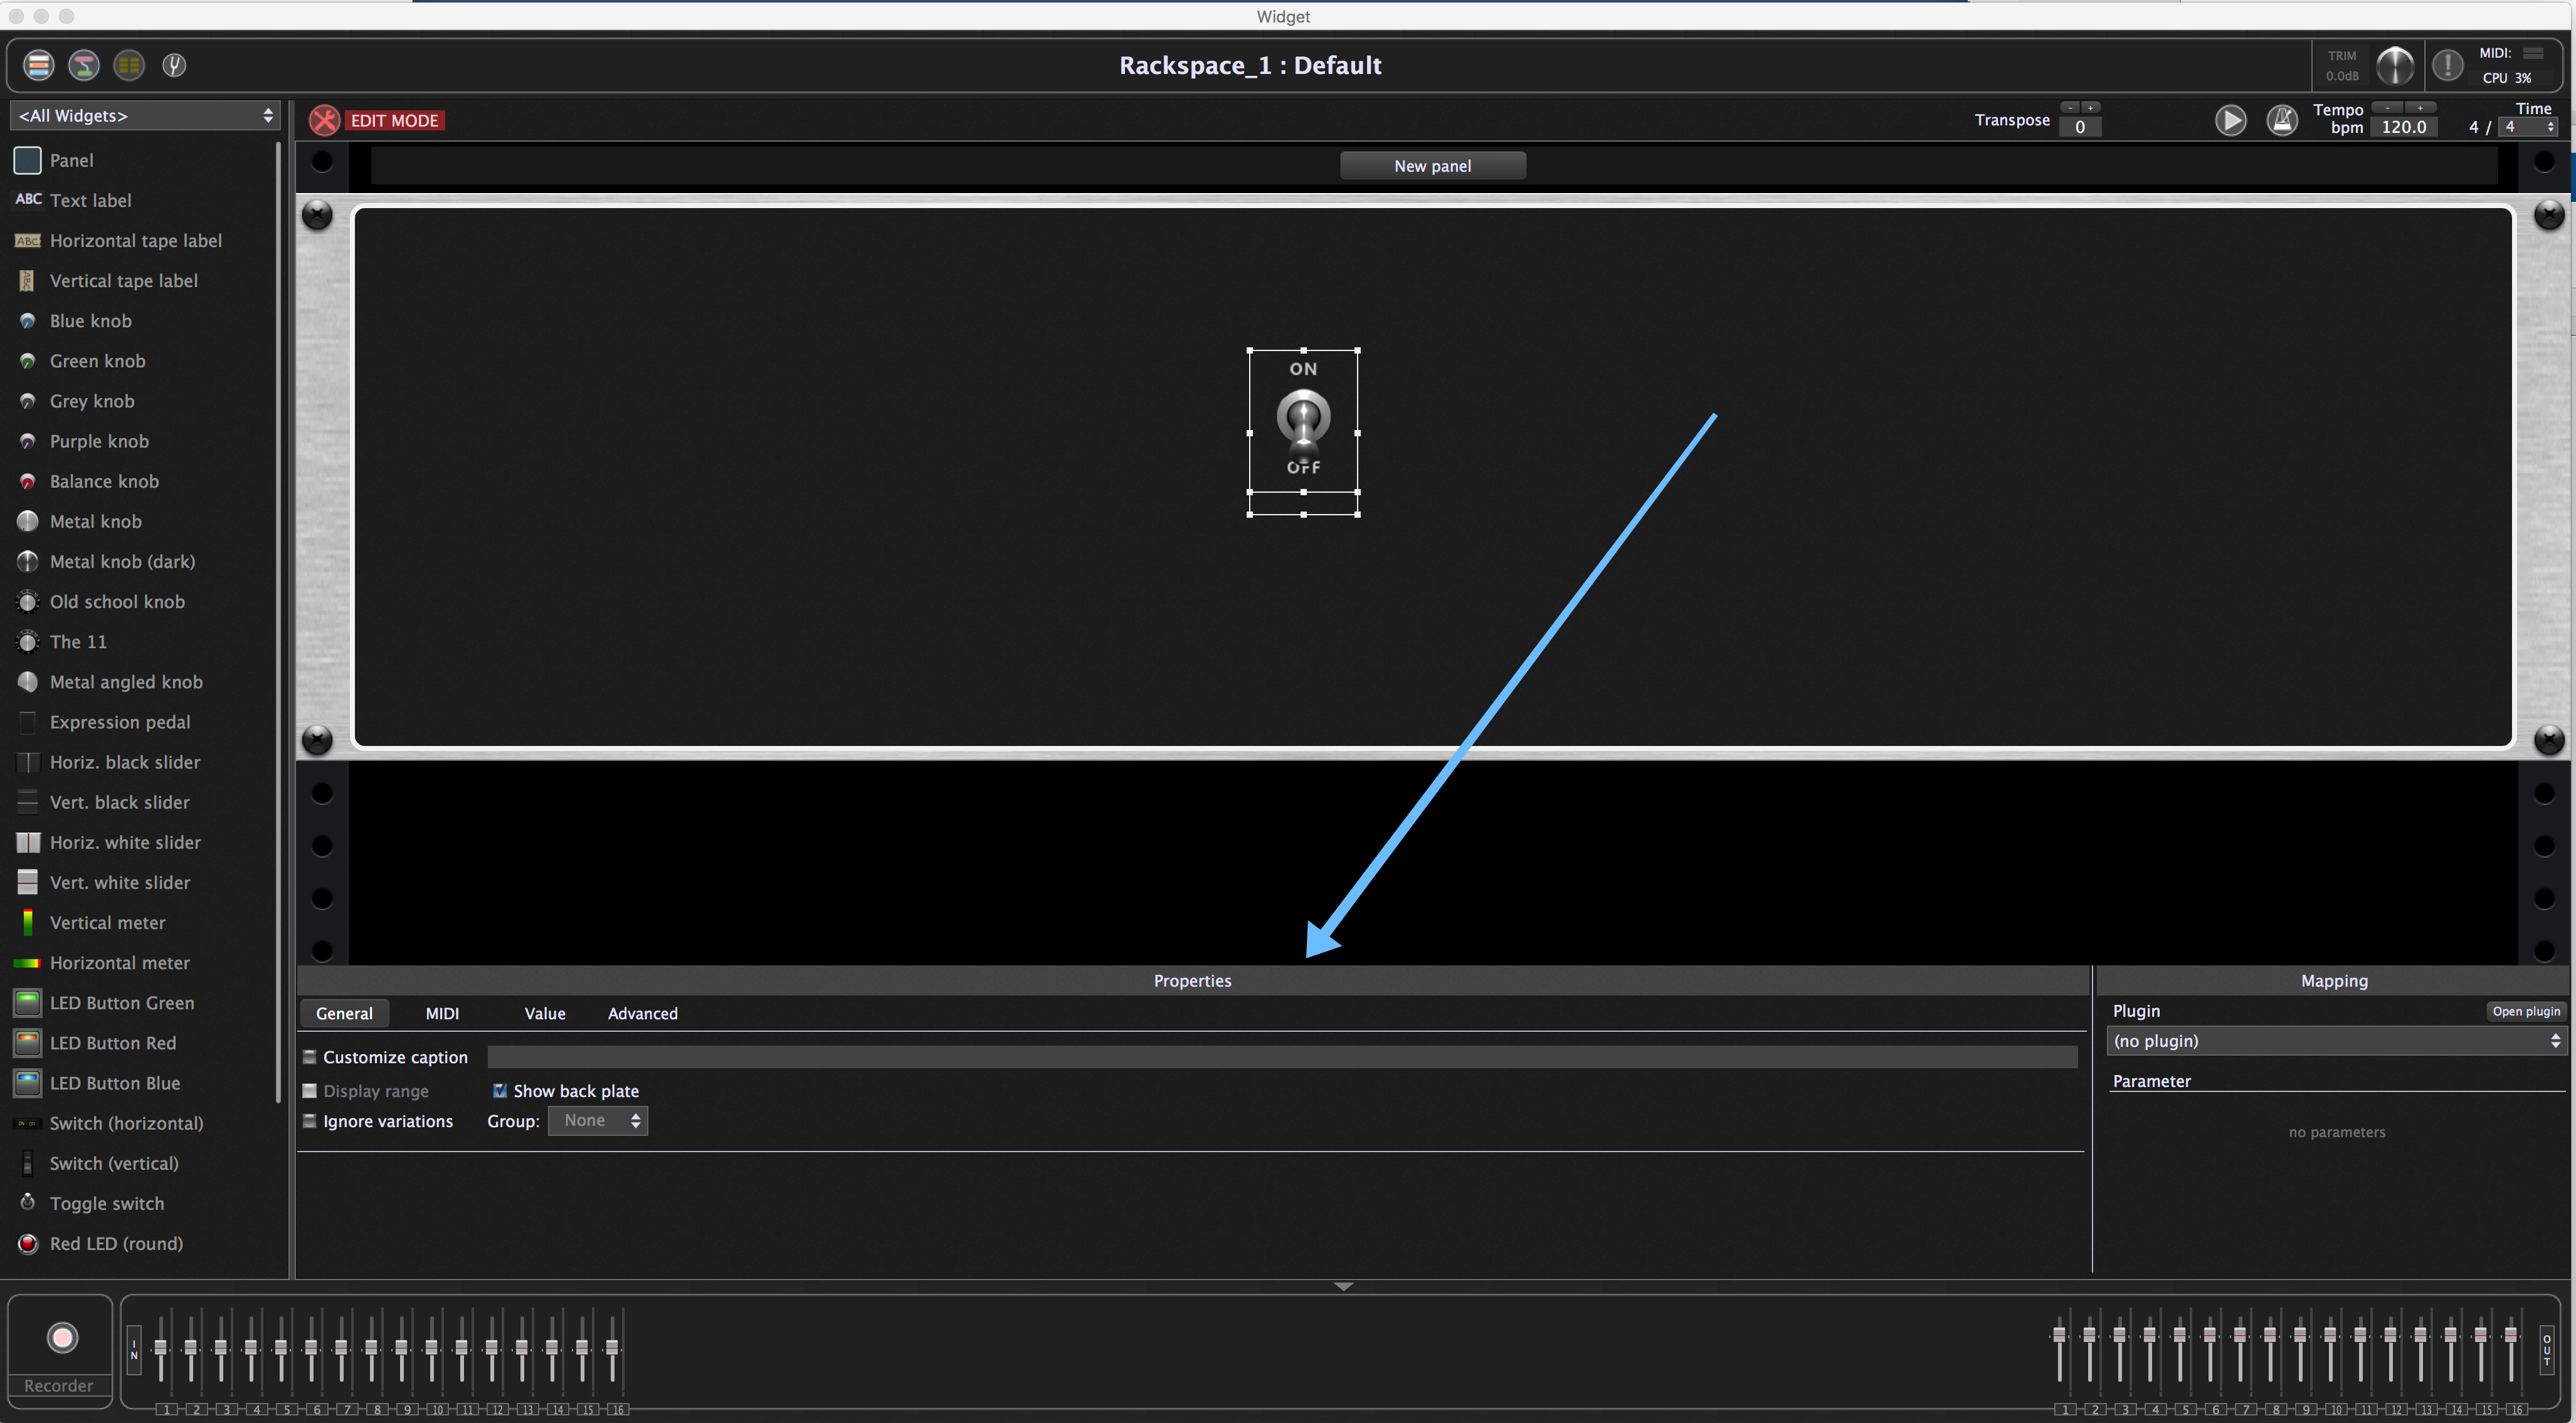
When a widget is highlighted, a Widget Properties “inspector” area appears below(indicated by the arrow). The “New Panel” button above it allows you to create additional panels within the rackspace if desired.The inspector is divided into two sections: Properties and Mapping. The Properties section on the left allows you to associate the widget with a physical button, knob or slider on a connected MIDI controller; it also allows you to optionally assign it a name that can be used with GP Script and OSC. The Mapping section on the right allows you to assign the widget to control a particular plugin parameter. Together, this enables you to use the buttons, pads, sliders and knobs on your controller to change parameters in real time.
Note: There are no technical differences between the various knob and slider widgets—only cosmetic differences. They all do the same thing: they generate values when you move them. But their different appearances allow you to easily group related items or have certain kinds of parameters (for example, all volume parameters) stand out clearly.
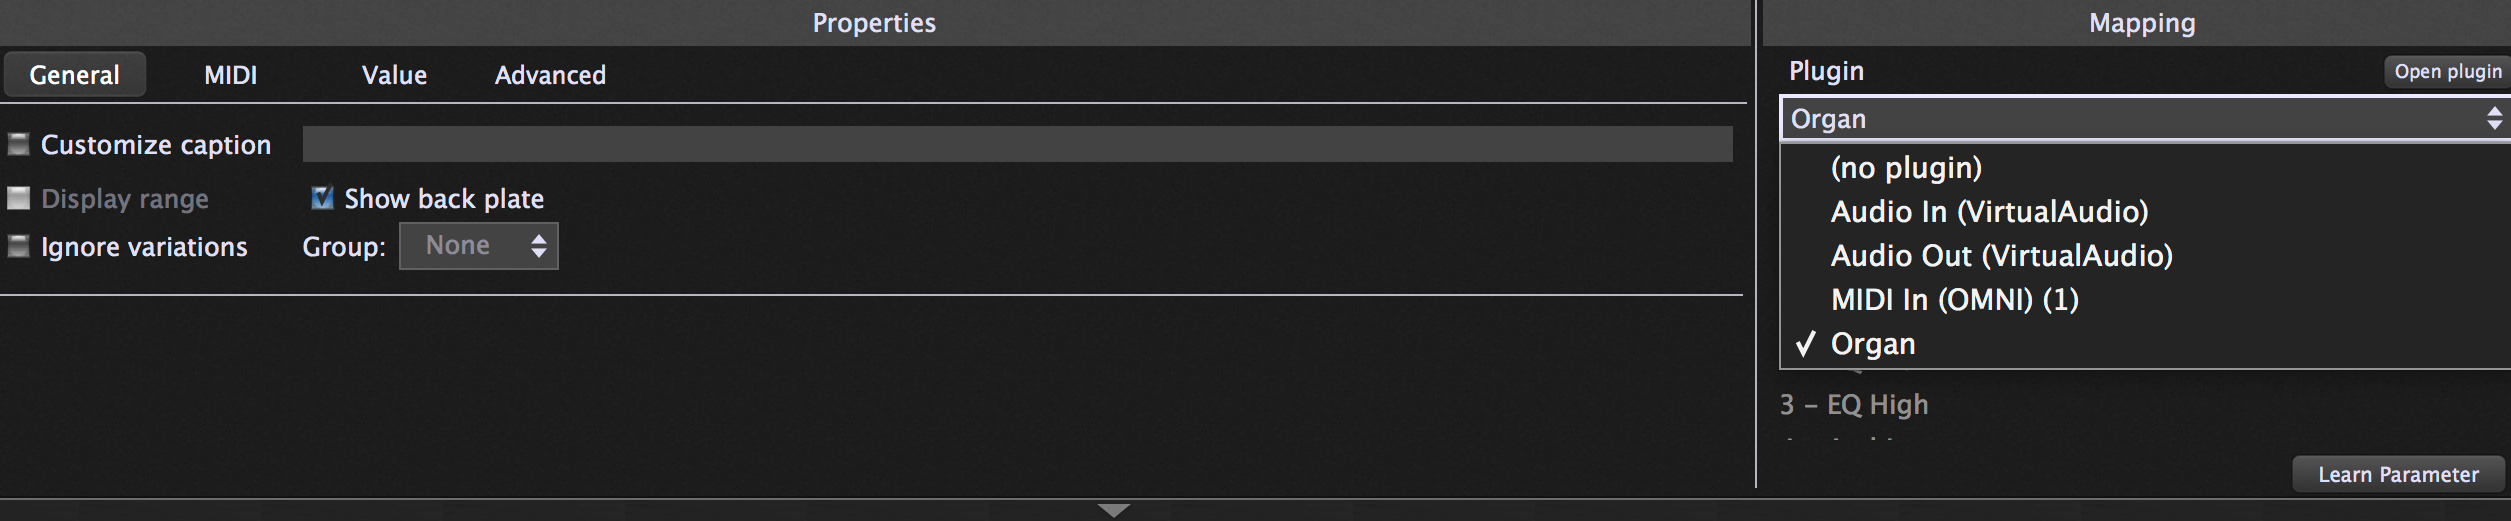
8.Assign the widget to a plugin. We’re going to use this toggle switch to select fast or slow Leslie speeds for our Hammond organ sound. (Pretty much every Hammond organ plugin offers such a parameter). Start by telling Gig Performer to which plugin you want to apply the widget. This is accomplished by clicking on the plugin list dropdown menu beneath the word “Plugin”in the mapping section of the inspector (indicated by the arrow).

The default selection when you first create a widget is always “(no plugin),” as indicated by the check mark to the left. Click on that (no plugins) item and you will be able to scroll down the list of plugins — currently, there are just four of them: your audio interface input and output, the built-in MIDI In (Omni) plugin, and your Organ plugin — and then select Organ.
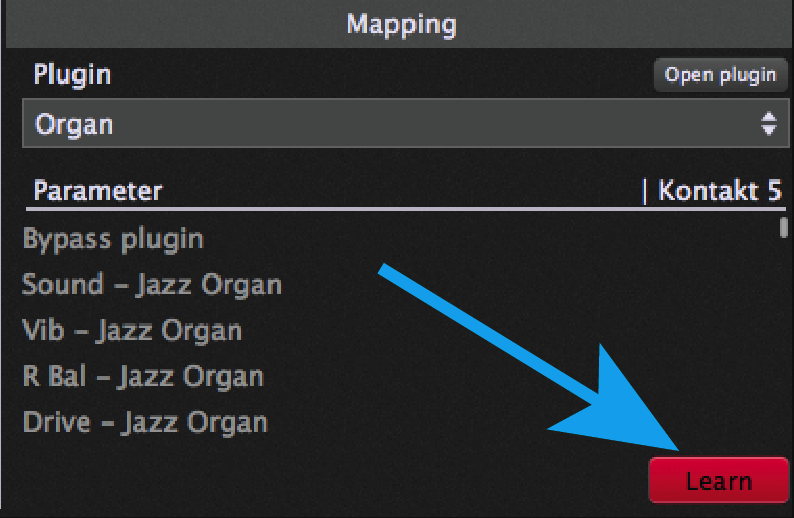
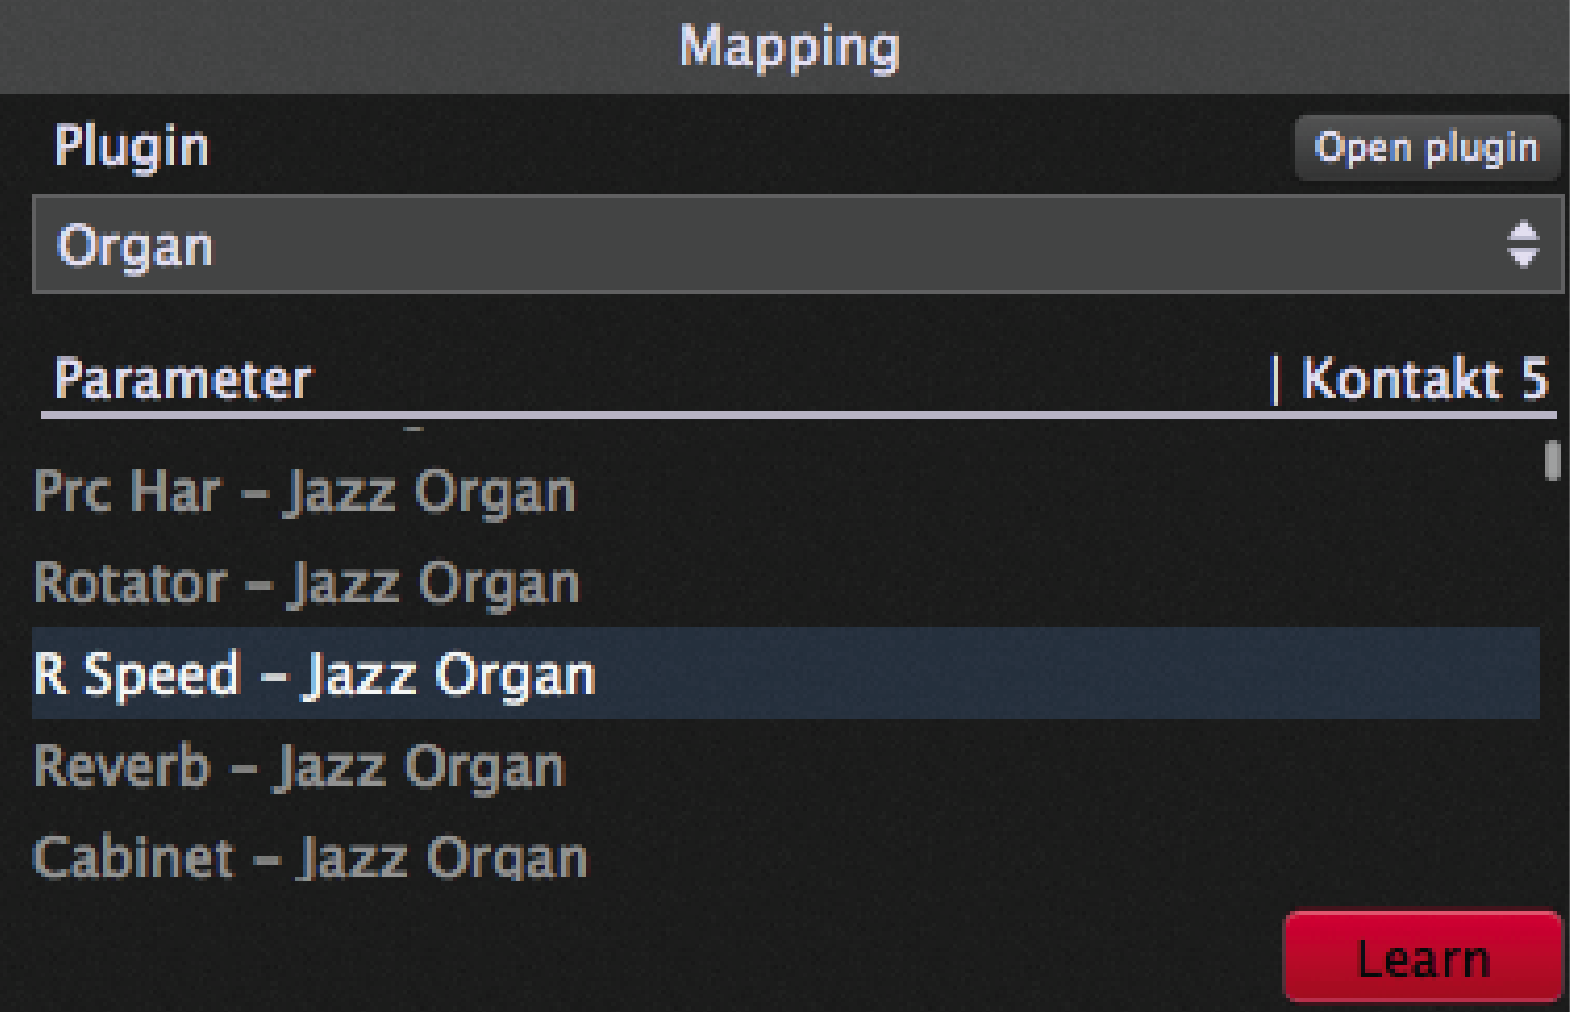
9.Assign the widget to a plugin parameter. Next, we have to tell Gig Performer which parameter we want to have the widget control. This is done in the Parameter area of the mapping section of the Widget Properties inspector, immediately below the plugin list menu.As soon as you select a plugin, this area is populated with a list of available parameters that can be controlled by widgets via host automation. This list always begins with the “Bypass plugin” option, enabling you to use a widget to simply bring the selected plugin in or out of the signal chain. The remainder of the controllable parameters are plug-in specific. Many plugins provide a list that is easily readable (i.e., “volume,”“overdrive,”“reverb level,”etc.), in which case all you need to do is to select the parameter you want the widget to affect, and you’re done with this part of the process. However, other plugins simply offer a list of parameter numbers, leaving you to decipher which number affects what aspect of the sound. Even if that’s the case, no problem, thanks to Gig Performer’s handy Learn mode ,which enables it to instantly recognize and learn the appropriate parameter. To use Learn mode, simply click on the “Learn” button in the right-hand Plugin section(as indicated by the arrow) so that it turns red.
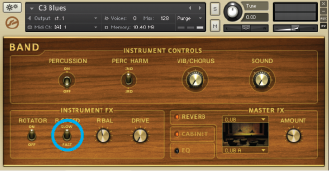
Doing so immediately opens the selected plugin’s editor window. Now all you have to do is use your mouse to move the control you want the widget to affect, and Gig Performer instantly learns the parameter. In the case of the “C3 Blues” instrument, the parameter is called “R Speed – Jazz Organ” (circled below).
10.Use the widget to control the sound. If you now close your plugin’s editor screen, the mapping section of the Widget Properties Inspector will display the parameter assigned to your widget (in this case, “R Speed - Jazz Organ”).
At this point, if you exit Edit mode by clicking on the Widget Layout Designer icon in red (above your rackspace), you will see a panel with your toggle switch, in this case also named “R Speed – Jazz Organ.” (We’ll show you how to change the name in a moment.) More importantly, if you click on the toggle switch with your mouse or trackpad, it will flip between the “ON” and “OFF” positions, and your organ sound will switch between a slow Leslie and a fast Leslie speed. (Try it!) When you’re done, disable Learn mode by clicking on the “Learn” button again so that it no longer lights red.
If for some reason a widget works the opposite way you’d like it to (for example, if the “ON” position of a toggle switch gives you a slow Leslie speed instead of the fast speed), you can easily change that in Edit mode. Just click on the widget to open the Inspector, then click on the “Invert value” button in the Properties section on the left; alternatively, you can swap the MIN and MAX values. Click here for more information.
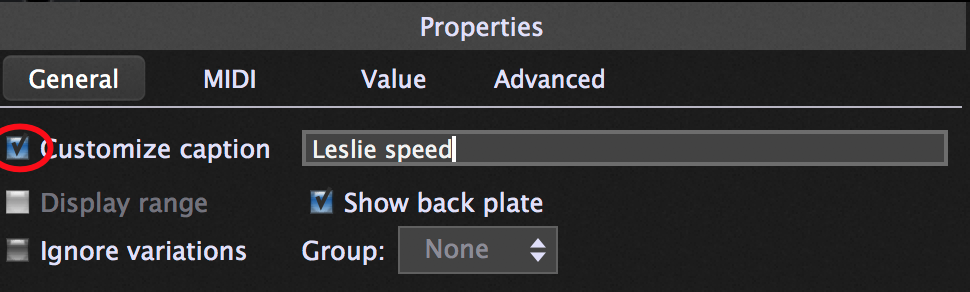
Edit mode also gives you the ability to rename the caption below a widget. To do so, simply click on the “Customize caption” button (circled below) in the Properties section and type in a new name. Let’s enter “Leslie speed” as the caption:
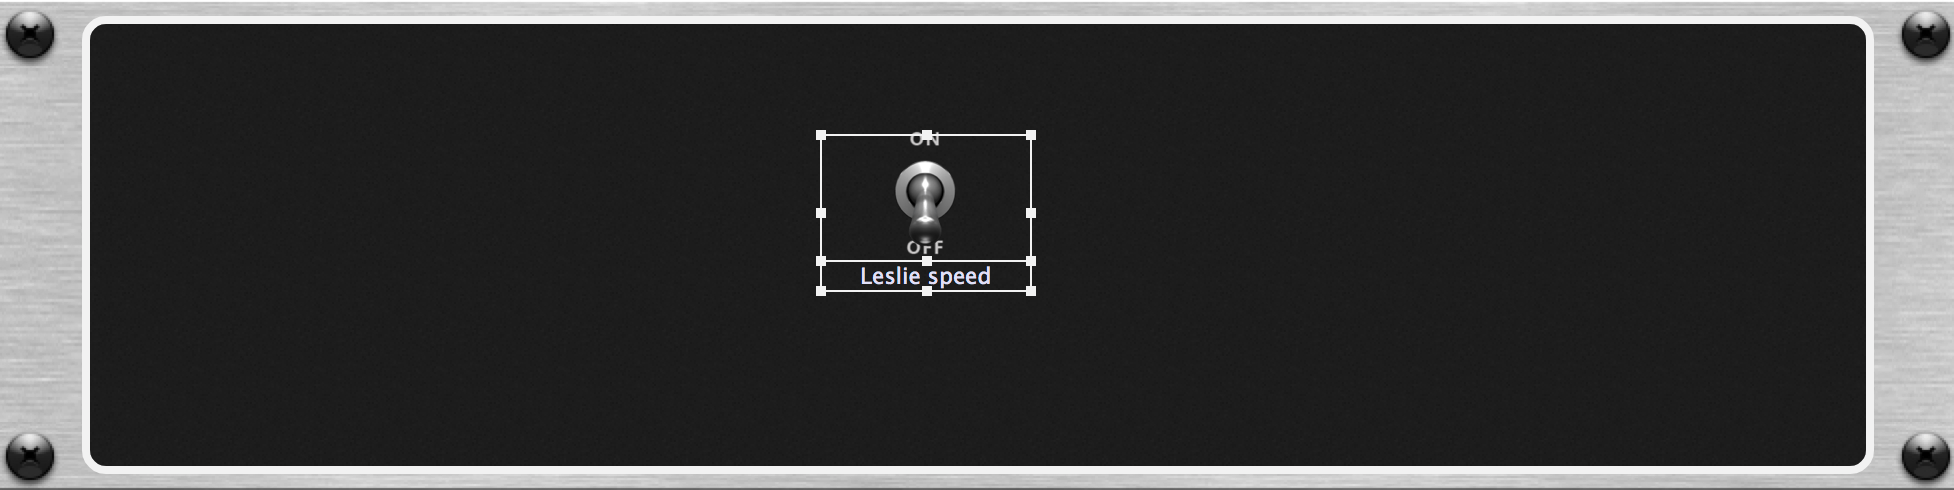
As you may notice, a name of more than a few characters may not display properly within the default caption space. No problem! As mentioned earlier, the white rectangle that appears around the selected widget (and caption below) in Edit mode allows you resize it (and the accompanying caption) by dragging any of the corner points. Here we’ve made it considerably larger so as to accommodate the new “Leslie speed” caption:
11.Associate a widget with a physical device. The real power of Gig Performer is that it gives you the ability to associate widgets with physical devices like the knobs, sliders, pads, buttons, and switches on your MIDI controller, as well as any pedals connected to it. You can even control widgets by playing specific notes, or by pressing down on keys harder.
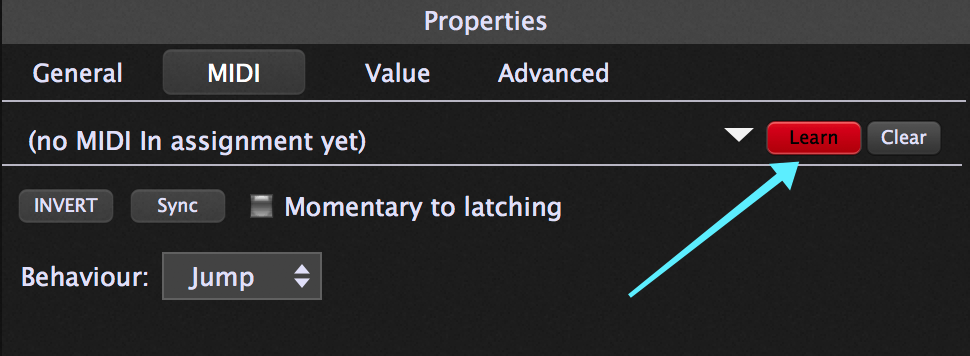
Once again, this process is made easy by a Learn mode, which enables Gig Performer to instantly recognize which physical device you want to use to control the selected widget. To enter this mode, click on the MIDI tab in the left-hand Properties section of the inspector and then click on the “Learn” button (indicated by the arrow) so that it turns red.
Now all you have to do is touch or move any switch, button, knob, slider, or pad on your MIDI controller, play any note on your keyboard, or step on any connected pedal. Gig Performer instantly learns the MIDI message transmitted by that device, and the toggle switch widget moves at the same time. Try it!
If your keyboard controller has pads, they likely transmit MIDI note-on/note-off messages (unlike switches and buttons, which typically transmit MIDI controller messages). For that reason, when using notes or a pad to control an on/off widget such as the toggle switch, you may need to click on the “Treat momentary as latching” button in the MIDI section of the Widget Properties inspector for them to work correctly. Click here for more information.
When you’re satisfied with the physical controller you’ve selected, click the “Learn” button again so that it no longer lights red.
Tip: While in “Learn” mode, you can click on different widgets and keep associating them with plugin parameters or physical controls—useful if you want to create all your widgets first and then associate them with parameters and physical controls later.
Important note: While you can use continuous physical controllers like knobs or sliders to control on-off widgets such as buttons or toggle switches (and vice versa: physical on-off controllers such as switches, buttons, or pads can be used to control continuous widgets such as knobs or sliders), this can get awkward and is not recommended practice!
Important note: Using keys to control widgets requires some extra care. When you first press a key while Gig Performer is in Learn mode, it will recognize and learn a Note On event. However, if you release the key while Learn is still enabled, Gig Performer will recognize and learn a Note Off message. In addition, if your keyboard controller generates aftertouch (channel pressure) messages, they will occur as you push the key harder in-between the Note On and Note Off messages. If Learn mode is still enabled while a note is being held, Gig Performer may well recognize and learn one of those values instead of the desired Note On or Note Off message.
12.Name your rackspace. Double-clicking on the rackspace name (currently the default name “Rackspace”) in the upper left-hand corner of the screen brings up the Rackspace Properties dialog:
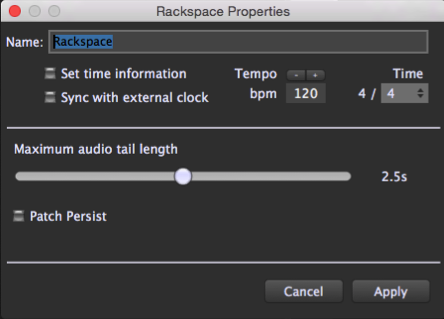
There are a number of options provided here, all of which are discussed in the Reference section of this User Guide. For now, simply type in a new name—let’s use “Organ with Leslie speed control”—and click on Apply, which will close the dialog.
13.Create a variation. As discussed in the Basic Terminology section of this User Guide, a variation is essentially a rackspace preset which contains the same plugins and interconnections but with different widget settings. Variations allow you to leveragethe plugins in a single rackspace to create many different sounds without having to duplicate the rackspacefor each sound. It’s also a great way to save on memory! For example, you could have multiple virtual instrument plugins feeding a mixer plugin,and then mutedifferent plugins, or have a different mix of them,in each variation. Or you could connect multiple effects (i.e., phasing, flanging, tremolo, reverb, echo, etc.) and have different ones enabled or disabled in each variation. Rather than creating a rackspace for an instrument with phasing, and another for the same instrument with echo, the same thing is accomplished by two variations of a single rackspace containing both phasing and echo.
As an example, let’s create one variation of our “Organ with Leslie speed control” rackspace that is set to a slow Leslie speed, and another that is set to a fast Leslie speed. You can freely switch between variations instantaneously—and with no interruption of sound—either manually, with up/down pedals, or via MIDI program change messages.
Variations contain only the value of widgets, which are connected to plugin parameters. Parameters not attached to widgets are not stored in variations.
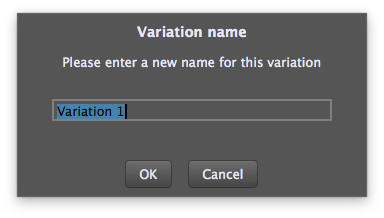
To create a new variation, either go to ortypeCmd-N. A dialog will open asking you to type in a new name. Let’s call this variation “Leslie Fast.”
You’ve probably noticed that there’s already a variation for the “Organ with Leslie speed control” rackspace you created, with the name “Default”:
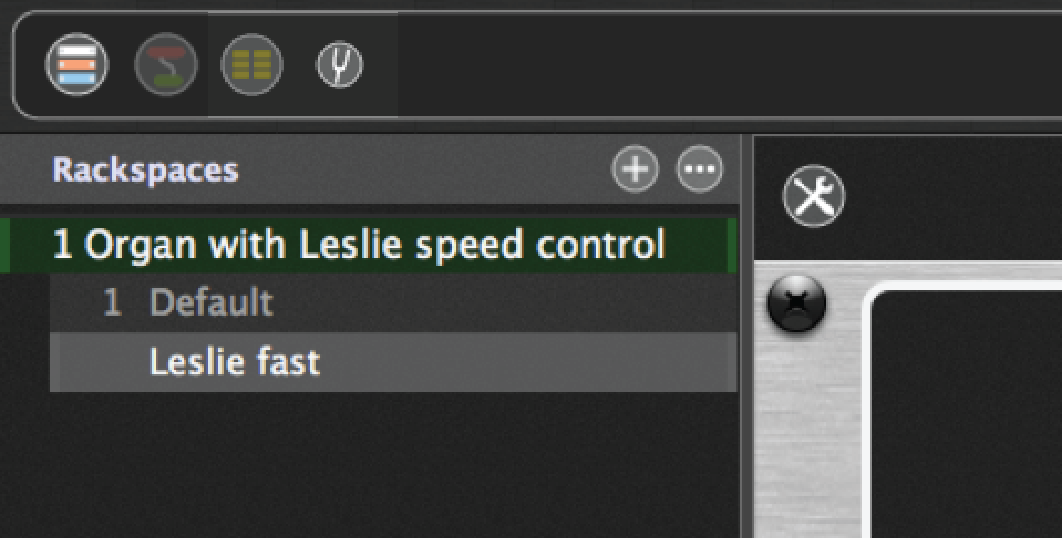
Every rackspace automatically comes with at least one variation, initially named “Default.”(The reason is that, technically, only variations—not the rackspaces themselves—can be selected with MIDI program change messages.) Now that we’ve created a second variation, let’s go ahead and rename the first one. To do so, double-click on the name, which will bring up the Variation Properties window:
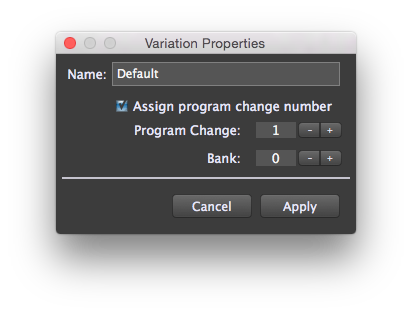
Enter the name “Leslie slow” in the Name field. If you want to switch to this variation by sending Gig Performer a MIDI program change message, be sure the Assign program change number box is checked, and set the program change number and, if desired, the bank number, using the “+” and “-“ keys next to the fields, or by simply clicking in the fields directly and entering the values. When you’re done, click on Apply, which will save the settings and close the dialog.
Now all that remains is to make sure the toggle switch widget is set to the “Off” position—something you can do either manually from your laptop or by moving the associated physical device on your MIDI controller (as set in step 11 above) and that it is set to the “On” position when you click on the “Leslie fast” variation. For more information about switching between variations with MIDI pedals or a MIDI controller, click here.
14.Create a new rackspace with multiple variations. As discussed in the Basic Terminology section of this User Guide, a rackspace can actually be pretty much anything you like: It can represent a single sound or all the elements needed for an entire song—or even just one part of a song. You can switch from one rackspace to another instantaneously, either manually, with up/down pedals, or via MIDI program change messages.
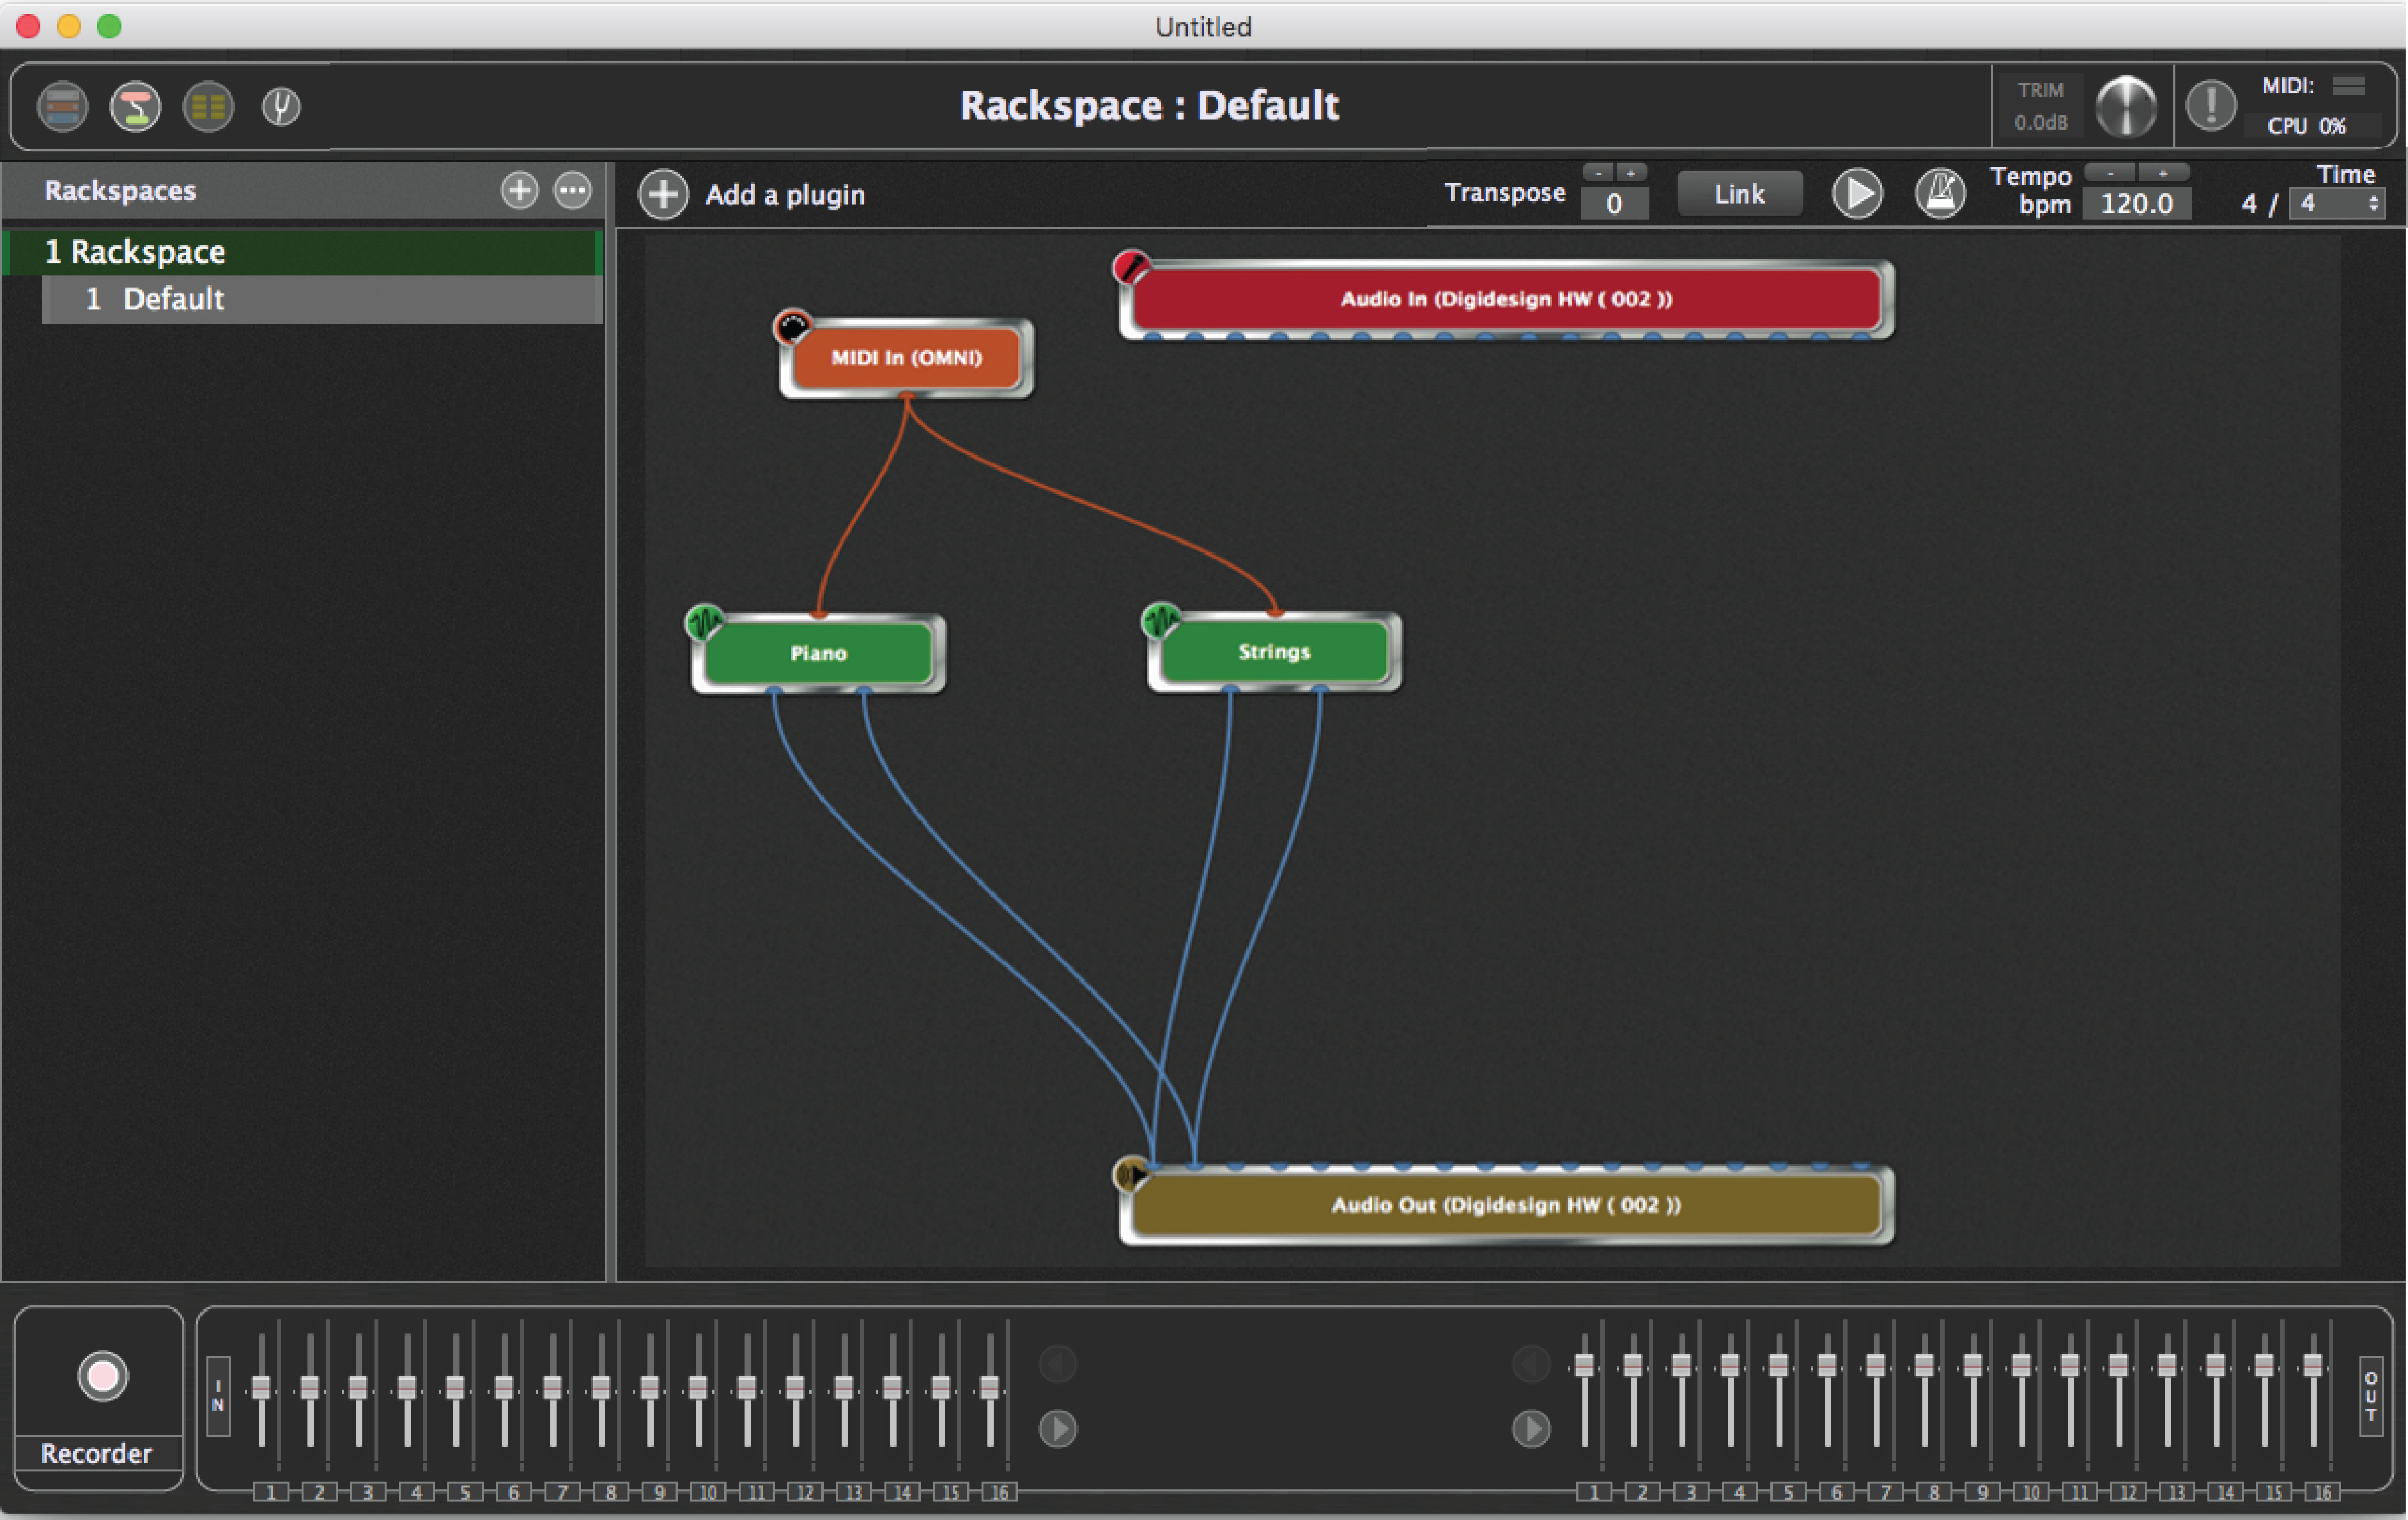
With that in mind, let’s create a new rackspace by going to , by using the Cmd-Shift-N (Mac)/Ctrl-Shift-N (Windows) keystroke commands, or by clicking on the “+” icon above the list of rackspace names. In the Rackspace Properties window that opens, rename it “Piano and strings,” then, following the procedures outlined earlier in this tutorial, insert two plugins: one generating a piano sound and the other generating a string sound. Rename them “Piano” and “Strings” respectively, and make the appropriate MIDI and audio connections. Your Connections View screen should now look something like this:
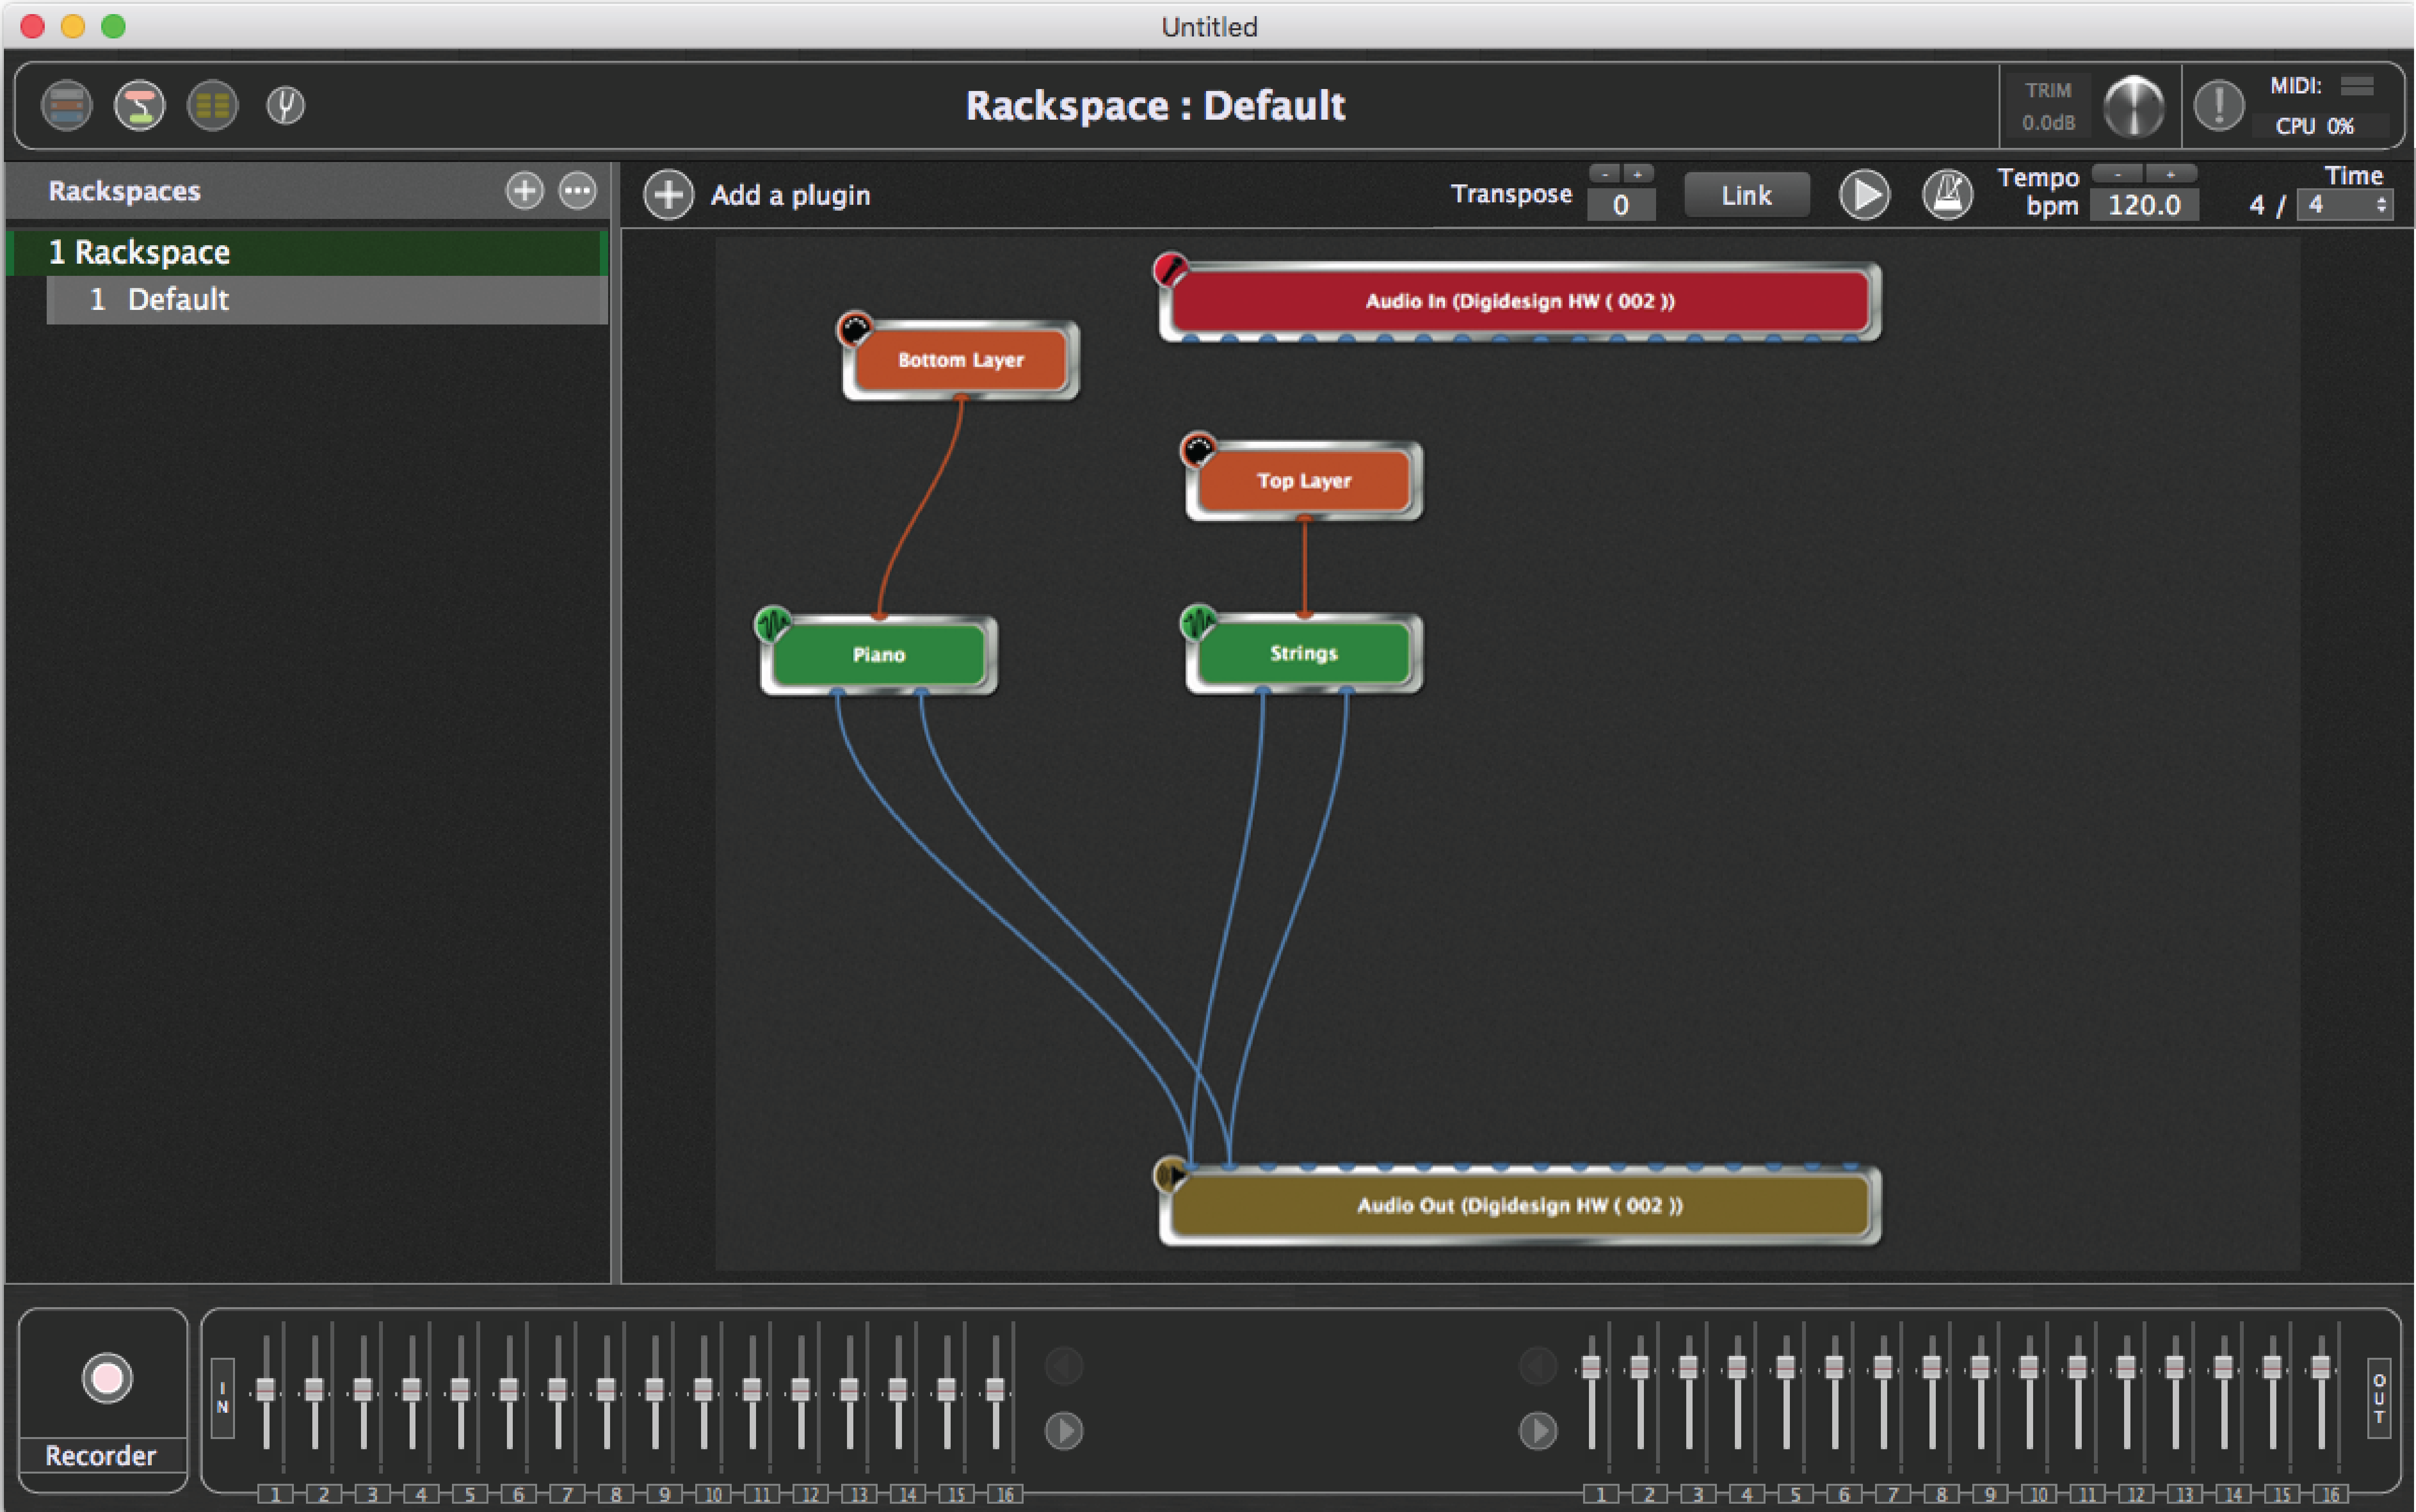
Gig Performer allows a single MIDI input block to control two or more plugins simultaneously, so if you now play your keyboard controller, you should hear both sounds, layered together. However, we’re going to create a keyboard split so that the strings only layer with the piano when notes above Middle C are played. Doing this requires separate MIDI input blocks, so right-click in the Connections View screen and add a second “MIDI In (OMNI)” block and rename it “Top Layer,” then move the orange connection from the first “MIDI In (OMNI)” block to the “Top Layer” block. Finally, rename the first “MIDI In (OMNI)” block as “Bottom Layer.” Your screen should now look something like this:
Next, we’ll create the keyboard split. Double-click on the “Top Layer” MIDI Input block to open its plugin editor:
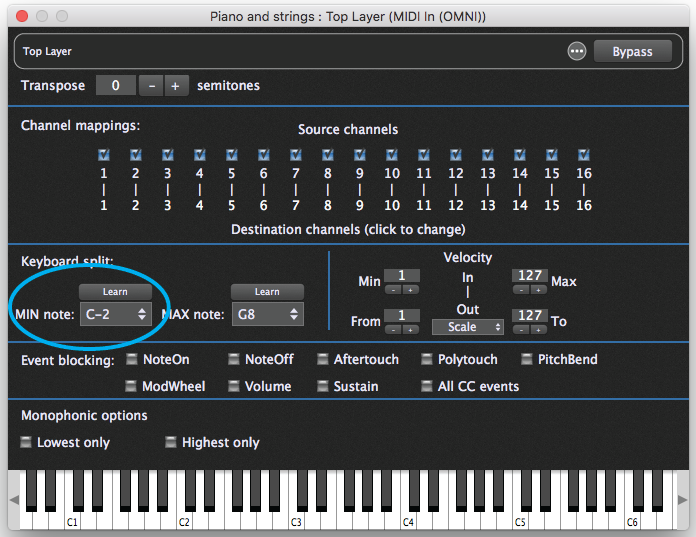
Click on the Learn button above the “MIN note” parameter (circled above) and play“C3”on your MIDI keyboard or other controller; the notes below C3 on the virtual keyboard become darkened, indicating that they are inactive. (Notes outside the specified MIN and MAX note range are always darkened this way.)
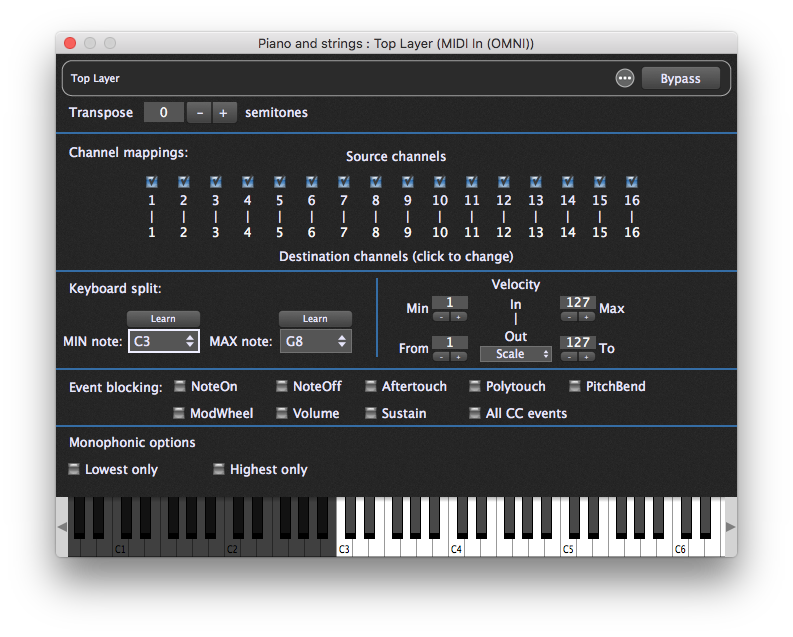
Your keyboard split is complete! If you now play your keyboard controller, you’ll only hear strings when Middle C or higher notes are played. (If you’d prefer hearing the strings on their own when notes Middle C or higher are played instead of layering them with the piano, simply set the Max note for the “Bottom Layer” MIDI In block to B2.)
Now let’s add widgets that allow the two sounds to be turned on and off individually. Switch to Performer View and enter Edit mode, then drag two LED Button widgets into the rack panel. Assign one to the “Bottom Layer” MIDI In block (controlling the piano sound) and set it to the “Bypass plugin” parameter, then assign the other to the “Top Layer” MIDI In block (to control the strings sound) and set it to the “Bypass plugin” parameter as well. Bypassing the MIDI In block instead of the synth plug-in means that a string of Note Off messages are sent when the block is bypassed, shutting off any notes still sounding when you mute the instrument.
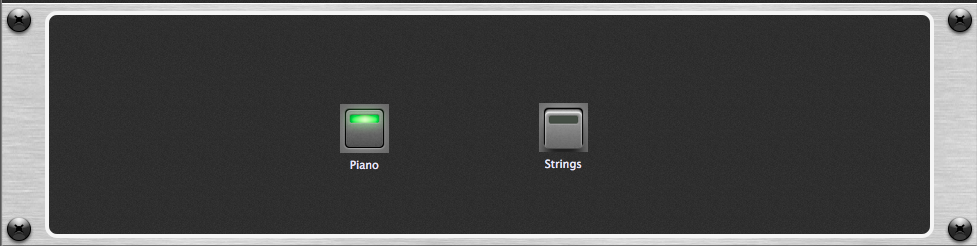
Click “Invert value” (in the left-hand Properties section) so that the “On” (button lit) position of the LED allows the associated plugin to be heard and the “Off” (button unlit) position causes the associated plugin to be bypassed. Caption each widget accordingly and test to make sure everything is working as expected. (Feel free to assign either or both widgets to physical devices on your MIDI controller if you like.) Your rackspace should now look like this:
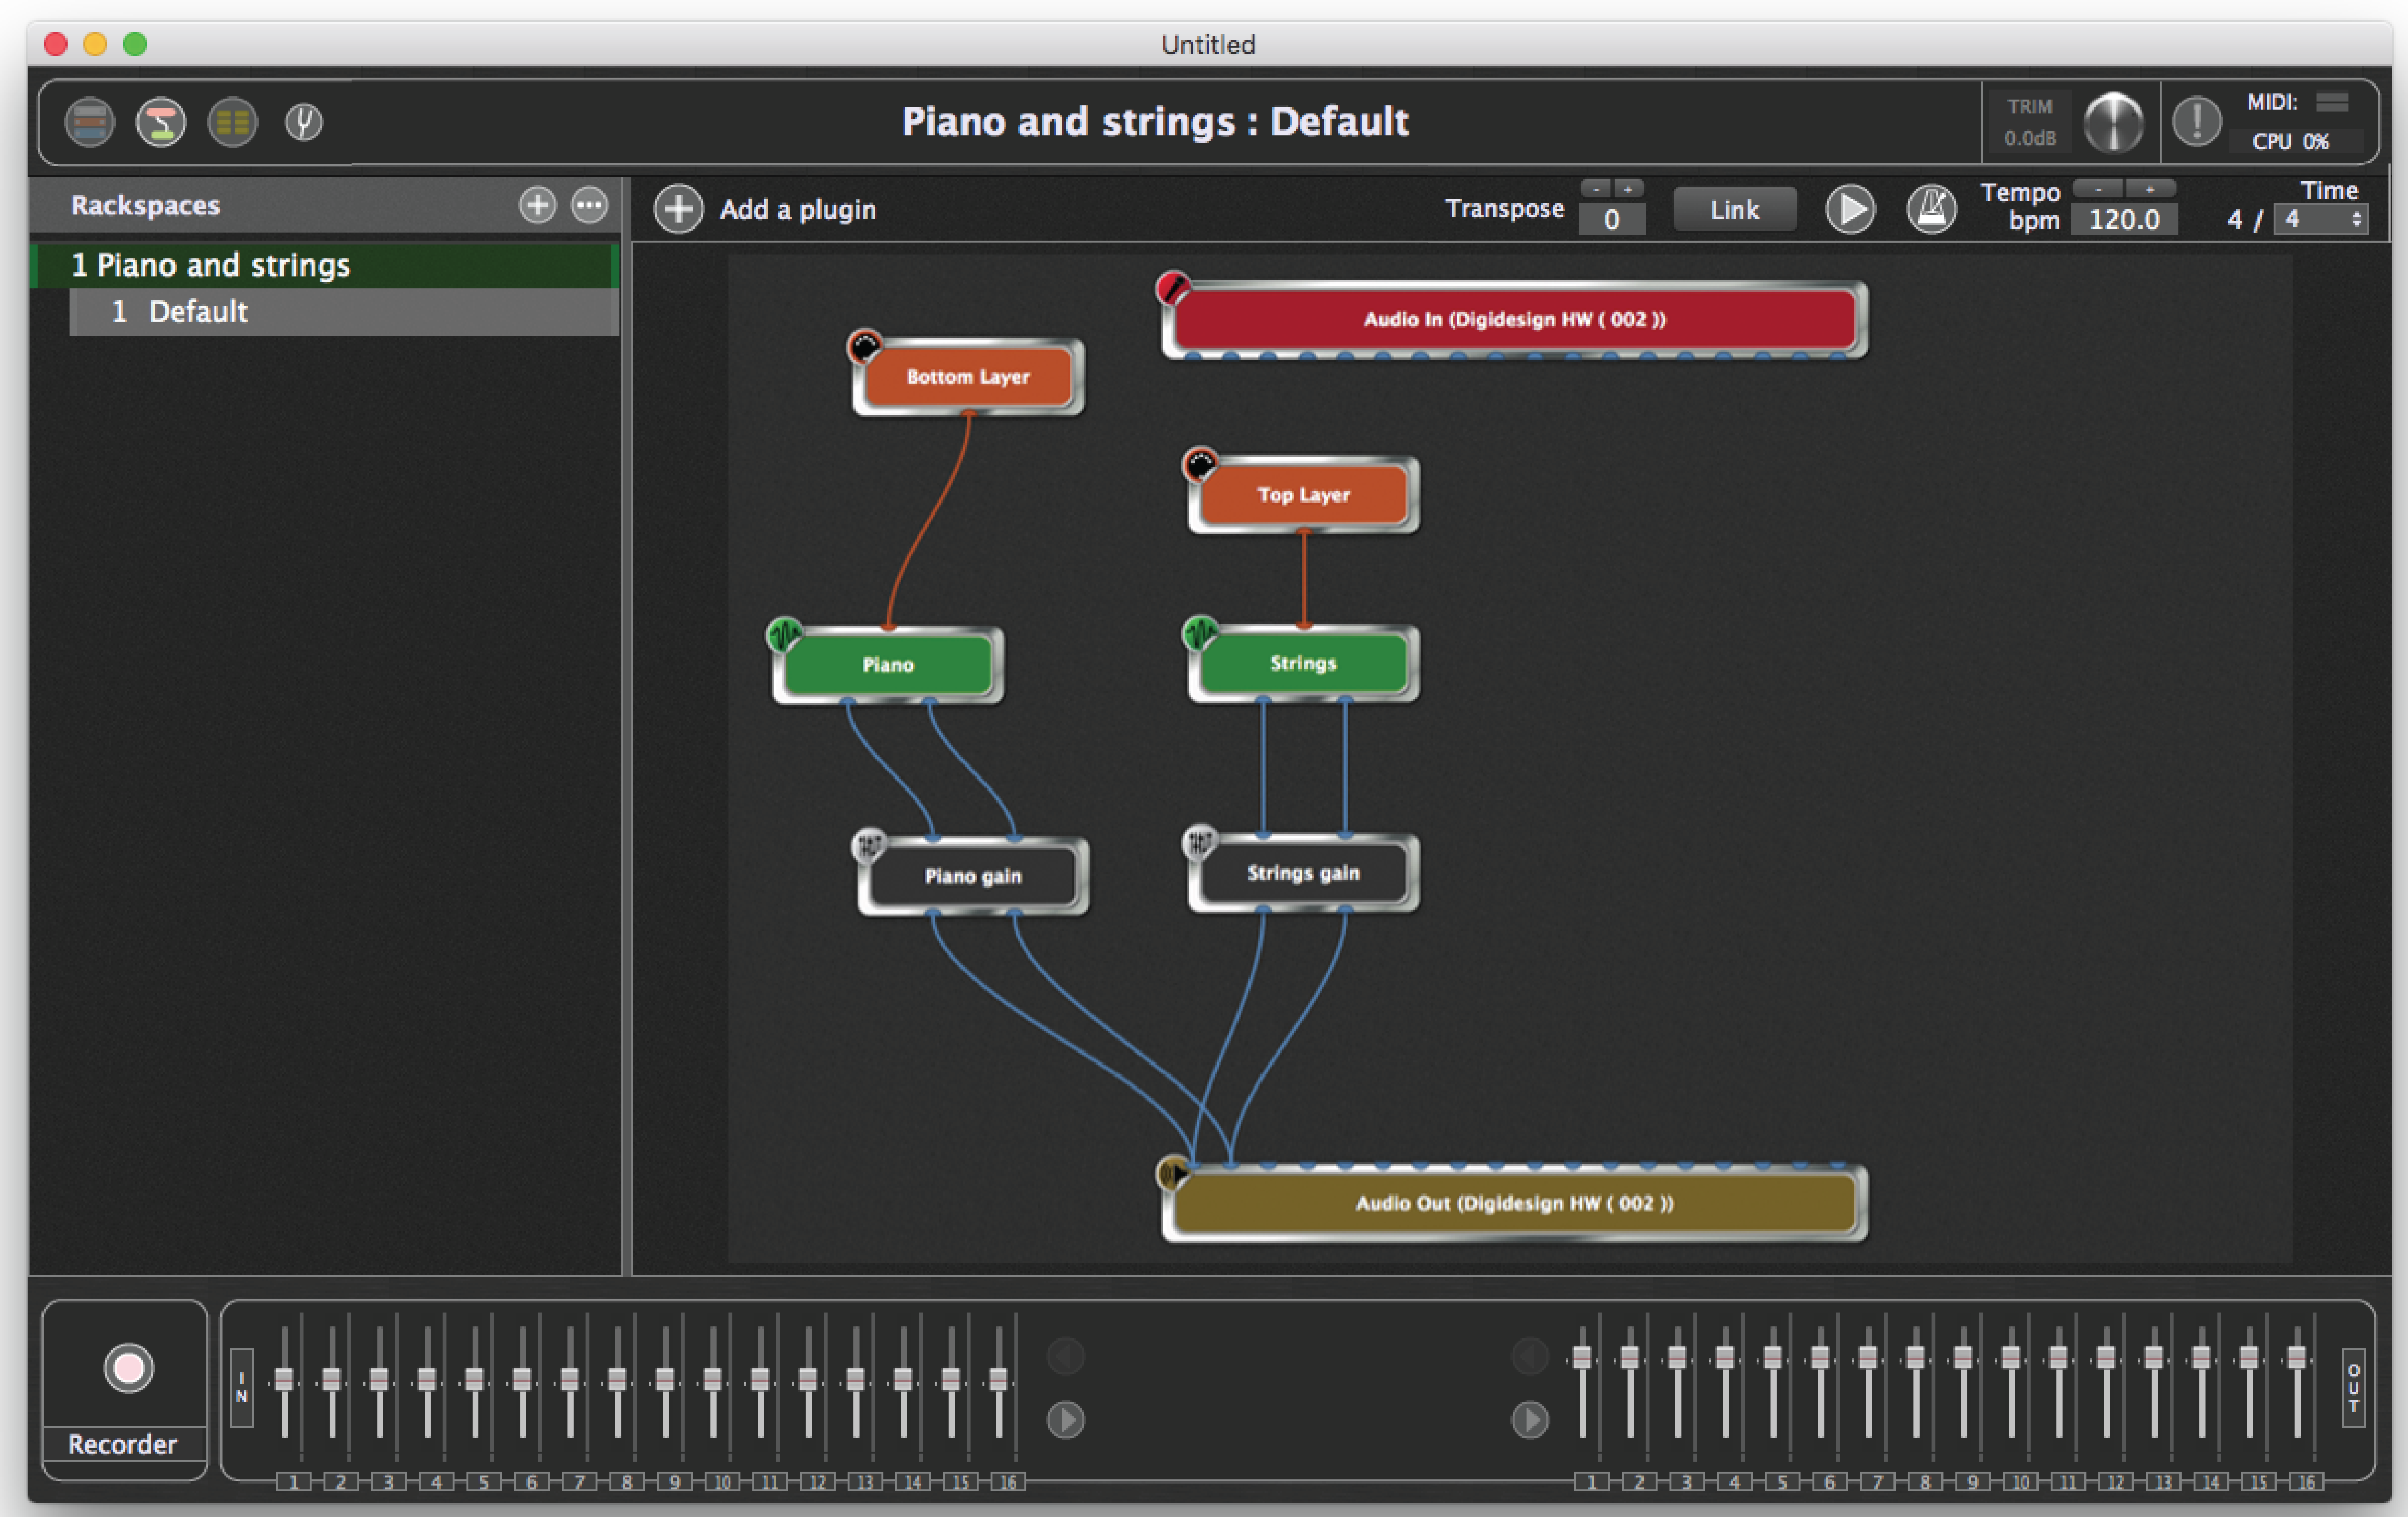
Next, we’ll add a new panel and slider widgets to control the levels of the two sounds. (Rackspaces can contain multiple panels, and Gig Performer provides options to resize them if your laptop provides limited screen real estate.) Although some plugins offer master volume parameters, many do not, and so the best way to accomplish this is with the use of the Gain and Balance plugin bundled with Gig Performer. Accordingly, return to Connections View and insert two Gain and Balance plugin blocks. Connect one between the audio outputs of your “Piano” plugin and your audio interface’s output block, and rename it “Piano gain.” Then connect the other between the audio outputs of your “Strings” plugin and your audio interface’s output block, and rename it “Strings gain.”
If you connect the audio outputs of multiple plugins to the input of another plugin, the signals will be mixed automatically. If you’d like to take control of that mix and create custom blends, simply insert one of Gig Performer’s bundled Audio Mixer/Router plugins, or one of its Gain plugins (Gain Control, Gain and Balance, or Gain and Balance (m->s)) in-between, then adjust their volume controls as desired. These plugins can also be used as sends to effects such as reverb plugins. See the Configuring Audio Plugins tutorial in this User Guide for an example of how to do this.
Your screen should now look like this:
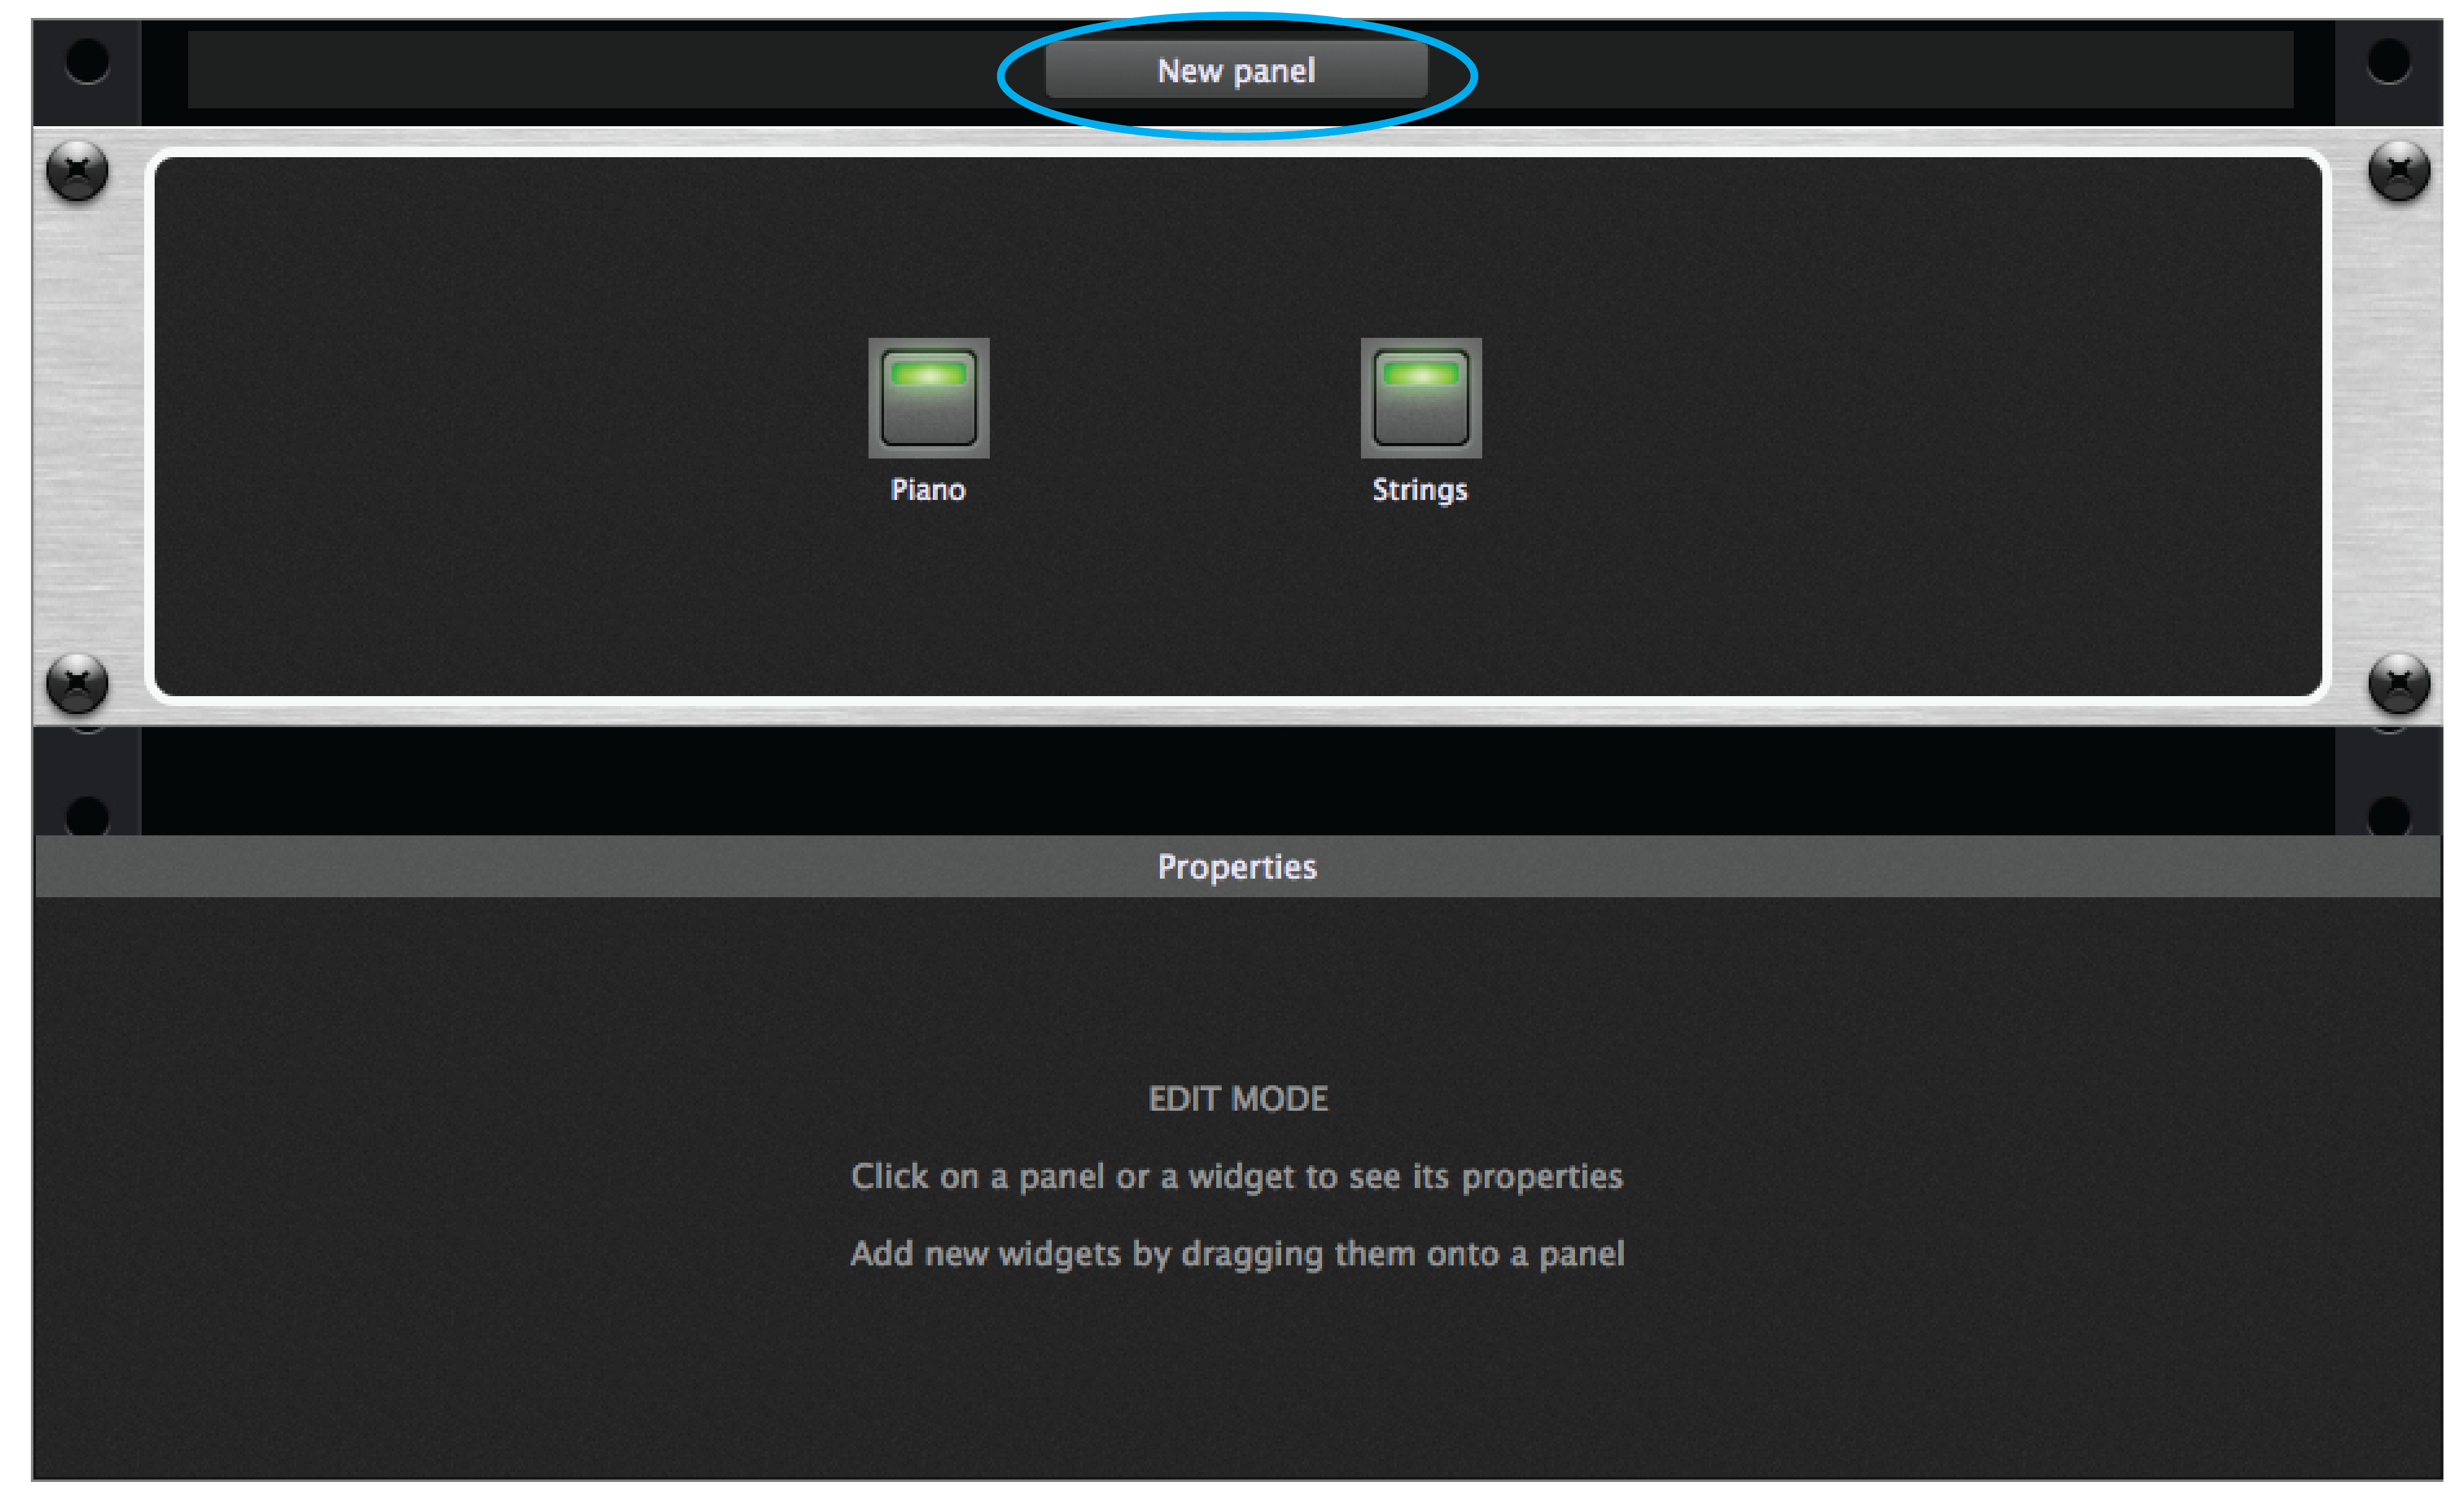
Return to Edit mode and click on the “New panel” button (circled below) that appears between the first panel and the Properties area below. (Depending upon the screen size of your laptop, you may need to resize your screen or scroll down below the current panel to see this button.)
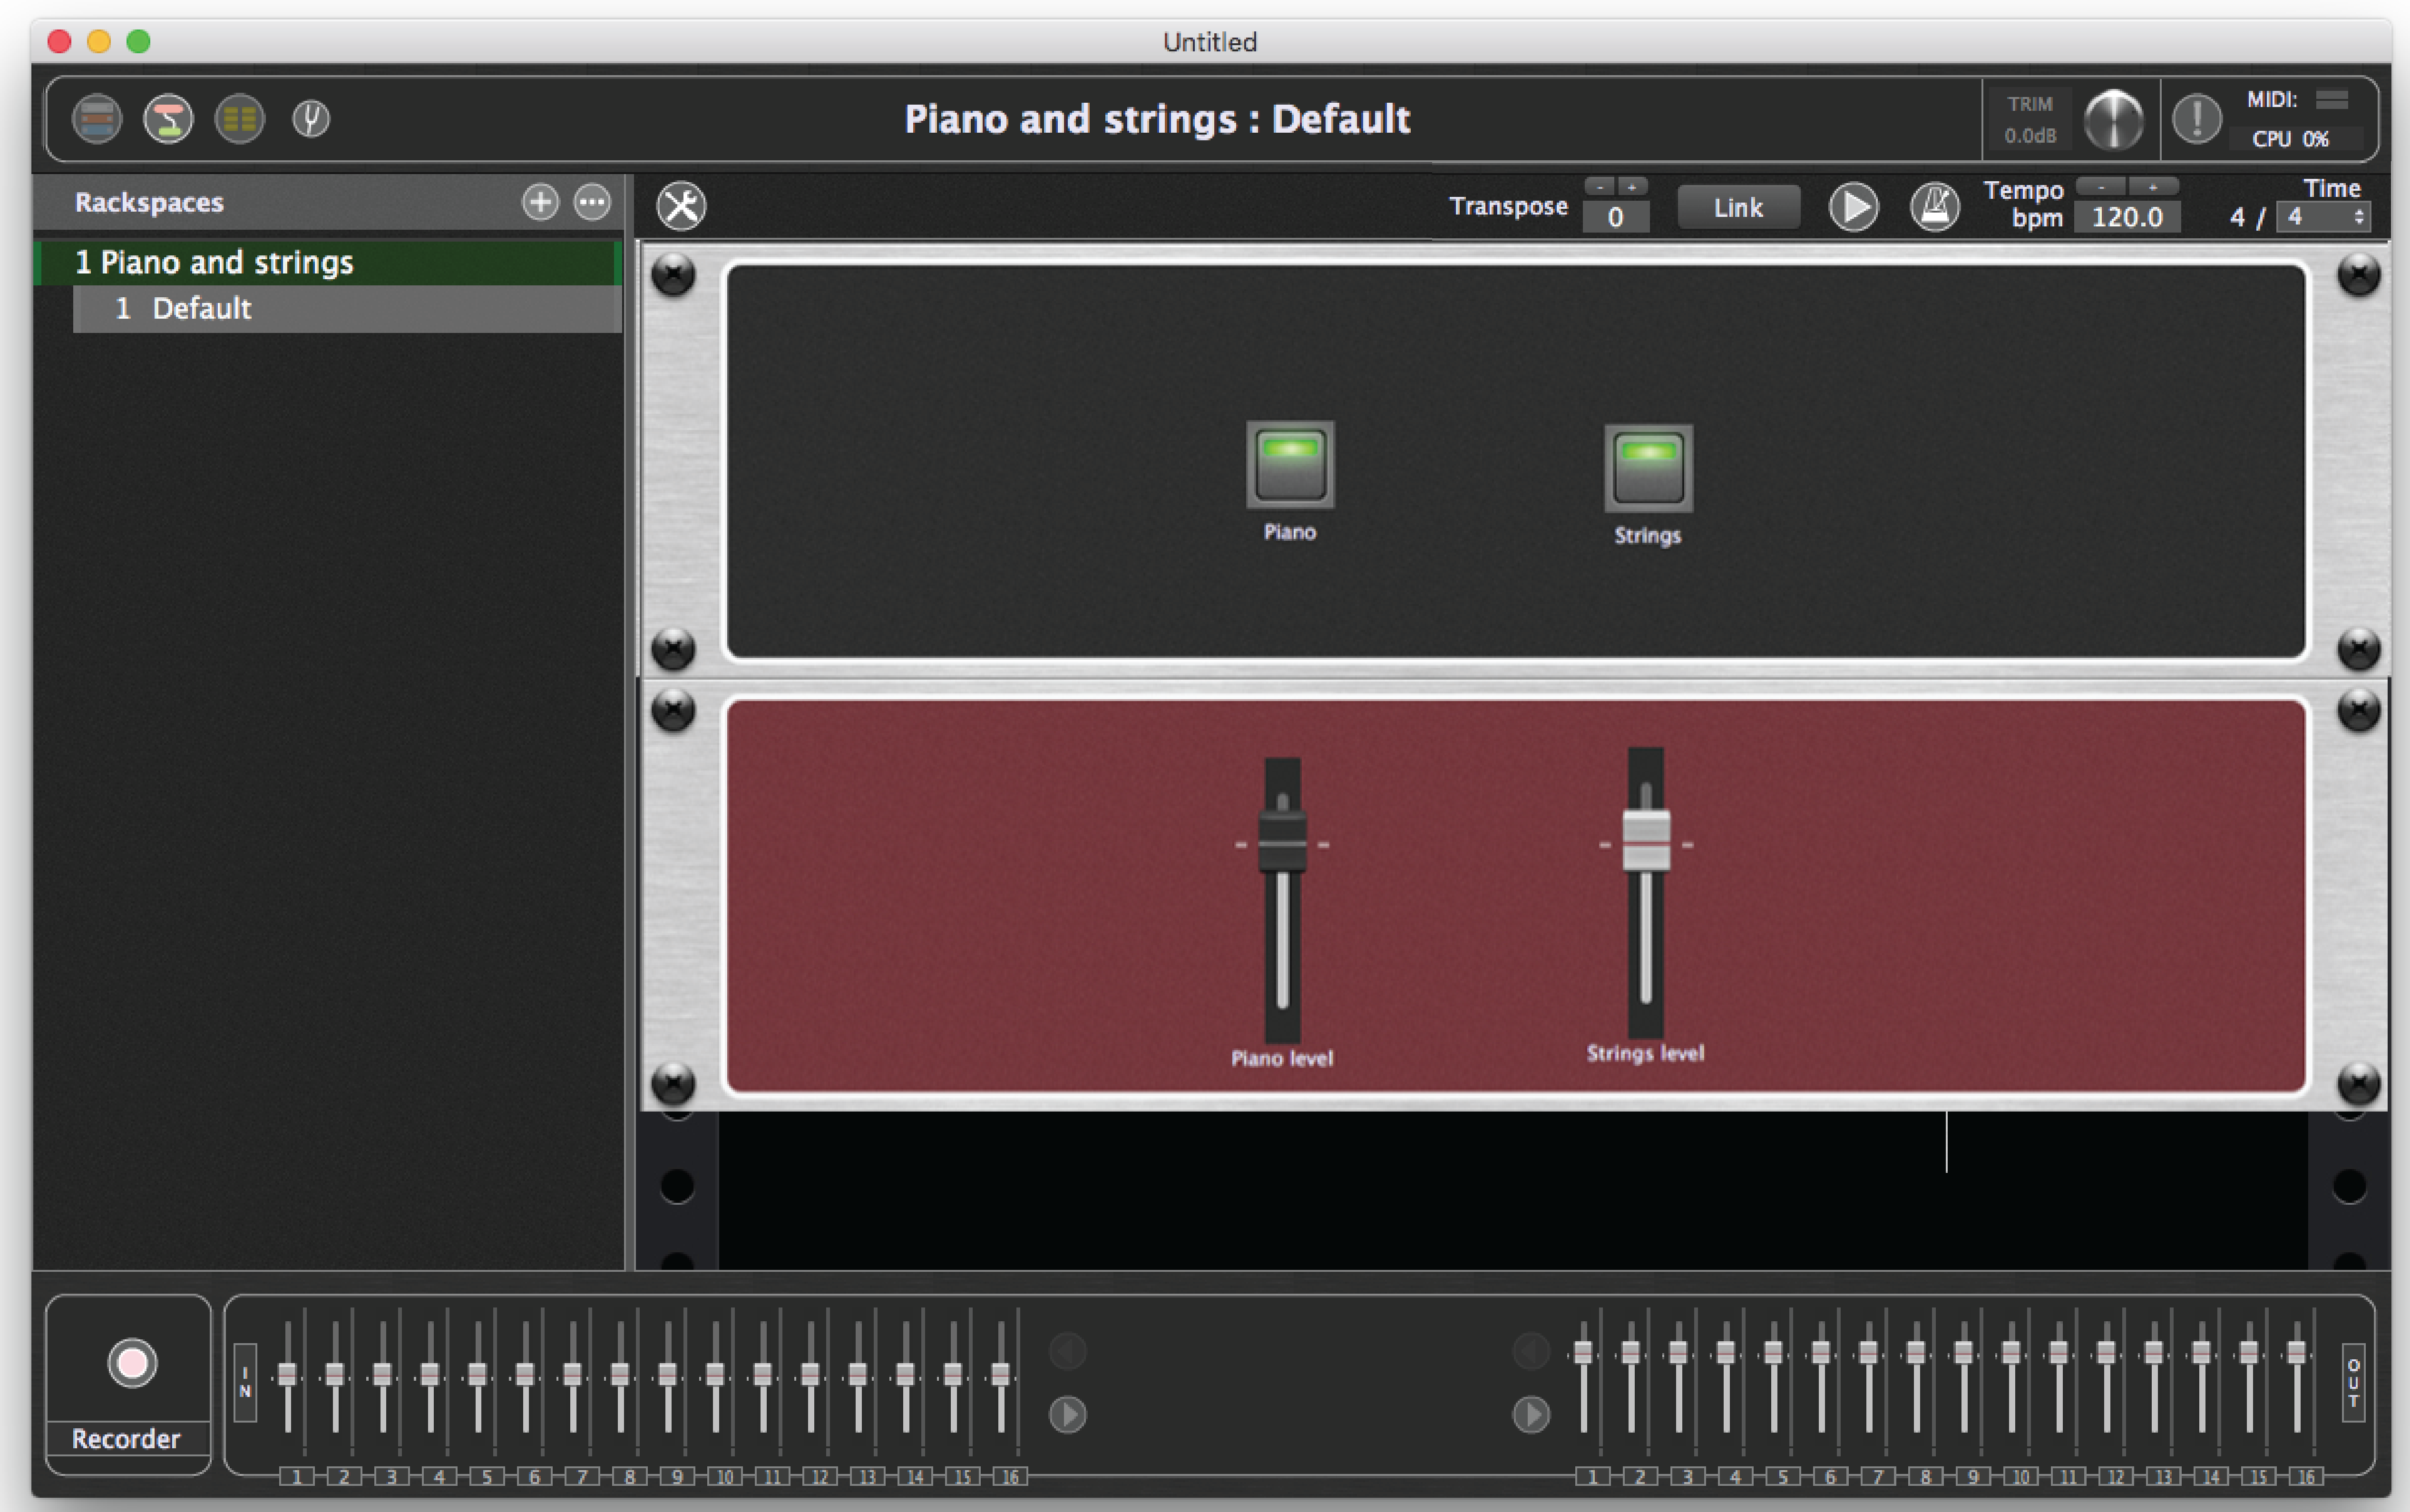
Select “New 2U panel” (“U” stands for “Rack Units”; you can always change the size later if necessary) and then double-click on the panel. From the “Style” menu that appears under “Rack Unit Properties,” select a custom color for the new panel. Next, drag one vertical black slider and one vertical white slider into the new panel. Assign the black slider to the “Gain” parameter of the “Piano gain” plugin (NOT the “Piano” plugin) and the white slider to the “Gain” parameter of the “Strings gain” plugin (NOT the “Strings” plugin). Finally, assign the black slider to control the “Piano gain” plugin’s “Gain” parameter, and the white slider to control the “Strings gain” plugin’s “Gain” parameter. Feel free to assign either or both widgets to physical devices on your MIDI controller if you like. (If you have an expression pedal connected to your controller, that would be an excellent way to fade the strings in and out—you can even substitute an Expression Pedal widget for the white slider.) Finally, caption the two sliders “Piano level” and “Strings level,” respectively. (You may need to resize them to view the entire caption.) Listen and test to make sure everything is working as expected. Your Performer View screen should now look like this:
Want to cross-fade between two different sounds (such as the Piano and Strings in this tutorial), or two different effects? It’s easily accomplished with Widget Groups. See an example of how to do this in the Configuring Audio Plugins tutorial.
15.Add variations. Finally, add a number of variations to the rackspace, following the procedures described earlier in this tutorial.For example, you might want to have one variation that provides piano sound only (with the “Strings” LED widget unlit) and another that provides both sounds (both LED widgets lit) at full volume, with a third variation that provides strings at half volume. Go on—experiment! The sheer flexibility of Gig Performer means that the sky is the limit.
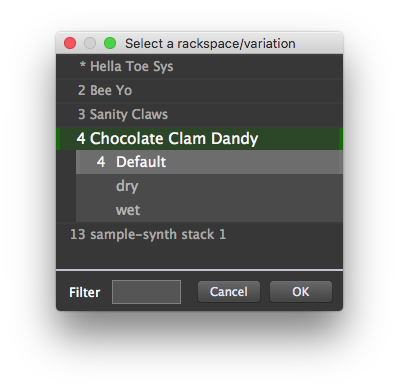
16.Load a variation. Clicking a variation in the browser instantly loads it. However, in performance it might be more convenient to switch variations using the Quick Variation Finder. Press Cmd-J (Ctrl-J on Win) to open the Quick Variation Finder. Click on the desired variation of a rackspace and click the Close button to apply your selection and close the window.
17.Save your work. Last but by no means least, be sure to save your work by going toand typing in a filename. The saved file, with the extension .gig, contains complete information about all rackspaces and variations.
You can also opt to save just the current rackspace for later importation into another Gig Performer session by selecting “Export current rackspace...” in the File menu. Click here for more information.