How to temporarily block a widget

How to temporarily block a widget

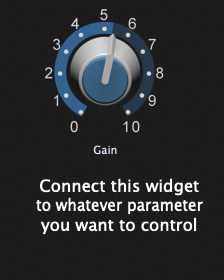
The normal way to use widgets is to map them to plugin parameters and to optionally have them learn a MIDI message so you can control that widget from a knob, slider or button on a keyboard or other MIDI controller.

However, in some rare cases, you might like to temporarily prevent that widget from responding to your controller.

There is no direct way to do this but with the help of a simple scriptlet, the functionality can be implemented quite easily.

The trick is to have the widget respond to a message produced by Gig Performer’s internal MIDI device, known as “Local GP Port”.

This can be arranged by connecting a scriptlet to a MIDI In port, arrange for the scriptlet to respond to the specific MIDI message that your controller is generating and then to conditionally inject that message into the Local GP Port. 
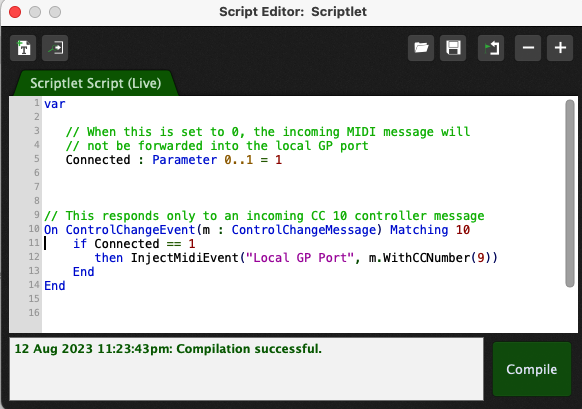
For information, here are the basic steps to implement this – but we have also attached an example gig file that you can just modify to suit your own needs.

Here is the scriptlet itself. Notice that in this example, the scriptlet listens for incoming messages on CC 10 but it injects the message using CC 9. You don’t have to change the CC number but it can be easier to debug problems if different numbers are used.

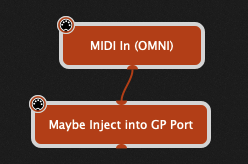
You just connect this to whatever MIDI In block received the controller message from your keyboard or MIDI controller.

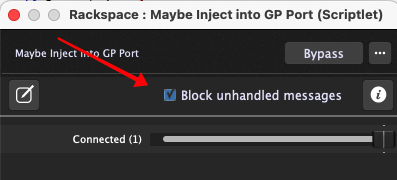
For efficiency, you should check the box that tells the scriptlet to not respond to other incoming MIDI messages.

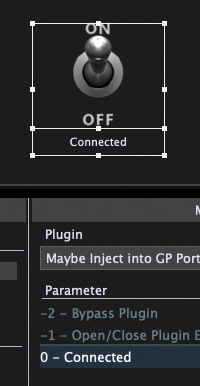
On a rackspace panel, insert a toggle button and map it to the Connected parameter of the scriptlet.

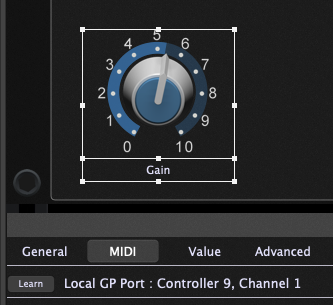
Next, add a widget that will control the desired plugin parameter. Using the normal parameter mapping, you can associate this widget with whatever plugin parameter you want to control.

Now, under normal usage, after switching to the MIDI learn section, we would simply learn the correct MIDI message but in this case we have to specify the MIDI message manually. As you can see here, the widget is mapped to CC 9 coming from the Local GP Port.

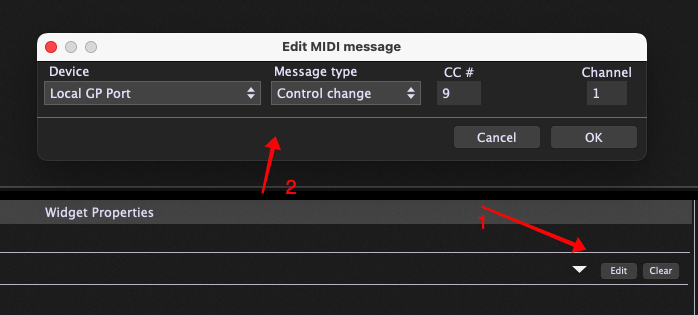
To create this, just click the Edit button (1) and select the device name, message type and CC number in the dialog that appears (2).

That’s it. When the Toggle Button is set to On, turning the knob on your controller will cause the knob widget to move but when you set the Toggle Button to Off, the knob widget will no longer respond to incoming messages. Of course the Toggle Button itself can be mapped to some physical button on your controller so that you can manage the behavior (connected or not) using just your physical controller.

Download the example gig file by clicking on the link below.

If you have any questions or want to share your feedback, please visit this Community thread.
.
Related topics:
The most flexible MIDI processing (blog)
What is a Scriptlet? (user manual)
What is the Local GP port? (user manual)


Scaling Curves


Scaling curves allow you to control the shape of the output of a widget or convert an incoming note velocity to a new velocity. Various predefined curves are available and they can be tweaked as necessary. You can also just draw your own curve as well to achieve the effect you require.


MIDI File Player Plugin


You can load up to 128 MIDI song files in a single plugin instance. Switch from one song to another, mute tracks and/or change their channel numbers. Tempo can be controlled by individual songs or you can use the global tempo and tap tempo to control the BPM interactively.


Favorites and Presets


Create a sound by placing and interconnecting your desired plugins, such as a synth, some effects and perhaps a mixer. Select them all and then save the selection as a named favorite. The favorite will subsequently show up in all plugin insert menus, making it easy for you to recreate that configuration whenever you need it again. This feature is also very powerful for creating your needed sounds on your studio computer and then transferring them to your touring laptop.


Probabilistic Sound Designer


Parameters you select in an open plugin are captured into the Probabilistic Sound Designer dialog window. When you click Randomize, you're only adjusting those selected parameters. Each entry in the PSD dialog has a curve but unlike widgets where the curve controls scaling, in the PSD the curves are used to define the probability of particular values being selected. Make sure the filter cutoff never gets too slow so as to block all sound. Perhaps adjust the max range of the VCA attack parameter so that the sound doesn't have too much delay. Constrain the octave ranges of the oscillators, perhaps ensuring that 1/3rd of the time we select 8' and 2/3rds of the time we select 4'. The possibilities are endless.


More Widgets


Numerous new widgets are included in Gig Performer - a new sustain pedal, plastic knobs, drum pads and more colored sliders. Shapes can be colored with different borders and fill colors and morphed from rectangular to circular. Your creativity is now the limit to creating fabulous front panels in Gig Performer.


MIDI Message Helper


Select MIDI devices by name. Choose the MIDI message type and adjust the appropriate parameters for the specific type


Layout management


Gig Performer supports arbitrary resizing. Layout your widgets the way you want - resize the main window and the widgets will grow or shrink as necessary to maintain the same interrelationships. No matter what size screen you have, your front panels will still be neat and usable.


Undo Support


If you move your widgets around and/or resize them, or even delete them by mistake, the Undo facility will correct your mistake. Minor moves to a widget by mistake will no longer spoil your design


Plugin Channel Count


Some plugins support a large number of outputs and they depend on the traditional channel strip to control how many ports should be available.   When you only need a stereo pair, it is convenient not to have a large horizontal block. In Gig Performer, the number of available ports  is controlled by the channel count override, which can be applied to individual plugins and will be remembered when the gigfile is reloaded or if the plugin is saved as a favorite.


Input muting and output fading


Rather than a single audio length tail, Gig Performer 4 gives you the ability to control input muting and output fading separately. Input muting controls how much time it takes for audio input to be silenced when you leave the rackspace. Output fading controls how much time will be taken for audio to fade out when you leave the rackspace.


Faster Plugin Finder


Instead of searching through menus of perhaps hundreds of plugins (you know who you are!), the Quick Plugin Finder makes it easy to find the plugin you need by simply typing partial strings. For example, as shown here, to find the Modartt Pianoteq 7 plugins, it's enough to type pia mod 7 (in any order, by the way)  to restrict the list of available plugins to those matching your query. The Quick Plugin Finder also knows about manufacturers, presets and favorites.


Touch Friendly Input


Any entry field can be changed by either dragging your mouse (or finger) up or down, or by using the large popup touchpad where you can just tap on the squares to enter a value. The large popup keypad also does validation so you can't enter an invalid value. You can also just tap the BPM field to pop up a larger view where you can quickly change tempo, tranpose, trigger Tap Tempo and enable Ableton Link, the last allowing you to synchronize Gig Performer with any other application that also supports Ableton Link.


New Tuner Display


The tuner view makes it easy for guitarists to quickly check and adjust their tuning. You can toggle into the tuner view from any other view and toggle right back as soon as you're done. All output will be silenced automatically while you're in tuning mode. You can adjust the concert reference pitch from its default of 440 Hz to suit your own needs. The tuner view fills the entire screen so you can easily see it from a distance.