Thank you for your interest in Gig Performer Essentials.
Please enter your name and email address in the field below. Links for both Windows and macOS downloads will be sent to you.
By providing your email address, you will be subscribed to our newsletter from which you will be able to unsubscribe at any time. Make sure you use a valid e-mail address and if you don't receive our e-mail, please check your spam folder.
Dialog window
Gig Performer® 14-Day Free Trial
Thank you for your interest in Gig Performer.
Please enter your name and email address in the field below. Links for both Windows and macOS downloads will be sent to you.
By providing your email address, you will be subscribed to our newsletter from which you will be able to unsubscribe at any time. Make sure you use a valid e-mail address and if you don't receive our e-mail, please check your spam folder.
In this article you will learn about ways to send program changes to external synths.
If you have a mixed environment, that is a combination of hardware synths and software plugins that you want to use together, you’re probably going to want to be able to send program changes to your external synths as you switch from one song to another, or even just one song part to another. There are quite a few ways to accomplish this with Gig Performer, and the right choice really depends more on what else you need to accomplish.
Using MIDI Out blocks in rackspaces
You use MIDI Out blocks to send MIDI messages such as notes, CCs, pitchbend, and aftertouch, etc to external devices.
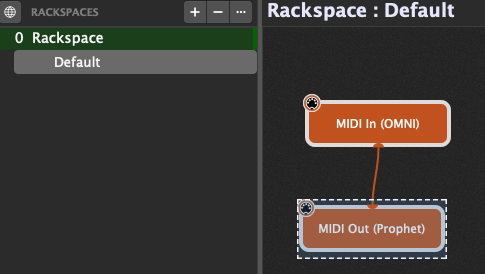
MIDI In to MIDI Out
You typically pass into them via a MIDI In block that responds to one of your keyboard controllers.
A simple connection from any keyboard controller to an external synth
In the above image, we have a MIDI In (OMNI) block connected to a MIDI Out block. The term OMNI simply means that that particular MIDI In block will receive and pass on MIDI messages from any and all MIDI controllers connected to your system. In this example, we are simply passing all incoming MIDI messages directly to a MIDI Output device. I have named it Prophet because that particular MIDI Out block is associated with a physical MIDI interface that’s connected to a Prophet synth.
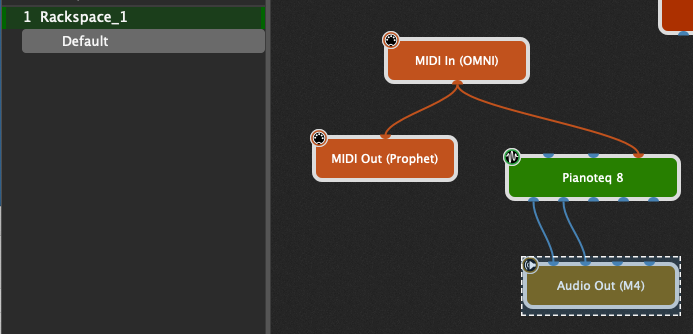
MIDI In to external synth and software synth
Here is another rackspace where, along with the connection to the external synth, the same keyboard controller is also driving a Modartt Pianoteq (acoustic piano) soft synth from which the audio is passed on to an audio interface, in this particular case a MOTU M4.
Layering a plugin with an external synth
You can switch instantly from one rackspace to the other, even in the middle of a bar, without any glitches. But suppose you want to use a different sound when you’re playing the Prophet by itself than when you’re layering it with the piano.
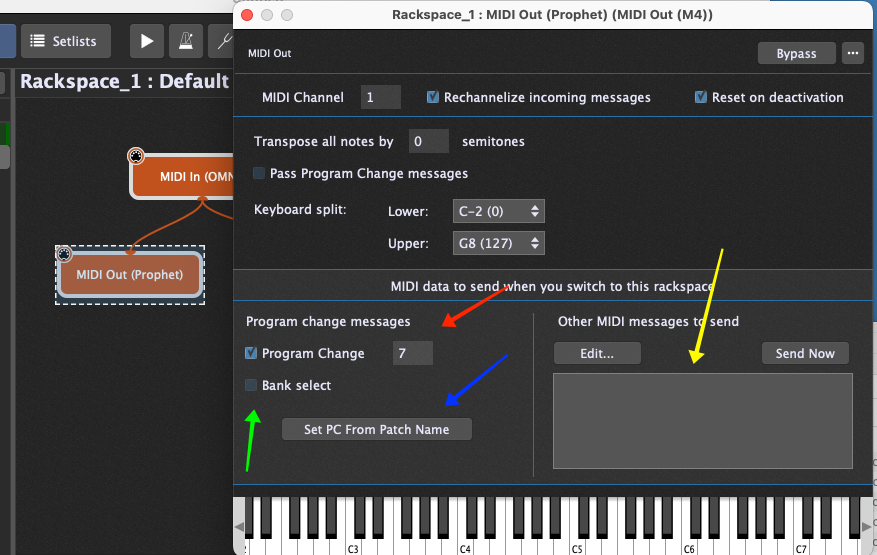
Turns out you can configure the MIDI Out block (or multiple MIDI Out blocks if you have more than one external synth) so that when you switch to a rackspace, the MIDI Out block will automatically send out a program change message, optionally with bank select.
Double-click on the MIDI Out block to open its plugin editor.
Configuring a MIDI Out block
There are quite a few options available but I’ll just mention a few here. A description of all the options is available in the online documentation. Looking at the colored arrows:
Red: click the number field to select the program change number you want to send out
Green: optionally check the box and fill in the bank select numbers
Blue: if you have an instrument definition file, then you can use patch names instead of explicit program change numbers
Yellow: You can optionally add an sequence of other arbitrary MIDI messages that should be sent out automatically when the rackspace is selected. Use this to, e.g. set volume and pan values. Another idea is to send out a Note On message for a drone effect or perhaps to trigger a sound effect in your external synth.
Using song parts
A complete description of how songs and song parts work is beyond the scope of this article and I encourage you to review the chapter covering setlists, songs and song parts in the online documentation.
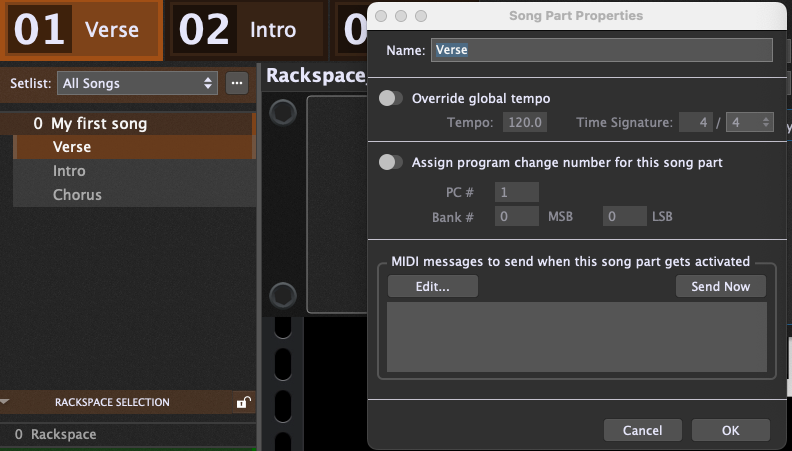
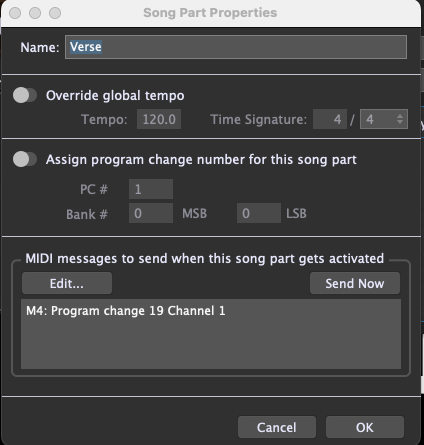
Accessing properties of a song part
In the image above we have a song with three parts in it. You can tie each part to a separate rackspace or to different variations of the same rackspace. You can even use the same variation but with song part overrides. When you double-click on a song part to open its properties, you can see the Song Part Properties dialog appear. Note the bottom section through which you can define MIDI messages to bet sent out to multiple arbitrary external MIDI devices. Clicking on the Edit… button opens up a MIDI Helper Tool dialog through which you can define the messages you want to send out.
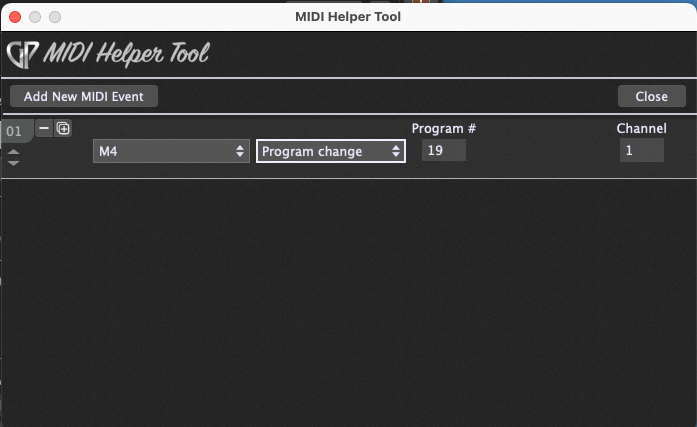
The MIDI Helper Tool dialog
In this example we have added a single entry consisting of an output MIDI device (the MOTU M4) and the kind of message we want to send. You can define multiple messages to send to different devices. When you click the Close button, the original dialog will now display the message (or messages) you defined:
Timelines and Actions
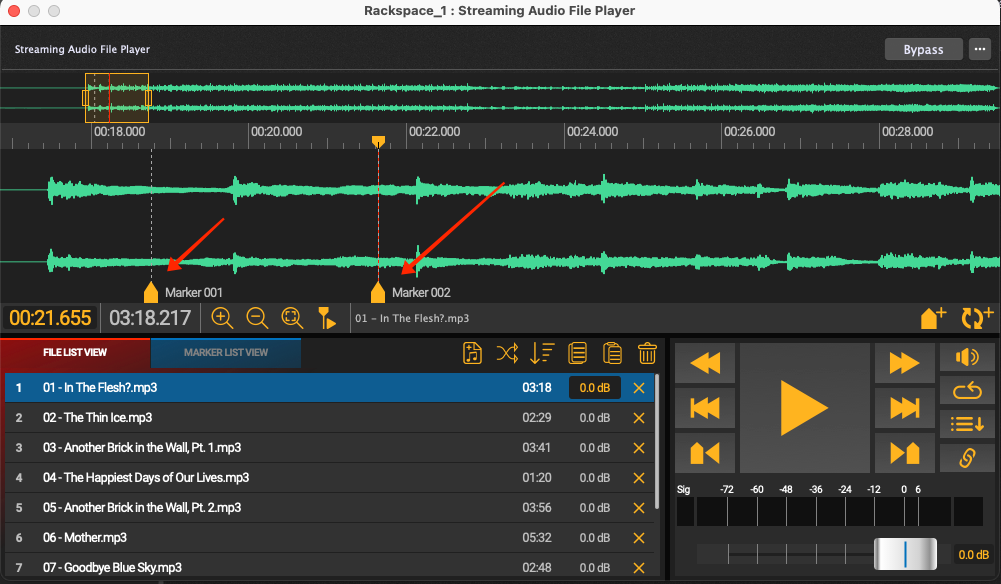
Gig Performer includes a Streaming Audio File Player that you can use to play backing tracks without significant use of RAM. You can have thousands of backing tracks available for instant playback. Each backing track allows you to define markers at particular points in the audio track:
The Streaming Audio File Player
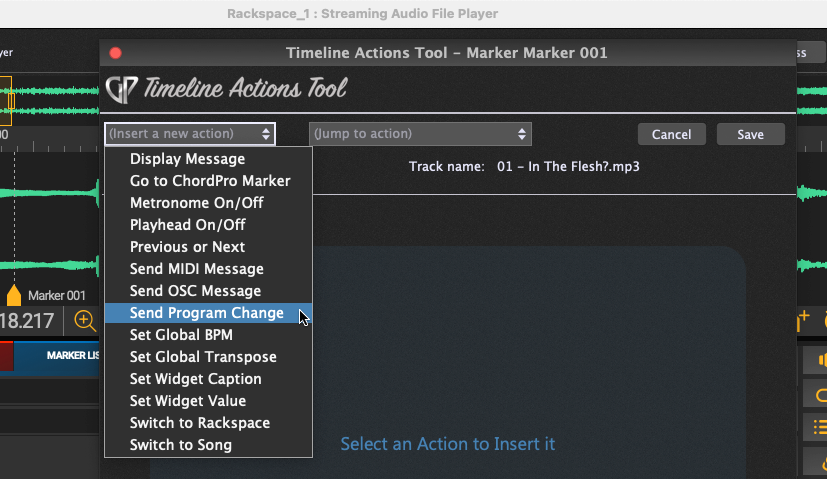
In the image above, we have a collection of songs and for the first one, there are two markers inserted into the time line. If you double-click on a marker, you can define actions that should be triggered when the marker is reached during playback:
Finally, Gig Performer includes a proprietary programming language GPScript. It allows you to do something beyond the capabilities of the standard user interface. Amongst its many capabilities are functions to send out program changes. Moreover, you can also create scriptlets to perform all sorts of sophisticated MIDI transformations. For more information on using GP Script, please see the documentation which covers both the language itself and the hundreds of system functions that are available.
We use cookies to ensure that we give you the best experience on our website. If you continue to use this site we will assume that you are happy with it.