When your files are in different places on different machines…

When your files are in different places on different machines…

Scenario

So you’ve created your gigfile and it’s running perfectly on your laptop with all your plugins. Then you decide you should have a second laptop as a backup in case your primary laptop breaks down …. not that we’re worried about Gig Performer crashing during your show but hard drives fail, screens fail, batteries die, or maybe you just dropped it! 

So you get another laptop and install all your plugins and samples and you run Gig Performer only to discover that some of your sounds don’t work any more. Or perhaps your second laptop has a smaller drive so you decide to use an external drive on your backup with the necessary samples.

What to do?

Most likely cause

The most likely reason this happens is because your samples and or other files are in different locations on your second laptop. Many plugins hard code the file path to their presets or samples, sometimes as part of the saved state, and so samples and related data appears to be missing

Symbolic links

If you can’t arrange for everything on your second computer to be in exactly the same place as on your first computer, including by the way your main username, the answer may be to use symbolic links. You can think of symbolic links as a way to have differently named folders (or even files) that all reference the same undying folder or file respectively. For example, suppose you have a piano sample called Piano.wav that, on your first computer, exists under your samples folder at  /HD/Samples/Piano.wav   (NB, I’m using Apple Mac pathnames but the concept is identical for Windows)

On your second computer, where perhaps you used an external drive for your samples, those samples are physically located at /Volumes/External/MySamples/Piano.wav

By using symbolic links, you can make the software (in particular your plugins) believe that the files physically located on that external drive appear to exist in the same location as they do on your main computer.  In other words you can create a symbolic link on your second computer that maps


/HD/Samples  ——> /Volumes/External/MySamples


Once you’ve done this, on your second laptop, your piano sample will appear to be at   /HD/Samples/Piano.wave even though it’s physically in a completely different place. The files themselves are not duplicated so you don’t have to be concerned that you have multiple copies of the samples using up huge amounts of disk space.
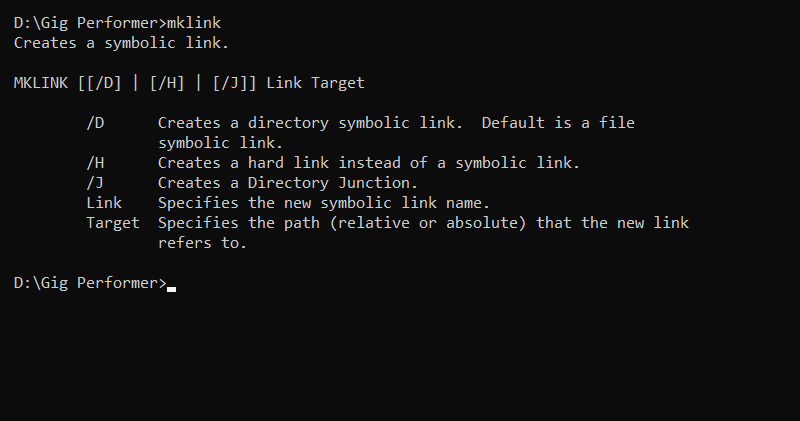
 

How do I do this

Just follow the links to these rather detailed articles that explain exactly how to do this for your platform


Mac

Windows


Scaling Curves


Scaling curves allow you to control the shape of the output of a widget or convert an incoming note velocity to a new velocity. Various predefined curves are available and they can be tweaked as necessary. You can also just draw your own curve as well to achieve the effect you require.


MIDI File Player Plugin


You can load up to 128 MIDI song files in a single plugin instance. Switch from one song to another, mute tracks and/or change their channel numbers. Tempo can be controlled by individual songs or you can use the global tempo and tap tempo to control the BPM interactively.


Favorites and Presets


Create a sound by placing and interconnecting your desired plugins, such as a synth, some effects and perhaps a mixer. Select them all and then save the selection as a named favorite. The favorite will subsequently show up in all plugin insert menus, making it easy for you to recreate that configuration whenever you need it again. This feature is also very powerful for creating your needed sounds on your studio computer and then transferring them to your touring laptop.


Probabilistic Sound Designer


Parameters you select in an open plugin are captured into the Probabilistic Sound Designer dialog window. When you click Randomize, you're only adjusting those selected parameters. Each entry in the PSD dialog has a curve but unlike widgets where the curve controls scaling, in the PSD the curves are used to define the probability of particular values being selected. Make sure the filter cutoff never gets too slow so as to block all sound. Perhaps adjust the max range of the VCA attack parameter so that the sound doesn't have too much delay. Constrain the octave ranges of the oscillators, perhaps ensuring that 1/3rd of the time we select 8' and 2/3rds of the time we select 4'. The possibilities are endless.


More Widgets


Numerous new widgets are included in Gig Performer - a new sustain pedal, plastic knobs, drum pads and more colored sliders. Shapes can be colored with different borders and fill colors and morphed from rectangular to circular. Your creativity is now the limit to creating fabulous front panels in Gig Performer.


MIDI Message Helper


Select MIDI devices by name. Choose the MIDI message type and adjust the appropriate parameters for the specific type


Layout management


Gig Performer supports arbitrary resizing. Layout your widgets the way you want - resize the main window and the widgets will grow or shrink as necessary to maintain the same interrelationships. No matter what size screen you have, your front panels will still be neat and usable.


Undo Support


If you move your widgets around and/or resize them, or even delete them by mistake, the Undo facility will correct your mistake. Minor moves to a widget by mistake will no longer spoil your design


Plugin Channel Count


Some plugins support a large number of outputs and they depend on the traditional channel strip to control how many ports should be available.   When you only need a stereo pair, it is convenient not to have a large horizontal block. In Gig Performer, the number of available ports  is controlled by the channel count override, which can be applied to individual plugins and will be remembered when the gigfile is reloaded or if the plugin is saved as a favorite.


Input muting and output fading


Rather than a single audio length tail, Gig Performer 4 gives you the ability to control input muting and output fading separately. Input muting controls how much time it takes for audio input to be silenced when you leave the rackspace. Output fading controls how much time will be taken for audio to fade out when you leave the rackspace.


Faster Plugin Finder


Instead of searching through menus of perhaps hundreds of plugins (you know who you are!), the Quick Plugin Finder makes it easy to find the plugin you need by simply typing partial strings. For example, as shown here, to find the Modartt Pianoteq 7 plugins, it's enough to type pia mod 7 (in any order, by the way)  to restrict the list of available plugins to those matching your query. The Quick Plugin Finder also knows about manufacturers, presets and favorites.


Touch Friendly Input


Any entry field can be changed by either dragging your mouse (or finger) up or down, or by using the large popup touchpad where you can just tap on the squares to enter a value. The large popup keypad also does validation so you can't enter an invalid value. You can also just tap the BPM field to pop up a larger view where you can quickly change tempo, tranpose, trigger Tap Tempo and enable Ableton Link, the last allowing you to synchronize Gig Performer with any other application that also supports Ableton Link.


New Tuner Display


The tuner view makes it easy for guitarists to quickly check and adjust their tuning. You can toggle into the tuner view from any other view and toggle right back as soon as you're done. All output will be silenced automatically while you're in tuning mode. You can adjust the concert reference pitch from its default of 440 Hz to suit your own needs. The tuner view fills the entire screen so you can easily see it from a distance.