In this guest article written by Ray Myers learn how to use BandHelper with Gig Performer.
What is BandHelper
BandHelper is a browser-based and iOS/Android application used by many bands to create set lists and share band activities among all members. Originally called SetListMaker, the application is solid, well-supported and well-maintained. See https://www.bandhelper.com/ for more information.
Gig Performer is a rock-solid Mac/PC application for hosting plugin instruments – but unlike a traditional DAW, it is optimized for live performance.
Although there is some overlap in functionality, using the two applications together can be a very powerful combination.
It took some time digging into both applications to make them play nice together, but now, it’s very solid for me and makes my live performances run more smoothly.
My goal
My goal was to use the features of BandHelper to answer the question “What are we playing at the next gig?” – and if needed, tweak the set order or contents just before the show. Also, since BandHelper will run on an iPhone or iPad quite nicely, it’s easy to keep on the stage and work with its touch friendly interface during a live performance rather than dealing with a laptop, mouse, keyboard, monitor, etc. So, when we finish a song and touch the interface to move to the next song, BandHelper sends a message to Gig Performer to let us know which song we are playing. Of course, Gig Performer has a nice setlist feature with many advantages, but the rest of the band doesn’t use it.
I then use Gig Performer to manage all the plugins to run fast and never ever crash during a performance.
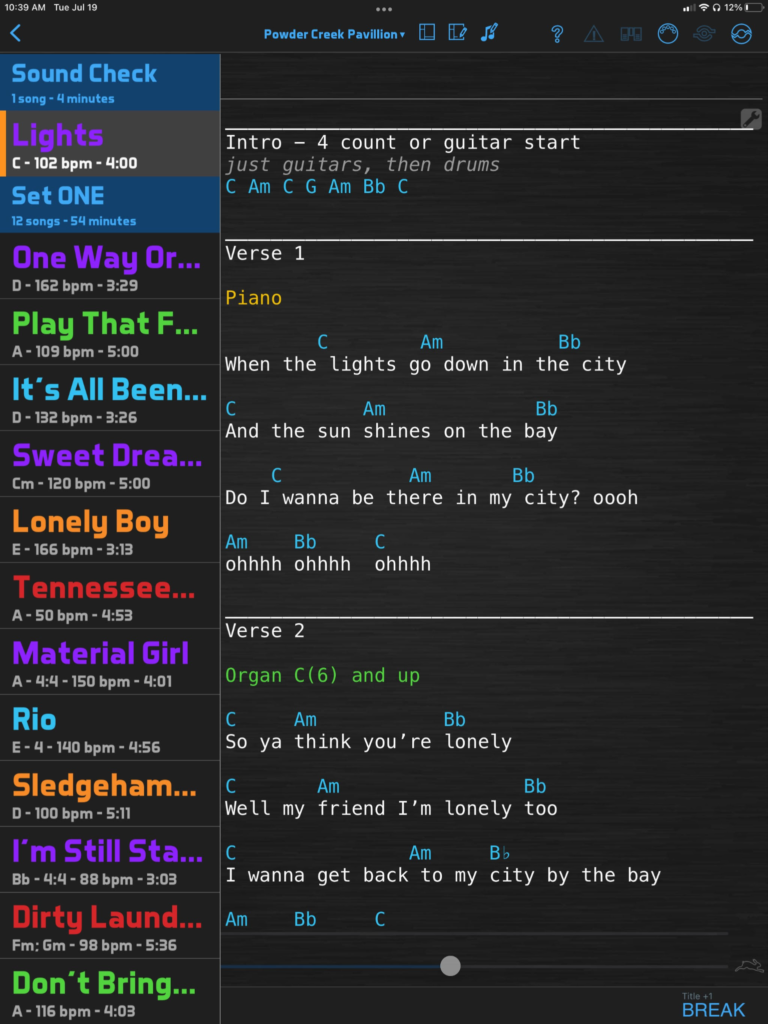
If you’re not familiar with BandHelper – here are a couple of screenshots. It is very customizable. I use it for set list management, notes on patch mapping, and performance notes (which are stored in ChordPro format). It’s great to have the song, its key, the tempo, who will be singing, and who starts it right in your face. It also tracks things like how much time has elapsed in each set, and how much time remains.
The GUI
The left side of the screen shows a set list for a single show. Touching any song title loads the song notes and sends MIDI messages to Gig Performer to load the appropriate Song Part which in turn loads the appropriate rackspace/variation.
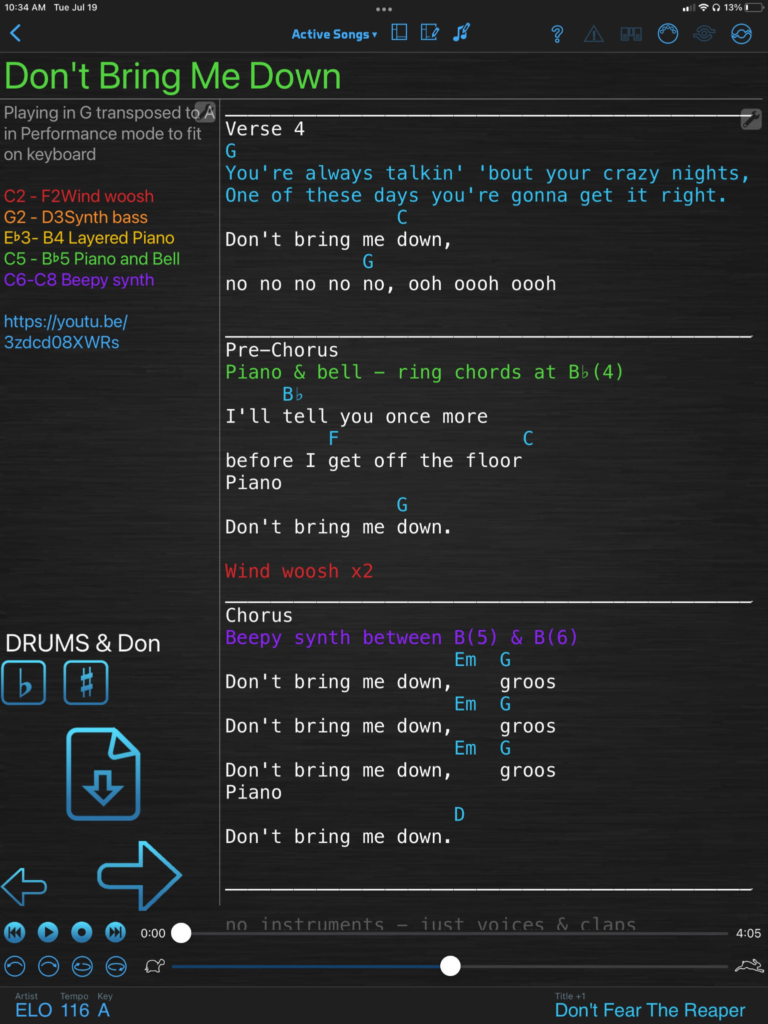
Imagine a live scenario where the band makes a last-second change and decides to play “Don’t Bring Me Down” by the Electric Light Orchestra to open Set One. That’s easy – scroll to the song, touch it. All the song details appear on screen and Gig Performer instantly loads everything I need to perform that song.
As you read the instructions below, it might seem like a lot of work to do this – but like everything in live performance, time spent planning, testing and automating can make things run much more smoothly when you’re up on the stage.
I offer this document to help others along the way – and even if the interfaces for each product change over time and this document becomes out of date, hopefully the principles remain and so you might find this helpful.
I assume the user has at least a basic understanding of each program (they both have excellent documentation and support channels) and a passing familiarity with how MIDI works.
What About Windows and Android?
.
I have not gotten Bluetooth MIDI to work well with Windows (yet). If anyone else has – I’d love to trade info! I’m a new Mac user, so hopefully others will benefit from my learning curve below. Some of my band members run BandHelper on an Android device very successfully. But as usual, integration can be simpler with fewer vendors in the mix.
MIDI Over Bluetooth on your Mac
.
The first time I tried this it was very frustrating, being a new Mac user. I’ll try to remember all the things I had to learn. First of all, Bluetooth and MIDI Bluetooth are very different things. This is nothing like pairing a keyboard or some AirPods.
- Run the Audio MIDI Setup app (which is found in the Applications/Utilities Folder for other new Mac users)
- From the Window menu, choose Show MIDI Studio.
- Look at all the teeny tiny icons on the MIDI Studio window and click the one with the Bluetooth icon (you may need your glasses on to see it)
- On the Bluetooth Configuration window, click the button labeled Advertise.
Since you will need to do this over and over, you can save a few steps by downloading this free app called QuickMIDI.
This app is free. It puts an icon onto your global toolbar that looks like a piano keyboard. Just click it, then click Open Bluetooth Configuration. (Two steps instead of 4, and no teeny tiny icons to find. I’m also looking for a way to put a Mac into Advertise mode when it starts – looked into Automator, Apple Script, Terminal commands – so far, no luck. Suggestions are welcome!)
Connecting Native iOS BandHelper to your Mac over Bluetooth
.
These instructions assume that you have already installed the BandHelper app on your device and that you created an account.
- Run the BandHelper App on your iOS Device (iPad or iPhone)
- Click the MIDI icon
- Click Connect to Bluetooth Device
- Click the name of your computer that you set up in the previous section. The status should change from “Not Connected” to “Connecting…” to “Connected”. (If you have any problems with this, troubleshooting is just like any other Bluetooth troubleshooting – make sure both devices have Bluetooth enabled and discoverable. Re-starts fix a lot of things, too.)
- Click Done to close the MIDI Status window and return to BandHelper
You can also use a wired connection – but without the right dongles, I prefer to use the one plug on my iPad to keep the battery from dying. Bluetooth has not failed me (yet).
You can read more here if interested: https://www.bandhelper.com/tutorials/sending_MIDI.html
Create a MIDI Device in BandHelper for Gig Performer
.
I find it easier to use the browser interface on a big computer for these tasks, although you could do them on an iPhone or iPad if you needed to.
- Log-in to BandHelper at https://www.bandhelper.com (NB: you must have an account to do this).
- Usually, your view opens to Repertoire, but if it doesn’t, just click Repertoire. Then click the MIDI Devices link on the second row of options.
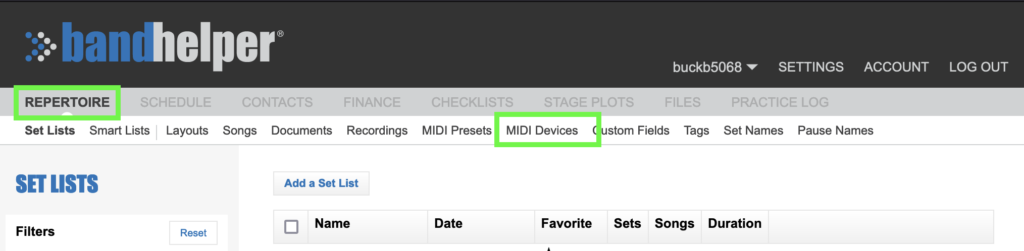
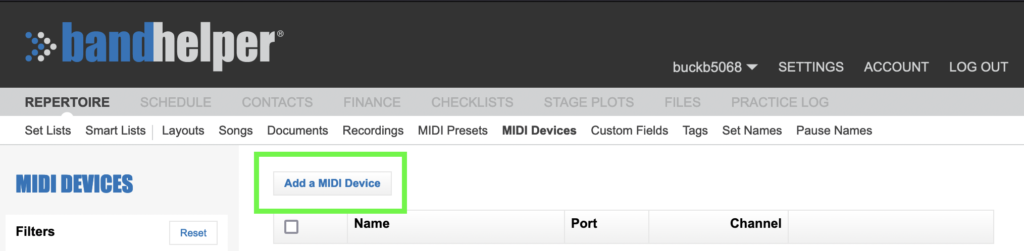
- Click the button labeled Add a MIDI Device.
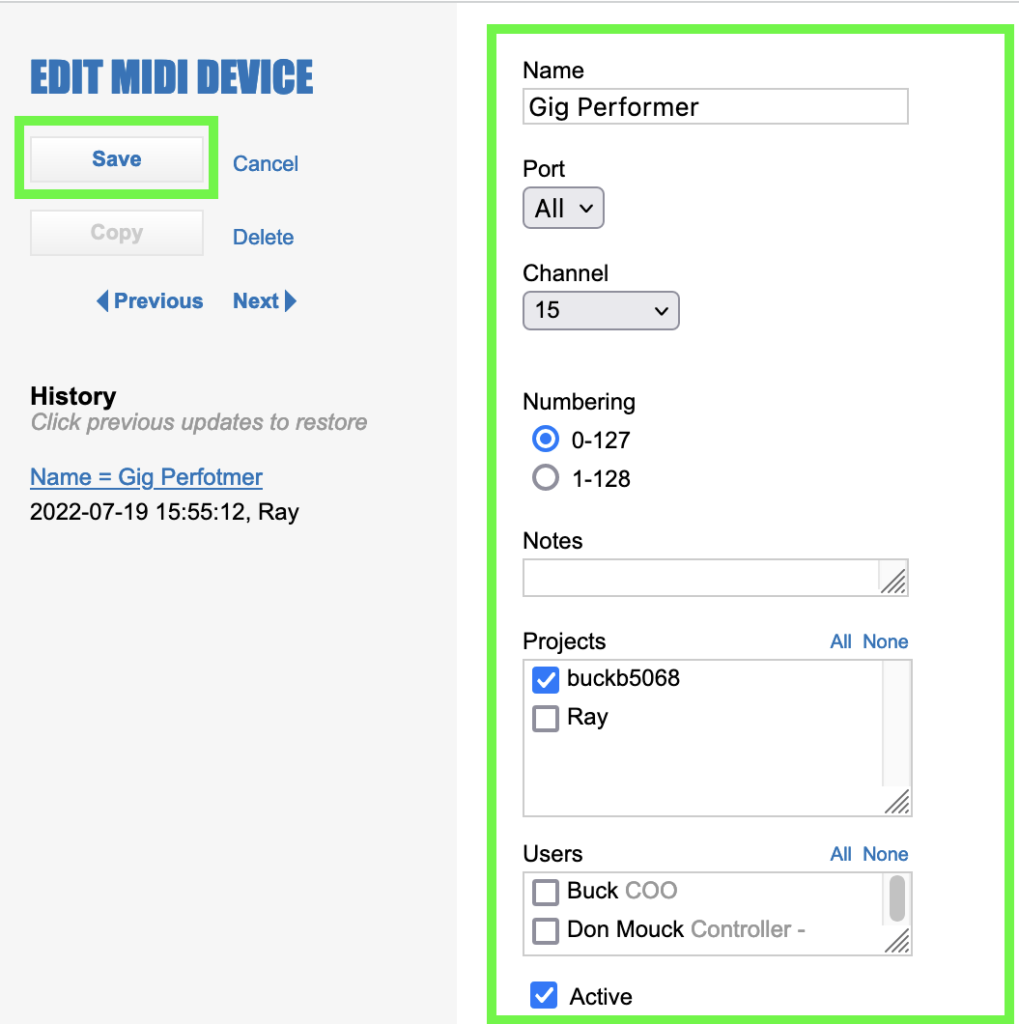
- On the next page, set the following values:
- Name: Gig Performer
- Port: All
- Channel: Pick a number, but remember it – it will be important. I chose 15. Depending on other MIDI integrations you already have, you may need to use a different channel number.
- Numbering: 0-127 (this is important)
- Notes: You can leave blank or add a note
- Projects: Check the boxes of each project where you want to use this MIDI Device
- Users: Check the names of each user who can use this MIDI Device (it is probably only you)
- Active: Make sure the box is checked.
- Click the Save button
Gig Performer Options
.
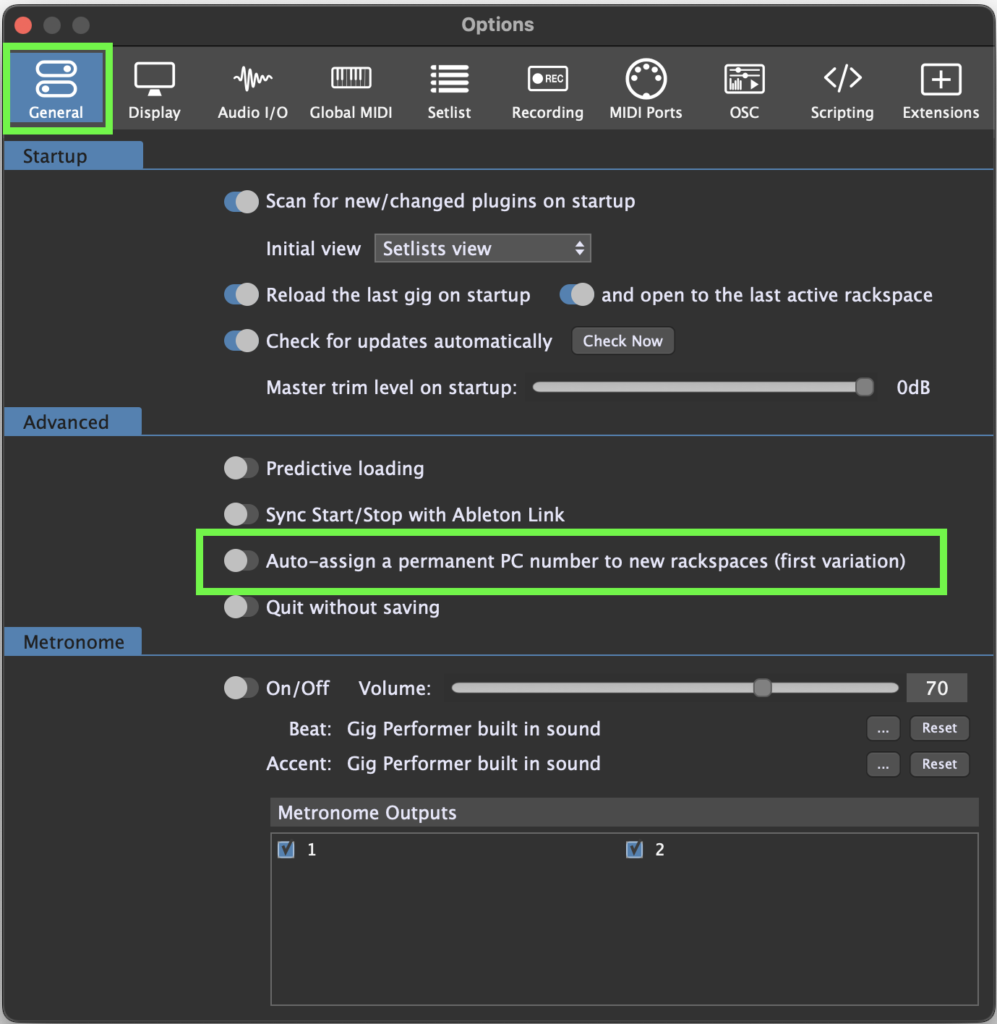
In Gig Performer, from the Options menu choose:
- General tab:
- In the advanced Advanced section, turn of the Auto-assign a permanent PC number to new rackspaces (first variation) toggle button:
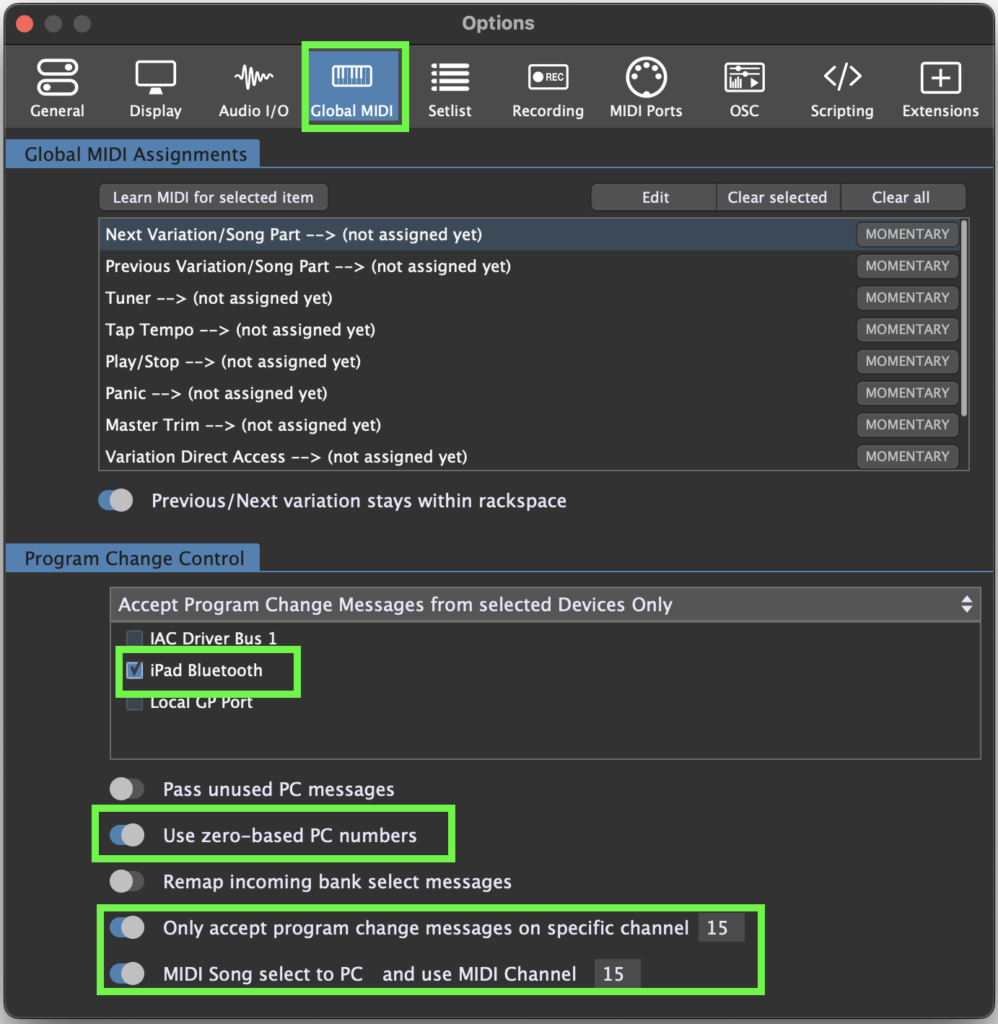
- Global MIDI tab
- Program Change Control
-
- Use zero-based PC Numbers: ON
- Only Accept program change messages on a specific channel: ON, and set the channel to the one you set up in BandHelper.
- MIDI Song select to PC and use MIDI Channel: ON, and set the channel to the one you set up in BandHelper.
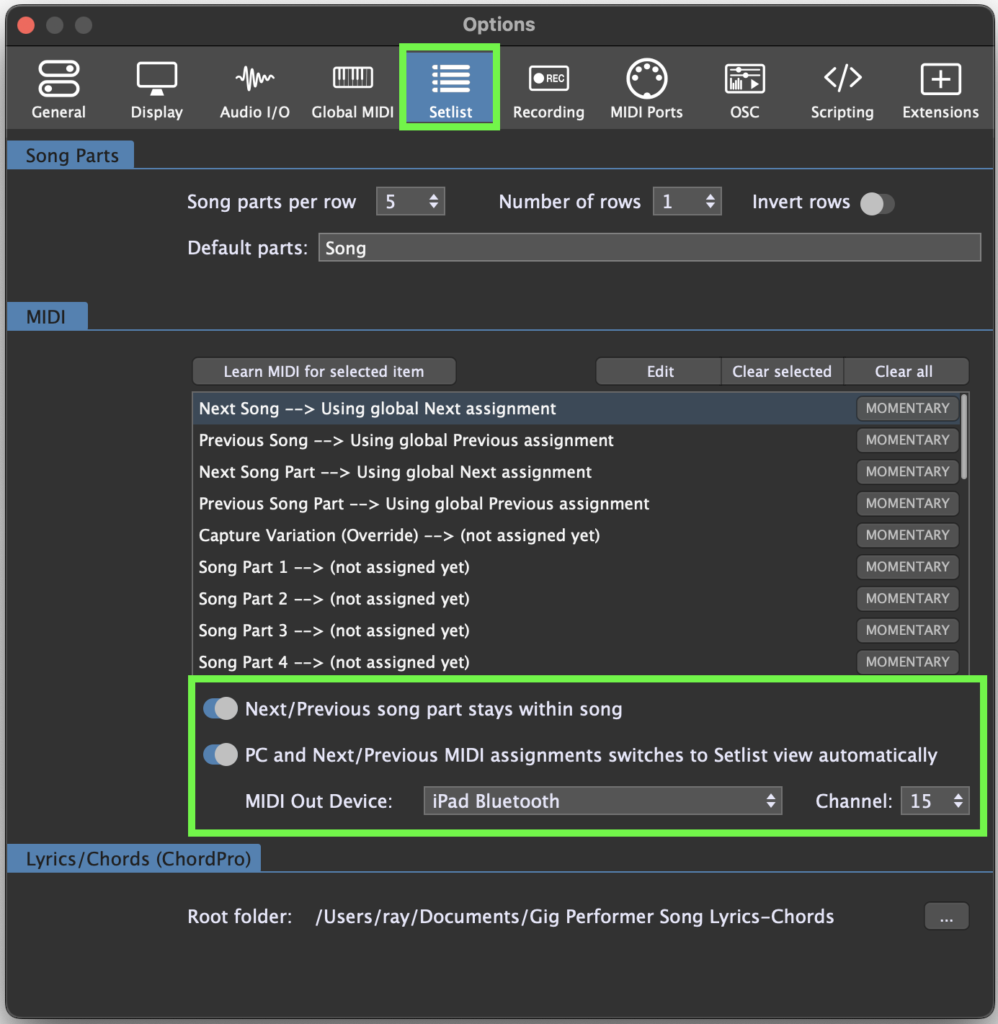
- Setlist
- MIDI
- PC and Next/Previous MIDI assignments switches to Setlist view automatically: ON
- MIDI Out Device: choose the iOS device you set up earlier
- Channel: use the one you set up earlier in BandHelper
Gig Performer Song Part Settings
.
You will need to do this for each Song you want to use. Get one working before you do a lot of them.
- Go to the Setlist view
- Click the Song you want to work with
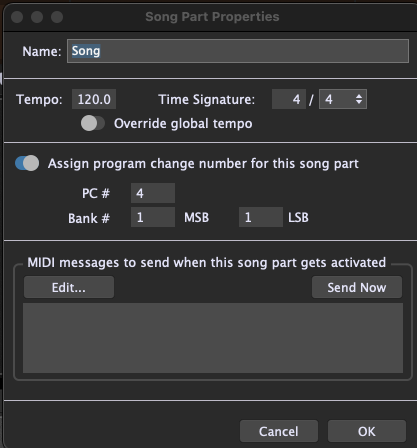
- Double-click the first Song Part of that Song
- Turn on Assign program change number for this song part
- Set the PC#, Bank # MSB, and Bank # LSB to any unique numbers you want (don’t worry, Gig Performer will tell you if it’s already been used) – you will need to know these for the instructions below, so you might want to do one song at a time.
.
BandHelper MIDI Presets
.
You will need to repeat this process for each song in your Repertoire. Use the BandHelper web interface for these steps, it’s easier. Get one working with the steps above before you do a lot of songs.
- Click the MIDI Presets link near the top of the page.
- Click the button labeled Add a MIDI Preset.
- Fill in these fields:
- Name: The name of your song
- Notes: Leave blank
- Projects: Choose the projects you want to use
- Users: Choose the users who will use this setting (often, just you)
- Active: Checked
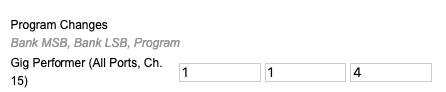
- Under Program Changes (not Control Changes) you should see “Gig Performer (All Parts, Channel __”)
- Set the Bank MSB, Bank LSB, Program boxes to match the song settings you made in the previous section. Note: Be very careful – Gig Performer and BandHelper put these in a different order on their interfaces and have subtle label differences:
- Here’s an example of what Gig Performer may look like:
- And this is how it will look in BandHelper:
- Click the Save button to save this MIDI Preset.
- Open the Song you want to use in BandHelper
- Under MIDI Presets, click the + button
- Search for the MIDI Preset you just made and check the box by it, then click Save.
.
Testing the Bluetooth MIDI Connection
.
Perform these steps to test the connection:
- Run Gig Performer
- From the Window menu, click Global MIDI Monitor.
- In the BandHelper iOS app, click any song that you have set up with a MIDI Preset
- You should see three lines of output:
- CC 0 Bank Select __ Channel __
- CC 32 Bank Select (fine) __ Channel __
- Program change __ Channel __
- The numbers in the blanks above should match the MSB, LSB, and Program numbers you put on the MIDI Device for the song you selected.
.
Putting it all Together
.
Now is when the magic happens. I’ll suggest creating a short Set List in BandHelper – but now any Set List that anyone in your band creates should work as long as you have performed the steps above.
You will do these steps every time you want to use the 2 products together:
- Run Gig Performer on your Mac
- Make sure you Mac is Advertising Bluetooth over MIDI
- Run BandHelper on your iOS Device
- Make Sure BandHelper is Connected over MIDI Bluetooth to your Mac
- Open any Set List in BandHelper
- Click any Song
- Gig Performer should switch to that song automatically
As part of my pre-show checklist – I always go through the entire Set List (in BandHelper) – ensure it switches correctly in Gig Performer, play some or all of the song to check all the Rackspaces and plugins.
Leading up to the show, band members may collaboratively change the set list order.
During the shows, I have access to the up-to-date set list. I can change from one song to another on my iPad in BandHelper in seconds – even pull ad hoc requests from other set lists or change the order on the fly. This loads up what I need in Gig Performer and I usually beat everyone else in the band into being ready to go! How often do keyboard players get to say that?
Trade Offs
.
The “Predictive Loading” feature of Gig Performer requires you to create a set list of all your songs in order in Set List view – in my case, this isn’t really an option since the set list order changes often, and sometimes at the last minute or second!
You need to work with the All Songs setlist – building a new setlist will re-number the Program Changes – even if you specify them as Permanent (this is a feature Gig Performer was working to improve at the time this was written). You could probably also ignore the Set List view and map your MIDI song changes directly to Rackspaces. Either way, this means longer load times if you have a large gig. I’m hoping to publish my thoughts on decreasing load time in the near future.
Like Gig Performer, BandHelper also supports ChordPro format and has an audio player. In my opinion, it does these things slightly better than Gig Performer (since it all runs on a tablet). My rig has an iPad mounted above my keys so I can change songs. My computer is hidden from the audience – I never need to mess with its interface. Any settings I need to adjust in the real-time are mapped to my keyboard in easy reach.
If the rest of your band uses BandHelper – the tradeoffs could be worth it.
If you have questions or want to share your feedback with us, please visit this community thread.
.
Share this article it to support Gig Performer and spread the word! 
Own The Stage® with Gig Performer®
.
Related topics:
– How to use OnSong with Gig Performer
– All Gig Performer resources at one place
