OSCulator – convert any input to any output

OSCulator – convert any input to any output

If you’re on a Mac, there’s a great app out there called OSCulator that can be used to transform pretty much any input to any output. For example, you can configure it to receive MIDI notes and have it send keystrokes (yes, that’s right, as if you are typing) to an application. Or you can receive OSC messages from Gig Performer widgets and control a Wiimote!

Right now, I’m experimenting with it to solve a problem that is due to a currently missing feature in Gig Performer. Gig Performer widgets can learn external MIDI events so as to respond to them. For example, you can associate a widget with a knob on your MIDI controller for example. However, Gig Performer widgets do not send out MIDI messages directly so if you have a MIDI controller like the MIDI Fighter Twister (an expensive but really cool surface) with endless knobs and LEDs that can display current position, turning a Gig Performer widget will not be reflected in the Twister.

Now, there are ways around this by associating a widget with a CC parameter in a MIDI Out block but then you’ll also need to use the widget grouping feature so that you can have another widget that will control the desired plugin parameter.

We’ll get around to supporting this directly at some point, but in the meantime, you can use OSCulator so solve the problem. Now, by its very nature, OSCulator is a complicated application but I’m going to provide step-by-step instructions complete with images so you can see how to do it. We’re going to leverage Gig Performer’s OSC functionality so that widgets send out OSC messages when they’re turned. Then we will use OSCulator to recognize those messages and convert them to MIDI CC events that are then sent to the Twister control surface.

By the way, if you’re already using Gig Performer’s OSC mechanism with a control surface such as Lemur, you’re going to need to configure Gig Performer to use Broadcast Mode for OSC messages. See this article for information on how to do this.

From now on, I’m going to assume that:

  • you have Gig Performer and OSCulator running,
  • you are already familiar with Gig Performer’s editing features,
  • you know how to use the widget MIDI Learn facility,
  • you have already configured Gig Performer’s OSC settings appropriately, and
  • you have a device such as the MIDI Fighter Twister that you want to use with Gig Performer.

.

Let’s get started:

  1. Create a new gig and drag a couple of widgets onto a panel

    Gig Performer, audio plugin host, create new gig, widgets
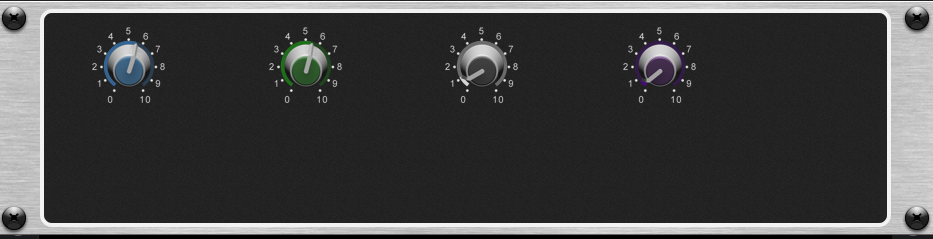
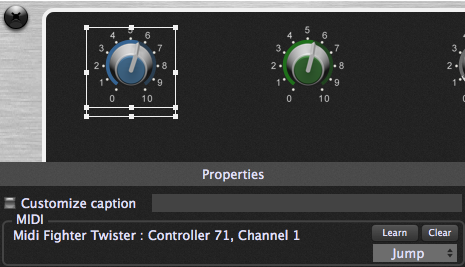
  2. Switch to Edit mode and learn a MIDI event for each widget

    Gig Performer, audio plugin host, Edit mode and learn a MIDI event for each widget
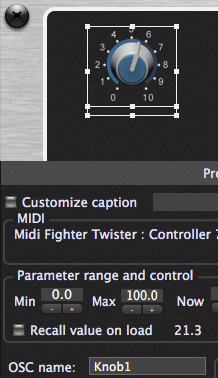
  3. Assign a unique OSC name to each widget. I use names like Knob1, Knob2, Knob3 because our Lemur template is already configured to recognize those names.

    Gig Performer, assigning unique OSC name to each widget
  4. Exit out of edit mode. The Gig Performer widgets should be responding as you turn knobs on the Twister but turning the Gig Performer widgets doesn’t affect the Twister.
  5. Run OSCulator and make sure it is listening on port 8000, the same port on which Gig Performer is sending OSC messages.
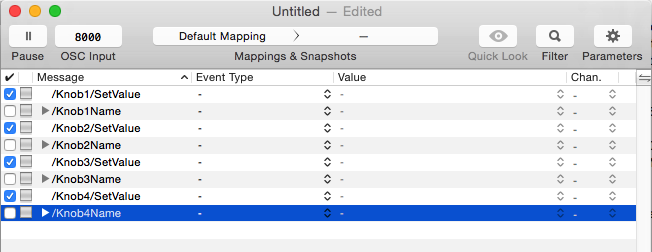
  6. Turn the knobs on your Twister and examine the main OSCulator window. You should see something like the following:
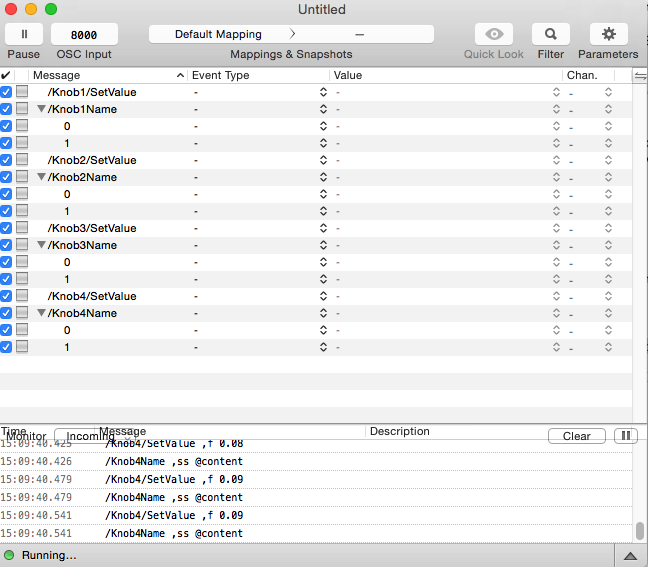
    Osculator, Twister, Gig Performer, audio plugin host
  7. The only items you care about are the ones that end with /SetValue so uncheck the other entries.
    OSCulator with audio plugin host Gig Performer, SetValue
  8. Next you need to select the output device to where your MIDI events will be sent. Click the Gear button called Parameters to bring up the following window (which will look different depending on what devices are available on your own system.
    Osculator, selecting the output device to where MIDI events will be sent
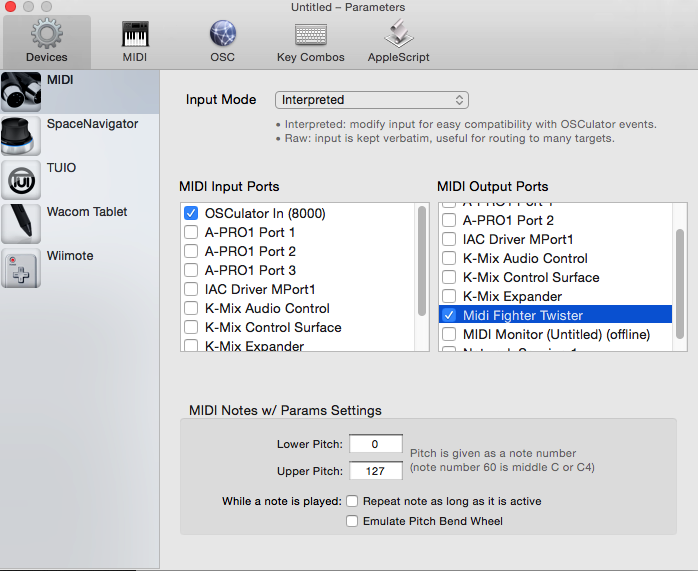
    Note that the first input port, OSCulator In(8000) represents a virtual MIDI In port created by OSCulator itself. Other applications that produce MIDI events could send those events directly into OSCulator using that virtual port. I’ve selected the MIDI Fighter Twister as the output port.
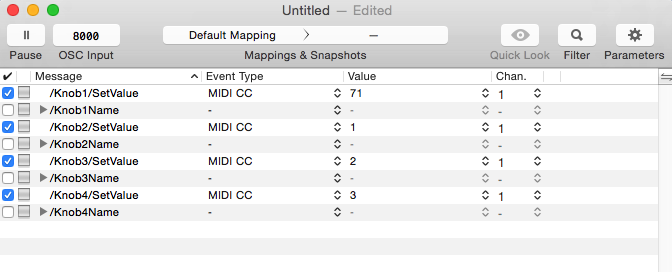
  9. For each of the selected messages, you’re now going to define the Event Type and the Value. As you will note from Step 2 above, the first knob should be associated with MIDI Controller number 71 and the next three (which are not shown here) happen to be associated with controllers 1,2 and 3. You should end up with something that looks like this:
    OSCulator, defining event type and value, to work with Gig Performer
  10. Now, if you move your Gig Performer onscreen widgets, the LEDs on the associated knobs of your MIDI Fighter Twister will show the same values. If you do this for multiple rackspaces, whenever you switch racks, your Twister display will reflect your Gig Performer Widgets.
  11. Finally, save your OSCulator mappings so you can easily use it again later. I saved mine to a file called GPTwister.osc3

Wildora is graciously offering a 25% discount for OSCulator specifically for Gig Performer customers.

For more information on our recommendation policy, please see this knowledge base article.


Scaling Curves


Scaling curves allow you to control the shape of the output of a widget or convert an incoming note velocity to a new velocity. Various predefined curves are available and they can be tweaked as necessary. You can also just draw your own curve as well to achieve the effect you require.


MIDI File Player Plugin


You can load up to 128 MIDI song files in a single plugin instance. Switch from one song to another, mute tracks and/or change their channel numbers. Tempo can be controlled by individual songs or you can use the global tempo and tap tempo to control the BPM interactively.


Favorites and Presets


Create a sound by placing and interconnecting your desired plugins, such as a synth, some effects and perhaps a mixer. Select them all and then save the selection as a named favorite. The favorite will subsequently show up in all plugin insert menus, making it easy for you to recreate that configuration whenever you need it again. This feature is also very powerful for creating your needed sounds on your studio computer and then transferring them to your touring laptop.


Probabilistic Sound Designer


Parameters you select in an open plugin are captured into the Probabilistic Sound Designer dialog window. When you click Randomize, you're only adjusting those selected parameters. Each entry in the PSD dialog has a curve but unlike widgets where the curve controls scaling, in the PSD the curves are used to define the probability of particular values being selected. Make sure the filter cutoff never gets too slow so as to block all sound. Perhaps adjust the max range of the VCA attack parameter so that the sound doesn't have too much delay. Constrain the octave ranges of the oscillators, perhaps ensuring that 1/3rd of the time we select 8' and 2/3rds of the time we select 4'. The possibilities are endless.


More Widgets


Numerous new widgets are included in Gig Performer - a new sustain pedal, plastic knobs, drum pads and more colored sliders. Shapes can be colored with different borders and fill colors and morphed from rectangular to circular. Your creativity is now the limit to creating fabulous front panels in Gig Performer.


MIDI Message Helper


Select MIDI devices by name. Choose the MIDI message type and adjust the appropriate parameters for the specific type


Layout management


Gig Performer supports arbitrary resizing. Layout your widgets the way you want - resize the main window and the widgets will grow or shrink as necessary to maintain the same interrelationships. No matter what size screen you have, your front panels will still be neat and usable.


Undo Support


If you move your widgets around and/or resize them, or even delete them by mistake, the Undo facility will correct your mistake. Minor moves to a widget by mistake will no longer spoil your design


Plugin Channel Count


Some plugins support a large number of outputs and they depend on the traditional channel strip to control how many ports should be available.   When you only need a stereo pair, it is convenient not to have a large horizontal block. In Gig Performer, the number of available ports  is controlled by the channel count override, which can be applied to individual plugins and will be remembered when the gigfile is reloaded or if the plugin is saved as a favorite.


Input muting and output fading


Rather than a single audio length tail, Gig Performer 4 gives you the ability to control input muting and output fading separately. Input muting controls how much time it takes for audio input to be silenced when you leave the rackspace. Output fading controls how much time will be taken for audio to fade out when you leave the rackspace.


Faster Plugin Finder


Instead of searching through menus of perhaps hundreds of plugins (you know who you are!), the Quick Plugin Finder makes it easy to find the plugin you need by simply typing partial strings. For example, as shown here, to find the Modartt Pianoteq 7 plugins, it's enough to type pia mod 7 (in any order, by the way)  to restrict the list of available plugins to those matching your query. The Quick Plugin Finder also knows about manufacturers, presets and favorites.


Touch Friendly Input


Any entry field can be changed by either dragging your mouse (or finger) up or down, or by using the large popup touchpad where you can just tap on the squares to enter a value. The large popup keypad also does validation so you can't enter an invalid value. You can also just tap the BPM field to pop up a larger view where you can quickly change tempo, tranpose, trigger Tap Tempo and enable Ableton Link, the last allowing you to synchronize Gig Performer with any other application that also supports Ableton Link.


New Tuner Display


The tuner view makes it easy for guitarists to quickly check and adjust their tuning. You can toggle into the tuner view from any other view and toggle right back as soon as you're done. All output will be silenced automatically while you're in tuning mode. You can adjust the concert reference pitch from its default of 440 Hz to suit your own needs. The tuner view fills the entire screen so you can easily see it from a distance.