The System Actions plugin is new with Gig Performer 4 and is multi-purposed. One important feature is to provide local control many Gig Performer global actions. These actions are, for example, Tap Tempo, Play/Stop, setting the Master Trim among many others.
Background
If you’re familiar with Gig Performer 3 or earlier, you will know that you can learn an external MIDI event such as a note or a CC message and attach it to Tap Tempo, Tuner, Play/Stop and so forth. These assignments are global so they’re always available. You will also know that that particular MIDI message is not available for anything else. Further, you cannot subsequently use a different MIDI message to trigger Tap Tempo.
However, that’s not what you always want. For example, you may have a particular song where you’d like the bottom note of your controller to use Tap Tempo. But here’s the problem. Suppose you use the Global MIDI option to do this. In this case, you’re committed to that note being available only for Tap Tempo. So, you can’t use the note in another song.
Further, you can’t assign another MIDI event such as a control surface button to Tap Tempo as you can only assign one event to a global command.
Another example is for those of you who use multiple keyboards or control surfaces. You may want to switch to the next or previous song using buttons on either or both controller. Again, in earlier versions of Gig Performer, you could only assign a single MIDI message to the global Next or Previous commands. With the System Actions plugin, the Next and Previous system actions are exposed through parameters. That means you can assign multiple buttons to them.
How the System Action plugin works
Simply insert one in a rackspace in the Wiring view…

…and a collection of actions will be exposed through parameters that can be associated with widgets in that rackspace.
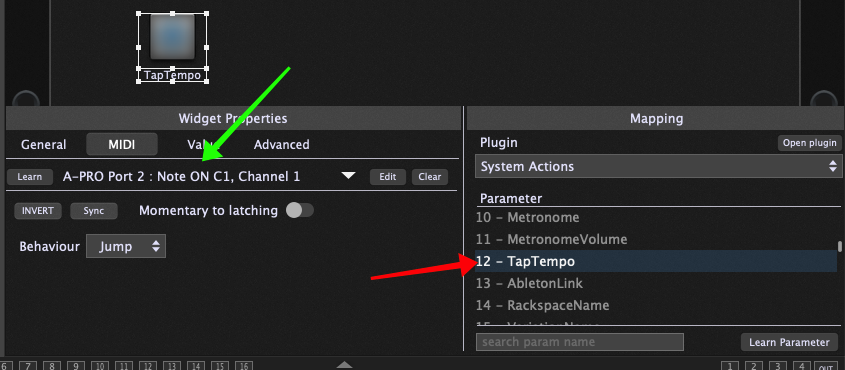
Now, you can simply map a widget to the TapTempo parameter (red arrow) and map a note (say) on your keyboard to that widget (green arrow) and just in that rackspace, the note on your keyboard can be used for Tap Tempo. When you switch to another rackspace, the note on your keyboard will behave normally.
If you wanted to have Tap Tempo available on the bottom note of two or more keyboards for a particular song, simply add more widgets and associate them with the same TapTempo parameter.
You can read more about the system actions through the online user guide for Gig Performer 4.
.
Related topics:
– New Plugins in Gig Performer 4 (User Manual)
– How To Use The System Actions Block In Gig Performer 4 (Youtube)
– How to create a custom metronome with visual feedback
