In this guest blog article you will learn how our community member Thomas Lisi (@NanoMalefico) is working with TouchOSC and Gig Performer.
TouchOSC next generation, with the integration of scripts inside it, for me won the best place on the podium among the competitors. Now I can create some awesome templates with advanced functions for Gig Performer.
Inspired by David’s Lemur template I started my study to get the same functionality with TouchOSC. I also saw the great template for TouchOSC created by community member @rank13 and I said to myself – OK I want it, but I want to try to add an expandable and scrollable Songs List. So I continued to deepen the study.
The TouchOSC file and the gig file are attached at the end of this article and I will guide you through what you can do with them.
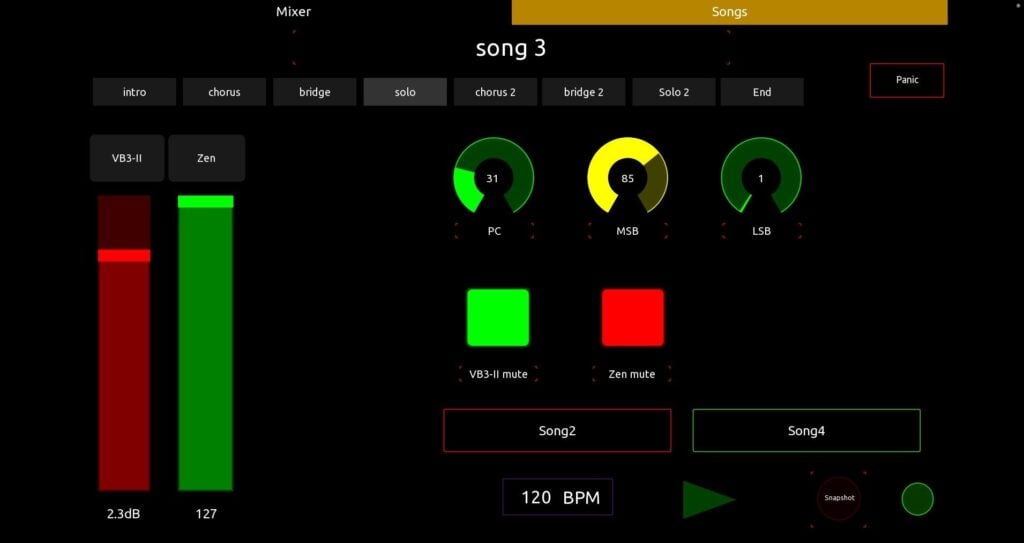
All unneeded controls will be hidden
.
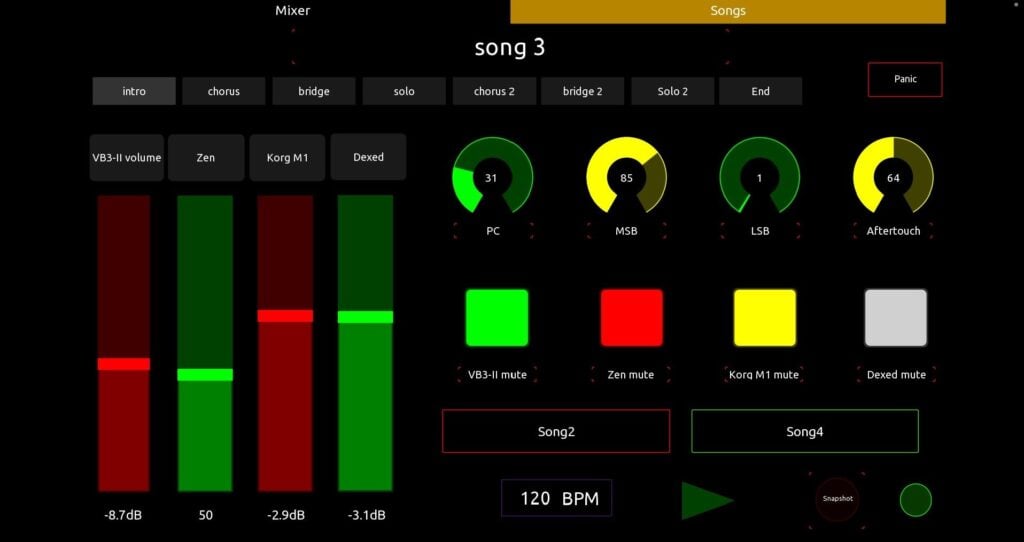
This is one of some interesting features present in the David’s Lemur template. Take a look at the screenshots below:
…
As you can see from the screenshots, this mechanism allows us to view only the controls assigned to the widgets that have OSC addresses. Other widgets do not show up.
The Show / Hide function will only be executed on controls that are assigned the ‘Tag‘ described below. So, all untagged controls like faders, knobs, labels will not be hidden.
Song and song parts in TouchOSC
.
Only the songs and song parts present will be displayed and the selected songs and song parts will be highlighted:
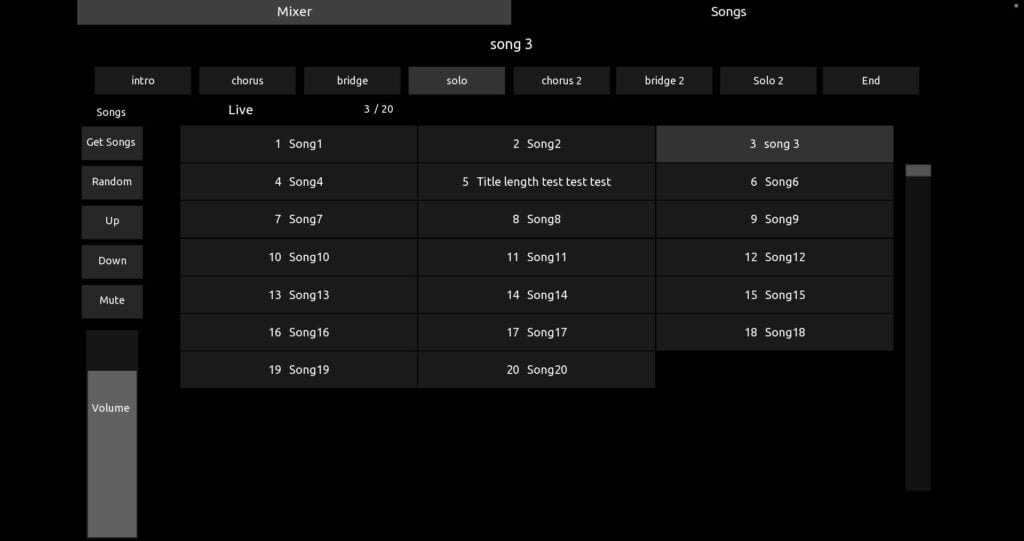
Grid adjustments in TouchOSC
.
We can resize the grid containing the list of songs, and scroll it through the side fader:
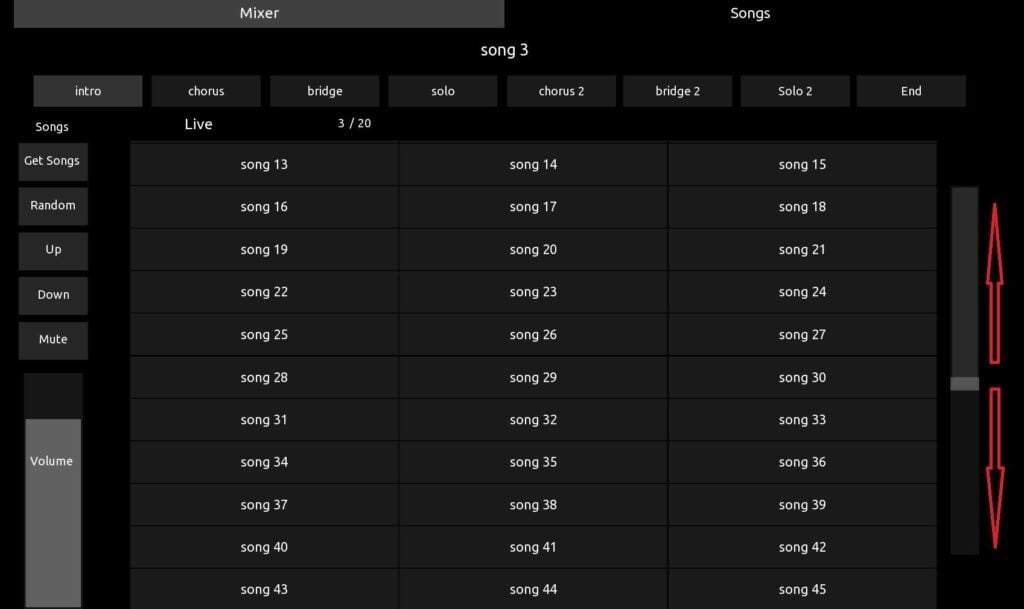
Change these parameters to resize the grid:
– Control → H (grid height)
– Grid → X (Columns) and Y (Rows) (X*Y = max number of songs that you can display, so be careful not to use too low values)
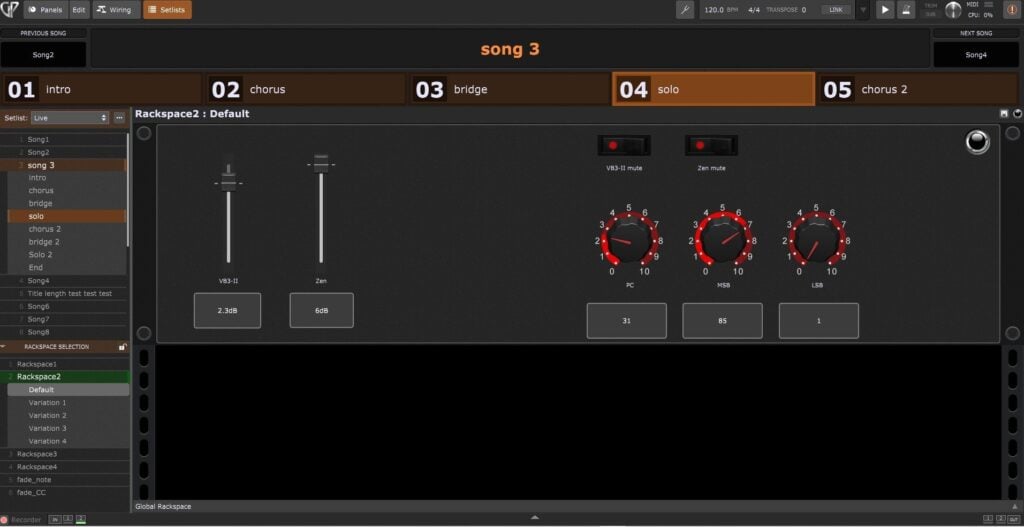
How to set and rename Tag, Controls, Widgets to TouchOSC and Gig Performer
.
This is how TouchOSC and Gig Performer are set:
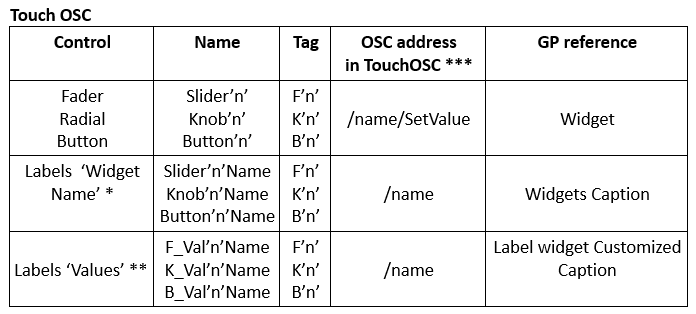
Notes:
* The Label ‘Widget Name’ shows the caption of the widget
** The Label ‘Value’ shows the values of the parameter assigned to the Label Widget in Gig Performer.
If you don’t want to display it (the value of the parameter assigned to the Label Widget in Gig Performer, e.g. mixer volume -8.7dB) but only values from 0 to 127 see in the template how to set it on the ‘Slider2’ control and on its ‘Label’ value.
*** In the Address setup click ‘+’ → ‘Property’ → ’Name’. It will insert the name of the control (If you follow these steps and click ‘Name’, you can automatically see the name of the control in the OSC message).
When we add a control, the TAG is optional. We can use it to group different controls. Let’s take an example. We add a fader and name it Slider1, a label named Slider1Name and one named F_Val1Name. For all 3 objects we write F1 in the TAG box. Now for example we could use any function for all the controls associated with the F1 TAG without repeating it for each control. In our specific case we will use the TAG on the controls we want to use with the show / hide function.
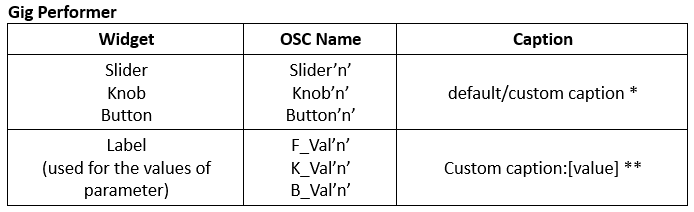
Notes:
* You can use the default caption or customize it
** In the Label widget, set the caption to Custom caption and rename it to [value]
– ‘n’ is an ID Number
This is what you can do without modifying the script
- Remove, Add (limitless), Move (anywhere) all controls associated with widgets. You can create your own template by replacing controls, adding pages and groups with controls inside it. NB: just remember to set the tag if you want to use the show / hide function on the desired control.
- Move (anywhere) but don’t remove groups containing song parts and songs list, songs count label and current song label
- All other controls not mentioned yet can be removed.
Note: if you move a control to another page or group it will be renamed. So you will need to rename it back to its old name.
The script
.
The primary purpose of this article is to help users like me, who have little experience in programming, think it’s too difficult, but would like to try it anyway. Each line of code is commented to help understand how to use its functions and those of LUA.
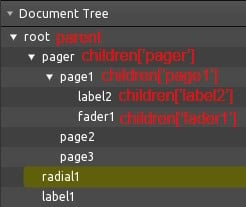
Parent & Children – how and when to use them
We can think of parent as a container and children as its content.
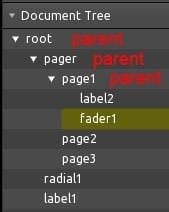
Referring to the image above we can see our current position highlighted. Now suppose we want to visualize the value of the fader1 on the label1 present in the root. We can do it by sending this value to the label1 by the ‘notify’ function. (the ‘notify’ function is explained further in the article). There are several ways to do this and we can see them in the image below (Script in fader 1):
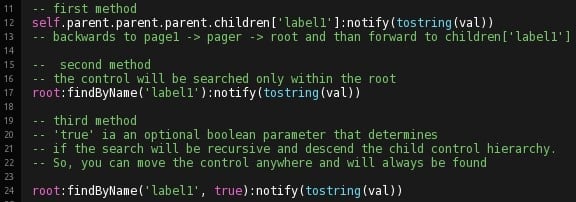
Instead, if we want pass a value by radial1 to label2 we can do this as follows:
Here’s the script in radial 1:

Gig Performer template
.
Here are code screenshots (check out the comments, as well).
The script in the root
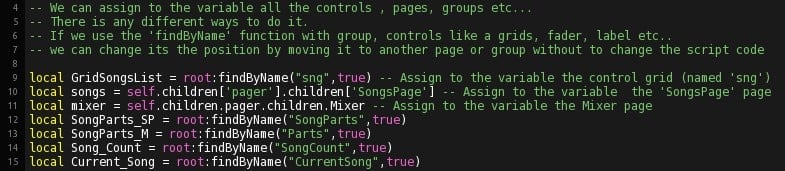
All about the tag
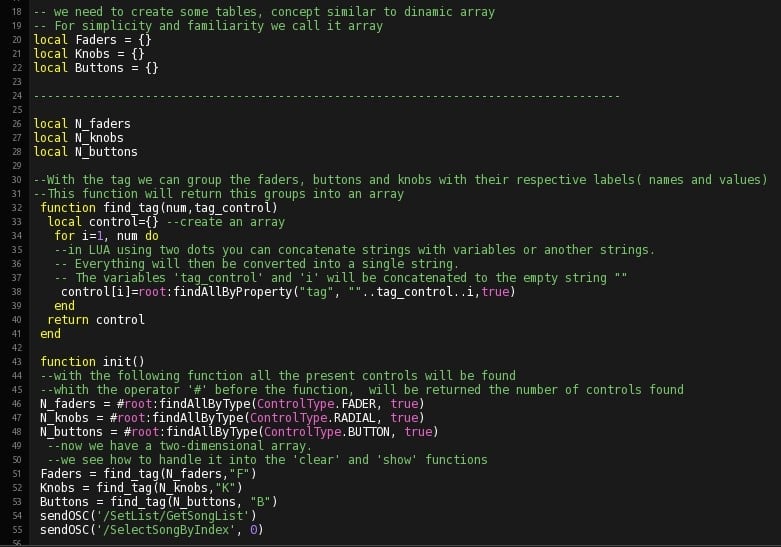
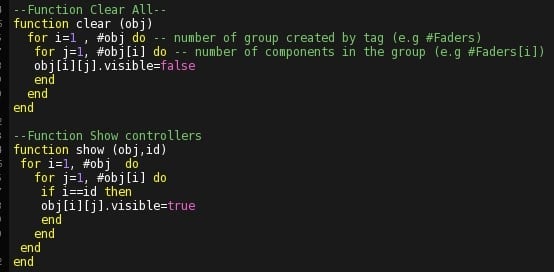
Functions clear/show controls
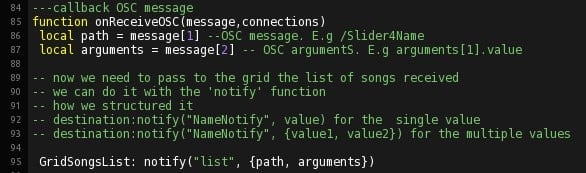
Callback function on ReceiveOSC
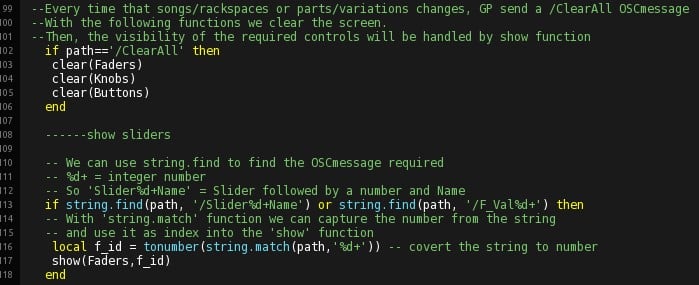
‘Clear/show’ function in action after the callback function
Similar to the ‘show’ function, here we can only see the first part dedicated to Sliders. Obviously, repeat the same procedure for Knobs and Buttons.
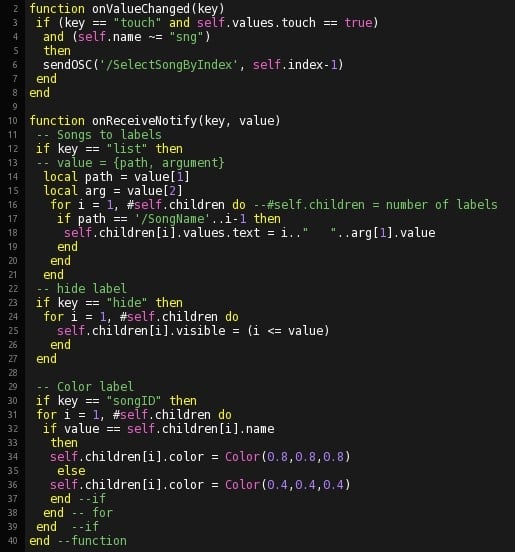
Get the songs and place them in the song list grid
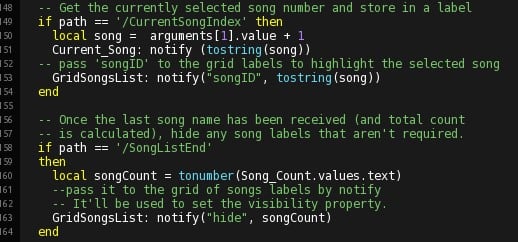
Current song in the count number and highlighted label
Grid songs list and the script inside it
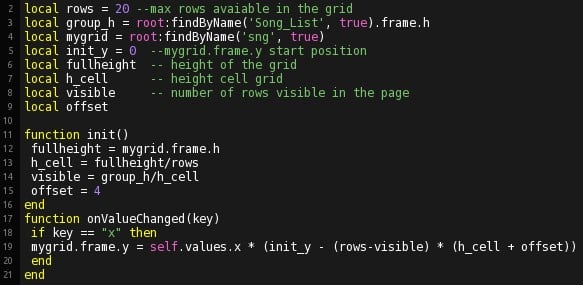
How I did the scrolling feature

As you can see, the frame of the grid protrudes from the frame of the group it is inside (the frame of the grid of the labels is bigger than the frame of the group in which it is inserted). Therefore, only the part inside the frame of the group will be visible.
Through the fader to its right, we can move the grid position up to view the part outside of the group frame.
The script inside the scroll fader
Conclusion
.
After several tests everything seems to work as it should. I tested it from my Android phone and Windows PC program.
Download: TOSC and GIG files
In the attachment, together with our template there is a gig file containing different situations (e.g. with GPScript) to test it thoroughly.
For more information about the LUA language, you can visit:
- TouchOSC examples and modules – LINK. There are some interesting examples to download and try. From those examples, I discovered several really useful features that I included in my Gig Performer template.
- TouchOSC Manual – LINK
- Gig Performer Community – LINK. There are very competent and helpful users! By reading several posts on Gig Performer scripts, OSC etc., you can have a really good starting point.
.
Written by Thomas Lisi (@NanoMalefico). If you have any questions, visit this community thread.
Own The Stage® with Gig Performer®
Related topics:
– OSC Support in Gig Performer
– How to control your guitar or keyboard effects from a Web browser
– Use your mobile phone to control your guitar or keyboard effects
– Gig Performer as an OSC controller
