In this article you will learn how to easily use more than one instance in Gig Performer.
.
What is multi-instance support
.
Multi-instance support means that you can run an application multiple times on the same computer, with each such “instance” operating independently.
.
What is multi-instance support in Gig Performer
.
While most audio plugin hosts have little or no support for multiple instances, Gig Performer fully supports running multiple instances both on macOS and Windows.
This has many different practical applications. Here are some examples:
- If you play two different instruments on your gig, say guitar and Eigenharp, you can separately control what your Eigenharp plays and what your guitar plays.
- If you happen to be a vocalist and say keys or guitar player, you can control your vocal effects separately, in another instance.
- In a band situation, a laptop could be shared and each band member could have their own instance to control their own instrument sounds without impacting what other band members are doing. They could even use separate MIDI controllers or pedal-boards to do so.
.
See more use cases or share your use case in this Community thread.
.
How to create an instance in Gig Performer
.
In this example, we’ll create two instances, one for the guitarist and one for the vocalist.
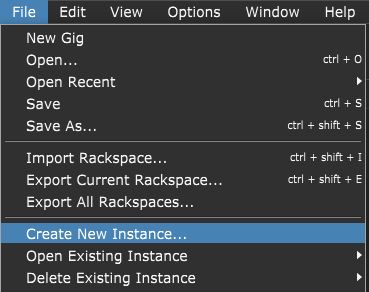
Creating another instance of Gig Performer is easy. Click on the File menu and then select on the Create New Instance… menu item:
Afterward, type in a name, e.g. Guitar, and you are all set:
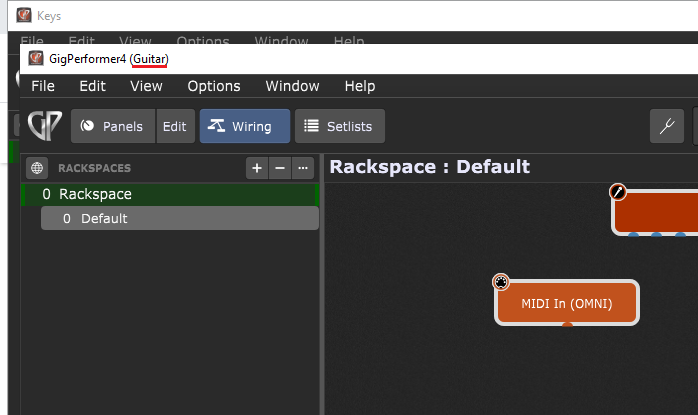
Note that the new instance will include the name you typed in parenthesis, in this case “(Guitar)”, as indicated in the screenshot above.
Following the previous steps, create one more instance and name it “Vocals”.
Note: All instance management operations are done through the File menu; you can create new instances, open existing instances or delete existing instances.
.
How to easily access instances in Gig Performer on Windows
.
You open your instances through the File menu and the Open Existing Instance submenu in the main Gig Performer application. Note: accessing an instance from another Gig Performer instance is not supported. This means that if you want to access your instance through the menus, you first need to start Gig Performer and then open the desired instance.
There is another way to access instances quicker and easier in Windows. We can simply copy the Gig Performer shortcut and then provide it with the additional argument in=name_of_an_instance to open the desired instance:
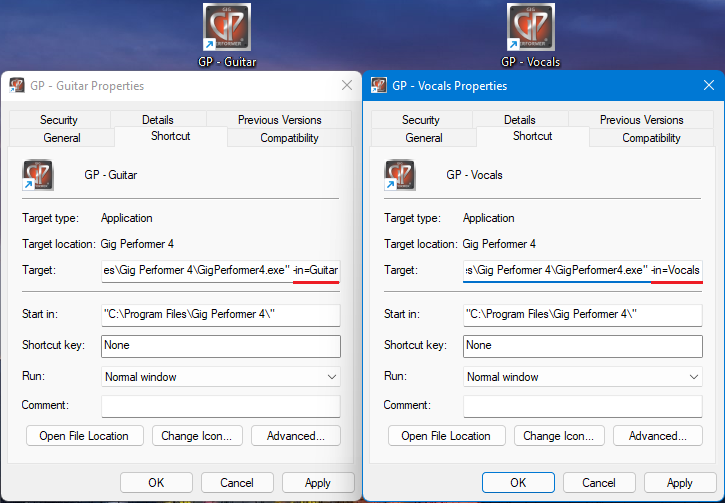
Simply copy the Gig Performer 4 shortcut, paste it two times, and rename new shortcuts to “GP – Guitar” and “GP-Vocals”. Afterward, right click on a shortcut and then select Properties. Note the Target field and then append -in=Guitar and -in=Vocals to have shortcuts open the Guitar and the Vocals instance respectively (refer to the screenshot above).
Using this method, just double-click on the desired shortcut to open the corresponding instance. Note that you don’t need to start the main Gig Performer application to start an instance.
Visit this post to learn how to automate the startup of your instances.
.
How to easily access instances in Gig Performer on macOS
.
On macOS you cannot modify aliases to append arguments to applications. We will use a different approach than on Windows, but the functionality will be the same – we’ll have two items on the Desktop that we can double-click and open the desired instances.
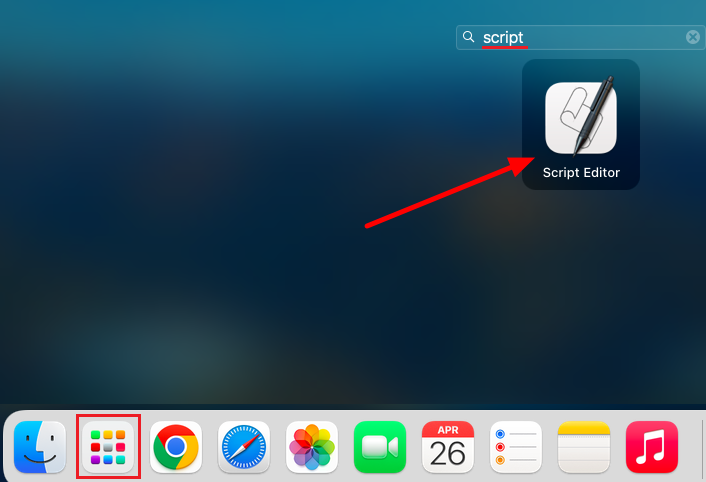
Click on the Launchpad and then type in script in the search field:
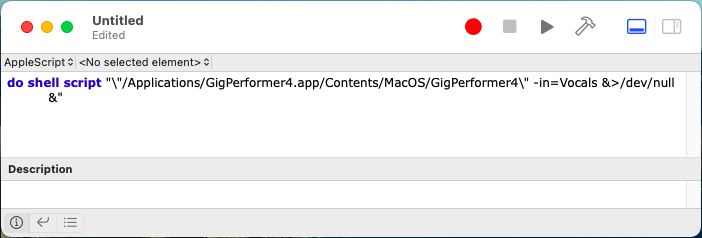
Click on the Script Editor. Copy this line for the Vocals instance and paste it into the editor:
do shell script "\"/Applications/GigPerformer4.app/Contents/MacOS/GigPerformer4\" -in=Vocals &>/dev/null &"
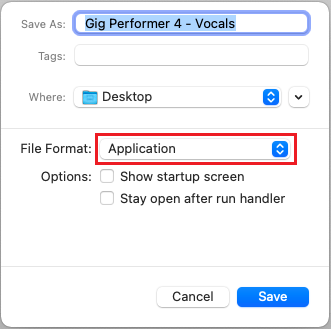
Save the script; in the dialog select “Desktop” in the Where combo box and make sure to select “Application” as the File Format (as indicated in the screenshot below):
Afterward, click on the Save button.
Repeat the same procedure for the Guitar instance, just use this line:
do shell script "\"/Applications/GigPerformer4.app/Contents/MacOS/GigPerformer4\" -in=Guitar &>/dev/null &"
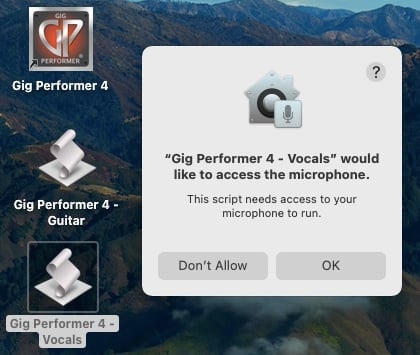
Note that you have two icons on the Desktop; double-clicking each of them will start the corresponding Gig Performer instance. One last step is to allow access to the microphone; click on the OK button:
For more tips on instances on macOS, make sure to visit this link.
.
Other useful notes
.
How to synchronize two instances
Starting from Gig Performer v4.7, you can easily synchronize two or more instances. Check out this YouTube Short or this user manual page to learn more.
How many instances can I run
The number of instances you will be able to successfully have open at any one time is dependent upon your system’s RAM and CPU resources. Each instance can access entirely different plugins and MIDI In blocks. Separate instances can also access different audio interfaces.
Caveats
Do not open the same instance twice as both opened instances will respond to the same MIDI and OSC commands and changing any settings in one of the instances will change it for both, but only one will get the change immediately.
Before deleting an instance from the File menu, make sure to first close that instance or the delete operation will fail.
If you want to use two or more instances with the same audio interface, make sure that you set the sample rate to the same value in Audio Options otherwise one of the instances will have be slightly out of tune.
Some Windows ASIO drivers still allow only one application to use the audio interface at a time; these are known as single-client drivers. Multi-client audio drivers started coming out years ago, but there are still many single-client drivers in place. Two instances of Gig Performer count as two applications, which is a problem when running on a single-client driver. Read this blog article to find out how to run multiple instances of Gig Performer with a single-client ASIO driver on Windows.
There are also many advanced usages: for example, you can use a MIDI In plugin to send program change messages from one instance to another so that one instance can be used to change the rackspace in another instance.
All presented guidelines are tested on Windows 11 and macOS Monterey.
.
Share this article to support Gig Performer and spread the word!
Own The Stage® with Gig Performer®
Nemanja Pudar
.
Related topics:
– How to use a separate Gig Performer instance as your effects box
– Clever ways to optimize your plugin usage
