In this article you will learn how to manage the visibility of audio pins for audio plugins.
Suppose that you insert a plugin that has a large number of audio channels (also referred to as “audio pins”). In that case, you may notice that your Wiring view is now somewhat cluttered, particularly so if you add a couple of these plugins. Let’s also suppose that you only need a couple of them.
So, what to do?
.
Maximum visible pins per block
.
The good news is that you can hide unneeded audio channels in a plugin block.
First, let’s start by setting the maximum visible audio pins per plugin block. Right-click on the desired plugin block with many pins and select Max Visible Audio Channels… (1):

In the Maximum visible pins for this block dialog (2), modify the value per your preference, e.g. 4 and click OK.
You can see that the number of channels has been reduced (3).
This way, you can adjust the visibility of audio pins for any other individual plugin block.
But… What if you work with many plugins each of which has many audio pins and you don’t want to repeat the same procedure over and over again? Look at the screenshot above and note the yellow rectangle that says: Global Maximum Setting: 32. This will be explained in the next section.
.
Maximum visible pins for all plugin blocks
.
You can change the visibility of audio pins for all plugins in Gig Performer. This is the global maximum setting for all rackspaces and gig files. You can change this setting in the Display Options. Click the Options menu and then Display Options. Note the option Maximum number of audio channels to display in blocks which is, by default, 32. This value is the Global Maximum Setting, from the previous section.
Now, let’s suppose that you have two plugins with many audio pins (A). Simply change the value of the option indicated by the red rectangle to the desired (e.g. 8) and close the window.
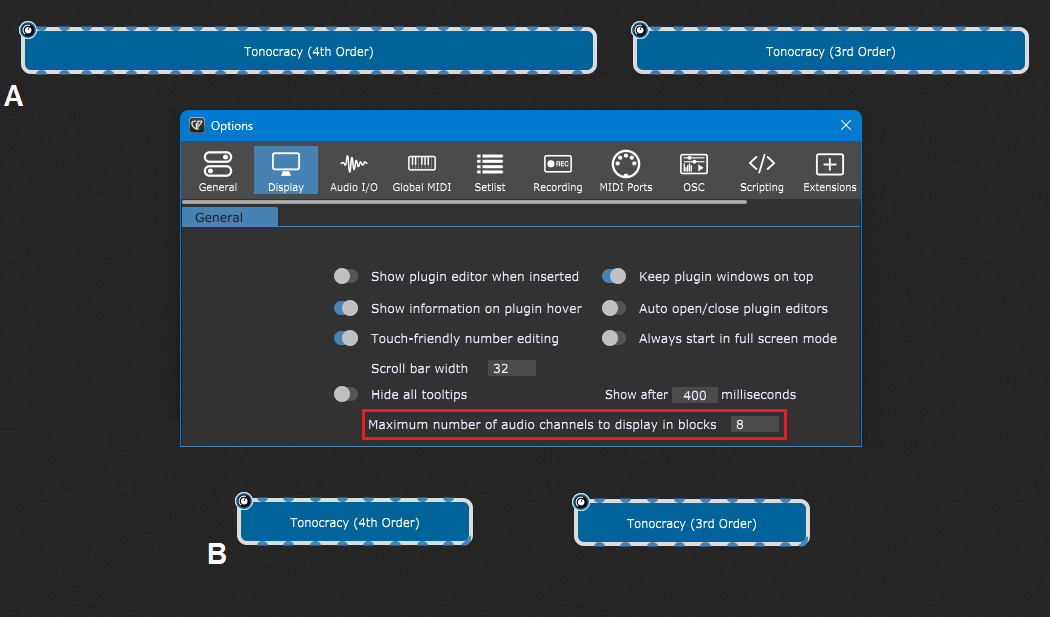
You will notice that these two plugin blocks now have 8 audio pins (B).
.
Which setting has the priority
.
In certain cases, it may happen that you want the default global visibility option to be just 8 channels, but for certain plugins you sometimes need more than 8 channels. This is possible, as any manual setting overrides the global setting.
You only need to configure the desired number of pins in the Maximum visible pins for this block dialog.
Tip: if audio channels are being hidden in a particular plugin, that plugin block will show the symbol indicated by the red circle:
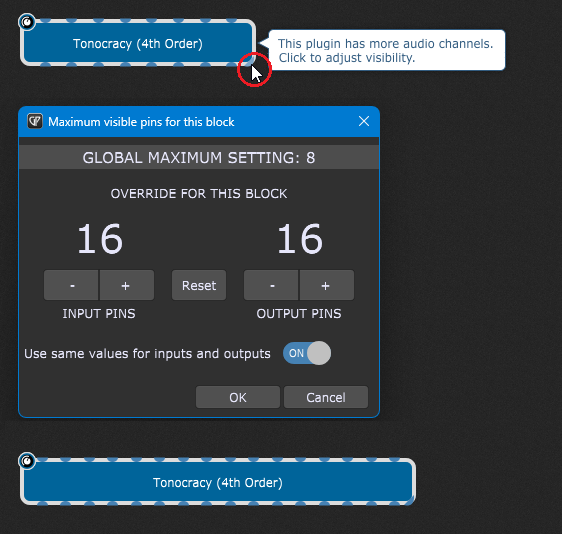
Clicking this symbol will open the Maximum visible pins for this block dialog, where you can quickly select the desired override (e.g. 16). Click OK and see the results.
.
Wrapping up
.
These Gig Performer features are very useful for certain plugins that expose a large number of channels (64 or even 128). This makes the plugin block extremely wide, taking up a lot of horizontal space in the Wiring view.
In such cases, you can use the above-mentioned options to force the plugin to display the channels that you actually use. (e.g. only the first few channels)
Important note: these features don’t change the number of audio channels in the plugin nor the Bus Layout of the plugin. They just change how many of audio pins you can see.
To see more tips and tricks, or you want to share your feedback, please check this community thread.
.
Share this article to support Gig Performer and spread the word!
Own The Stage® with Gig Performer®
Nemanja Pudar
.
Related topics:
– My plugin has so many output ports – which ones do I use?
– Why Gig Performer? Because!
– Gig Performer as an ultimate enhancer
– All Gig Performer tutorials
