How to save a ton of memory if you’re using Kontakt

How to save a ton of memory if you’re using Kontakt

I love Kontakt! It was the key that allowed me to stop having to carry a Korg Kronos with me on tour along with my other controllers (I love the Kronos as well but it’s so darn heavy.)

If you load a Kontakt instrument, particularly one with a massive sample set such as The GIANT, or the Session Strings and so forth, you could easily end up loading a gigabytes of samples, using previous space as well as taking a long time to load. As I write this, I just loaded the Session Horns Pro library and Kontakt used up 2.54GB of space.

But what if you only need a few notes from one of these libraries? Maybe you only need an octave or two and even then you only need the notes that fit the scale in which you’re playing.

Enter the “Purge” subsystem. Here’s an image from Kontakt with “THE GIANT” loaded.  It’s basically a giant piano.

Kontakt, The Purge subsystem, The Giant

Note that the memory value is 0.69 GB which means that Kontakt loaded more than half a gigabyte of samples. So suppose you only need two octaves starting at Middle C. Here’s what you do.

  1. Click the Purge drop down box and select purge all samples
    Kontakt, Purge drop down box, Purge all samples
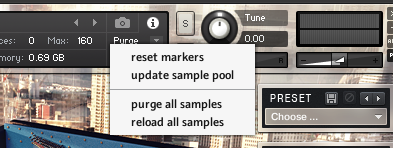
  2. Kontakt will now indicate that no memory is being used.Kontakt, The Giant, Purge Option, No memory is being used
  3. Now play each note in the two octaves of interest. If the instrument has multiple samples for each note (to cover different velocity ranges for example) then you may want to play the same note several times at different velocities. You might observe a slight delay before you hear some notes. Don’t worry about that, Kontakt is just loading the required samples on the fly as you play. Here’s an image of the instrument after I played the two octaves multiple times at varying velocity values. Notice that we’re only using just under 54 MB of memory.Kontakt, Loading the required samples on the fly as one plays
  4. Finally, save the instrument in a new location. Don’t save it in the location offered, typically a Native Instruments folder. Instead just save it to one of your own folders. Click the disk icon, select Save as… and then select Instrument #1 – The GiantKontakt, Saving sampled instrument in new location
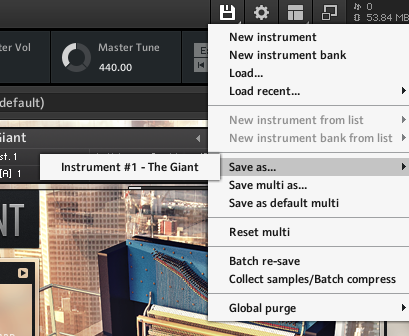
  5. I saved it to a patch folder under my documents folder and called it My little giant. Kontakt, Load instrument two octave version, Preload needed samples, time and RAM savings.

You’re done. Just load that instrument any time you just need the two octave version and Kontakt will just preload the samples you need, saving both time and RAM.

Related topics:
How to route different Kontakt instruments in a Multi to different audio outputs
My go-to plugin list
What are the best plugins to get?

Tags:
,


Scaling Curves


Scaling curves allow you to control the shape of the output of a widget or convert an incoming note velocity to a new velocity. Various predefined curves are available and they can be tweaked as necessary. You can also just draw your own curve as well to achieve the effect you require.


MIDI File Player Plugin


You can load up to 128 MIDI song files in a single plugin instance. Switch from one song to another, mute tracks and/or change their channel numbers. Tempo can be controlled by individual songs or you can use the global tempo and tap tempo to control the BPM interactively.


Favorites and Presets


Create a sound by placing and interconnecting your desired plugins, such as a synth, some effects and perhaps a mixer. Select them all and then save the selection as a named favorite. The favorite will subsequently show up in all plugin insert menus, making it easy for you to recreate that configuration whenever you need it again. This feature is also very powerful for creating your needed sounds on your studio computer and then transferring them to your touring laptop.


Probabilistic Sound Designer


Parameters you select in an open plugin are captured into the Probabilistic Sound Designer dialog window. When you click Randomize, you're only adjusting those selected parameters. Each entry in the PSD dialog has a curve but unlike widgets where the curve controls scaling, in the PSD the curves are used to define the probability of particular values being selected. Make sure the filter cutoff never gets too slow so as to block all sound. Perhaps adjust the max range of the VCA attack parameter so that the sound doesn't have too much delay. Constrain the octave ranges of the oscillators, perhaps ensuring that 1/3rd of the time we select 8' and 2/3rds of the time we select 4'. The possibilities are endless.


More Widgets


Numerous new widgets are included in Gig Performer - a new sustain pedal, plastic knobs, drum pads and more colored sliders. Shapes can be colored with different borders and fill colors and morphed from rectangular to circular. Your creativity is now the limit to creating fabulous front panels in Gig Performer.


MIDI Message Helper


Select MIDI devices by name. Choose the MIDI message type and adjust the appropriate parameters for the specific type


Layout management


Gig Performer supports arbitrary resizing. Layout your widgets the way you want - resize the main window and the widgets will grow or shrink as necessary to maintain the same interrelationships. No matter what size screen you have, your front panels will still be neat and usable.


Undo Support


If you move your widgets around and/or resize them, or even delete them by mistake, the Undo facility will correct your mistake. Minor moves to a widget by mistake will no longer spoil your design


Plugin Channel Count


Some plugins support a large number of outputs and they depend on the traditional channel strip to control how many ports should be available.   When you only need a stereo pair, it is convenient not to have a large horizontal block. In Gig Performer, the number of available ports  is controlled by the channel count override, which can be applied to individual plugins and will be remembered when the gigfile is reloaded or if the plugin is saved as a favorite.


Input muting and output fading


Rather than a single audio length tail, Gig Performer 4 gives you the ability to control input muting and output fading separately. Input muting controls how much time it takes for audio input to be silenced when you leave the rackspace. Output fading controls how much time will be taken for audio to fade out when you leave the rackspace.


Faster Plugin Finder


Instead of searching through menus of perhaps hundreds of plugins (you know who you are!), the Quick Plugin Finder makes it easy to find the plugin you need by simply typing partial strings. For example, as shown here, to find the Modartt Pianoteq 7 plugins, it's enough to type pia mod 7 (in any order, by the way)  to restrict the list of available plugins to those matching your query. The Quick Plugin Finder also knows about manufacturers, presets and favorites.


Touch Friendly Input


Any entry field can be changed by either dragging your mouse (or finger) up or down, or by using the large popup touchpad where you can just tap on the squares to enter a value. The large popup keypad also does validation so you can't enter an invalid value. You can also just tap the BPM field to pop up a larger view where you can quickly change tempo, tranpose, trigger Tap Tempo and enable Ableton Link, the last allowing you to synchronize Gig Performer with any other application that also supports Ableton Link.


New Tuner Display


The tuner view makes it easy for guitarists to quickly check and adjust their tuning. You can toggle into the tuner view from any other view and toggle right back as soon as you're done. All output will be silenced automatically while you're in tuning mode. You can adjust the concert reference pitch from its default of 440 Hz to suit your own needs. The tuner view fills the entire screen so you can easily see it from a distance.