In this article you will learn how to set up live streaming using OBS, Gig Performer and JACK Router.
As we previously mentioned in this blog article, due to Gig Performer’s stability, efficiency and feature-richness, it has found its way to being used for purposes other than live performance and in particular is being used in many live streaming scenarios very successfully (you can see examples in this and in this Gig Performer in Action thread).
Because there were recent discussions on the Community forums about JACK (e.g. here and here), we decided to provide you with some guidelines to help you set up JACK and Gig Performer with OBS. The guidelines below apply to Windows, but since JACK, OBS and Gig Performer all run on Apple computers, the approach is the same on macOS, as well.
Note: if you use a Stream Deck device, Gig Performer provides you with an extension that allows for seamless integration with it. Click here to learn more.
What is JACK2
.
JACK Audio Connection Kit (or simply JACK) is a professional sound server API and a pair of daemon implementations to provide real-time, low-latency connections for both audio and MIDI data between applications. It is great for taking the audio output from one application and sending it to one or more other applications. It is available for Windows, macOS and Linux.
What is OBS
.
OBS Studio is a free and open source software application for video recording and live streaming, available for Windows, macOS and Linux. It provides you with high performance real time video/audio capturing and mixing.
Prepare your Windows system
.
First, let’s make a couple of preparations to avoid occasional Windows-related problems. As Gig Performer user @vindes mentioned in this thread, the best practice is to ensure that sample rates and buffer sizes are the same everywhere (this tip and many other optimization tips are also indexed here). Since I use a buffer size of 128 and a sample rate of 44.1 kHz, I make sure that all my devices in the Sound applet in the Control Panel are set to 44.1 kHz:
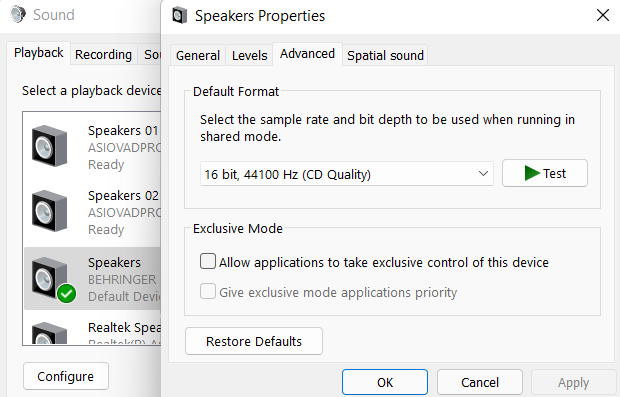
In the Advanced tab, select the desired sample rate. Additionally, if you happen to have the Enhancements tab, make sure to check the Disable all enhancements check box.
Download and install necessary software
.
Download the JACK “64bit installer” from this link. Run the setup file and in the installation wizard select Full installation (with JACK-Router).
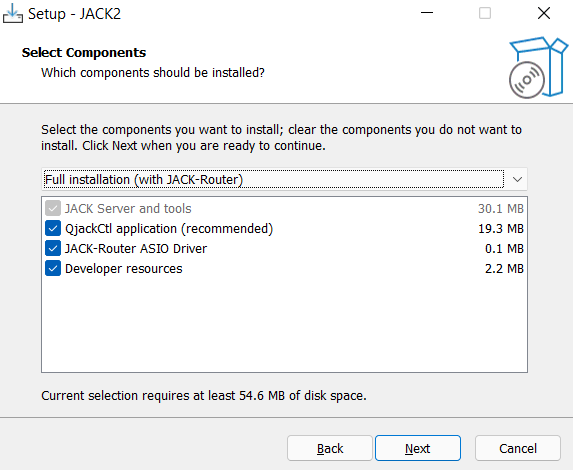
This will install a new ASIO device named “JackRouter”, which will be selected in OBS Studio and Gig Performer in the steps below.
Download OBS Studio from this link. After you install it, in the Audio Settings, select the desired sample rate (make sure that the sample rate is consistent, 44.1 kHz in my case) and select your audio interface in the Global Audio Devices section.

Afterward, close the OBS Studio as we also need to install the ASIO OBS plugin.
The ASIO plugin for OBS-Studio is a plugin that allows audio capture from ASIO sound devices, which are often professional or semi-professional grade hardware for studio or home-studio use. Another benefit of this plugin is that also provides OBS Studio with multi-client capabilities (i.e. you can use several ASIO devices at the same time with OBS Studio).
Download it from this link and install it.
Configure OBS Studio to capture ASIO input
.
Firstly, start OBS Studio and click on the “+” button under the Sources pane. Once the ASIO plugin is installed, a new menu item will be available – ASIO Input Capture.
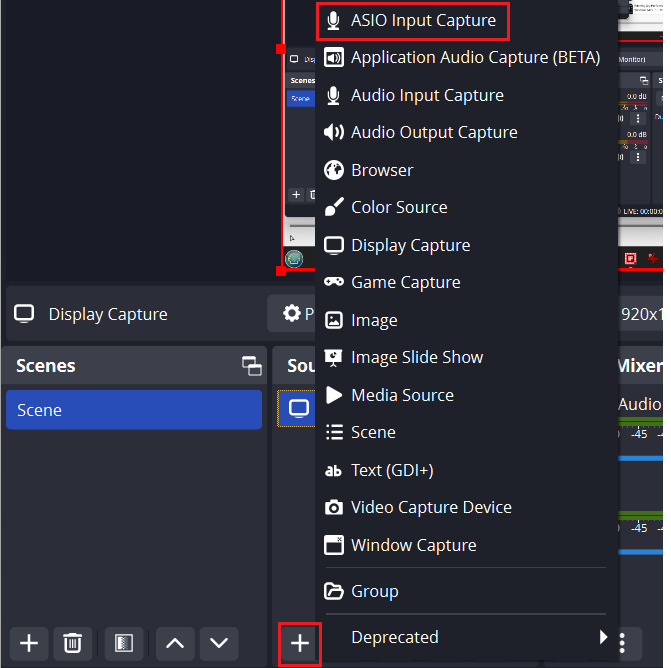
Secondly, click on this menu item and in the next dialog click on “Create new” and then type in the name of the source (e.g. “Jack ASIO Capture”):
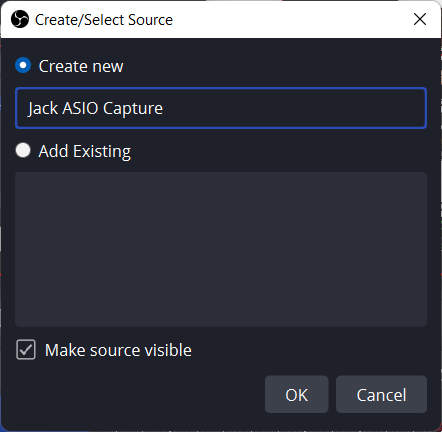
Thirdly, click OK and when the next dialog appears, match the parameters as shown in the screenshot below:
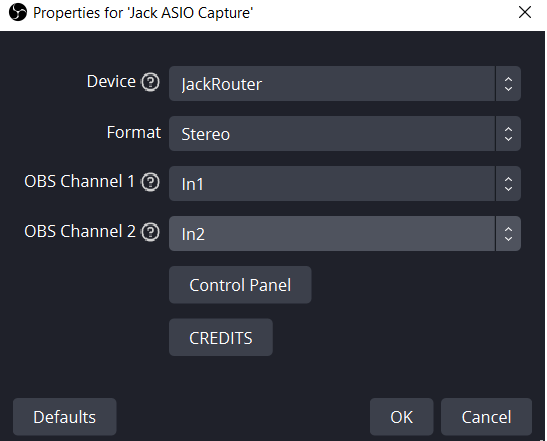
Finally, click on the OK button to save the changes and then quit OBS studio.
Configure Gig Performer to use JACK Router
.
In Gig Performer’s Audio Options window select the parameters (Audio device type, Device, Sample rate, Audio buffer size) as in the screenshot below:
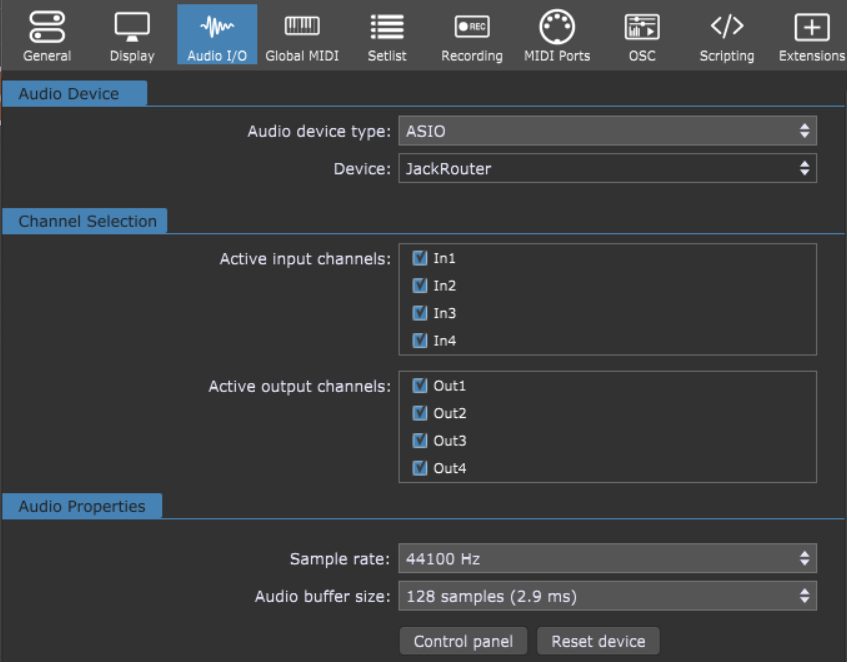
Make sure to select the JackRouter ASIO device and to match the sample rate and audio buffer size as in other audio applications. After that, close Gig Performer when you finish.
QjackCtl configuration
.
Before proceeding with any steps make sure that you closed all your audio applications (OBS Studio, Gig Performer, and all other audio applications). Otherwise, you might get errors while trying to start the JACK server.
Click on the Start button, type in “QjackCtl” and then open this application:
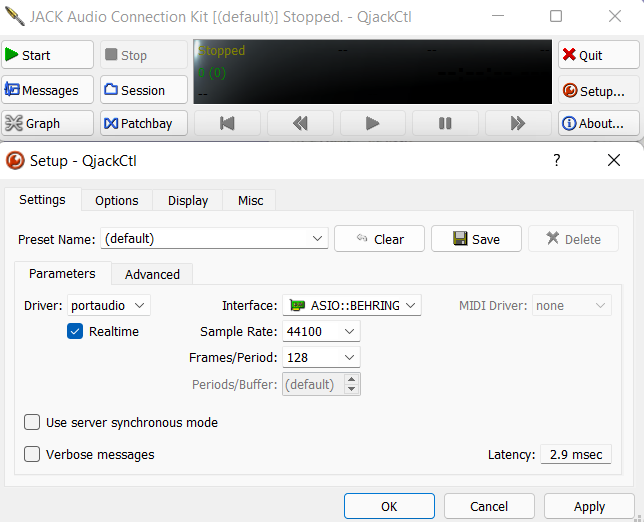
Click on the Setup… button and then select your audio interface, Sample Rate and Buffer Size (“Frames/Period). In my case, it is always 44.1 kHz / 128. After that, click OK and then click on the Start button.
You can see the yellow message “Started” and that the Start button is now grayed out:
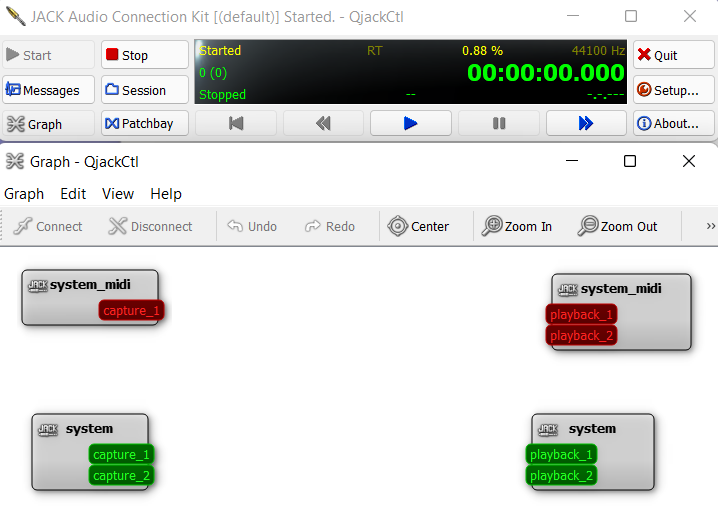
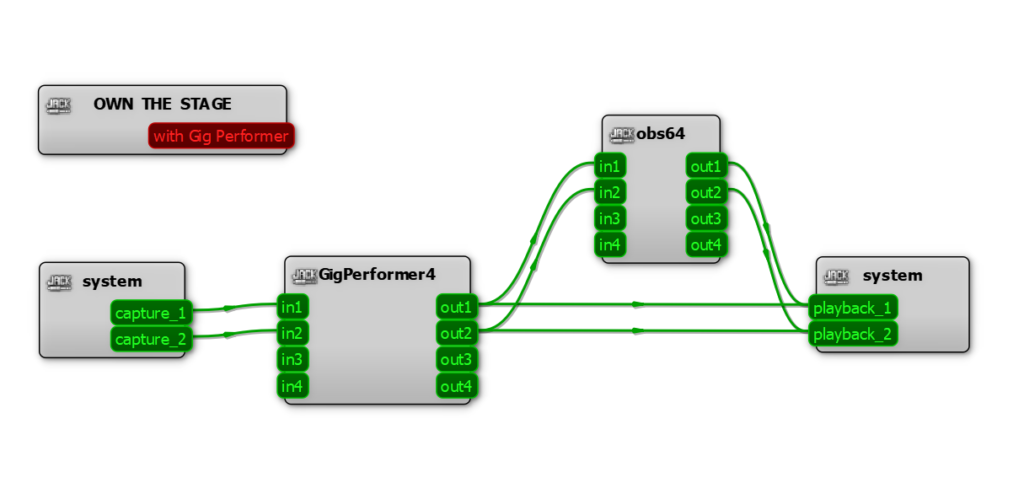
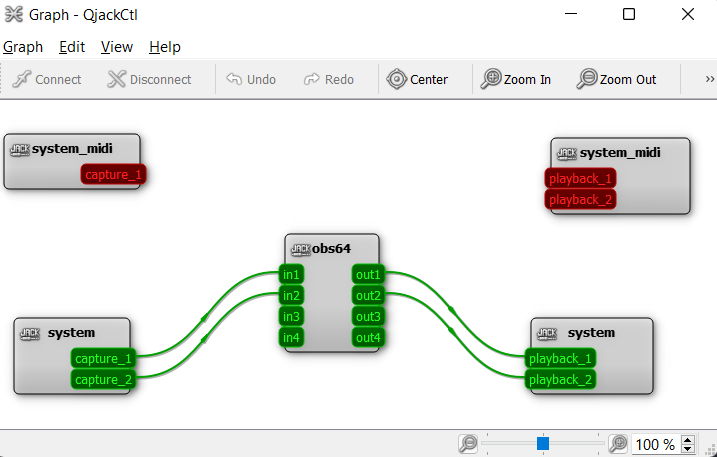
Next, click on the Graph button. This will list all running audio applications where “JackRouter” is selected as an ASIO device. After that, start OBS Studio and you’ll see that another node is added to the graph:
Finally, start Gig Performer and note the addition of Gig Performer to the graph:
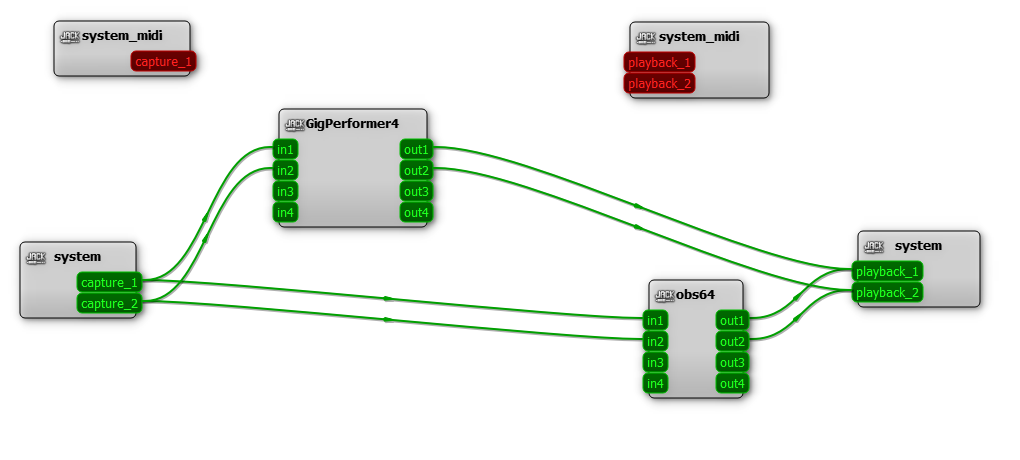
To route Gig Performer outputs into OBS Studio, simply drag the out1 and out2 pins from the “GigPerformer4” node to the in1 and in2 pins of the “obs64” node respectively:
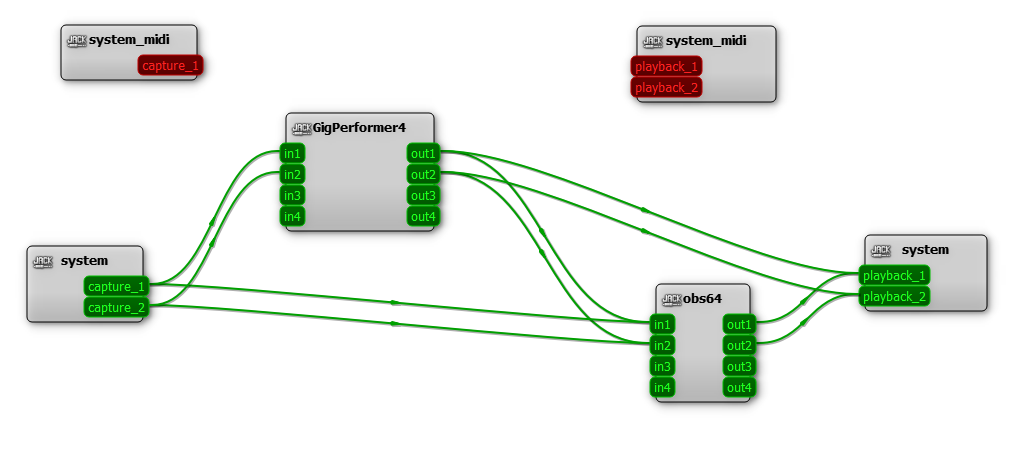
Of course, you can easily route whatever you want and wherever you want. Feel free to experiment to find what works best for you.
Audio Mixer in OBS Studio
The Audio Mixer in OBS Studio is useful to troubleshoot any issues.
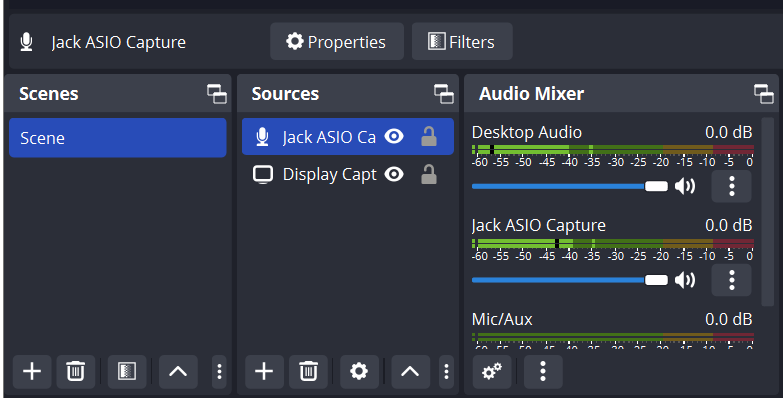
In this screenshot, I can hear a YouTube video clip while also hearing outputs in Gig Performer.
If you have any questions or you want to share your feedback, please visit this Community thread.
Note: there are a couple of concerns with using JACK. Please see this community article for more information.
.
Share this article it to support Gig Performer and spread the word!
Own The Stage® with Gig Performer®
Nemanja Pudar
.
Related topics:
– Gig Performer is the best companion for all your musical efforts and more
– How to use a single-client ASIO driver with multiple applications on Windows
– Why use a computer with Gig Performer rather than hardware
