In this article you will learn how to use an audio interface with a single-client ASIO driver to run multiple applications at the same time on the Windows operating system.
What is a single-client ASIO driver?
.
A Windows ASIO driver that allows only one application at a time to use an audio interface is called a single-client ASIO driver. Similarly, a Windows ASIO driver that allows multiple applications to use the same audio interface simultaneously is called a multi-client ASIO driver.
Unfortunately, there are still audio interfaces that come with single-client ASIO drivers. Since Gig Performer with two instances counts as two applications, your second Gig Performer instance will be unable to use the audio interface (click here to learn what are the benefits of using multiple instances in Gig Performer).
If you plan to buy a new audio interface, we suggest that you choose an audio interface with multi-client ASIO drivers. Check the drivers page or contact the manufacturer to learn which interfaces support multiple applications running simultaneously. Note that this is not a Windows limitation but the developers’ decision and it may happen that a driver update brings support for multiple applications running simultaneously.
If you need to use an audio interface with a single-client ASIO driver, read on to learn how you can still use that audio interface with multiple applications.
GP Relayer
GP Relayer is a new plugin in Gig Performer 5 that allows you to transport audio and MIDI effortlessly between Gig Performer instances, to other DAWs for easy recording, and from DAWs back to Gig Performer to utilize their proprietary sounds and effects.
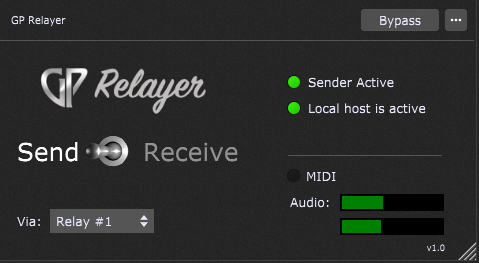
Click here to learn more about GP Relayer, and check out this resources thread for a list of tutorials.
Blue Cat’s Connector and their Windows ASIO driver
.
Blue Cat’s Connector is an inexpensive audio and MIDI streaming plugin that can be used to transmit audio and MIDI signals in real time between several computers or applications, or to create your own routings within a single application with minimal latency. It also provides you with a free Windows ASIO driver to allow integration with ASIO-compatible audio applications.
Blue Cat Connector is available as a free demo so we will show you an example setup using two instances of Gig Performer that you can try for yourself to help you get started.
First, click here to download Blue Cat’s Connector and their free Windows ASIO driver. In the Downloads pane on the right I downloaded “Win VST demo” and “Windows ASIO Driver”. After downloading, install both the demo and the driver.
Gig Performer setup
In this example I’m running the main Gig Performer instance along with a second instance that I named “GuitarEffects” (click here to learn how to create new Gig Performer instances).
In your second instance, open Audio Options and select the “BC Connector ASIO” driver, as shown in the screenshot below:
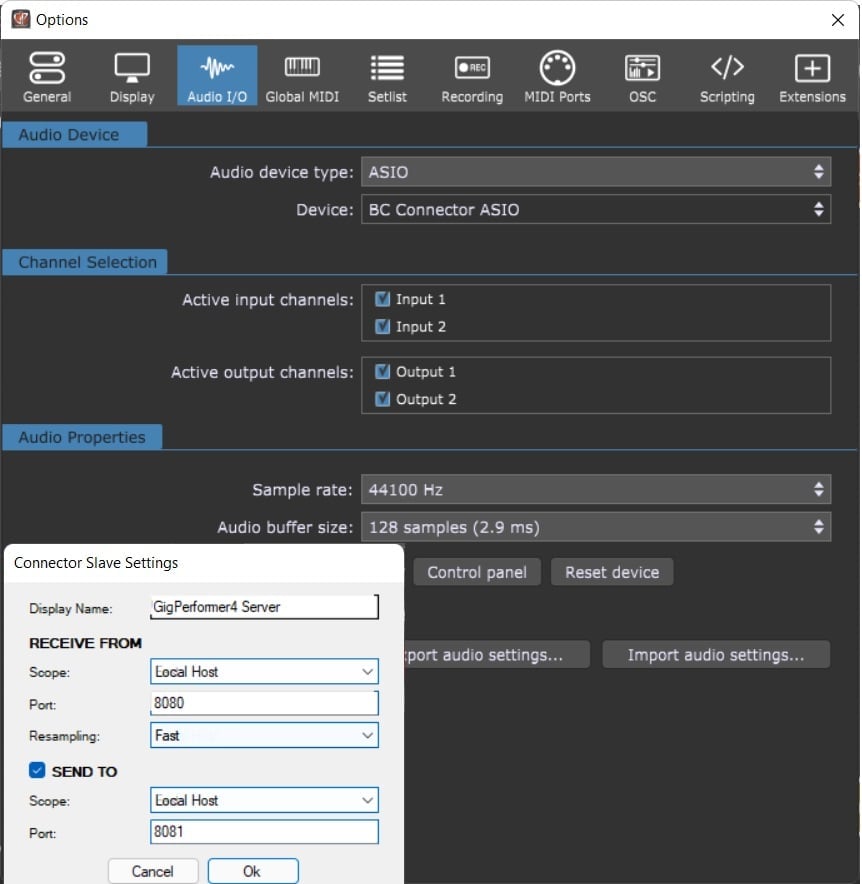
Note that you are limited only to two input and two output channels.
After you choose the desired Sample rate and Audio buffer size, click on the Control panel button. The Connector Slave Settings dialog appears and you can specify here your scope (Local host or Network), port and resampling (Fast, Medium or Best). Note the port numbers as you will need them later. NB: I’m using two Gig Performer instances on the same computer so I selected “Local host” (of course, Gig Performer could be located on two computers in your network).
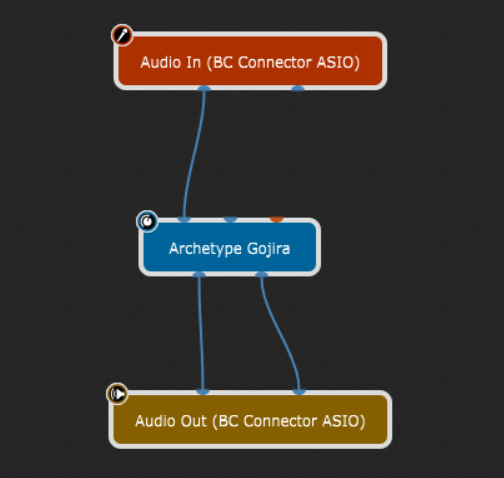
Now, while you are in your second Gig Performer instance, click on the Wiring view and create an audio chain, e.g.:
Blue Cat’s Connector plugin
Now go to your main instance, insert Blue Cat’s Connector plugin, and connect it with inputs and outputs, as shown in the screenshot below:
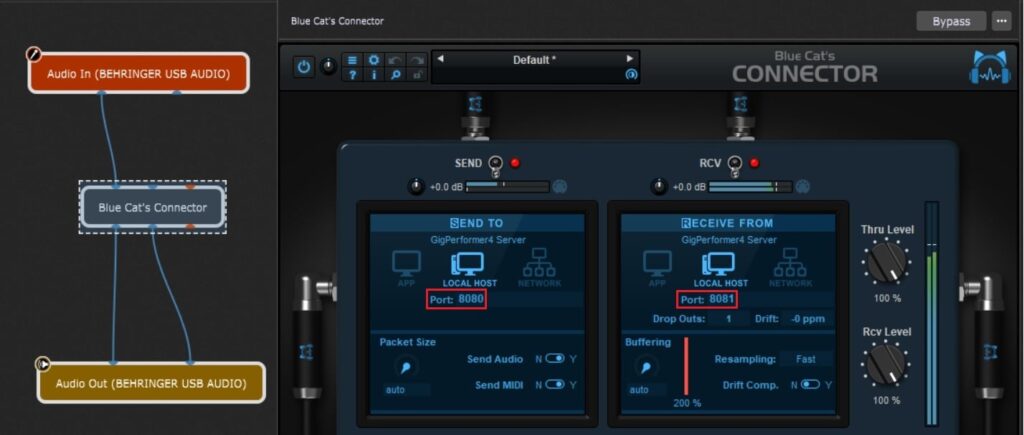
In its plugin editor window set the ports as indicated with the red rectangles. That’s it! When you play your instrument (in this case a guitar), you’ll be able to hear your guitar sound with the effects. NB: if the plugin in demo mode, you will hear occasional drop-outs.
Audio signal diagram
Let’s look at the big picture and how the audio signal flows:
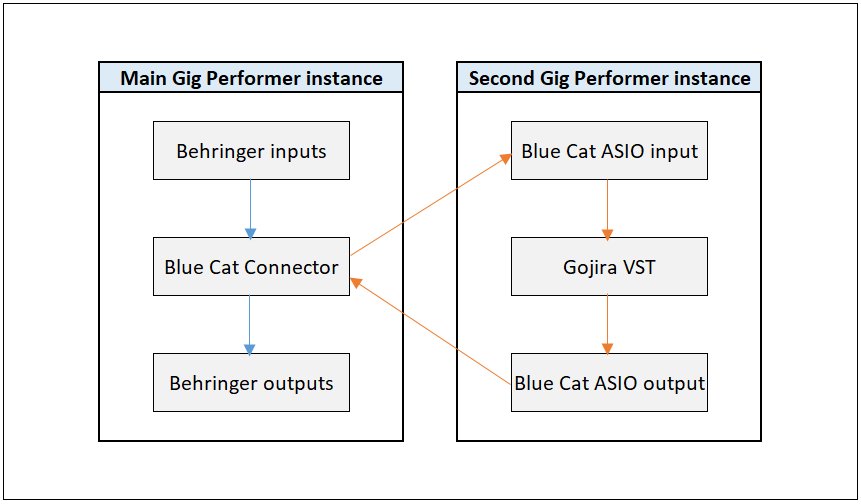
First the audio comes from my Behringer audio interface with its own ASIO driver and goes to Blue Cat’s connector plugin. This plugin handles the routing of audio signals to and from the second Gig Performer instance, where we configured Blue Cat’s free ASIO driver and inserted the guitar effects plugin. This way is audio processing offloaded to another instance of Gig Performer (NB: read this blog article to see clever ways to optimize your plugin usage).
VB-Audio Matrix
.
The VB-Audio Matrix is an audio framework to connect several ASIO devices, several Windows devices or different audio applications together.
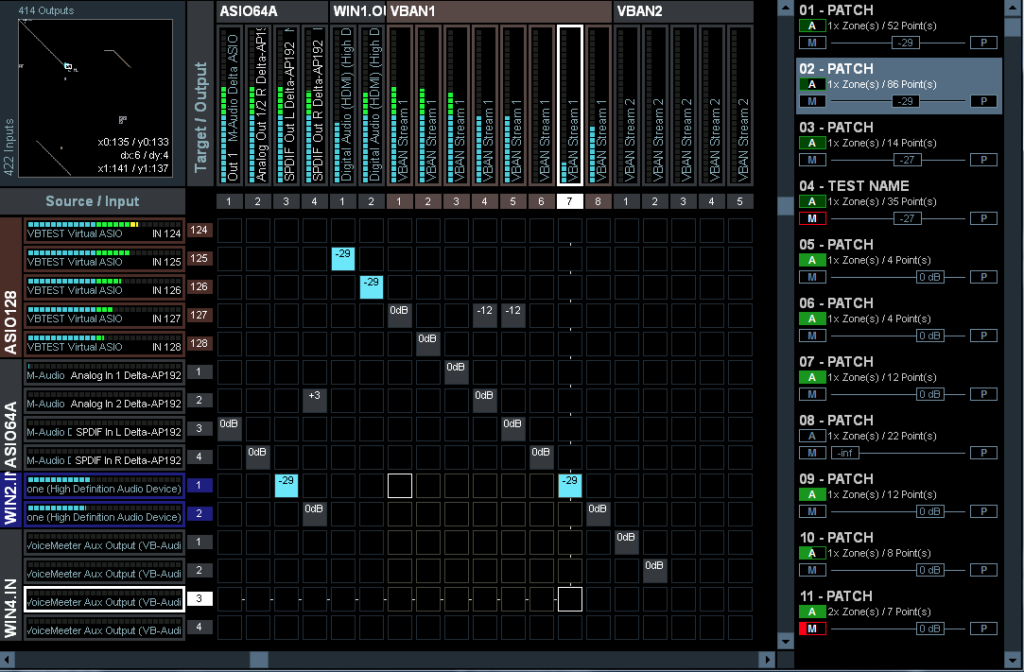
There are 5 different types of slots available for use:
– ASIO Devices – you can select up to 3 different ASIO devices.
– Windows Devices – you can choose up to 4 different slots for Windows Audio devices.
– Virtual Audio I/O – there are 4 slots for virtual audio, used for playing back audio files, Windows sounds etc.
– VB-Audio Network – up to 4 different slots are available for various streaming purposes.
– Virtual ASIO devices – up to 4 different types of virtual drivers are available: an 8 channel, (2)-64 channel, and a 128 channel.
Read the review of this application in this community post.
ASIO4ALL
.
Read this blog article to see how to set up multiple instances of Gig Performer using ASIO4ALL. This driver is also able to aggregate your audio devices:
Read this blog article to see how you can aggregate your audio device and a virtual audio cable driver.
One caveat: this driver introduces additional latency, so test and use with caution.
On some low-cost devices such as this one, ASIO4ALL is the only driver that is provided. This driver can also serve as a solid replacement for old audio interfaces with drivers that may crash Windows.
If you don’t play very percussive stuff or don’t need very low latency try ASIO4ALL (in some cases even Windows Audio may work well with your setup. See an example here). Here is an example of using ASIO4ALL from the Gig Performer in Action thread.
ASIO Link Pro
.
Although abandonware, this software still runs remarkably well on Windows 10 and Windows 11 and introduces near-zero additional latency. It provides you up to 64 input and output channels. Visit this page to see how to download and install it on your PC.
In this example, I’ll route the outputs of another application (in this case Guitar Pro 7 with RSE engine) to Gig Performer to play along with drum and bass tracks. NB: Gig Performer v4.5 now allows you to record outputs of your audio interface, so you can capture your playing along with Guitar Pro’s sounds.
Audio Options in Gig Performer
Let’s first configure the Audio Options in Gig Performer; select ASIO Link Pro from the list of available ASIO devices:
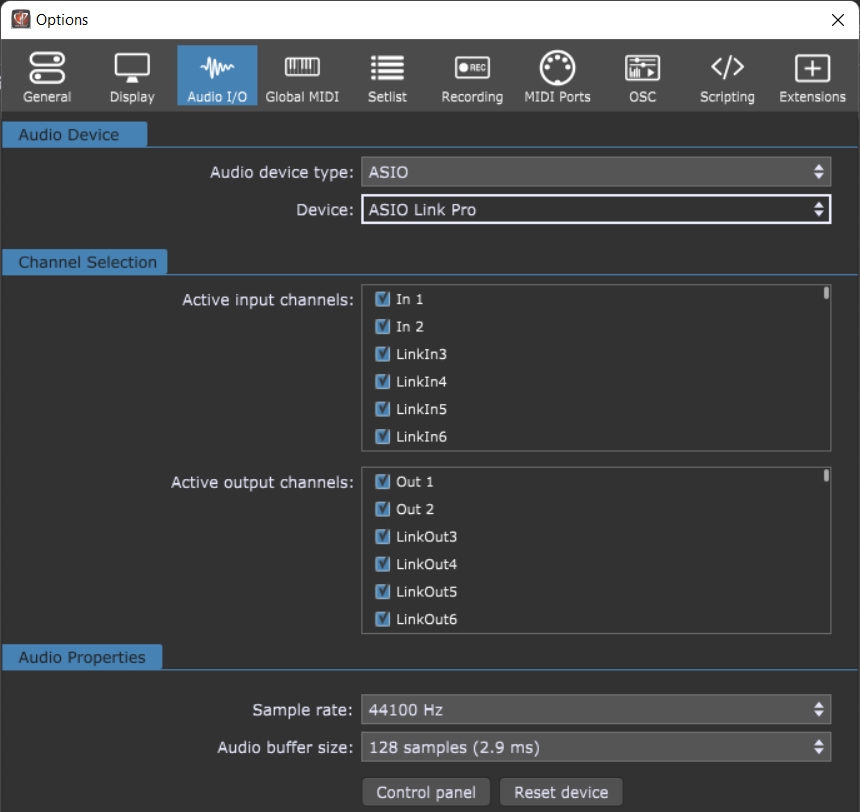
Enable multi-clients
The following window will appear. NB: if it doesn’t appear, look for it in the notification area of the task bar.
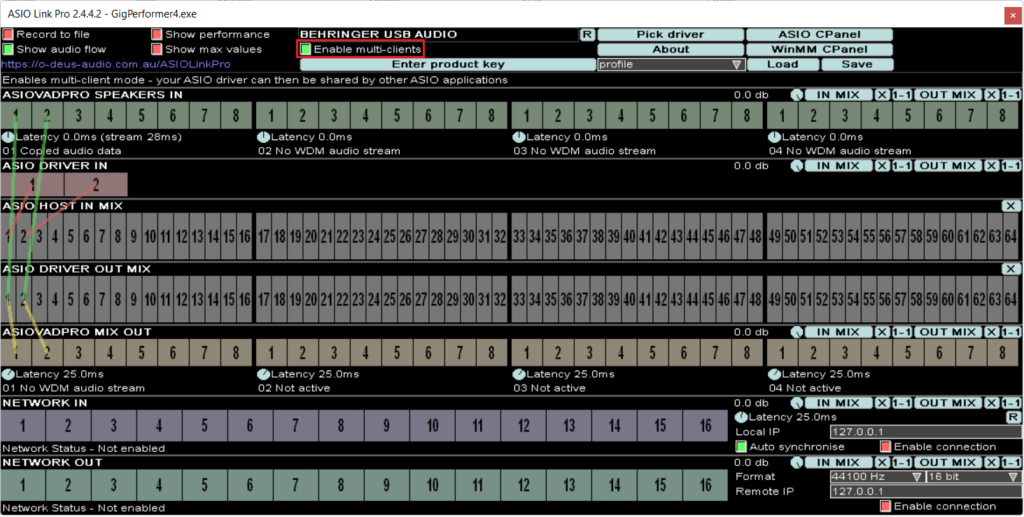
Click on the Enable multi-clients check box. This enables multi-client mode, so your ASIO driver can be shared by other ASIO-enabled applications.
Guitar Pro configuration
Now start your audio application, and look for the Sound settings. In Guitar Pro 7, click on the Sound menu and then select Audio / MIDI settings:
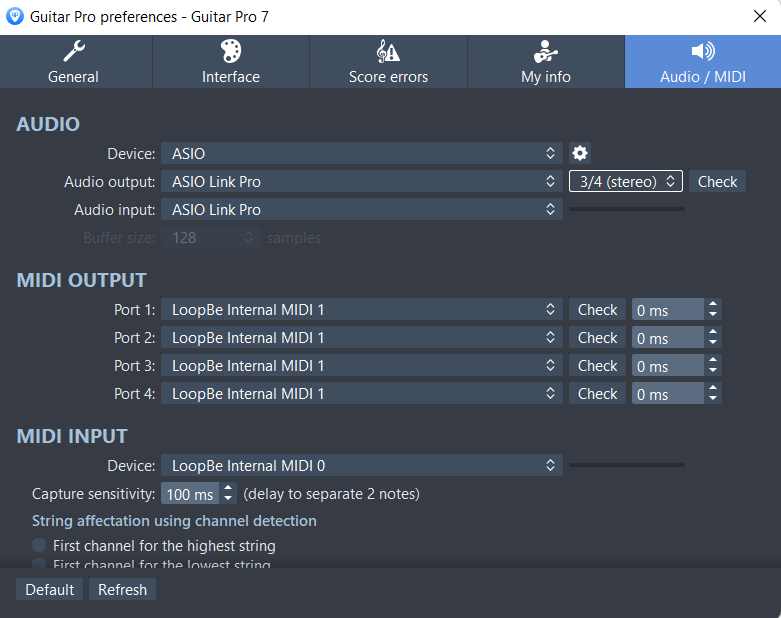
In this window, under the Audio settings group, select the ASIO device and then ASIO Link Pro for audio input and output. For the audio output select 3/4 (stereo) as we want to use these channels in Gig Performer.
Route to ASIO In
Note that this window also appeared (if it didn’t appear, you can always find it in the notification area of the task bar):
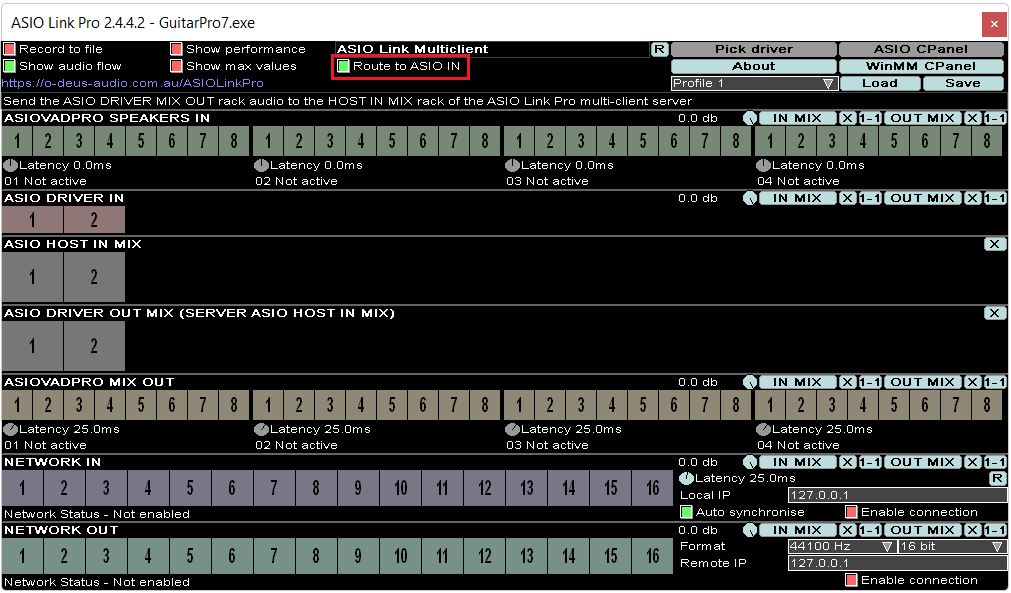
Check the Route to ASIO IN check box (as indicated with the red rectangle).
Now go to the Wiring view and create the wiring as indicated below:
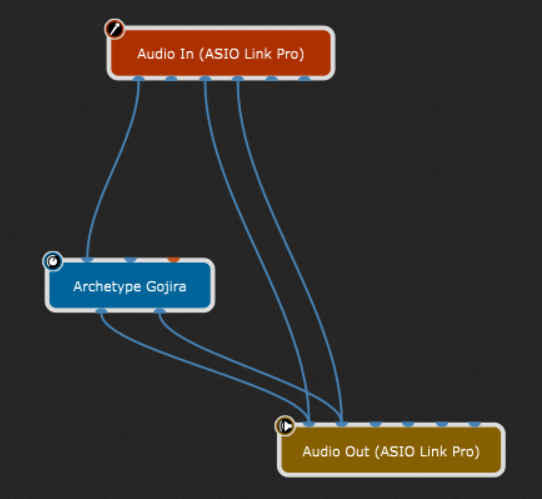
When you click on load a file and play it in Guitar Pro (for example, the bundled “All of them Witches” is cool) the outputs will be sent to channels 3 and 4 in the Gig Performer’s Audio In block. This way you can play along and record outputs of ASIO Link Pro, if desired.
NB: you see 6 audio channels in the screenshot above, as I limited the channel number to 6 – otherwise the screenshot would be very big, showing all 64 channels in Audio In and Audio Out blocks.
Honorable mentions
I also used ASIO Link Pro to route audio from Gig Performer to my video recording software in this YouTube video. Erik Schütz (@schamass) used ASIO Link Pro in this Backstage with Gig Performer episode.
JACK
.
JACK Audio Connection Kit (or simply JACK) is a professional sound server API and a pair of daemon implementations to provide real-time, low-latency connections for both audio and MIDI data between applications. It is great for taking the audio output from one application and sending it to one or more other applications. It is available for Windows, macOS and Linux.
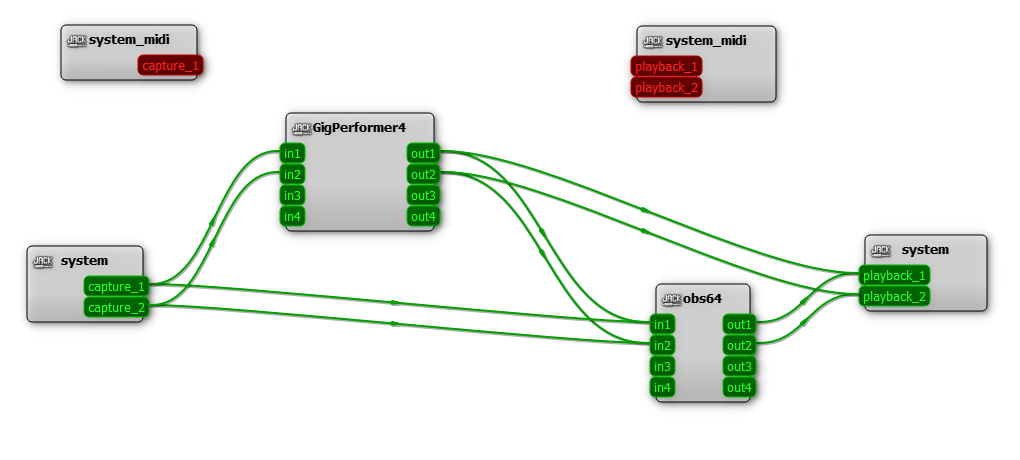
In this article we demonstrated how you can easily route audio using JACK and set up live streaming using OBS.
Make sure to visit this thread for more solutions, tips and tricks from our Community.
.
Share this article it to support Gig Performer and spread the word! 
Own The Stage® with Gig Performer®
Nemanja Pudar
.
Related topics:
– How to offload the processing of audio plugins to remote computers using AudioGridder
– How to use multiple instances of Gig Performer with JACK
