Gig Performer is NOT a DAW!
Gig Performer is an audio plugin host for live performance and session musicians, part of your instrument.
Think of the main view of your DAW containing everything you need for a session as analogous to just one rackspace in Gig Performer.
When you switch from one rackspace to another, you are essentially getting a completely new “session”. In Gig Performer, this happens instantaneously. You can switch from one set of sounds to completely different sounds in real-time while you’re performing. It is instant always, even during the complex songs, without missing a beat.
.
About DAWs
.
Almost everyone involved in composing or performing music knows about Digital Audio Workstations (DAWs) and probably has at least one. There are numerous DAWs available for all the major platforms, both free and commercial. Examples include Logic Pro, Cubase, ProTools, Cakewalk, Digital Performer, Studio One, Reaper, Ardour, Reason, among many others.
There are also some DAWs out there that cross over into the live use domain for certain genres, Ableton Live being the most well known with its ability to trigger clips and record/playback loops on the fly.
.
DAWs are intended for recording
.
However, for the most part, DAWs are really designed as a modern version of the traditional multi-track recording studio to record, edit and playback multiple tracks and finally mix down to the finished product. In this sense, DAWs implement a “linear” paradigm where a song is built up from multiple tracks. Each track contains either audio data (pianos, guitars, vocals, drums recorded using microphones) or MIDI data where, via a channel strip, each track will typically be associated with an external MIDI driven synth or with a software plugin, usually known as a VST, VST3, AU (Mac only) or AAX (ProTools) plugin. That last kind of track is usually called a software instrument track.
Software instrument tracks are associated with MIDI channel strips and plugins are inserted into the channel strips with effects plugins (reverb, echo, phase, etc) directly under them.
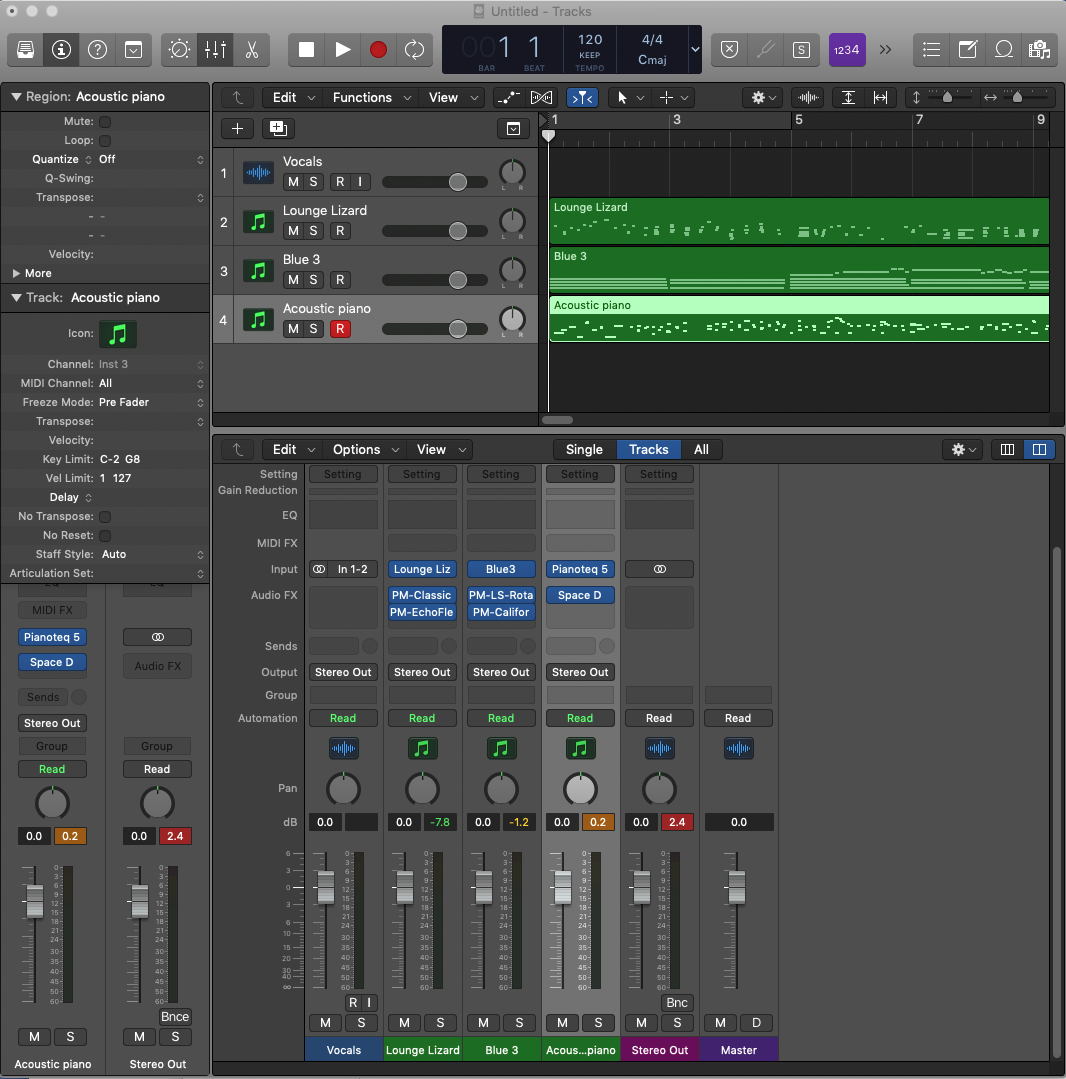
For example, here’s a screenshot of Logic Pro where we have created an audio track to be used for vocals and three MIDI tracks each of which is driving a software plugin along with some effects. If you want all your plugins to share some effects (e.g. SENDs) then you have to create auxiliary bus channel strips to handle these. There’s an awful lot of information in here, much of it not even useful for live performers.

.
Closer look at a channel strip
.
Let’s take a closer look at one of the channel strips – for example, here’s the one for Blue 3 – a rather wonderful Hammond organ emulator. At the top, the Blue 3 plugin is inserted and directly under it are the rotator and distortion respectively effects plugins. In this strip, the two effects plugins are the “inserts” and audio flows directly from Blue3 to the Rotator and then the output of Rotator goes into the distortion effect.

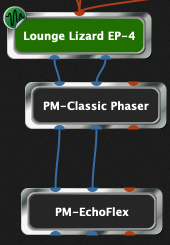
For comparison, here’s how this would look like in a Gig Performer rackspace, where there is deliberately no concept of a channel strip. You can see directly what will be the audio flow.

Now suppose you want to route that Phaser a reverb effect.
.
Inflexible Audio and MIDI routing
.
You can’t route that Phaser to a reverb effect with the channel strip directly.
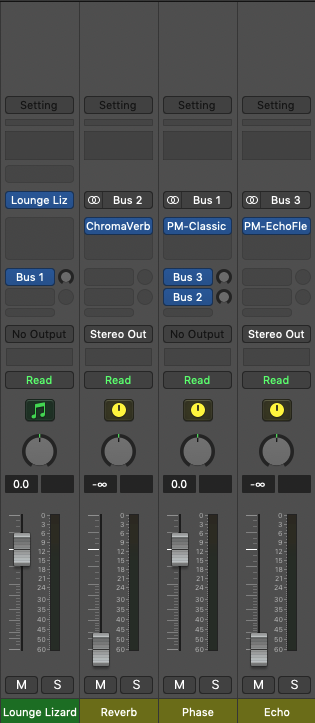
To do this, you now have to create multiple busses and use Sends to route audio. For example, in Logic Pro, you would create three busses, each containing a different effect. You would then route the audio from Lounge Lizard channel strip into the phaser channel strip by sending audio to “Bus 1” and also disable direct sending to Stereo Out. Then, in the Bus 1 channel strip you would create two Sends to send the phaser to both the Echo plugin (Bus 3) and the Reverb plugin (Bus 2). Those last two busses would be enabled for Stereo out. So in summary, you have to create an entirely new structure to get the effect you want.
Good luck coming back to this later and figuring out what’s going on!

.
Gig Performer’s approach
.
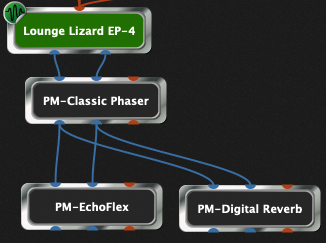
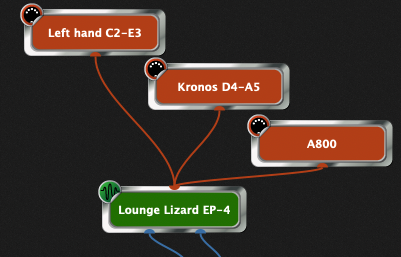
Compare this to Gig Performer’s approach where you simply add the Reverb plugin and connect it. Now you can easily see where audio is going without the distractions and complexity of organizing busses, very beneficial if you just want to focus on creating your sound.

.
Multi keyboard access to a sound
.
Now, right here, we’re going to see a critical reason why the DAW approach doesn’t really work in a live performance situation. In the studio, you can generally get away with a single keyboard since you’re most likely going to be recording one track. But what are you going to do in a live situation where you need one octave of that piano to be accessible on a section of one keyboard and another couple of octaves accessible on a different keyboard, or even on a different part of the same keyboard but transposed up or down?
I’ll leave you to figure out how to do that with your own DAW but here’s how it works in Gig Performer

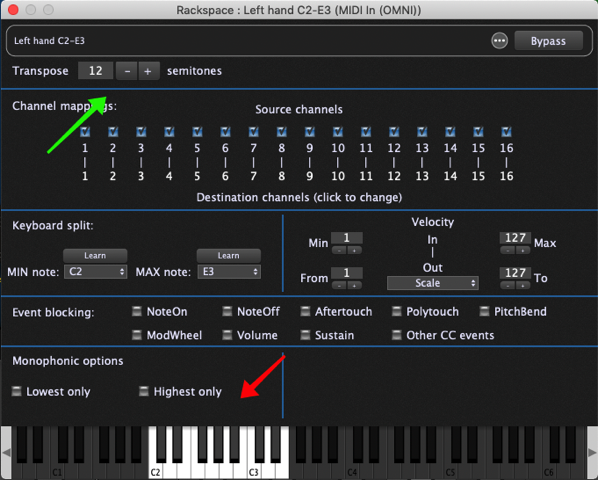
The orange blocks represent keyboards. Here’s an open view of the “Left hand C2-E3”

The red arrow shows that only 17 keys of that particular keyboard are active, from C2 to E3. The green arrow shows the Transpose amount, meaning that when you play notes on that keyboard between C2 and E3, notes between C3 and E4 will be sent to the plugin.
.
Sound layering
.
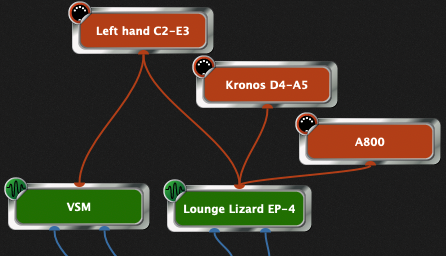
If you want to layer that Left Hand with Strings, it’s trivial – just connect that Left Hand to a Strings plugin and you’re done.

.
Instant access to every sound
.
A track-based environment makes perfect sense in a studio/recording situation. Whether you’re using old-fashioned multitrack tape or a DAW, you’ll typically have one instrument per track or even multiple tracks for one instrument if, for example, you’re using multiple microphones to record a piano, or if you are miking each drum and cymbal separately to create a submix, perhaps bouncing such a mix into yet another track.
But consider what happens when you’re in a live situation and you need your electric piano for four bars and then you need an acoustic piano plus strings for the next 8 bars and then you need to play all three together, either from a single keyboard or from multiple keyboards. DAWs are simply not designed for this kind of thing. And that’s just dealing with one song!
What happens when you have to play a different song that has completely different sounds and requires different splits and layers?
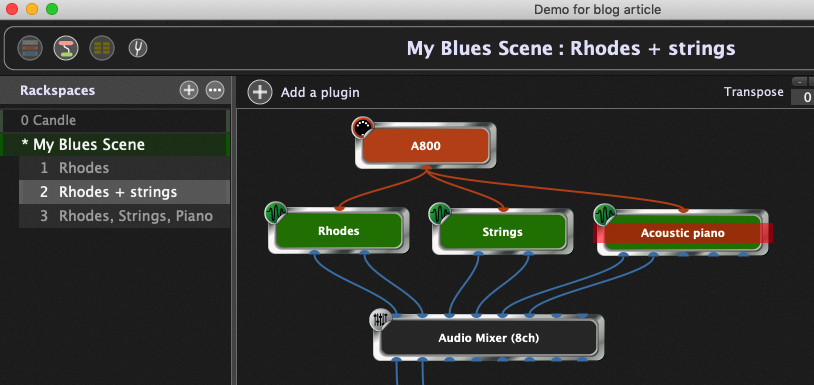
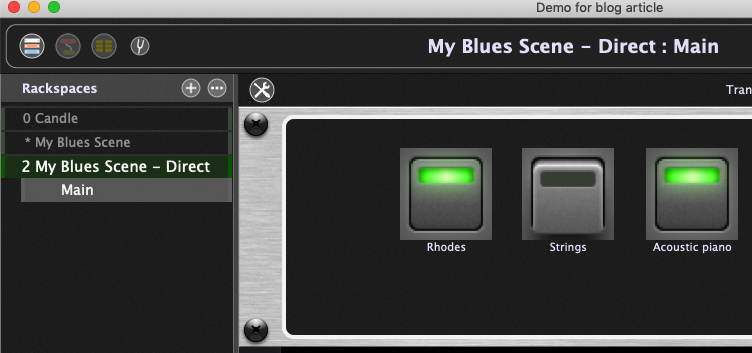
On the other hand, Gig Performer is designed specifically for these kinds of scenarios. For example, here’s a rackspace, called My Blues Scene. It contains three plugins (Electric piano, strings, acoustic piano) all playable from a single MIDI keyboard controller. On the left, you will see that the rackspace has three variations in it. Each variation determines which plugins are enabled. In this example, we have selected the Rhodes+strings variation and you can see that the Acoustic piano has a red bar across it meaning that it is currently turned off.

.
Sound switching
.
You can switch from one variation to another using buttons on your keyboard or a MIDI pedal controller. You have the option to go up or down or you can explicitly select a variation using MIDI.
Alternatively, you could just use a rackspace with a default variation. Then, using three buttons (or pedals) on your controller, you can associate the enable/disable control of each plugin with a specific button or pedal for direct access. Here, we turned on the Rhodes and Acoustic piano, and turned off the strings. Of course, you can have more than three plugins and more than three buttons.
We call these buttons “widgets”. Knobs and sliders are also examples of widgets. Most widgets can be trivially mapped to buttons, knobs or sliders on your hardware controllers. This makes it easy to adjust your sound in real time while performing on stage.

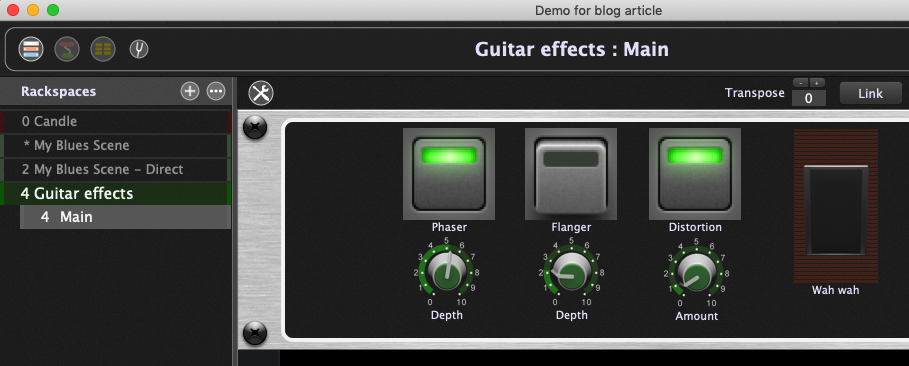
This last approach is particularly attractive for guitar players using lots of effects.
In the following example, we can directly turn on or off three effects (phaser, flanger and distortion), typically using buttons. We can also control parameters of those effects either directly or by using physical knobs on a controller that control the knobs displayed here in the panel. You could even use a tablet and control these widgets remotely.
A guitarist might also have an expression pedal which, in this particular song, is controlling a wah-wah effect. In another song, that same expression pedal might be controlling the amount of delay of an echo plugin.

Switching from one of these rackspaces to another is instantaneous and glitch free.
If you just even try to think about how you might go about doing this with a traditional DAW, your head will start hurting.
.
Songs and setlists
.
.
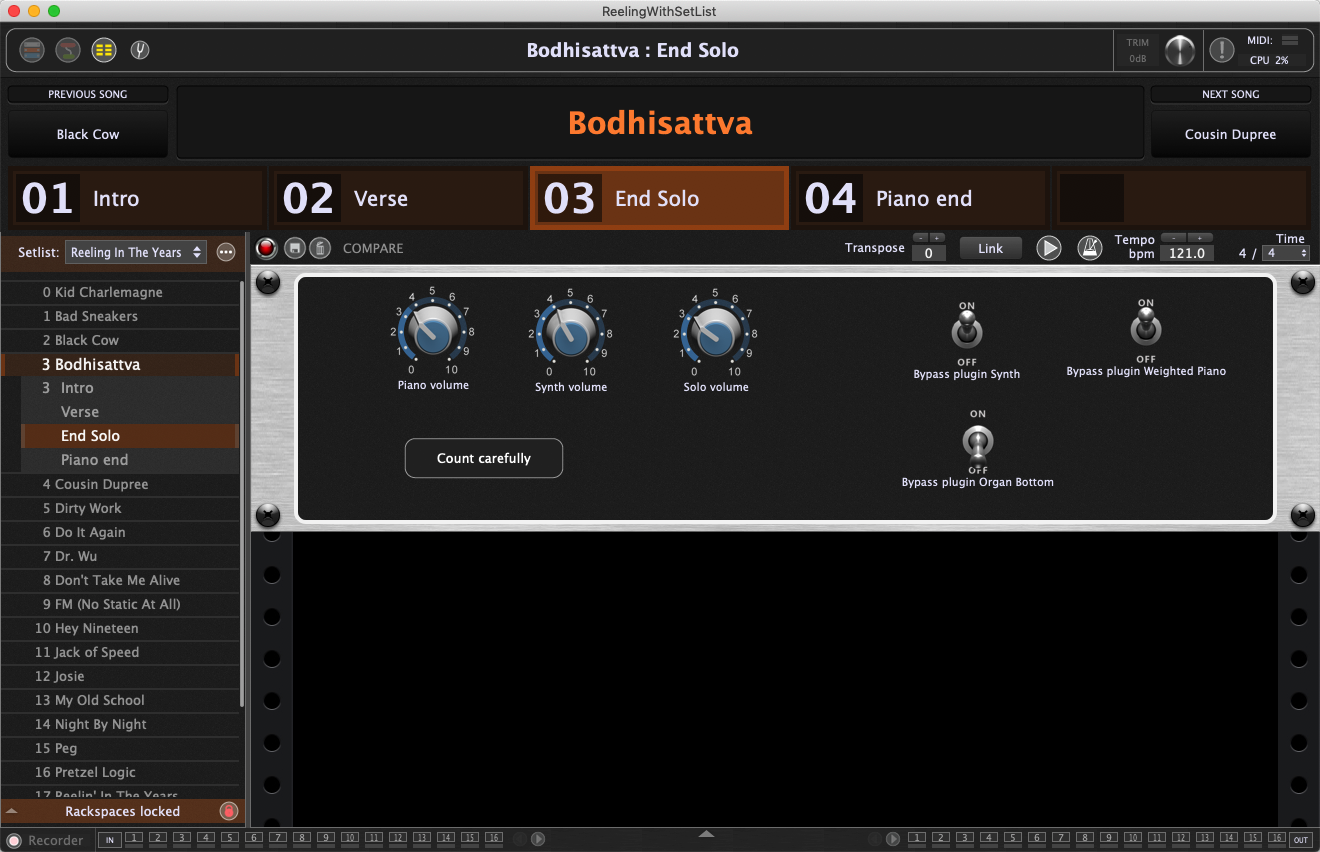
Suppose you have created your rackspaces, designed your front panels, and linked up your MIDI devices. Then you can start working on creating your setlist. Setlist are collections of songs. Each song is a collection of song parts. Each song part represents a single rackspace/variation pair along with some extra properties. Take a look at the image below, the view in which you would generally use when you are on stage. So there’s a setlist “Reeling In The Years” on the left and a list of songs below.
.
Using songs and setlists
.
You can click on any song to make it active instantly. Of course, you can also send the appropriate message from your control surface or MIDI pedal controller, etc. Each part of the song can be a completely different collection of plugins with a corresponding user designed front panel. Selecting song parts is also instant, even while you’re playing a chord. Song parts are laid out across the top for easy visibility or to match up with your pedal controller. You can temporarily override the widgets in front panels in song parts.
This means you can easily reuse rackspaces in different song parts and still remember different settings.

.
Other
.
There is too much “other” to describe here.
ChordPro support, Ableton Link, a full OSC implementation, a programming language for advanced control, to mention just a few features. If you want to know more, check out his page.
.
Related topics:
– Music software has failed you and here is why (blog)
– Gig Performer is not a plugin chainer!
– Gig Performer is the best companion for all your musical efforts and more?
– A High Level Look at Gig Performer 3 with Larry the “O” (YouTube)
– 5 Reasons for using Gig Performer rather than a DAW with Matt Vanacoro (YouTube)

