In this article you will learn how to automate switching rackspace variations and song parts using the MIDI File Player.
Gig Performer 4 comes with great features such as a bundled MIDI File Player, Scriptlets and a Local GP port. If you have a MIDI file that contains program change (PC) or control change (CC) messages, you can load that MIDI file into a MIDI File Player and route the output of that player in such a way so that you can both control Gig Performer (e.g. to change rackspaces or songs automatically) and also perform operations such as widget automation.
We will combine all the above-mentioned features to build an example gig file, which you can download as a starting point for your own use.
Note: you can also automate switching rackspace variations and song parts using Streaming Audio File Player and Timeline Actions Tool.
What applications to use to edit MIDI files
.
The first thing you will need of course is a MIDI file for the song you are planning to perform and into which you will insert PC and/or CC messages. You can of course create one using pretty much any DAW or MIDI sequencer (Logic Pro, Digital Performer, Cubase, etc.) that can export standard MIDI file (SMF).
If you don’t have a MIDI file for the song, you can probably find one using your favorite search engine.
The second thing that you need is an application through which you can edit the MIDI file so as to insert the desired PC and/or CC MIDI messages. For this purpose, you can use simple applications like MidiEditor. It is free for Windows and Linux, and donations are accepted. Alternatively, you can use complete solutions like:
– Cakewalk – free for Windows.
– Ardour – for macOS/Windows/Linux and there is a free/demo version that periodically goes silent after 10 minutes.
– MuLab – available on macOS and Windows, and the free version is available.
Please visit this thread to see more software recommendations from our community members. .
For this article, I used MidiEditor, which is extremely easy to use.
How to insert a program change or a control change message into a MIDI file
.
Simply load your MIDI file and scroll down until you see the Program Change section (indicated with the red rectangle) and the Control Change section (indicated with the green rectangle). All operations are easily available from the main toolbar and are very intuitive (for example, the Pencil symbol creates a new MIDI event, the Eraser symbol removes a MIDI event, etc.). The Standard Tool (the arrow symbol) can move blocks containing MIDI events and right clicking on a block duplicates it.
From the screenshot below you can see that I created 4 Program Change blocks and 17 Control Change blocks:

In the Event properties you can define the desired program change value as indicated with the blue rectangle on the screenshot above. Here are values for other three program change blocks:

Here is important only the value of the program change message, you can ignore the text after the colon (say: “Bright Acoustic Piano”) as those are standard MIDI associations.
Insert as many program changes blocks as you want and save the MIDI file. These program change messages will be used to switch rackspace variations or song parts in the example gig file.
As for the CC messages, these will be used to demonstrate how you can automate widget movements using the Local GP Port. More specifically, we will gradually decrease and then increase the Output volume using a Knob widget. Here are Event properties for the first 3 blocks:
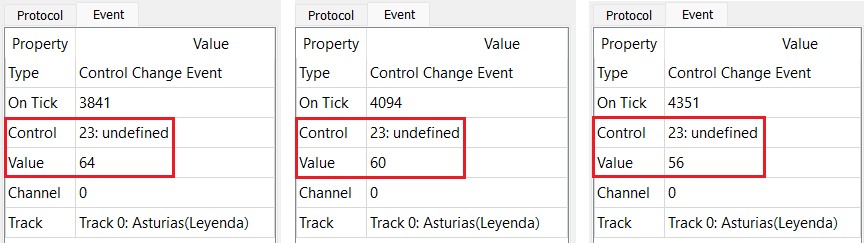
We’ll send CC23 and will gradually decrease values by 4 (64-60-56-52-48-44-40-36-32-28-24-20) and then increase values by 4 (24-28-32-36-40).
How to inject program change messages to the Local GP port
.
First, open the Global rackspace, click on the Wiring view, insert the MIDI File Player plugin and load your prepared MIDI file from the previous section. Afterward, insert the Scriptlet plugin and add this simple code:
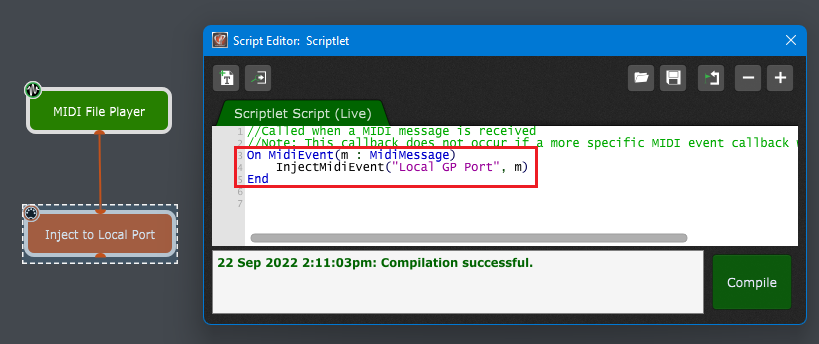
Click on the Compile button (click here to learn more about Scriptlets). This scriptlet will inject all incoming MIDI messages (that are coming from the MIDI File Player, in this example) into the Local GP Port.
The Local GP Port is a special port that exists only inside Gig Performer. It functionally behaves like any other MIDI In block, for example, widgets can be associated with MIDI events arriving at this port, just like any physical MIDI Input port.
How to use the Local GP port in rackspaces
.
There are no restrictions for the location of the Local GP port in terms that you can insert in the Global rackspace or in regular rackspaces.
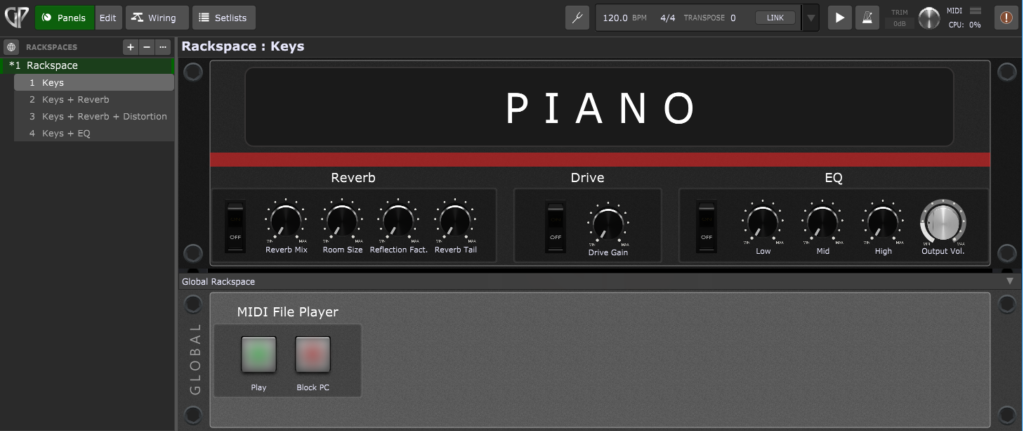
For this example, I built a rackspace with four variations:
We assigned the corresponding program change number to every variation. Refer to this page to learn more.
In Edit mode of the Panels view, click on the Output Vol. widget:
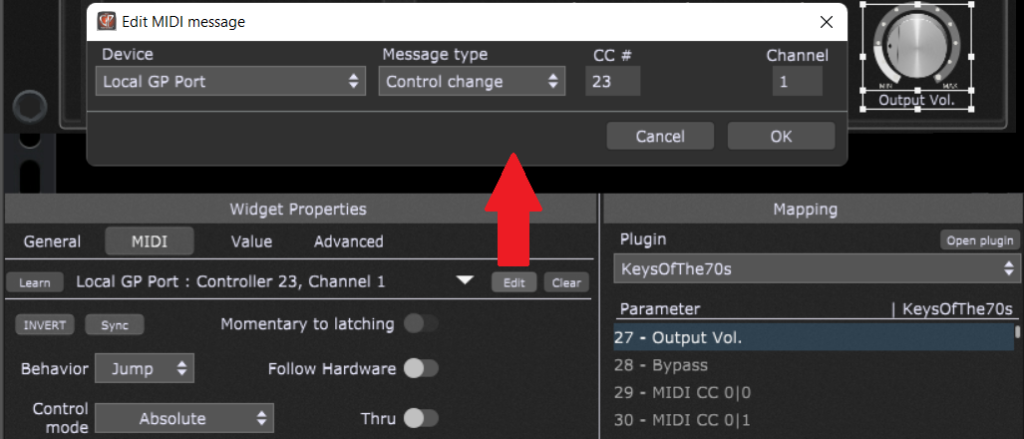
Click on the MIDI tab and then click on the Edit button. Match the settings from the screenshot above and click OK to save your input.
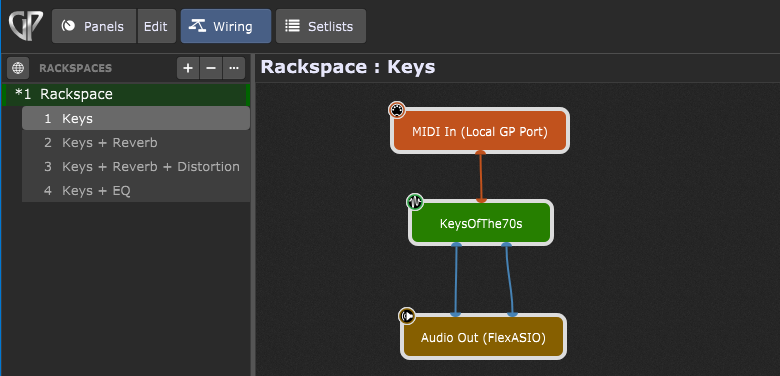
In the Wiring view of this rackspace, the Local GP Port is connected to the bundled KeysOfThe70s plugin:
If you click on the Play button in the Global rackspace, you can see how variations change automatically as the MIDI file plays. Also note how the Output volume widget moves.
Click on the Setlist view. As the MIDI file is being played, the corresponding song parts will switch automatically.
Another button, “Block PC” blocks sending out the program changes in the MIDI File Player, so clicking this button won’t change variations or song parts.
Wrapping up
.
Some plugins like KeysOfThe70 can react to program change messages. In this case, make sure to turn off the option “Pass unused PC messages” in the Global MIDI options. Otherwise, any program change message that is not assigned to rackspace variations or song parts will be sent to the KeysOf70s plugin. Click here to learn more.
Finally, you can use CC messages and the System Actions plugin to change rackspace variations or song parts; refer to this blog for detailed instructions.
Here is the example gig file: DOWNLOAD
Note: you can play the supplied MIDI file in this gig file even if you don’t already have this file on your computer – the MIDI File Player will report that the underlying MIDI file is “missing”, but you can still play it. The reason for this is because the MIDI files loaded in the MIDI File Player plugin are stored as part of the state of the plugin.
To learn more about program change messages, make sure to read this in-depth blog Program change management.
To share your feedback and to see more recommendations and tips, please visit this Community thread.
.
Please share this article it to support Gig Performer and spread the word! 
Own The Stage® with Gig Performer®
Nemanja Pudar
.
Related topics:
– How to step through the MIDI File? (Finger Tap)
– Questions about Rackspaces and Variations
– How to change sounds and control plugins from your MIDI controller
