In this article we’ll show you how to change sounds and control plugins from your MIDI controller.
Gig Performer is an audio plugin host for live performance and your live performance command center. Of course, it can be used as your loyal companion on many other use cases. In this article, we’ll cover everything starting from the moment when you connect your MIDI controller to your computer and ending with some bonus tips. Make sure to check all the links in this article for additional explanations.
Let’s get started.
Note: there is also a YouTube video that cover this topic in detail. Check it out here.
Connecting your MIDI controller to your computer
.
Depending on what physical ports are on your MIDI controller, audio interface and computer, there are several ways to make a working setup.
Connectors and ports
In this example, the Lenovo Yoga laptop has two USB-C ports and one USB 3.1 port:
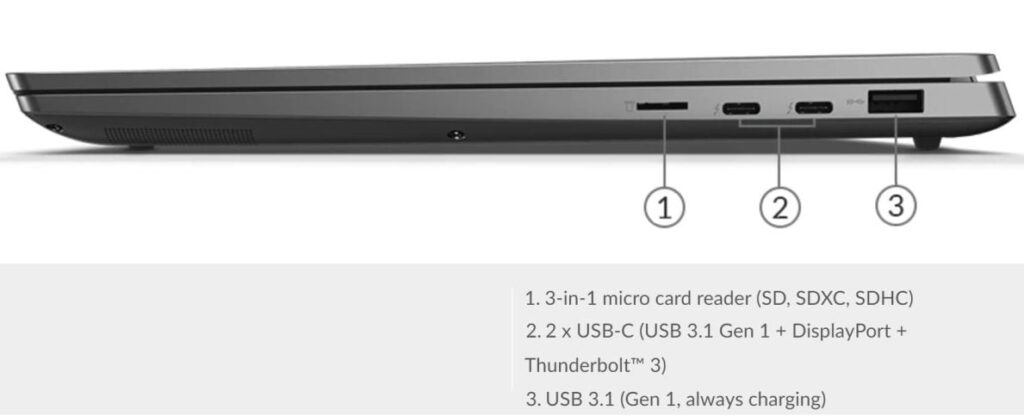
We connected a Behringer audio interface, an Arturia MiniLab Mk2 and a Behringer FCB1010 to this laptop.
Note: if your MIDI controller has a USB cable, simply connect it directly to a USB port on your computer and it will work. You don’t need any additional audio/MIDI interfaces for your MIDI controller. In this setup, I’m using an audio interface just to connect my guitar.
The Behringer FCB1010 uses standard MIDI 5-pin DIN connectors for MIDI In and Out. If my audio interface had MIDI inputs, I could have simply connected it with a MIDI cable. In my case, my audio interface doesn’t have MIDI inputs, so I use a LogiLink MIDI to USB adapter and it works very well. For the remaining USB-C ports, I use a USB-to-USB-Type-C OTG adapter. NB: OTG adapters are also interesting as they allow you to connect your MIDI keyboard directly to your Android smartphone or tablet.
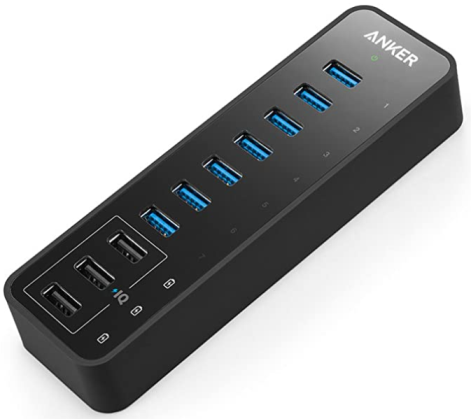
Alternatively, you can use USB hubs to connect your audio and MIDI devices. If you use USB hubs, we strongly recommend that you use a quality and powered USB hub. We also recommend this in our Windows and macOS optimization guides. An example of such a hub is the Anker 10 Port 60W Data Hub with 7 USB 3.0 Ports. Click here to learn more.
Connect your MIDI device
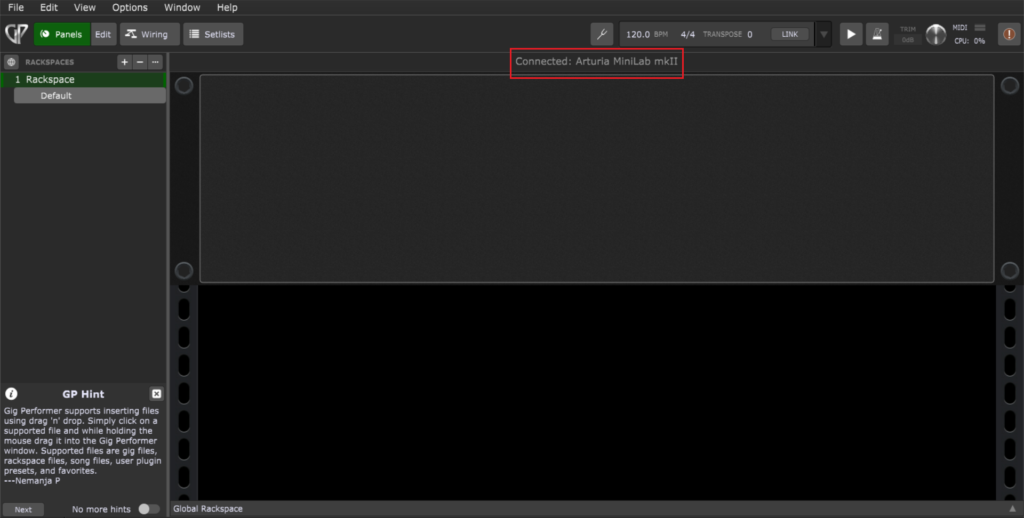
Immediately after you connect your MIDI device to the computer, Gig Performer will display a message that your MIDI device is connected (as shown with the red rectangle):
Connected MIDI ports will also be listed in the MIDI Ports options.
In the next section you will learn how to test your connection and how to identify what MIDI events are being sent from your MIDI controller.
Testing the connection
.
When you have everything set up, open the Global MIDI Monitor in Gig Performer to test the connection:
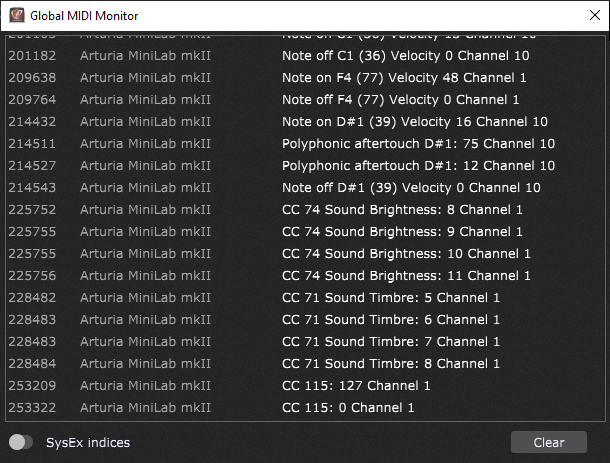
Press buttons, move sliders or knobs on your MIDI controller to check whether Gig Performer registers the corresponding MIDI events.
The Global MIDI Monitor is also useful to determine what type of message (and on what channel) is being sent when you move hardware controllers on your MIDI device. For example, pressing a footswitch on a Behringer FCB 1010 sends program change (PC) messages by default:
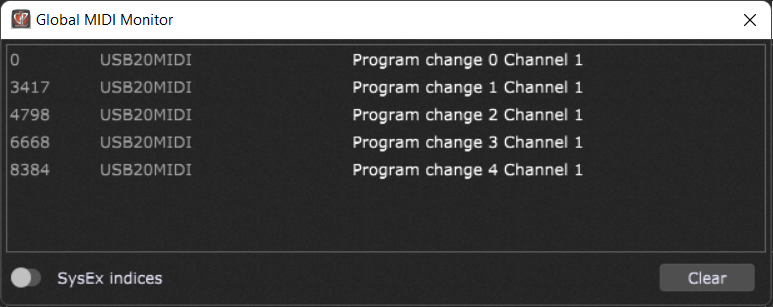
Note that the name of the adapter will be displayed here if you use one (in this case: “USB20MIDI”).
These footswitches can also be programmed to send CC messages; in general, please check the documentation for your MIDI controller to learn what options are supported.
Note: If your MIDI device sends keystrokes, that’s also no problem for Gig Performer! Check The most flexible MIDI processing blog article to see examples of how Gig Performer responds to keystrokes and also to learn how Gig Performer provides you with the most powerful MIDI capabilities on the market.
How are sounds represented in Gig Performer
.
Before proceeding with how to change sounds from your MIDI controller, we’ll first explain Gig Performer’s approach to handling sounds.
So, the short answer: sounds are represented through rackspaces.
The long answer: to fully understand how a sound is constructed you have to become familiar with the basic concepts in Gig Performer, particularly: plugins, widgets, rackspaces and variations (click on each link to visit the corresponding user manual pages).
The rackspace approach is fundamental in Gig Performer as it allows you to not only change sounds instantly and glitch-free, but also to take advantage of other features such as Patch Persist and Predictive Loading.
After you have become familiar with the basic concepts in Gig Performer, in the next section we’ll put them into practice in a simple example.
Tip: we have also the Getting Started gig file to get you quickly up and running:
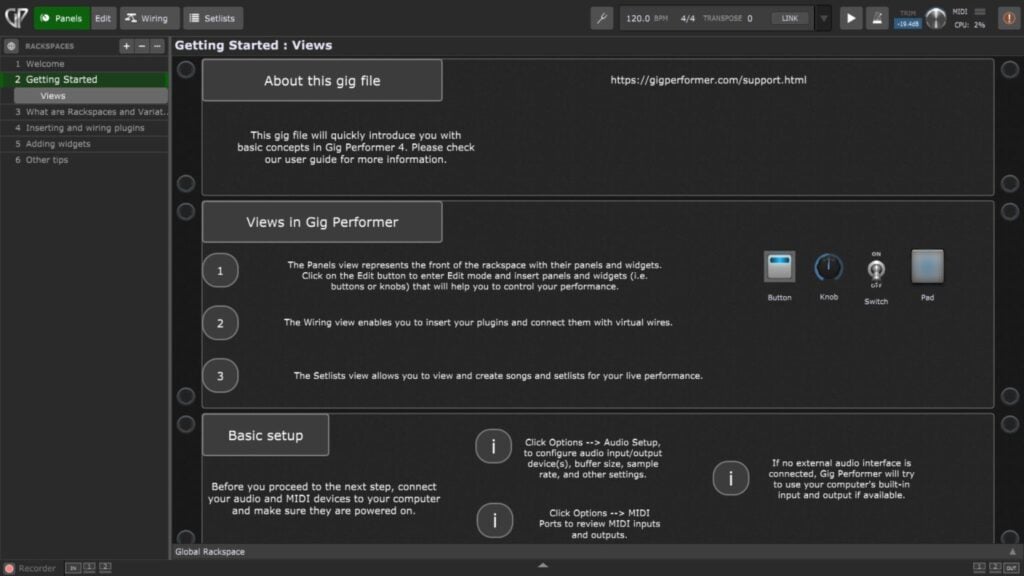
This gig file provides detailed guidelines created with various elements inside Gig Performer to help you understand basic Gig Performer features. Download it for free here.
Creating sounds in Gig Performer
.
The user manual includes guidelines with basic setups for keyboardists, guitarists, vocalists, drummers, other musicians and FOH engineers.
Also make sure to check out the templates that are bundled with Gig Performer; since these templates are built using some of those bundled plugins, you can immediately try them out and hear the sound. Click here to learn more about the built-in templates.
Of course, you can install other 64-bit VST, VST3 and AU (Mac only) plugins and use them with Gig Performer. Visit the Top websites for free audio plugins and how to use them in Gig Performer blog article to see detailed guidelines.
Don’t forget to visit our Gig and Rackspace Files forum to see many great gig files that were created by Gig Performer community members.
How to change sounds from your MIDI controller
.
When you start building your rackspaces, you’ll notice numbers that are located before the names of the rackspaces. If your MIDI controller sends program change messages (like Behringer FCB-1010), then simply press the desired footswitch to activate the desired rackspace. An example is shown below:
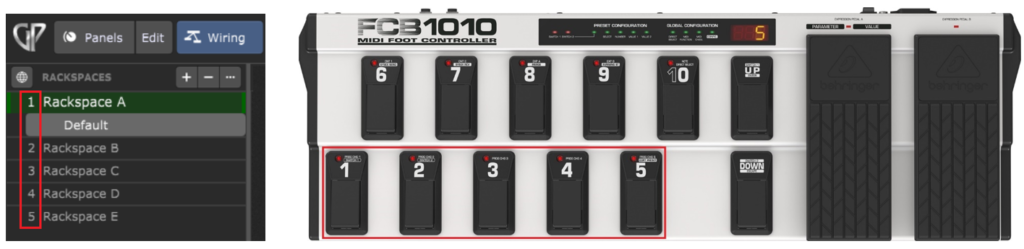
Pressing the footswitches 1-5 will activate rackspaces 1-5 respectively.
You can assign explicitly program change numbers to variations in the Variation Properties.
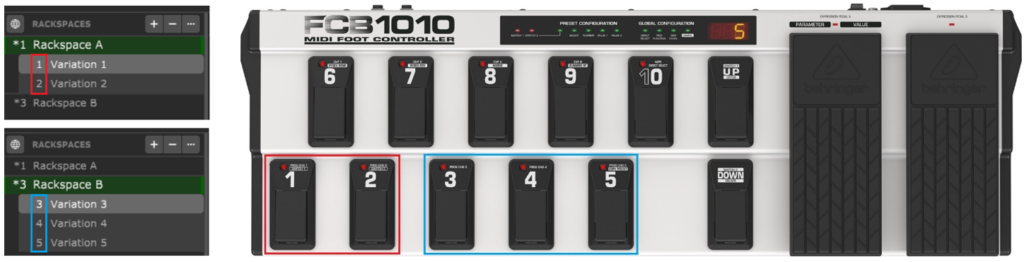
Pressing footswitches 1 and 2 will activate variations 1 and 2 from Rackspace A respectively. Similarly, pressing footswitches 3, 4 and 5 will activate variations 3, 4 and 5 from Rackspace B respectively.
The same rackspaces/variations logic applies to the Setlists view to change songs/song parts. Note: visit this blog article to learn how to use the same set of PC messages to select parts in any song.
If your MIDI controller sends CC messages or Note messages, you can add pad button widgets and map them to the desired System Actions parameters and learn CC or Note message. See the bonus section below to learn more.
Alternatively, you can learn the desired MIDI events through the Global MIDI Options and Setlist Options.
How to control plugins from your MIDI controller
.
Let’s create a simple setup in the Wiring view; insert the bundled HaNonB70 plugin and connect it to your MIDI controller and outputs of your audio interface:
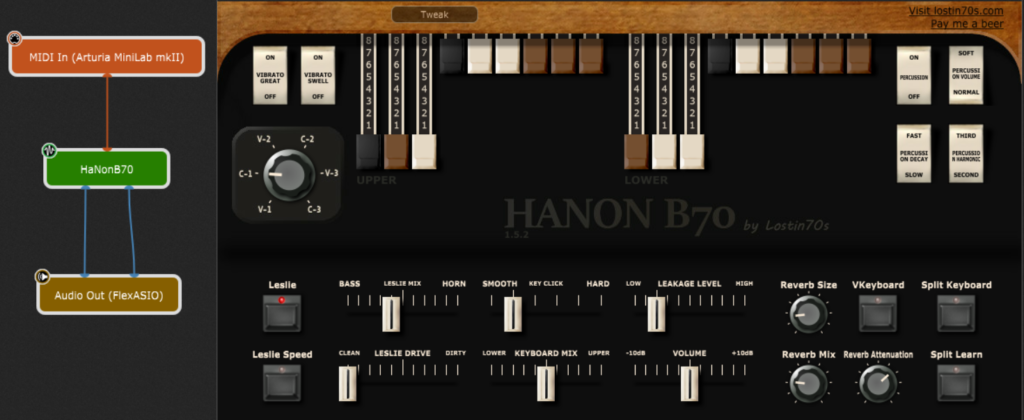
Suppose you want to control Leslie Speed (slow or fast) and Leslie Drive (it ranges between ‘clean’ and ‘dirty’).
We’ll use the host automation feature of this plugin and control its parameters via widgets (learn more about host automation here).
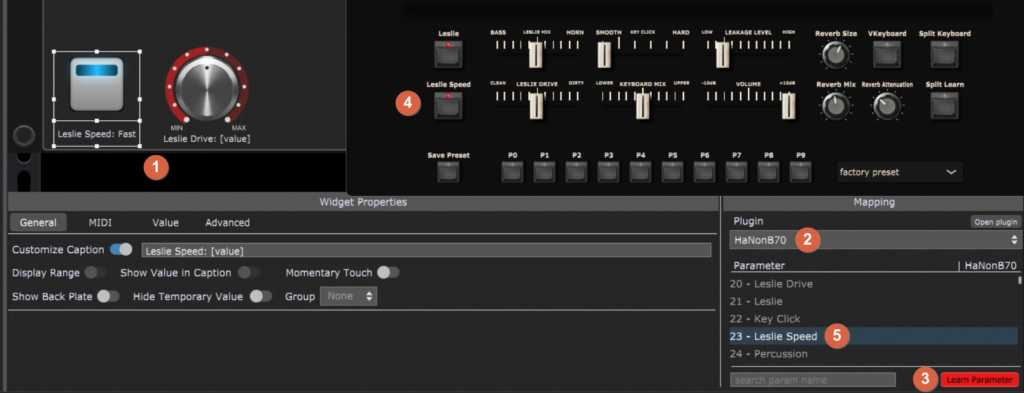
It’s easiest to simply learn these parameters. Enter the Panels view, Edit mode (shortcut – just click the Edit button) and add a LED button and a knob (1). Afterwards, in the mapping section select the HaNonB70 plugin (2) and click on the Learn Parameter button (3). The plugin editor window appears, and in that window click on the Leslie Speed button (4). Notice that Gig Performer automatically recognized the parameter (5).
While still in Learn mode, click on the knob and in the plugin editor window, move the Leslie Drive slider. The ‘Leslie Drive’ parameter will be automatically recognized. Turn off the Learn Parameter button.
The next step is to learn the MIDI message from your controller. For a knob, click on the MIDI tab and then click on the Learn button:
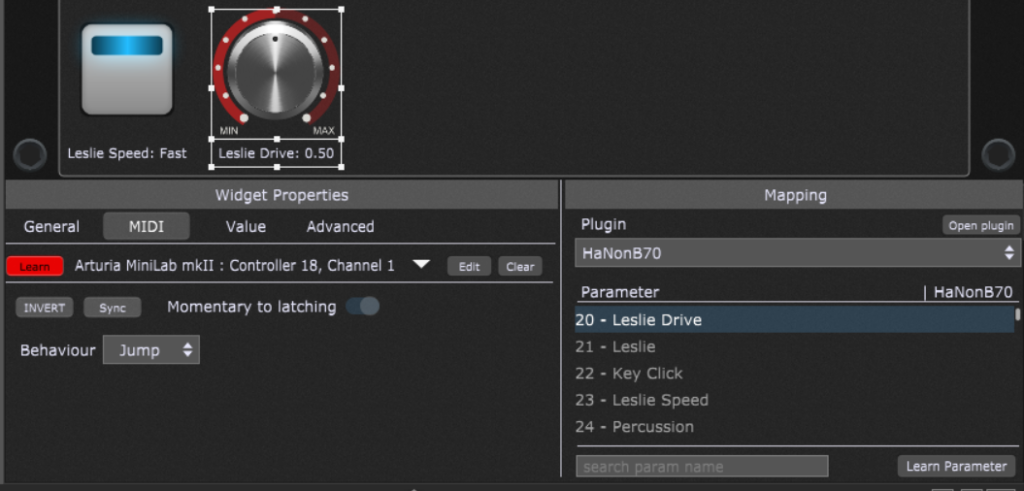
Move the physical control on your MIDI controller to learn it. While still in Learn more, click on the button and then learn the desired MIDI event. After you finish, turn of Learn mode.
BONUS: Using your Android device to change sounds
.
Android applications work great with Gig Performer, and our blog has already covered applications that work via OSC (such as OSCAR) and G-Stomper Rhythm, that synchronizes with Gig Performer via Ableton Link.
In this example I’ll use a Redmi Note 7 smartphone that is connected to a Windows laptop by a USB cable and a free Android application (not bloated with ads) – MIDI Keyboard and switch rackspaces with Note messages.
When you connect the smartphone to the computer, select MIDI:
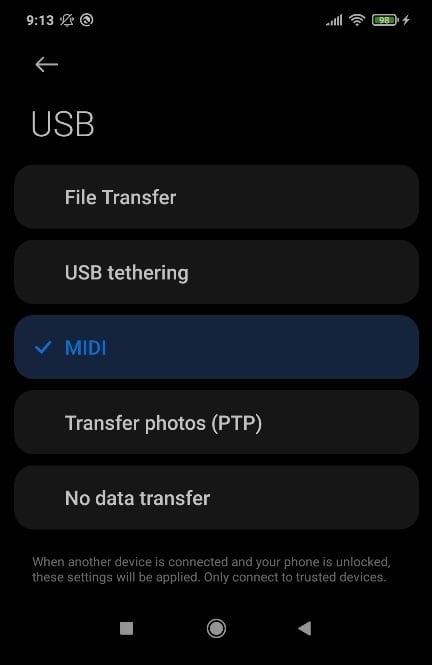
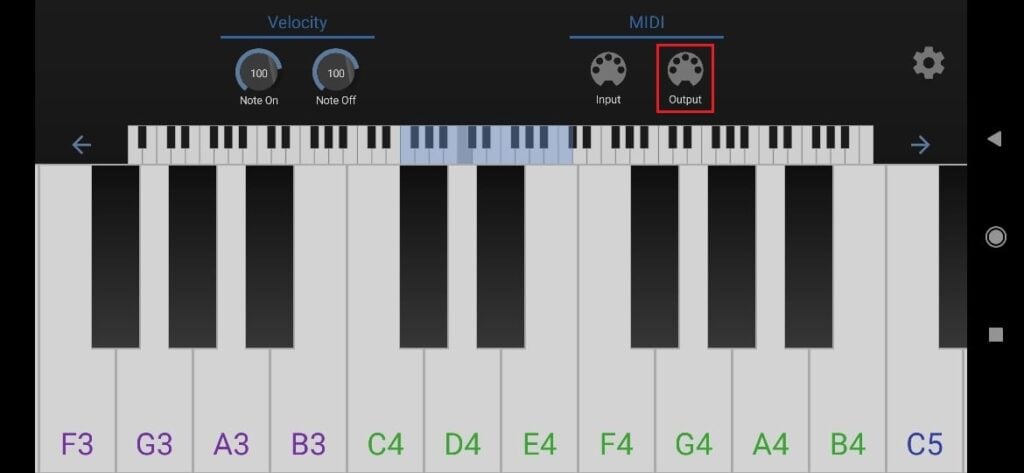
Afterward, Gig Performer will recognize the smartphone as “MIDI Function”. Open MIDI Keyboard and then tap on MIDI output:
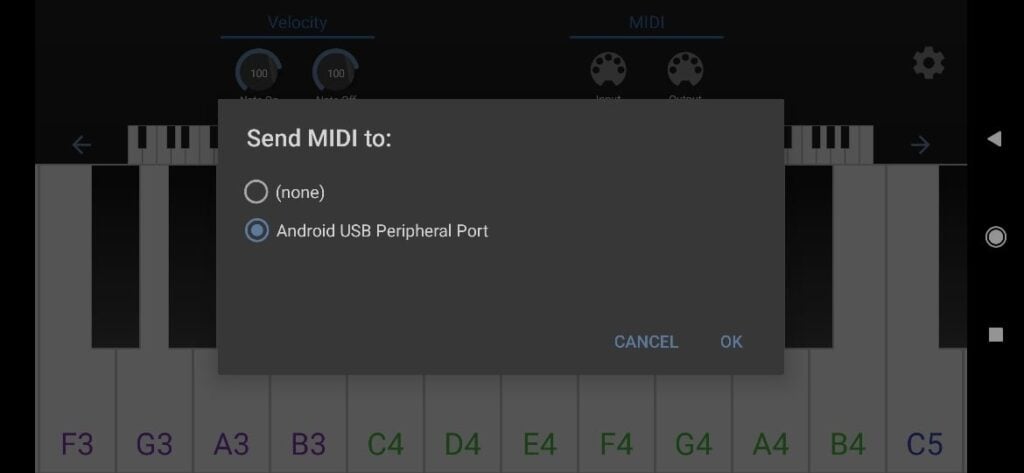
In the dialog, select “Android USB Peripheral Port”:
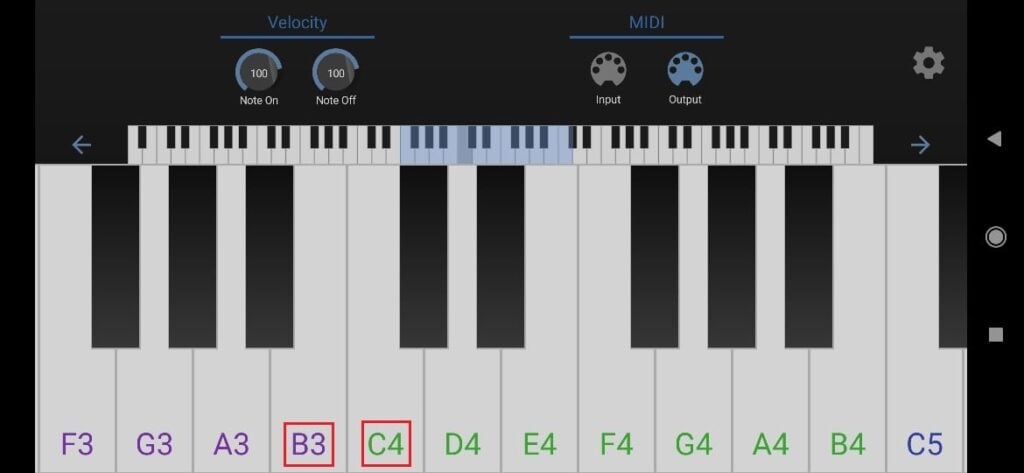
In this example I’ll use B3 to switch to the previous rackspace and C4 to switch to the next rackspace:
Insert the System Actions plugin into the Global rackspace, and then add two Blue pads in the Panels view, Edit mode:
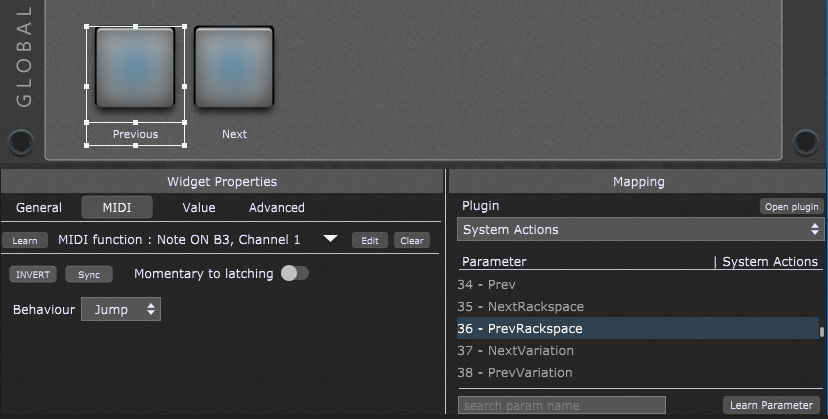
Click on the Learn button and then tap and hold the B3 key on the MIDI keyboard app. Click again on the Learn button and release the key (this way you ensure that the Note ON event is learned). In the Mapping section, select the System Actions plugin and then the PrevRackspace parameter.
Repeat the same procedure for the C4 key, just select the NextRackspace parameter.
Now you’ll be able to switch rackspaces from your Android device by tapping on B3 and C4 keys.
ENCORE: How to use widgets to jump to specific rackspaces
.
In this community thread I created a downloadable example along with the guidelines on how to set up a widget to jump to a specific rackspace.
.
If you have any thoughts or want to share what MIDI controllers and applications you use, visit this Community thread.
If you like this article, please share it to help spread the word! 🙂
Own the Stage® with Gig Performer®
Nemanja Pudar
.
Related topics:
– Controlling your guitar or keyboard effects using a Web browser on any computer, laptop, smartphone or device
– Automating switching rackspace variations and song parts using the MIDI File Player
– Changing rackspaces from your Stream Deck
– Sending Program Change messages out to hardware devices and other applications
– Separating your sustain pedal from your controller
– Connecting the keyboard and creating the keyboard and velocity splits
