In this article we will compare rackspaces vs program changes as methods to change sounds.
.
Background
.
The normal way to use Gig Performer® is to create rackspaces each of which contains a collection of plugins connected together as desired. A rackspace might contain everything needed for a single song or you might use several rackspaces during a single song, switching from one to another on the fly. When you develop your gig this way, you get the ability to switch instantaneously from one set of sounds to another without any glitches as well as the optional ability to persist sounds in the old rackspace until you release keys or your sustain pedal (our Patch Persist™ feature).
Adding multiple variations allows you to use that same collection of plugins with different settings (e.g, switch a phaser on or off, bypass a particular effect, change the depth of a flanger, adjust the cutoff frequency of a filter) so you don’t even have to create new rackspaces for minor changes to your sounds (perfect if you’re Donald Fagen performing on a Rhodes). If you are using plugins that require huge amounts of memory for each sound (typically samplers), then you can of course also use our Predictive Loading™ feature to reduce significantly both RAM size and CPU utilization.
.
Program Change MIDI events
.
Musicians who have used MIDI for a long time, particularly with outboard gear are very familiar with the concept of sending MIDI Program Change (PC) events to hardware synthesizers to switch from one sound patch to another.
Sometimes, users who are new to Gig Performer, or perhaps just trying it out, but who are familiar with the use of PC events, want to control their plugins using PC events to change presets rather than using the normal rackspace approach. Sometimes, they’re concerned that duplicating plugins will use too much memory.
Now, it happens to be the case that some plugins – albeit not that many – do have the ability to respond to MIDI PC events. However, each plugin that supports PC events does it differently, even plugins coming from the same manufacturer. The feature is often disabled by default and then you have to manually associate plugin presets with PC numbers in advance.
,
Caveats about using PC events with plugins
.
Generally, it’s not really a good idea to use PC events with plugins (see here). Apart from the fact that only some plugins have support for it, you also don’t know how long it will take for a plugin to change its patch after receives a PC event. Depending on the plugin’s implementation, you may even get stuck notes if you were holding keys or the sustain pedal down when a program change is sent.
It’s rarely instantaneous and you can’t take advantage of features such as Gig Performer’s Patch Persist™ mechanism that allows an “old” sound to continue even after you switch to a different set of plugins, using the standard rackspace mechanism. A plugin taking significant time (and 100th of a second is significant time!) to switch from one preset to another might also not handle updated widget values that get sent when you switch variations.
Consequently, up until Gig Performer version 1.8.3, we chose deliberately to have only very limited support for explicit program changes. Normally, when a MIDI PC event is received from the “outside”, it is interpreted by Gig Performer as a request to switch to the rackspace/variation associated with that incoming PC value. There is an option to allow PC events that don’t correspond to rackspaces to be passed through to plugins (via MIDI In blocks) but that requires care to make sure that you don’t use the same PC values for both rackspaces and plugins. We don’t recommend doing this as it prevents many Gig Performer features from working properly.
Nonetheless, there are some older systems around, where the only way to change sounds is to send PC events to plugins. To address this need, follow the guidelines below.
.
How to send PC events to plugins
.
Please understand however that if you use this mechanism, all bets are off and we cannot support you if it doesn’t behave the way you want or expect. Gig Performer features like Patch Persist, Predictive Loading, instantaneous glitch free switching from one set of sounds to another and variation updates just can’t work properly. If your plugin doesn’t behave correctly, that’s on the plugin and there’s absolutely nothing we can do about it. Feel free to complain to the plugin developer that their plugin doesn’t respond sufficiently fast for your needs! You have been warned!
We exposed PC as a parameter in both MIDI Out blocks and MIDI In blocks. This allows you to associate a knob (say) with a program change parameter so that turning the knob causes a different program change event to be sent out. If you create multiple variations and the knob position is different in each variation, then every time you switch variations, a program change MIDI event can be sent out.
Here’s an unsupported example of how you CAN do this if you really must. We’ll use Native Instrument’s wonderful FM8 plugin for this purpose. If you need to use a different plugin, please consult the plugin’s documentation. For everything following, I am assuming that you are already familiar with the basic use of Gig Performer so I say things like “create a rackspace” or “add a new plugin and connect it”, I’m assuming you already know how to do that. Even though it’s easy to get started with Gig Performer without any documentation, we do have a comprehensive user manual. Various video tutorials are also available.
Wiring view
So first, create a basic rackspace and add FM8 into it.

Configure the plugin to respond to PC messages.
Next you have to configure the plugin so that it will respond to program change messages. This procedure will be different for different plugins and may often not even be available. Open the FM8 editor and you’ll notice a little switch near the righthand side of the plugin, to the left of a button called “Programs”. That’s the on/off switch for enabling PC support in FM8.

Press that switch to enable PC support and then click the Programs button. The FM8 editor should now look something like this:

You’ll note that there is an empty numbered list on the right. Those numbers correspond to program change values. Note that program change numbers in Gig Performer start from 0 so when we send 0 to FM8 that will correspond to program number 1. (This “off-by-one” scheme is not unusual by the way, some systems start at 1, others start at 0)
All your available patches show up as a list in the center pane of FM8 and basically you drag patches that you want to use from that center section into your program number list. For example,

Here, I have dragged three patches into the program number list. If I send a PC value 1, FM8 will switch to the 303 patch. If I send PC value 6, FM8 will switch to Falling Electrons (remember, off-by-one).
How to send the desired PC numbers
So how do we get Gig Performer to send the desired program change numbers? Well, we could just add a knob, associate it with the PC parameter of the Midi In block and turn it (holding SHIFT key down for finer resolution) until FM8 switches to the desired program. Then add another variation and repeat to get the next program change, etc. However, there’s an easier way and although the following procedure will work with knobs, it is now possible (since 1.8.3) to do this using the Text Label widget so let’s do that!
1: Add a new Text Label to the rackspace

2: Associate it with the MIDI In (OMNI) block
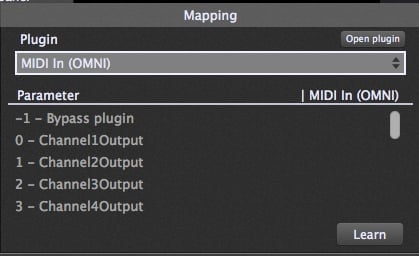
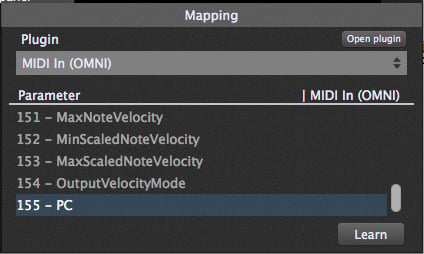
3: Scroll down to the bottom of the parameter list and select PC
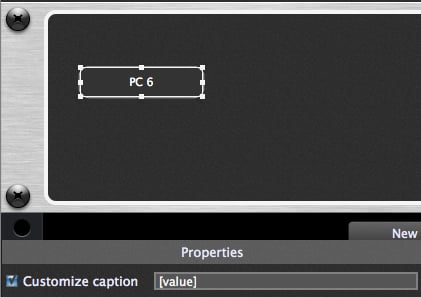
4: Modify the “Customize caption” so that it just contains [value] (yes, including those square brackets). The label will now display PC xxx (where xxx is some random – for now – integer)
Here’s where the fun starts. Make sure you have your FM8 plugin editor window open so you can see the list of programs. If you were following along exactly with me, then your FM8 Program List entries with numbers 2, 4 and 7. (Now remember that these will correspond to 1, 3 and 6 in Gig Performer)
Create variations
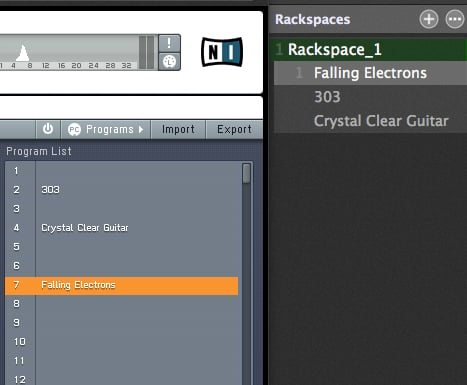
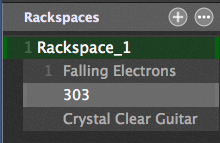
Now before you go any further, go ahead and create two more variations so that you now have a total of three variations for the rackspace. Optionally name your variations so that they show the names of the Program Change items in FM8 as shown here (the righthand side of FM8 is on the left and the lefthand side of Gig Performer is on the right 🙂
5: Select one of your variations. Here, I’ve selected 303
6: Switch back to edit mode and select the label. Note that there is an entry field Now
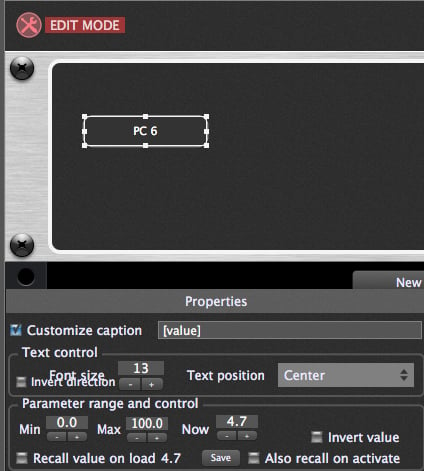
7: The patch in FM8 called 303 is at position 2 in the FM8 Program List. That means we need to send MIDI program change value 1 to access that specific patch. So type 1m into the field called Now and press Enter,. The ‘m’ after the number 1 is critical because it tells Gig Performer to interpret the value as a MIDI number rather than the usual kind of value that goes from 0 to 100.
As soon as you do this, your MIDI number will be replaced by a decimal value (which happens to be 1.0) but more importantly FM8 will now show that the 303 patch is selected.
8: Now switch to another variation in Gig Performer. Here I selected “Crystal Clear Guitar”
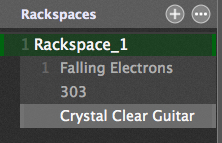
Looking at the FM8 Program List we can see that Crystal Clear Guitar is at position 4 in the list which means we need to send MIDI program change 3 to it. So switch back to edit mode and type 3m into the entry field called Now and press enter. The value in the Now field will change to 2.4 (see below for an explanation why) and the FM8 patch will change to Crystal Clear Guitar.
Repeat this process for all other program changes you want to access.
Finally, watch the FM8 Program List as you switch from one variation to another. Each time you switch, the current “value” will be sent out as a MIDI Program Change and FM8 will update accordingly.
That’s it!
Sending Program Changes to external devices
.
You can easily use the same mechanism to send program changes to external devices such as synth modules. Just connect a MIDI In block directly to a MIDI Out block. However, make sure that you check the box “Pass Program Change messages” in the MIDI Out block.

If you don’t need to leverage other MIDI In block features (e.g, defining splits, changing channels, blocking events) and you just want to send a PC to an external device without subsequently controlling that device from inside Gig Performer, you don’t need the MIDI In block. The MIDI Out block also has a PC parameter to which you can directly connect your widget.

Visit the blog article How to send Program Change messages out to hardware devices and other applications to learn more.
.
Wrapping up
.
Why does the Now field display 2.4 after we typed in 3m?
Values in Gig Performer are always decimal numbers between 0.0 and 100.0. Think percentage: if you turn a knob fully clockwise, its Now value will be 100.0. If the knob is halfway up, its Now value will be 50% and so on. However, MIDI values range from 0 to 127 and when you type in a number followed by the letter m, Gig Performer will divide your number by 1.27 so that it maps into the internal available range from 0 to 100. So whenever you see a decimal value, you can multiply it by 1.27 and round it to see the equivalent MIDI value. Hence 2.4 multiplied by 1.27 gives us 3.048 which rounds to 3.
Please remember, sending program changes directly to plugins bypasses some important Gig Performer functionality.
– You won’t get Patch Persist,
– There may be delays before the sound changes
– And there’s also the risk of stuck notes if the plugin doesn’t automatically silence itself when a program change occurs.
You have been warned. If you have problems with this mechanism, it’s between you and the plugin developer 🙂
Gig Performer (or indeed any plugin host) has no control over how a plugin will react to program changes.
.
Related topics:
– How to change programs in Gig Performer if you can only send Note messages
– Basic Terminology in Gig Performer
– Avoid controlling plugin parameters directly from your MIDI controller
