In this article we’ll show you how to send Program Change messages out to hardware devices and other applications.
Gig Performer 4 introduces improved support for sending out MIDI to your hardware MIDI devices and external applications.
Gig Performer 4 MIDI improvements
First, Gig Performer 4 introduced the MIDI Helper Tool.
Next, Gig Performer 4 you specify MSB and LSB values separately. That’s the same way that most hardware handles bank select. Gig Performer 3 combined bank select fields into a single number. You needed to calculate “MSB * 128 + LSB” to determine the actual number to use.
Further, starting from v4.5, Gig Performer can display outgoing MIDI messages. Click here to learn more.
In the following sections we will cover different approaches to sending out program change (PC) messages. Check out this blog and our user guide to learn more about program change and control change messages.
Note: This article was published before GP v4.5 was available. That’s why we monitored sent-out MIDI messages using the free application MIDI Monitor for Mac. Alternatively we recommended the free application MidiView, available for both Windows and macOS.
Let’s get started!
1. How to send out a program change message when you select the desired rackspace
.
The MIDI Monitor app
Install the MIDI Monitor app as usual and run it:
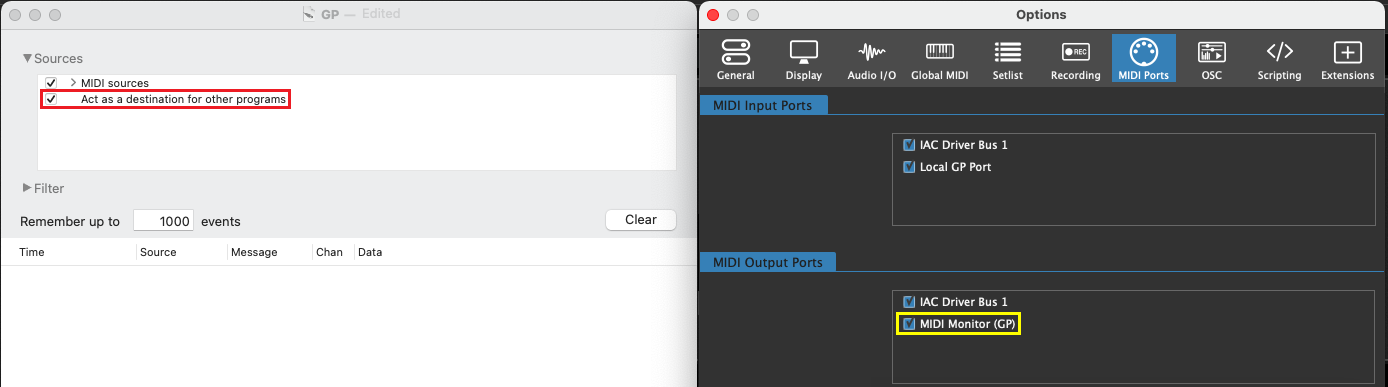
Expand Sources and then tick the option Act as a destination for other programs (as indicated with the red rectangle). When you run Gig Performer you will notice a new MIDI Output port in MIDI Ports Options (as indicated with the yellow rectangle).
The MIDI Out block
In Gig Performer, click on the Wiring view and insert that MIDI Out block (click here if you need help inserting plugins):

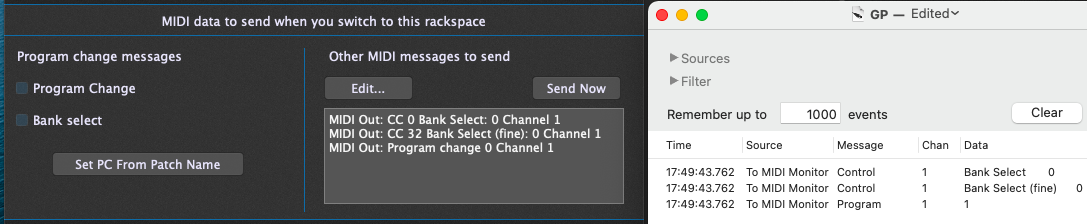
When the MIDI Out block’s plugin editor opens, note the section called MIDI data to send when you switch to this rackspace (as indicated with the red rectangle). Under Program change messages tick the Program Change check box, and optionally the Bank select checkbox where you can enter the desired MSB and LSB values.
Testing the setup
Every time you change any of the values in the MIDI Out plugin editor, they all get sent out so you can immediately see the changes. Try it: click on the edit box where “1” is already specified and just confirm this value by pressing the Enter key:
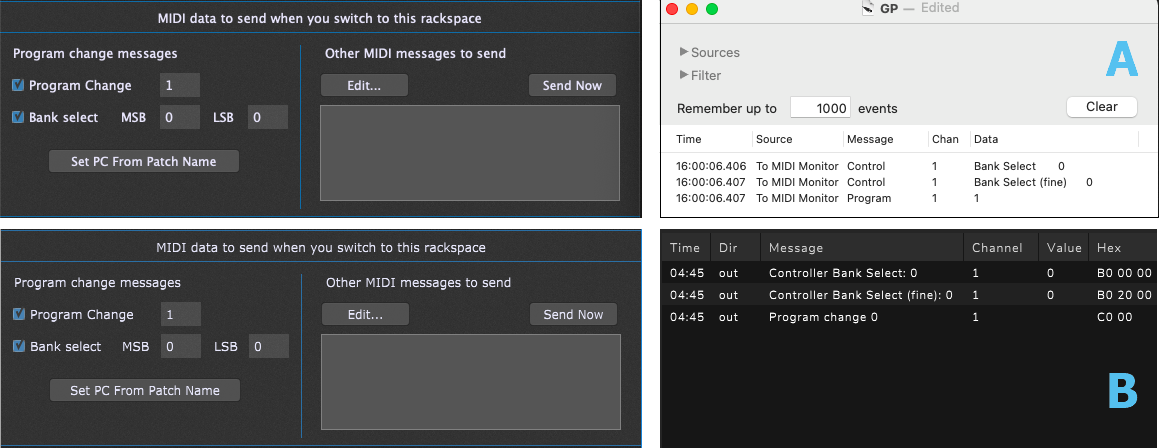
On the screenshot above are displayed MIDI Monitor (A) and MidiView (B) windows (for those who decided to install MidiView, which was also recommended at the beginning of an article).
Program Change range in apps and devices
You may wonder why the outputs are different (on A you can see the PC 1, and on B you can see the PC 0 displayed).
Here are the reasons:
- MIDI Program Changes always go from 0 to 127.
- Some hardware and software devices count the first program change as PC0 (the range is 0-127) and the others as PC1 (the range is 1-128).
- Gig Performer by default displays 1 as the first program change and that behavior can be changed in the Global MIDI Options – turn on the Use zero-based PC numbers toggle button if you want to display 0 instead of 1 for the first program change message (so the scope is 0-127 instead of 1-128). Note: regardless of how Gig Performer displays the first program change, under the hood the first program change is always 0 (as mentioned in the first bullet point).
- The “Other MIDI messages to send” section and the MIDI Helper Tool (which will be mentioned shortly) always use the “pure MIDI” values (0-127) regardless of how you set Gig Performer to display the first program change.
.
Interpreting the messages
So, what happened in the screenshot above (Gig Performer is set to the default options)?
– In (A), Gig Performer displays 1, but sends 0 under the hood. The MIDI Monitor app gets 0 and displays it as 1 (it displays the first program change – which is internally 0 – as 1).
– In (B), Gig Performer displays 1, but actually sends 0 and the MidiView app gets 0 and displays it as 0.
Feel free to experiment with sending out different PC messages and see the results. Every time that you switch to this particular rackspace, the specified program change message and/or MSB/LSB values will be sent out to your hardware device or application.
Using the MIDI Helper Tool
Alternatively, you can send out PC messages using the MIDI Helper Tool to create the messages. Notice the “Other MIDI messages to send” section; when you click on the Edit… button, the MIDI Helper Tool will open:
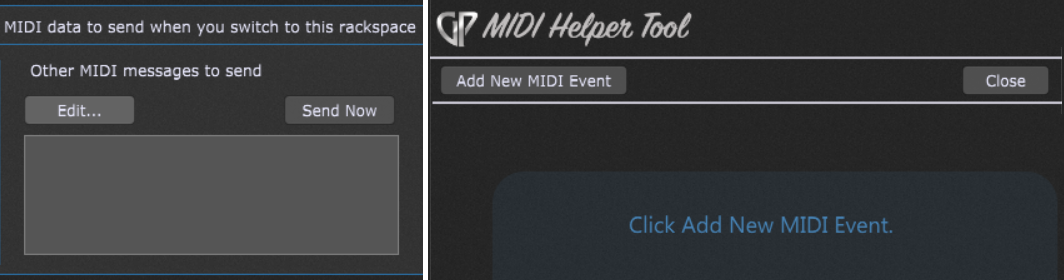
Clicking on the Add new MIDI Event button will open a new window where you can specify the desired MIDI messages. Check the user manual to learn more.
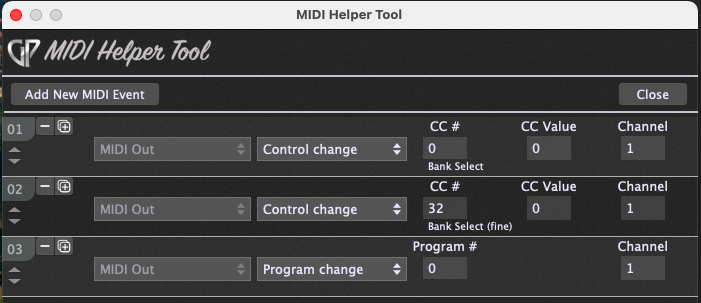
For example, if you want to replicate the MIDI messages from A (see one of the screenshots above) so the MIDI Monitor shows the same output as in A, enter messages like shown on the screenshot above. Note that bank select messages (MSB and LSB) are just control change messages CC0 and CC32 (these are the only CC messages that are deliberately by Gig Performer). Afterward, click on the Close button.
Click on the Send Now button to see the results in the MIDI Monitor.
2. How to send out a program change message when you select the desired variation
.
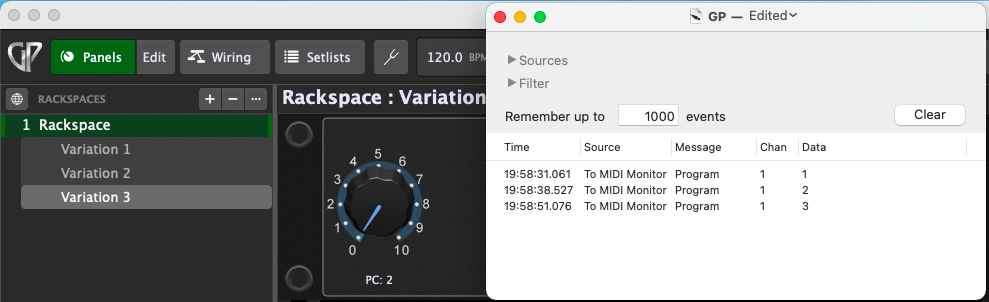
In this example we’ll take advantage of the MIDI Out’s plugin parameter and send out PC 0 in the first variation, PC 1 in the second variation and PC 2 in the third variation.
MIDI Out PC parameter
First make sure that the MIDI Out (MIDI Monitor) plugin is inserted in the Wiring view. Then go to Edit mode in the Panels view and insert a Plastic Blue Knob. Select the MIDI Out block plugin and its PC parameter as indicated in the screenshot below:

Create two more variations and name them Variation 2 and Variation 3 respectively (click here to learn more). Afterwards, click the Variation 2 and enter Edit mode.
Entering MIDI values
First, while in Edit mode, select the Plastic Blue Knob. Then, click on the Value tab and type in 1m as the Widget value. NB: you can enter values using MIDI numbers by adding the letter “m” at the end of the value. For example, if you type in “64m”, Gig Performer will interpret it as an exact value of 50.39 (roughly 50% of the maximum MIDI value of 127).
Similarly, in the Variation 3 type in 2m as the widget value and press the Enter key.
Testing the configuration
Test your configuration: select the first, second and the third variation respectively:
Note: while you can also send out bank select messages through variations (CC0 and CC32), keep in mind that they must be sent out before sending a PC message. As there is no guarantee that bank select messages will be sent out before a PC message, we recommend that you don’t use these three parameters simultaneously.
However, you can arrange for bank select messages to change through variations, and then send program changes from your MIDI controller. See the following section to learn more.
3. How to pass-through program change messages from your MIDI input
.
A convenient way of sending program change messages is using your MIDI controller. If your MIDI controller can send out program change messages, you can connect the MIDI In block to the MIDI Out block and send out these PC messages to the external hardware or applications.
Connect MIDI In to MIDI Out
Click on the Wiring View and connect the MIDI In (OMNI) block to the MIDI Out block. Afterwards, open the MIDI Out’s plugin editor:
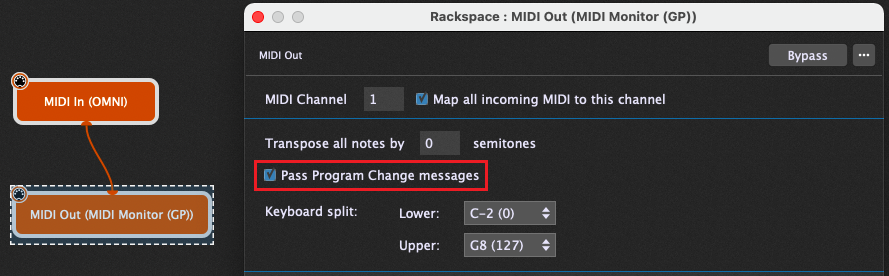
By default, the MIDI Out blocks program change messages that it receives. To pass PC messages, make sure to tick the Pass Program Change messages checkbox.
Try sending out a PC message from your MIDI controller.
Program Change parameter in MIDI In blocks
The MIDI In blocks also have the PC parameter, so you can send PC messages out using widgets and techniques that are already demonstrated in the previous section.
4. How to send out a program change message when you select the desired song part
.
Clicking on a song part can also send program change messages:

Check our user manual to learn more.
Clicking on the Edit… button opens the MIDI Helper Tool and you can easily add MIDI events, using steps that are provided in the section 1.
Instrument definition file support
.
Rather than just using PC and bank numbers, clicking on the Set PC From Patch Name button in the MIDI Out block allows you to select the PC and bank numbers to be sent out using patch names defined in instrument definition file (INS file) if available for your hardware synth when switching to the current rackspace:
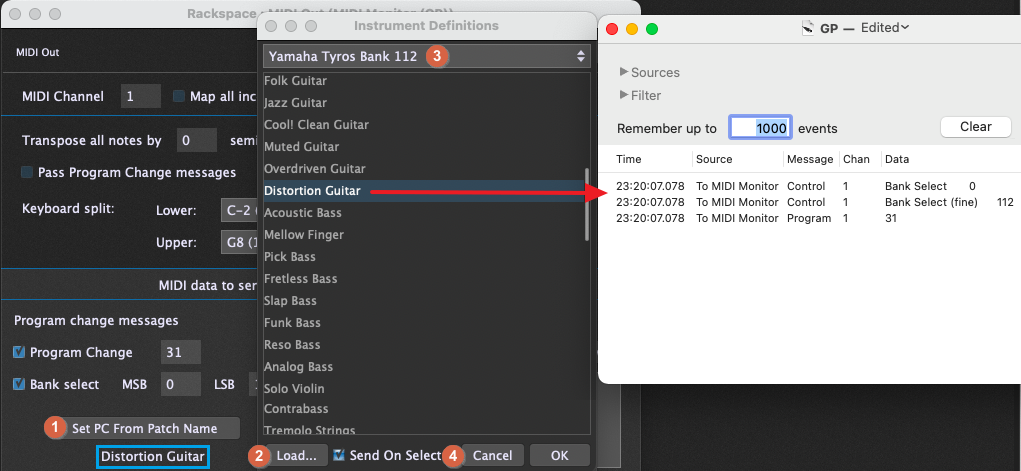
Simply click on the Set PC From Patch Name button (1) to open the Instrument Definitions window; click on the Load… button (2) and then select the desired INS file. Afterwards, click on the drop-down menu to select the desired bank (3) and optionally tick the Send on Select check box (4) if you want to send bank select and PC messages immediately when you select the desired patch name, i.e. Distortion Guitar. The resulting output in the MIDI Monitor application is indicated with the red arrow. Gig Performer will set the correct PC, MSB and LSB values and show the patch name (indicated with the blue rectangle).
Experiment!
.
Make use of these different techniques presented in this article and build your own versatile and creative setup. You can also combine various options from different plugins. For example, consider the following setup:
– Create a new rackspace and three variations.
– Insert a MIDI Out block and in its plugin editor check only the Bank select check box (don’t check the Program Change checkbox).
– Connect the MIDI In (OMNI) to the MIDI Out block.
– Insert a knob and map it to the PC parameter of the MIDI In (OMNI) block.
– Set variations 1, 2 and 3 to send PC0, PC1 and PC2 to respectively.
– Duplicate this rackspace, and in the MIDI Out block, change MSB to 1 and LSB to 1.
An example and the results
Here are the results when you click on the first rackspace, then on each variation, and then on the second rackspace and each of its variations:

In this example we arranged to send bank select messages before the PC messages (that a knob sends in different variations). So, when the first rackspace is activated, the bank select messages (MSB: 0 and LSB: 0) are first called and then program change messages (all MIDI messages related to the first rackspace are indicated with the red rectangle).
When you click on the second rackspace, the banks change, so every coming PC message is now bound to MSB 1 and LSB 1 (all MIDI messages related to the second rackspace are indicated with the blue rectangle).
More explanation and useful information
- If you have a MIDI Out block in your rackspace, when you switch to another rackspace, you’ll see All Notes Off and Hold Pedal messages.
- Consider banks (MSB and LSB) as states – you send them and they are stored. So, if you need to send your PC message to the different bank, you need to send MSB and LSB before sending the program change messages (it doesn’t matter in which order MSB and LSB messages are sent, it’s only important that they are sent before a PC message).
- You can of course send program change messages without sending MSB and LSB messages in which case the associated patch will be selected from the current bank.
- The MSB and LSB (if needed) values are typically remembered by the receiving synth so there is no need to resend one of them if the value hasn’t changed.
.
Note: you can also use GPScript to cover the most sophisticated use cases for your live performance. Please visit our community to share with us your use case or if have questions about approaches presented in this article.
Action Management Tool
You can also send program change messages (among other useful actions) through the Timeline Actions Tool. This is a feature first introduced in Gig Performer v4.7. Click here to learn more.
If you like this article, please share it and spread the word.
Own the Stage® with Gig Performer®.
Nemanja Pudar
.
Related topics:
– Backstage With Gig Performer – MIDI in and MIDI out Blocks (Youtube)
– Rackspaces vs Program Changes
– Gig Performer provides you with the most flexible MIDI processing
– How to change sounds and control plugins from your MIDI controller
