Separate your sustain pedal from your controller

Separate your sustain pedal from your controller

Although most MIDI controllers and many workstations have the ability to split their keyboards, when you’re using Gig Performer, the best practice is to use multiple MIDI In blocks as described in this blog article and to just leave your physical controller on a single MIDI channel (typically channel 1). There are many reasons to do this, not least of which is because you can easily have multiple splits as needed without having to adjust your physical controller. This is also particularly beneficial if you have to use a different controller, due to either a failure or because you’re on tour or at a festival where you have to use somebody else’s system.

One question that arises is how to use your sustain pedal, which is typically plugged into one of your controllers, to control only specific splits. Well, it turns out that if you follow the advice above, this becomes really trivial.

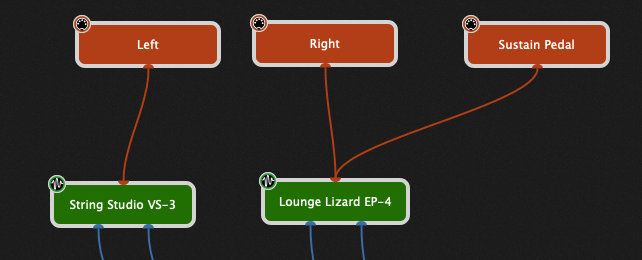
Let’s suppose you want a split where the left half of your keyboard plays strings and the right half plays acoustic piano and you want your sustain pedal to only affect the acoustic piano.

Solution

.
We’re going to use three MIDI In blocks to handle this.

Here’s what it looks like.

Wiring view in Gig Performer, sustain pedal and MIDI controller with Lounge Lizard and String Studio plugins

So what’s going on here?

.
The top three blocks are all MIDI In Omni blocks. Why Omni? Well, if you only have one keyboard, then you don’t need to start specifying specific MIDI input devices. If you do have more than one keyboard, then you should use MIDI Input Blocks associated with the specific devices. In particular, for the Sustain Pedal, make sure you choose the MIDI Input Block associated with the controller into which the sustain pedal is physically connected.

You can define the specific split values for Left and Right to suit your needs. The only critical item you must configure for both Left and Right is to block Sustain (CC 64) MIDI messages.

Event blocking in Gig Performer; Check the Sustain box.

But for the third block, the one we called Sustain Pedal, you do the opposite. You block all MIDI messages except the Sustain MIDI message.

Event blocking in Gig Performer; Check every box except the Sustain box.

The end result is that Sustain messages cannot reach the synth plugins unless you explicitly connect a MIDI In block that allows Sustain messages through. All other messages should be blocked so that you can continue to use the controller into which the sustain pedal is physically connected without the sustain pedal having any effect.

Please visit this community thread if you have any questions.

Own the Stage® with Gig Performer®.

.

Related topics:
The most flexible MIDI processing
The hidden power of the MIDI In block
How to change sounds and control plugins from your MIDI controller


Scaling Curves


Scaling curves allow you to control the shape of the output of a widget or convert an incoming note velocity to a new velocity. Various predefined curves are available and they can be tweaked as necessary. You can also just draw your own curve as well to achieve the effect you require.


MIDI File Player Plugin


You can load up to 128 MIDI song files in a single plugin instance. Switch from one song to another, mute tracks and/or change their channel numbers. Tempo can be controlled by individual songs or you can use the global tempo and tap tempo to control the BPM interactively.


Favorites and Presets


Create a sound by placing and interconnecting your desired plugins, such as a synth, some effects and perhaps a mixer. Select them all and then save the selection as a named favorite. The favorite will subsequently show up in all plugin insert menus, making it easy for you to recreate that configuration whenever you need it again. This feature is also very powerful for creating your needed sounds on your studio computer and then transferring them to your touring laptop.


Probabilistic Sound Designer


Parameters you select in an open plugin are captured into the Probabilistic Sound Designer dialog window. When you click Randomize, you're only adjusting those selected parameters. Each entry in the PSD dialog has a curve but unlike widgets where the curve controls scaling, in the PSD the curves are used to define the probability of particular values being selected. Make sure the filter cutoff never gets too slow so as to block all sound. Perhaps adjust the max range of the VCA attack parameter so that the sound doesn't have too much delay. Constrain the octave ranges of the oscillators, perhaps ensuring that 1/3rd of the time we select 8' and 2/3rds of the time we select 4'. The possibilities are endless.


More Widgets


Numerous new widgets are included in Gig Performer - a new sustain pedal, plastic knobs, drum pads and more colored sliders. Shapes can be colored with different borders and fill colors and morphed from rectangular to circular. Your creativity is now the limit to creating fabulous front panels in Gig Performer.


MIDI Message Helper


Select MIDI devices by name. Choose the MIDI message type and adjust the appropriate parameters for the specific type


Layout management


Gig Performer supports arbitrary resizing. Layout your widgets the way you want - resize the main window and the widgets will grow or shrink as necessary to maintain the same interrelationships. No matter what size screen you have, your front panels will still be neat and usable.


Undo Support


If you move your widgets around and/or resize them, or even delete them by mistake, the Undo facility will correct your mistake. Minor moves to a widget by mistake will no longer spoil your design


Plugin Channel Count


Some plugins support a large number of outputs and they depend on the traditional channel strip to control how many ports should be available.   When you only need a stereo pair, it is convenient not to have a large horizontal block. In Gig Performer, the number of available ports  is controlled by the channel count override, which can be applied to individual plugins and will be remembered when the gigfile is reloaded or if the plugin is saved as a favorite.


Input muting and output fading


Rather than a single audio length tail, Gig Performer 4 gives you the ability to control input muting and output fading separately. Input muting controls how much time it takes for audio input to be silenced when you leave the rackspace. Output fading controls how much time will be taken for audio to fade out when you leave the rackspace.


Faster Plugin Finder


Instead of searching through menus of perhaps hundreds of plugins (you know who you are!), the Quick Plugin Finder makes it easy to find the plugin you need by simply typing partial strings. For example, as shown here, to find the Modartt Pianoteq 7 plugins, it's enough to type pia mod 7 (in any order, by the way)  to restrict the list of available plugins to those matching your query. The Quick Plugin Finder also knows about manufacturers, presets and favorites.


Touch Friendly Input


Any entry field can be changed by either dragging your mouse (or finger) up or down, or by using the large popup touchpad where you can just tap on the squares to enter a value. The large popup keypad also does validation so you can't enter an invalid value. You can also just tap the BPM field to pop up a larger view where you can quickly change tempo, tranpose, trigger Tap Tempo and enable Ableton Link, the last allowing you to synchronize Gig Performer with any other application that also supports Ableton Link.


New Tuner Display


The tuner view makes it easy for guitarists to quickly check and adjust their tuning. You can toggle into the tuner view from any other view and toggle right back as soon as you're done. All output will be silenced automatically while you're in tuning mode. You can adjust the concert reference pitch from its default of 440 Hz to suit your own needs. The tuner view fills the entire screen so you can easily see it from a distance.