Gig Performer’s MIDI In block is not just your everyday block for receiving MIDI events. It can do much more than just receive MIDI messages from an external MIDI device and feed them to connected soft-synth plugins.
It has important other functionality that often relieves you from having to use multiple separate MIDI processing plugins.
First of all, let’s just look at the plugin editor for a MIDI In block in Gig Performer 4. As you can see, the functions are broken up into different sections.

Let’s now examine each section, going from top to bottom.
Transposition

You can transpose incoming MIDI note events up or down by up to 127 semitones (indicated with the red rectangle). The Global transpose is displayed in the main Gig Performer window. See the blue rectangle. The Global transpose can be ignored. This is important when you use a MIDI In block to trigger sound effects or drums (these should never transpose).
MIDI Merging
.
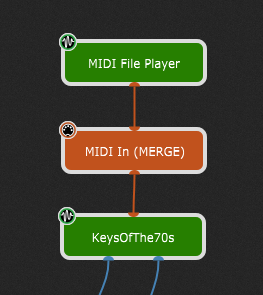
Clicking Enable MIDI merge exposes a MIDI input pin at the top of a MIDI In block, and enables you to merge MIDI events produced by other plugins that produce MIDI, such as our MIDI File Player, a Scriptlet, or a third-party MIDI arpeggiator plugin:
NB: make sure to check out this Backstage with Gig Performer Foundations episode to see this feature in action.
Channel routing

You can remap incoming events on one channel to another channel or completely block messages on specific channels. This feature is also convenient when you need to deal with a rented or back-lined gear. Click here to learn more.
Keyboard splits

You can create a keyboard split by selecting the lowest and highest keys between which are allowed to pass through.
Tip: if you want multiple keyboard splits (including the ability to do partial layering), simply create multiple MIDI In blocks and configure each of them to the desired range.
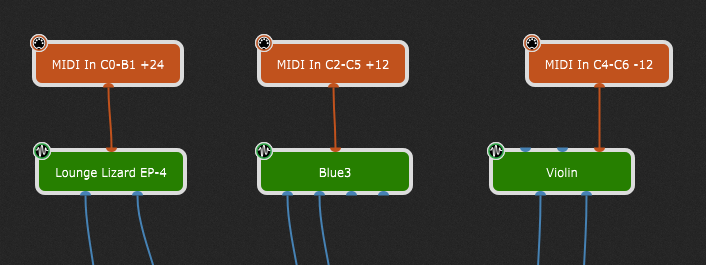
In this example, we have three MIDI In blocks, each connected to a different plugin. The split ranges and transpose values are configured individually in each MIDI In block and the blocks themselves have been renamed to display the actual splits and transpose values. Note that there is a deliberate overlap for the Blue3 (Hammond organ) and Violin where one octave (C4-C5) is applied to both.
For detailed guidelines, check out this blog: How to create keyboard and velocity splits.
See also this forum article for the way to split your keyboard to control sounds that are on different MIDI channels of the same plugin.
Note: Ticking the Invert keyboard checkbox allows you to produce lower notes when playing higher up the keyboard (and vice-versa). This is a nod to Joe Zawinul who famously inverted the ARP 2600 keyboard when he performed Black Market. It makes it easy to do certain counterpoint as you can use the same fingering on both hands.
Velocity layering and scaling

You can restrict the range of note velocities that are allowed through. For example, you might allow only softly played notes to go through while loud notes are blocked. This is extremely useful if you want to have two instruments on the same range but only have one of them sound, depending on whether you play notes softly or loudly. The trick (much like with layering) is to use multiple MIDI In Blocks, each one configured to a different velocity range.
Velocity scaling lets you remap incoming velocities to either expand or (more typically) compress the outgoing velocity values. However, it’s also extremely useful when you are restricting the velocity range. For example, even though you might have configured one sound to only play if you hit notes hard, you probably don’t want the sound to be only played loud. So for example, if you set the Min and Max values to 80 and 127 respectively and then you set the scaling From 1 To 60 respectively, your loudly “played” notes will be heard more softly.
Check this blog article to learn more about the scaling mechanism introduced in Gig Performer 4 and this blog article to learn how to create velocity splits.
Velocity constraining

If you switch from Scale to Constrain, then you are defining the minimum and maximum velocity values that are allowed. For example, if you set From and To to 50 and 80 respectively:
– any notes with incoming velocities less than 50 will be set to 50.
– and any notes with incoming velocities greater than 80 will be set to 80.
Event blocking

You can block certain events from being passed through. For example, if you are laying two sounds using multiple MIDI In blocks that receive MIDI from the same physical device, you may want your ModWheel or PitchWheel (say) only apply to one of the sounds. Or you might want to be able to adjust the volume of your lead sound without impacting the volume of your pad sound. Of course, you can also do this kind of thing by using widgets in a rackspace. Sometimes, it’s just convenient to send MIDI CC events directly into a plugin and so this blocking mechanism gives you finer control.
Tip: visit this community thread to see a convenient way to manage your sustain pedal independently of other messages.
Monophonic options
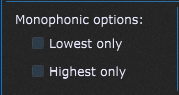
You can arrange for only the lowest or highest note of a chord to be sent out. Combined with layering, this allows you to play chords but have the top (or bottom) note of your chord play a lead sound. Check out the blog The most flexible MIDI processing to see an example.
MIDI In OSC Patchbay
.
If you enable the Show MIDI In OSC Patchbay toggle button in the OSC Options, you’ll see a new section. This section is on the bottom right and is not shown by default:
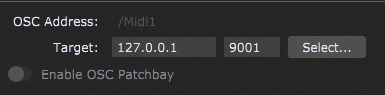
This section is for advanced users. Check the documentation for more information.
Related plugins.
.
Gig Performer also has a MIDI Filter plugin that can be used to either block events or to remap them to various other events. Gig Performer 4 adds a MIDI Channel Constrainer plugin. Check this blog to learn more.
GPScript and Scriptlets.
.
If you’re still not satisfied, there’s always our proprietary language, GPScript! It allows you to perform arbitrary processing of incoming MIDI events. For example it allows for more sophisticated splitting, layering and filtering. It can also “send” MIDI events into the future, allowing you to create such effects as MIDI delay or arpeggiation. Of course, you can use MIDI events to trigger other behavior inside Gig Performer itself.
The power of GPScript allows you to create your own MIDI processor plugins – Scriptlets. Check this user manual page to learn more.
Host Automation
.
We would be remiss to point out that pretty much every function described above can be controlled using host automation. By using rackspace variations or switching song parts, you can instantly change your velocity scaling, modify the split range, turn on or off blocking and so forth. The possibilities are endless.
Enjoy and Own the Stage® with Gig Performer®.
.
Related topics:
– Gig Performer built-in plugins
– How to separate your sustain pedal from your controller
