The Rig Manager

The Rig Manager

The Rig Manager is used to isolate the particular keyboards and/or MIDI controllers (MIDI pedal boards, etc.) from your actual rackspace setups. The fundamental idea is:
– you name your physical devices in the Rig Manager,
– and you use those names when you are creating MIDI In blocks and widgets.

If you later need to use a different keyboard or control surface, you can simply redefine the association in the Rig Manager and then all your rackspaces will work with the new hardware. This is particularly useful if you are touring and/or using Gig Performer in different locations and you have to use different MIDI controllers.

The Rig Manager adds three significant features to Gig Performer:

  1. The ability to use alias names for keyboards and widgets
  2. The ability to switch from one set of controllers to another
    (Also useful when Windows decides to change the name of your MIDI port)
  3. The ability to distinguish controllers that use the same USB identifier

.

Aliases

.

Rig Manager in Gig Performer, creating aliases.

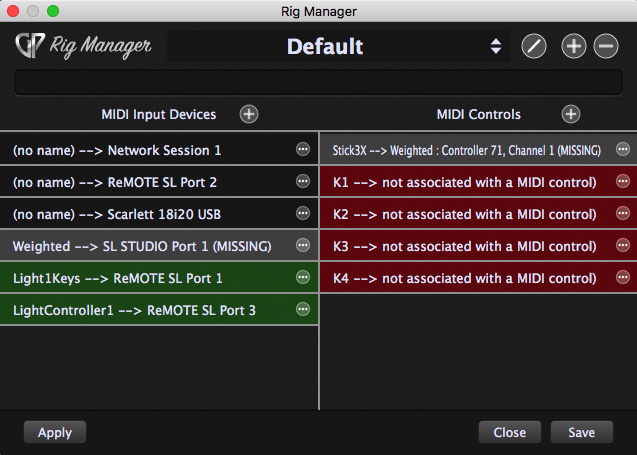
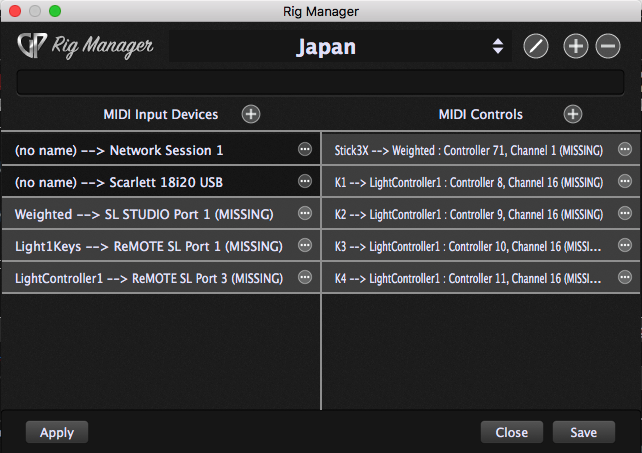
Take a look at the image above. On the left we have a list of physical devices, i.e, actual MIDI ports, typically over USB connections. In particular you can see that there is a Studio Logic keyboard called “Weighted” which is currently not connected to the computer and a Novation ReMOTE keyboard. The latter supports three MIDI ports, two of which have been named, Light1Keys and LightController1 respectively.

On the right is a list of controls that have been named. They are Stick3X, K1, K2, K3 and K4. The first, Stick3X, is currently a control that has been associated with the Studio Logic keyboard called Weighted which, as we’ve seen, is currently not available.

Now I’m going to associate those four controls, K1 thru K4 with four knobs on the Novation. After I’ve done that, we will see the following:

Rig Manager in Gig Performer, creating aliases, assigning controls

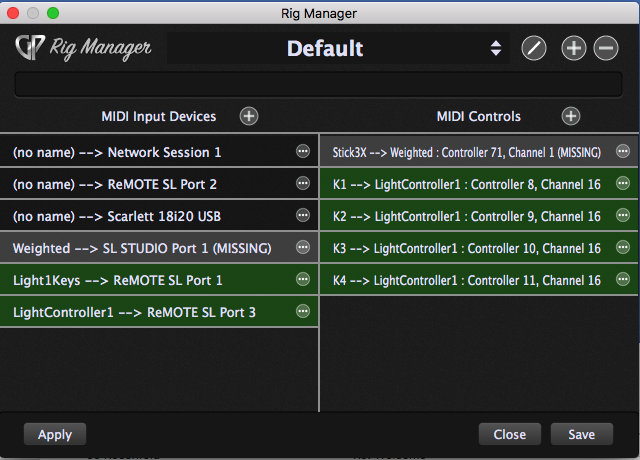
To use this configuration as our default, just click the Save button.

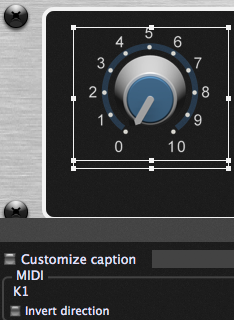
The benefit of this initial configuration will be immediately obvious once we start creating widgets in rackspaces. Take a look at this picture:

Gig Performer 3, Rig Manager, Creating Widgets, assign aliases

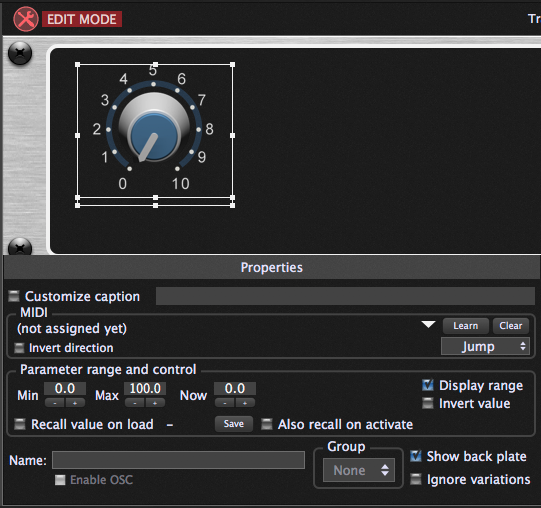
With Gig Performer 1 the next thing we would do is click the Learn button so as to associate a physical controller with the widget. That’s fine but the disadvantage is that as you create new rackspaces and add widgets, you have to perform that association every time. However, notice that to the left of the Learn button there is a little drop-down arrow. If you click that arrow, you will see the following:

Gig Performer, list of aliases created in the Rig Manager, learning MIDI controls, Rig Manager

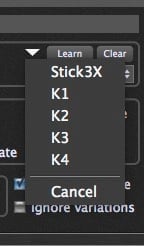
This is of course the list of aliases that we created in the Rig Manager as we were learning MIDI controls. You can now just select the alias you want and the associated control on the Novation will be attached to the widget. Below you can now see that the name K1 is associated with the widget.

Gig Performer, alias K1 is associated with a widget

As you create new rackspaces and add widgets, simply associate them with the desired aliases and you’re done.

Controller sets

.
You’ll recall from above that we saved our work as the default configuration. However, if you have more than one set of controllers and keyboards that you use at different times, or perhaps you need to deal with controllers that you’re given at a particular show (such as when the show has been backlined), then you can copy your current Rig to a new rig but with a different name. Once you’ve done that, you’ll see the same list of alias names but the original physical devices will be displayed as missing.

MIDI input devices and MIDI controls in Rig Manager, Gig Performer

Sadly, I don’t have another set of controllers available where I’m currently writing this article but if I did, I would plugin them in and then for each device or control, I would just click the  button which would open this menu:

Gig Performer, MIDI controls, Learn MIDI

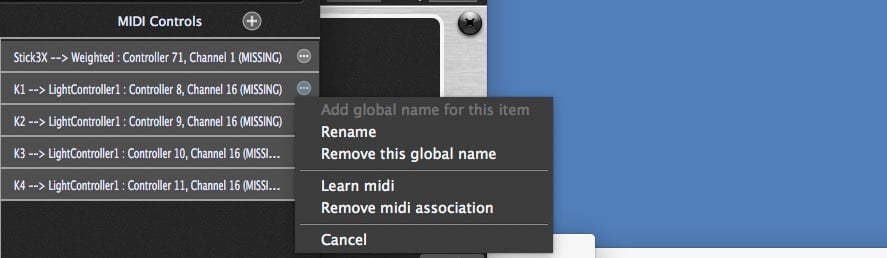
At this point, you would click on Learn midi, then twist the knob on the new physical device and you’re done! All the widgets that you defined in your rackspaces would immediately work with the new physical controls.

Distinguishing identical MIDI devices

.
If you have multiple identical MIDI devices (for example I use three Roland A800 keyboards on tour, each connected to a USB hub), then you may have the problem that, depending on the order in which your controllers powered up and/or depending on which keyboard is connected to which input on your USB hub, the plugin host will not know which keyboard corresponds with which MIDI In block in your plugin Wiring view. However, it turns out that the MIDI In blocks also use those alias names so if you look at your list after creating names for your keyboards in the Rig Manager, you might see the following in your plugin list:

Gig Performer Quick Plugin Finder, MIDI in

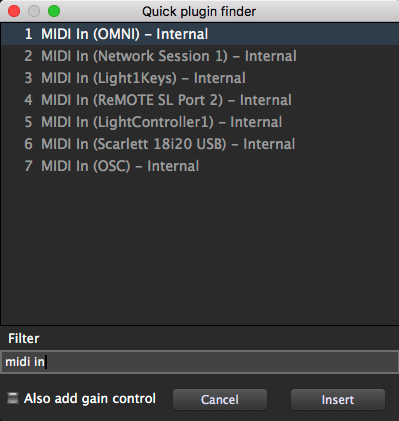
As you can see here, items 3 and 5 have names. So as long as you use those names in your MIDI In blocks then, just like you can relearn aliases for physical controls, you can relearn aliases for keyboards and doing so will ensure that you always have the correct USB controllers associated with the correct MIDI In blocks. It’s something that takes about 2 minutes to do so you can easily and quickly do this after you have set up your rig on stage.
.

Related topics:
How to switch between different controllers using the Rig Manager (YouTube)
Gig Performer concepts (User Manual)
The Rig Manager example (YouTube Shorts)


Scaling Curves


Scaling curves allow you to control the shape of the output of a widget or convert an incoming note velocity to a new velocity. Various predefined curves are available and they can be tweaked as necessary. You can also just draw your own curve as well to achieve the effect you require.


MIDI File Player Plugin


You can load up to 128 MIDI song files in a single plugin instance. Switch from one song to another, mute tracks and/or change their channel numbers. Tempo can be controlled by individual songs or you can use the global tempo and tap tempo to control the BPM interactively.


Favorites and Presets


Create a sound by placing and interconnecting your desired plugins, such as a synth, some effects and perhaps a mixer. Select them all and then save the selection as a named favorite. The favorite will subsequently show up in all plugin insert menus, making it easy for you to recreate that configuration whenever you need it again. This feature is also very powerful for creating your needed sounds on your studio computer and then transferring them to your touring laptop.


Probabilistic Sound Designer


Parameters you select in an open plugin are captured into the Probabilistic Sound Designer dialog window. When you click Randomize, you're only adjusting those selected parameters. Each entry in the PSD dialog has a curve but unlike widgets where the curve controls scaling, in the PSD the curves are used to define the probability of particular values being selected. Make sure the filter cutoff never gets too slow so as to block all sound. Perhaps adjust the max range of the VCA attack parameter so that the sound doesn't have too much delay. Constrain the octave ranges of the oscillators, perhaps ensuring that 1/3rd of the time we select 8' and 2/3rds of the time we select 4'. The possibilities are endless.


More Widgets


Numerous new widgets are included in Gig Performer - a new sustain pedal, plastic knobs, drum pads and more colored sliders. Shapes can be colored with different borders and fill colors and morphed from rectangular to circular. Your creativity is now the limit to creating fabulous front panels in Gig Performer.


MIDI Message Helper


Select MIDI devices by name. Choose the MIDI message type and adjust the appropriate parameters for the specific type


Layout management


Gig Performer supports arbitrary resizing. Layout your widgets the way you want - resize the main window and the widgets will grow or shrink as necessary to maintain the same interrelationships. No matter what size screen you have, your front panels will still be neat and usable.


Undo Support


If you move your widgets around and/or resize them, or even delete them by mistake, the Undo facility will correct your mistake. Minor moves to a widget by mistake will no longer spoil your design


Plugin Channel Count


Some plugins support a large number of outputs and they depend on the traditional channel strip to control how many ports should be available.   When you only need a stereo pair, it is convenient not to have a large horizontal block. In Gig Performer, the number of available ports  is controlled by the channel count override, which can be applied to individual plugins and will be remembered when the gigfile is reloaded or if the plugin is saved as a favorite.


Input muting and output fading


Rather than a single audio length tail, Gig Performer 4 gives you the ability to control input muting and output fading separately. Input muting controls how much time it takes for audio input to be silenced when you leave the rackspace. Output fading controls how much time will be taken for audio to fade out when you leave the rackspace.


Faster Plugin Finder


Instead of searching through menus of perhaps hundreds of plugins (you know who you are!), the Quick Plugin Finder makes it easy to find the plugin you need by simply typing partial strings. For example, as shown here, to find the Modartt Pianoteq 7 plugins, it's enough to type pia mod 7 (in any order, by the way)  to restrict the list of available plugins to those matching your query. The Quick Plugin Finder also knows about manufacturers, presets and favorites.


Touch Friendly Input


Any entry field can be changed by either dragging your mouse (or finger) up or down, or by using the large popup touchpad where you can just tap on the squares to enter a value. The large popup keypad also does validation so you can't enter an invalid value. You can also just tap the BPM field to pop up a larger view where you can quickly change tempo, tranpose, trigger Tap Tempo and enable Ableton Link, the last allowing you to synchronize Gig Performer with any other application that also supports Ableton Link.


New Tuner Display


The tuner view makes it easy for guitarists to quickly check and adjust their tuning. You can toggle into the tuner view from any other view and toggle right back as soon as you're done. All output will be silenced automatically while you're in tuning mode. You can adjust the concert reference pitch from its default of 440 Hz to suit your own needs. The tuner view fills the entire screen so you can easily see it from a distance.