Controlling the RJM GT Mastermind from Gig Performer

Controlling the RJM GT Mastermind from Gig Performer

Background

.
The RJM GT Mastermind pedal controllers are MIDI pedalboards with a collection of buttons above which are little text displays. The normal way to use this pedal board is to create your banks using their software and define what information each button should send out when pressed and/or released. As well as buttons, you can also connect several expression and sustain (On/Off) pedals to it. Here’s a picture of it, taken from their website.

RJM Music Technology Mastermind GT MIDI Pedalboard

SysEx Support

.
It turns out that RJM supports the ability to send SysEx messages into the pedalboard and this opens up some powerful options when combined with Gig Performer 4. The messages allow such things as changing the label text and the color of each display.

Using with Gig Performer

.
I use this pedal board with all my bands and with the use of a gig script (new in Gig Performer 4) it is possible to have Gig Performer update the labels automatically (including hiding some of them) as you switch from one song to another. This lets me easily see what buttons are needed for particular songs. Further, when used in this fashion, it is no longer necessary to configure different MIDI messages in different banks. For my use case (I have the model with 16 buttons), each button is configured as a simple CC message (using CC numbers 70 to 85) each of which sends 127 when pressed and 0 when released. Gig Performer does the rest of the processing as required for particular songs.

The script

.
I’ll attach the script in its entirety at the end of this article but here I’m just going to post parts of it so I can explain how it works.

Control the Mastermind GT GT 16 part of the script

  • Line 5 defines the prefix that needs to be used for all SysEx messages that will be sent to the GT. Note that although there is a new SysEx type now built into GP Script, it is still sometimes convenient to just use strings so they can be manipulated as text.
  • Line 6 defines the name of the MIDI port used to receive messages. It’s a little confusing as one generally uses the term “Input” to imply input FROM a device INTO the computer but RJM have reversed this convention. Note also that variable declarations can include initialization.

Construct a complete sysex message to send to pedal

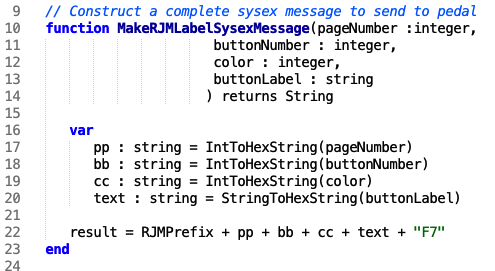
This function is used to construct a complete SysEx message given the parameters defined by the GT specification (the targeted page, button number, etc)

A complete SysEx message given the parameters defined by the GT specification

This is a convenience function to set the title of the large center display. Note the new function on line 31 that is used to send a SysEx message to a MIDI device using the actual exposed name of the device rather than the usual mechanism inside rackspace scripts where handles are defined to refer to plugin blocks.

Set the label text and color of the specified button, part of the Mastermind script

This is simply a convenience function used by the rest of the script to construct the appropriate SysEx message given the desired button, color and text.

A convenience function used by the rest of the script to construct the appropriate SysEx message given the desired button, color and text.

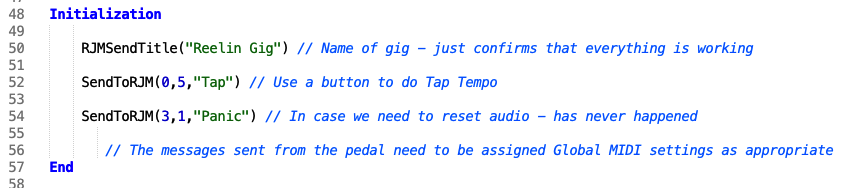
Hopefully self-explanatory – just a way to create some default labels for functions that are useful to have around.

Iterate through song parts and create SysEx messages and send out Systex messages.

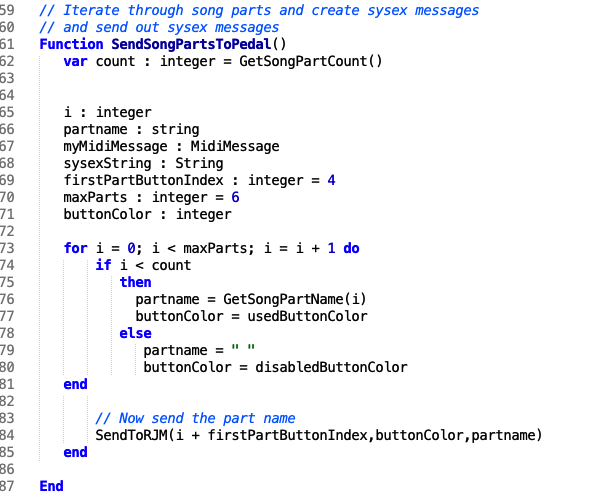
This function gets the name of all the song parts of the current song and sets the button labels accordingly. This allows me to switch from one song part to another by pressing a button and the button labels have the actual part names, making it easy to see what to press.

Part of the Mastermind script called when you switch to another song

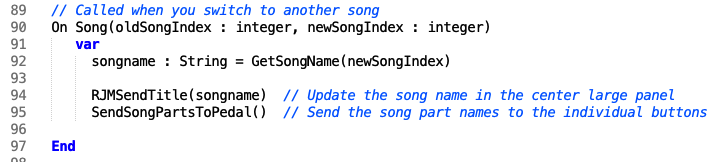
Finally, we define a callback that is triggered whenever we switch songs. When that occurs, we just update the large panel with the song name and set the names of the song parts.
.

Note: as usual, these scripts are not officially supported by Deskew Technologies, LLC but we hope you will find such examples useful, perhaps as a starting point to tailor it to use with your own device. You can also ask questions in the GPScript area of the Community forums..


Related topics:
My live keyboard rig
How to change sounds and control plugins from your MIDI controller


Scaling Curves


Scaling curves allow you to control the shape of the output of a widget or convert an incoming note velocity to a new velocity. Various predefined curves are available and they can be tweaked as necessary. You can also just draw your own curve as well to achieve the effect you require.


MIDI File Player Plugin


You can load up to 128 MIDI song files in a single plugin instance. Switch from one song to another, mute tracks and/or change their channel numbers. Tempo can be controlled by individual songs or you can use the global tempo and tap tempo to control the BPM interactively.


Favorites and Presets


Create a sound by placing and interconnecting your desired plugins, such as a synth, some effects and perhaps a mixer. Select them all and then save the selection as a named favorite. The favorite will subsequently show up in all plugin insert menus, making it easy for you to recreate that configuration whenever you need it again. This feature is also very powerful for creating your needed sounds on your studio computer and then transferring them to your touring laptop.


Probabilistic Sound Designer


Parameters you select in an open plugin are captured into the Probabilistic Sound Designer dialog window. When you click Randomize, you're only adjusting those selected parameters. Each entry in the PSD dialog has a curve but unlike widgets where the curve controls scaling, in the PSD the curves are used to define the probability of particular values being selected. Make sure the filter cutoff never gets too slow so as to block all sound. Perhaps adjust the max range of the VCA attack parameter so that the sound doesn't have too much delay. Constrain the octave ranges of the oscillators, perhaps ensuring that 1/3rd of the time we select 8' and 2/3rds of the time we select 4'. The possibilities are endless.


More Widgets


Numerous new widgets are included in Gig Performer - a new sustain pedal, plastic knobs, drum pads and more colored sliders. Shapes can be colored with different borders and fill colors and morphed from rectangular to circular. Your creativity is now the limit to creating fabulous front panels in Gig Performer.


MIDI Message Helper


Select MIDI devices by name. Choose the MIDI message type and adjust the appropriate parameters for the specific type


Layout management


Gig Performer supports arbitrary resizing. Layout your widgets the way you want - resize the main window and the widgets will grow or shrink as necessary to maintain the same interrelationships. No matter what size screen you have, your front panels will still be neat and usable.


Undo Support


If you move your widgets around and/or resize them, or even delete them by mistake, the Undo facility will correct your mistake. Minor moves to a widget by mistake will no longer spoil your design


Plugin Channel Count


Some plugins support a large number of outputs and they depend on the traditional channel strip to control how many ports should be available.   When you only need a stereo pair, it is convenient not to have a large horizontal block. In Gig Performer, the number of available ports  is controlled by the channel count override, which can be applied to individual plugins and will be remembered when the gigfile is reloaded or if the plugin is saved as a favorite.


Input muting and output fading


Rather than a single audio length tail, Gig Performer 4 gives you the ability to control input muting and output fading separately. Input muting controls how much time it takes for audio input to be silenced when you leave the rackspace. Output fading controls how much time will be taken for audio to fade out when you leave the rackspace.


Faster Plugin Finder


Instead of searching through menus of perhaps hundreds of plugins (you know who you are!), the Quick Plugin Finder makes it easy to find the plugin you need by simply typing partial strings. For example, as shown here, to find the Modartt Pianoteq 7 plugins, it's enough to type pia mod 7 (in any order, by the way)  to restrict the list of available plugins to those matching your query. The Quick Plugin Finder also knows about manufacturers, presets and favorites.


Touch Friendly Input


Any entry field can be changed by either dragging your mouse (or finger) up or down, or by using the large popup touchpad where you can just tap on the squares to enter a value. The large popup keypad also does validation so you can't enter an invalid value. You can also just tap the BPM field to pop up a larger view where you can quickly change tempo, tranpose, trigger Tap Tempo and enable Ableton Link, the last allowing you to synchronize Gig Performer with any other application that also supports Ableton Link.


New Tuner Display


The tuner view makes it easy for guitarists to quickly check and adjust their tuning. You can toggle into the tuner view from any other view and toggle right back as soon as you're done. All output will be silenced automatically while you're in tuning mode. You can adjust the concert reference pitch from its default of 440 Hz to suit your own needs. The tuner view fills the entire screen so you can easily see it from a distance.