In this article we explain how to synchronize Gig Performer’s tempo to an external MIDI clock or Link-enabled products.
Gig Performer is a versatile audio plugin host that provides you with variety of ways to manage your tempo. As of version 1.6, Gig Performer can sync its tempo to an external MIDI clock, adjusting tempo automatically based on the rate at which MIDI clock events are received. Gig Performer also supports Ableton Link, a technology that keeps Link-enabled products time synced over a local network.
Let’s get started!
How to synchronize Gig Performer’s tempo to an external MIDI clock
.
Set your MIDI device to respond to a MIDI clock source
First, make sure to set your MIDI device to respond to MIDI Clock in the Rig Manager. To check what other MIDI devices respond to MIDI Clock messages, you can also go to the MIDI Ports Options and check where the Rx Clock button is lit.
Enable clock synchronization in the desired rackspaces
Clock synchronization itself in Gig Performer is not global but rather it is enabled on a per rackspace basis. To enable MIDI clock synchronization, double-click on a rackspace, and turn on the Sync tempo with external MIDI clock toggle button in the Rackspace Properties dialog:

The next step is finding a source that generates MIDI clock events.
MIDI Clock source
The source is usually a special hardware MIDI clock device or a MIDI keyboard that can act as the MIDI clock master.
Alternatively, the source can be produced by applications such as MaxMSP, Ableton Live, or any other application with MIDI clock generating capability.
For the purposes of this article, I’ll use an open source and cross-platform application MidiClock. This is a simple MIDI Clock generator that sends generated MIDI messages through virtual MIDI devices.
Mac users have an advantage as macOS already includes the built-in IAC port that you can use with this kind of applications; Windows users will need to install a free virtual MIDI driver such as LoopBe1 (which is used in this example).
The procedure
So the steps are:
– Install the MidiClock application,
– If you’re on Windows, also install a virtual MIDI driver,
– Start Gig Performer and enable tempo synchronization with external MIDI clock,
– Start the MidiClock application:
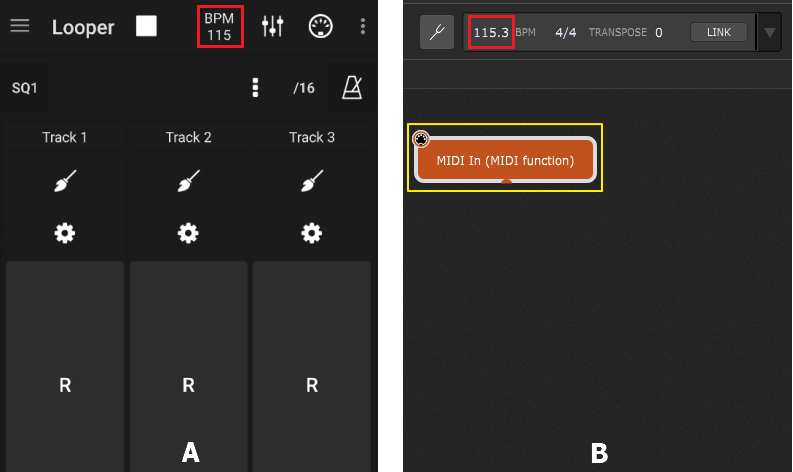
 and WIndows (B)")
Above are screenshots of Gig Performer running on Mac (A) and Windows (B). In MidiClock application, simply type in the desired BPM (1) (alternatively, select the desired range and use the slider), and select the desired MIDI out device (2) (IAC Driver on Mac or LoopBe on Windows).
MidiClock will immediately start generating MIDI messages. You’ll see that Gig Performer synchronizes with that tempo (see the yellow rectangle).
Gig Performer updates its tempo very frequently, according to generated MIDI messages. That’s why you see the different tempo value on every screenshot (also note the MIDI indicator activity in Gig Performer):

Interpreting the results
But why does Gig Performer show different values than the value in the MidiClock application? This is where the quality of MIDI clocks comes into place. While dedicated hardware MIDI clock devices are very precise, simple applications like MidiClock have difficulties maintaining perfect sync. Feel free to try out different applications for PC or Mac and compare the results. Visit our Community to see experience of our Community members with different MIDI clocks and Gig Performer.
Using a smartphone or a tablet as a MIDI clock
Suppose you have a MIDI-enabled smartphone or tablet, e.g. a Xiaomi Redmi Note 7 Android smartphone. In that case, you can use it as a MIDI clock.
To do so:
– Connect your smartphone with the USB cable to your PC and select MIDI mode; Gig Performer will automatically register it as a new MIDI device (you don’t actually need to insert the MIDI In block, as indicated with the yellow rectangle below. This is only to test whether your device is recognized in Gig Performer).
– Install an app on your smartphone that supports MIDI clock synchronization (like MIDI Looper in this example, see (A)). Depending on your app, you might also need to configure MIDI In/Out ports in your app.
You can see that this setup more accurately synchronizes Gig Performer’s tempo to an external MIDI clock (B).
How to synchronize Gig Performer’s tempo to Link-enabled products
.
Ableton Link is a technology that synchronizes musical beat, tempo, phase, and start/stop commands across multiple applications running on one or more devices. Applications on devices connected to a local network discover each other automatically and form a session in which each participant can perform independently: anyone can start or stop while still staying in time. Anyone can change the tempo, the others will follow. Anyone can join or leave without disrupting the session.
Gig Performer fully supports Ableton Link:
 Select a Link-enabled application
There are more than 200 Link-enabled products; check this list to see them. For the purpose of this article, I downloaded a free Android app G-Stomper Rhythm:

Simply long tap on the Play button, set the desired tempo (e.g. 110 BPM) and tap on Enable Ableton Link:

It doesn’t matter in which order you enable Link; if you first enable it in this app, it will state “Connected Links: 0”. If you first enable Link in Gig Performer and then in this app, the app will automatically recognize Gig Performer and state “Connected Links: 1”.
All that matters is that all devices are on the same local network (in this example, both this app and my laptop are connected on the same Wi-FI network).
And what about the tempo synchronization? You can see that before activating the Link, the tempo in Gig Performer was 100 BPM, before activating the Link, and afterwards it was fixed at 110 BPM:

In Gig Performer, you can see the number of connected Link devices inside the brackets, e.g. LINK [1]. Note that there are no frequent tempo updates like you saw in the previous section of this article.
Any new device is almost immediately available in the Link session, you only get the notification about the connected link in the App:

As you can see, Link is really hassle-free, there is virtually no configuration needed, it just works, and it works well.
Note: Link has higher priority in Gig Performer; if you enable the Sync tempo with external MIDI clock option in a rackspace and then turn on Link, you’ll see that the Sync tempo option is disabled until Link is turned off.
.
Share this article to help spread the word about Gig Performer.
Own the Stage® with Gig Performer® !
Nemanja Pudar
