,In this article we will learn about various features in Gig Performer that are available using the Shift key.
In many places, when you hold down the Shift key while performing some action, Gig Performer will behave slightly differently in response to that action. That is the reason why we titled this article – The Magic of the Shift key.
We have compiled many tips and tricks that may improve your workflow and efficiency with Gig Performer.
Let’s get started!
Temporary Startup Options
.
The first tip is related to Gig Performer’s startup. Namely, if you hold the Shift key down while starting Gig Performer and keep it down until you see Gig Performer start up, you will invoke the Temporary Startup Options dialog:
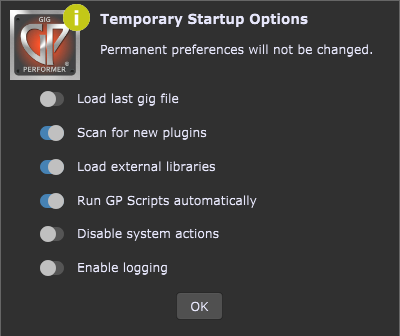
Learn more about the features in this dialog in this dedicated blog article.
The Shift key in the Wiring view
.
First off, you can add individual plugin blocks to the current selection by holding down the Shift key while clicking on the desired block. Similarly, clicking on an already selected block will deselect it.
Creating a stereo connection quickly
Probably the most mentioned workflow tip using the Shift key on our YouTube channel is creating a stereo connection quickly. To make a quick stereo connection, hold the Shift key down and drag a wire from an output port of one plugin to the input port of another plugin. Alternatively, hold the Shift key down while dragging a plugin until its output pins touch the input pins of another plugin, then release (unclick) the mouse.
If there is already a connection, this operation will cause it to be removed instead (additionally, see this YouTube video).
Insert or remove blocks from an Audio or MIDI path
As of Gig Performer 4.5, plugin blocks can simply be inserted into or removed from an Audio/MIDI path automatically. Hold down the Shift key while dragging the block over the connection wires.
Simply hold down Shift, click on the desired plugin block (A), then drag it onto connection wires until they light up (B), and then release the click (C). You can see that the block is inserted into the path.
You can extract a block from between two other blocks by holding down Shift and then dragging the block away.
Duplicating plugin with inputs
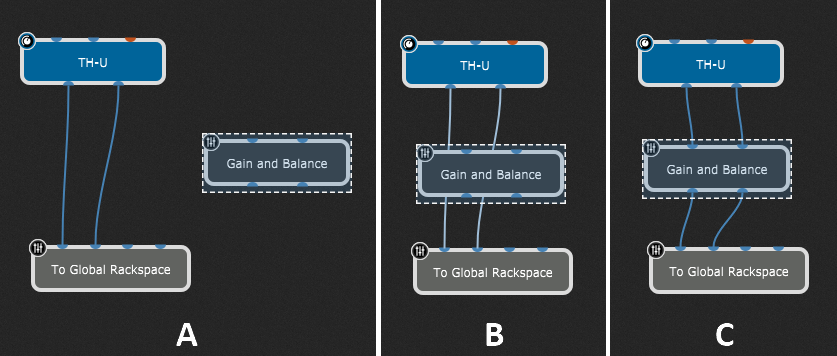
Another workflow tip that will be particularly appreciated by FoH engineers is duplicating a plugin with inputs. If you right click on a plugin while holding the Shift key in the Wiring view, you’ll notice the Duplicate with inputs menu item. Clicking on this menu item will preserve the original input connections in the new duplicate. For example, if you duplicate with inputs the Gain and Balance plugin block in (A), then the duplicate will preserve the connections, as indicated with (B):
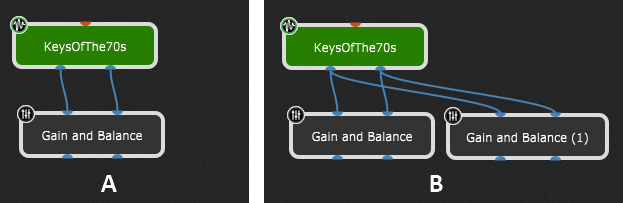
You can then add different effects after each gain control, thereby efficiently creating a multi-effect Send layout.
Quickly arrange rackspaces or songs
Normally, clicking on a rackspace activates that rackspace. However, if you just want to reposition that rackspace, holding the Shift key while dragging rackspaces prevents the dragged rackspace/song from being activated. This can be particularly useful for adjusting your rackspace order when the Predictive Loading feature is enabled.
The Shift key in plugins
.
In the MIDI In plugin editors, if you hold the Shift key down while enabling or disabling individual MIDI channels by clicking on their respective check boxes, the other check boxes will be set to their opposite states. This is a convenient way to quickly enable a single channel while blocking all others.
In the MIDI Out plugin editors, you can use Shift and a note on the virtual keyboard to create a keyboard split; hold down the Shift key and click on the desired key on the virtual keyboard to set a low note. Afterwards, hold the Alt key (Option key on Mac) and click on the desired key on the virtual keyboard to set an upper note.
If you double-click an entry in the MIDI Monitor plugin editor, that entry will be copied it to the clipboard, but if you hold down the Shift key while double-clicking, all entries will be copied to the clipboard (this applies to the Global MIDI Monitor window, as well).
If you want to see the underlying script behind a Scriptlet block, you usually click on the Edit Script button in the Scriptlet plugin editor. To speed up that process a bit, hold the Shift key while double-clicking the scriptlet block and both the scriptlet’s plugin editor and the script editor will open automatically.
Double-clicking a marker in a Streaming Audio File Player while holding down the Shift key allows you to execute all actions defined for that marker. This is useful for testing purposes — to quickly trigger all actions while the Streaming Audio File Player is not running.
The Shift key in the Panels view
.
We start with a tip that is new to Gig Performer 4.5: if you click on a widget while holding the Shift key in the Panels view (i.e., not in Edit mode), the Widget actions menu will appear:
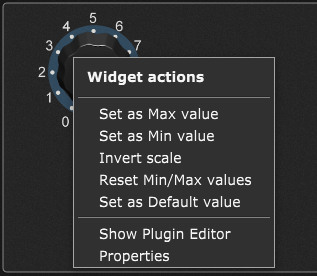
This menu allows you to quickly adjust some frequently used actions described in the Widgets Properties Inspector window.
Just like selecting plugin blocks, you can select multiple widgets (in Edit mode) by holding the Shift key and clicking on each individual widget (clicking on an already selected widget will deselect it).
When you move a widget with up/down/left/right arrows on your keyboard (in Edit mode), it moves in small steps. Hold the Shift key while moving a widget (or widgets) to move in bigger steps.
As in the Wiring view, rackspaces can easily be reordered by dragging them up and down using your mouse or trackpad in the Panels view (non-Edit mode), as well; hold down the Shift key while doing so to drag a rackspace without its being activated. This is more efficient as you don’t need to wait for each rackspace to activate.
You can already copy widgets from the Global rackspace and then paste them into a local rackspace using the Copy and Paste menu options. However, if a global widget is mapped to a parameter in the plugin in the Global rackspace, then if you hold down the Shift key while performing the paste into a local rackspace, (e.g. right mouse click on a panel → Paste or click on the Edit menu → Paste), the pasted widget will be automatically mapped to the actual parameter value of the widget in the Global rackspace (learn more here). NB: If it doesn’t already exist, this action will automatically insert the To Global Rackspace plugin into the local rackspace.
Widget Properties Inspector and the Shift key
.
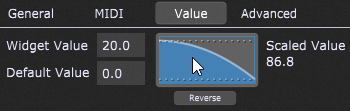
If you hold the Shift key down while clicking on the scaling curve, the curve settings will be copied to the clipboard. NB: besides widgets, this applies to the Probabilistic Sound Designer and velocity curves in MIDI In blocks.
Then, hold down Shift+Ctrl and click on another curve and the previously copied settings will replace settings of that curve:

If you hold the Shift key when you click on the “Reset to linear shape” button, the Step Function Generator window will appear (A):
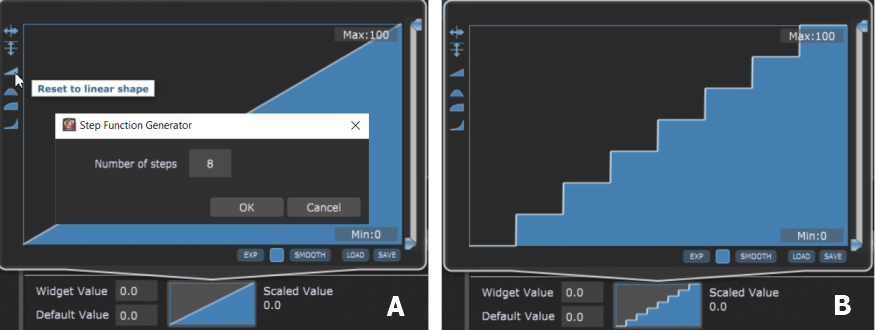
Enter the number of steps and click OK to create a step function (B). If you’re wondering why we did this, see a real use case scenario in this thread. Additionally, read a little bit of history here, how “Necessity is the mother of invention“.
Finally, holding the Shift key while moving Min or Max sliders allows you to move both of sliders at the same time.
The Shift key in the Setlist view
.
Clicking the padlock icon blocks changes to rackspace assignments in a selected song. This protects the selected song from accidental modification.
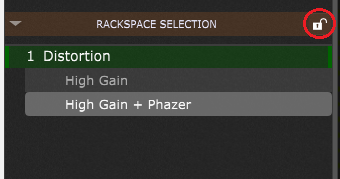
Hold the Shift key and click on this icon to apply the lock to all songs.
Holding the Shift key while dragging songs prevents the dragged song from being activated. This can be very useful for adjusting your setlist order when Predictive Loading is enabled.
Shift Key in Gig Performer Options
.
Holding Shift down while clicking on an input or output checkbox in Audio Options will set all of them to the inverse of the one you selected.
Double-clicking a MIDI assignment in Global MIDI Options or Setlist Options while holding the Shift key opens the Edit MIDI message dialog. In this dialog, you can manually select the desired device and the desired MIDI message. Holding the Shift key down while clicking on the Learn MIDI for selected item button clears the currently selected MIDI assignment.
Other tips and tricks using the Shift key
.
You can easily set values in various fields by clicking on the field and moving the mouse up or down:
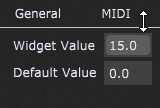
If you also hold Shift, values are increased or decreased by 0.1. Note that the dragging speed is also taken into account; moving your mouse faster will make greater changes in values.
By default, clicking on the field opens a mini pad for entering values:
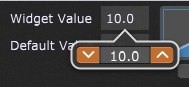
Click on up/down arrows to change value by 1; hold Shift to change value by 0.1 (or simply type in the desired value).
Hold Shift and click on the Randomize button in the Probabilistic Sound Designer to quickly randomize all parameters.
Hold down Shift and then click on the Metronome icon to open the General Options window.
Keyboard shortcuts
.
Finally, you can review keyboard shortcuts in our user manual. Many of them are using Shift with other keys. For example, Shift+I zooms in the Wiring view surface. Shift+O zooms out the Wiring view surface. To zoom plugin blocks to fit use Shift+F.
.
Share this article it to support Gig Performer and spread the word!
Own The Stage® with Gig Performer®
Nemanja Pudar
Related topics:
– Important workflow tools and tips (User Manual)
– Tips and Tricks (Community)
