In this article I’ll show you how to use your Android mobile phone or tablet to control your guitar or keyboard effects (or any other instrument effects) by using OSC in Gig Performer.
Gig Performer, our audio plugin host for live performance, supports full OSC implementation. See here how Gig Performer compares to other audio plugin hosts. There are many features unique to Gig Performer, such as ChordPro support, Ableton Link integration, and OSC support.
OSC (Open Sound Control) is a protocol for communication among various multimedia devices and applications, with a particular focus on applications used by artists and performers. In Gig Performer you can associate OSC names with plugins and widgets and then send messages to them from any remote device, such as Android phone or tablet, iPhone, iPad or other laptop to control their operation.
Every parameter available in your VST, VST3 and AU plugin (if you’re on macOS) can be controlled by widgets in Gig Performer, and every widget can be controlled just with a tap of or sliding your fingers on your favorite mobile phone via OSC protocol. Other OSC capable devices, like various digital mixers for example, can be controlled directly from Gig Performer using widgets and OSC. Gig Performer’s proprietary programming language (GPScript) also supports the OSC protocol.
Let’s get started! This article is split into following sections:
- Intro
- Preparation and OSC setup
- Layout and widgets setup in Gig Performer
- Layout editor installation and widget configuration
- Importing layout in an OSC-compliant application on a smartphone
- Outro
.
1. Intro
.
There are many great paid applications for your smartphone that can be used to control your guitar or keyboard effects. Perhaps the two most popular ones are Lemur (Android, iOS) and TouchOSC (Android, iOS). Since both of them are already covered in this blog (see here for Lemur, and here for TouchOSC), but don’t offer trial versions, I tried to find an application that’s either free or at least includes a trial version, so you can immediately try the techniques presented in this article.
I’m an Android user, so I tried to find out if there were any good free OSC-related apps in the Google Play Store. Unfortunately, I wouldn’t recommend any of the free ones (see in our Community thread why).
Luckily, I stumbled upon this decent commercial app OSCAR (ex OSC-Commander):
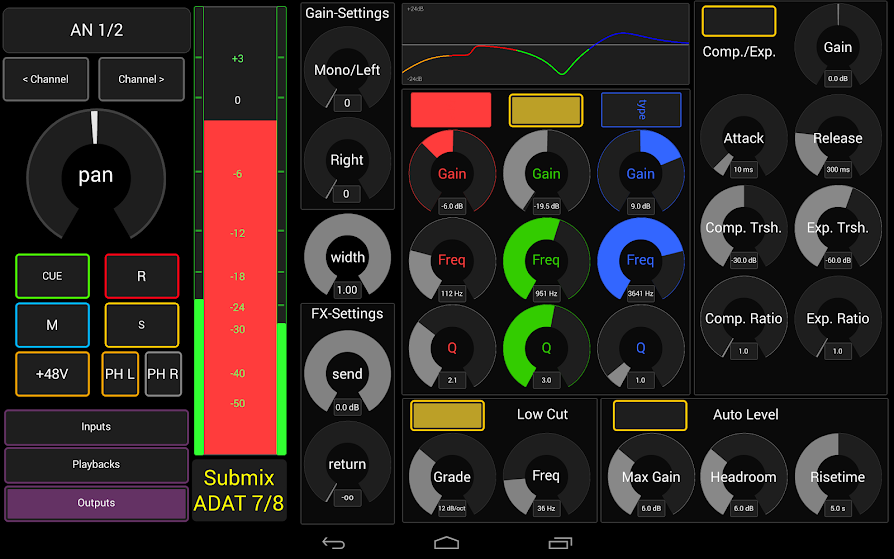
OSCAR’s developer Dr. Frederik Bertling also provides a free unlimited trial for the testing purposes (the only restriction, however, is that OSCAR randomly deactivates controllers, making their foreground gray, and removes all custom images from widgets. Fair enough!).
Please note OSCAR is an OSC-Controller for Android only.
2. Preparation and OSC setup
.
Before we start preparing OSCAR and Gig Performer to establish the OSC connection, please note they must be on the same local network.
Install OSCAR Trial on your smartphone/tablet via Google Play Store, as you would for any other Android app, and start it:
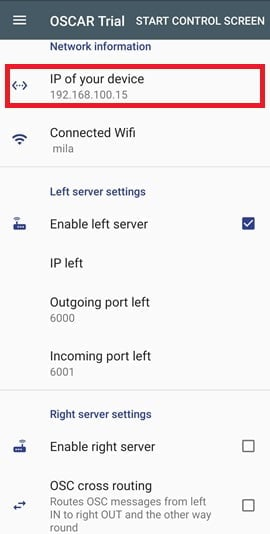
Particularly note the IP address of your device, since that will be needed for Gig Performer.
- Tick the checkbox Enable left server; leave the IP left parameter blank for now (that’s the IP address of the computer or laptop where Gig Performer is installed).
- Set the Outgoing port left parameter to 6000 (this port matches the Gig Performer listening port),
- and set the Incoming port left parameter to 6001 (this is the Remote client port in Gig Performer).
For more information on parameters, refer to the OSCAR’s documentation.
Now start Gig Performer; click on the Options menu and then select the OSC Setup… menu item:
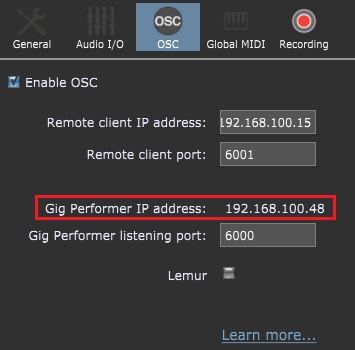
Note the Gig Performer IP address, as you will need this value for the IP left parameter in OSCAR. Please read the Gig Performer’s documentation for more information about the OSC configuration.
Here is a side-to-side view of OSCAR’s and Gig Performer’s parameters respectively:
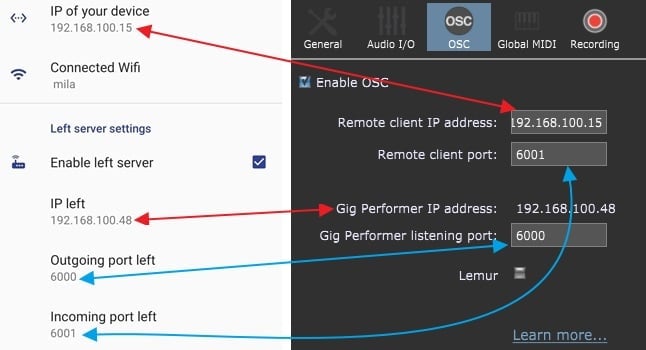
Network setup is now done and the OSC connection between OSCAR and Gig Performer should now be working (make sure Gig Performer is not blocked by a software firewall).
3. Layout and widgets setup in Gig Performer
.
Switch to the Back view in Gig Performer and create a simple layout:
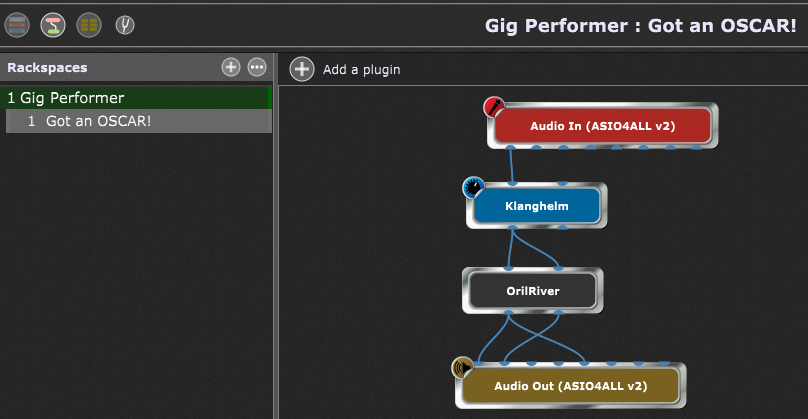
This is a similar setup as described in this article, where top websites for free VST, VST3, and AU audio plugins were discussed. Refer to that article if you need help downloading, installing and connecting these free plugins.
Now open the Front view of the rackspace, click on the Layout Designer button, and drag two widgets onto the panel surface (I chose the Old School Knob and an LED Button Red):
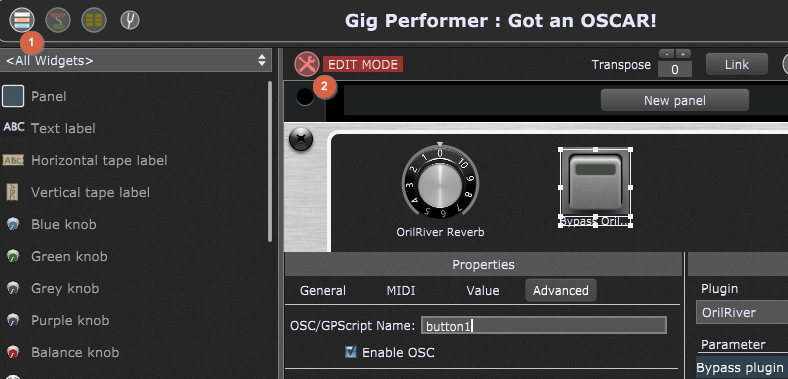
Select one of these widgets, and then click on the Advanced tab; I assigned the OSC names knob1 for the old school knob widget and button1 for the LED button. Note that these names are case sensitive. Tick the Enable OSC check box for both. The knob1 widget controls the reverb parameter of the OrilRiver plugin, and the button1 widget controls the parameter Bypass plugin (see the screenshot above: Plugin – OrilRiver, and Parameter – Bypass plugin).
4. Layout editor installation and widget configuration
.
To be able to create a layout in OSCAR and use your mobile phone to control your guitar or keyboard effects, you need to install OSCAR’s layout editor, add widgets to your layout, and then import this layout to your Android device.
Download OSCAR’s layout designer named OSC-Commander Editor from this link, and install it. Note you need to have Java installed to run this application. Start the application:
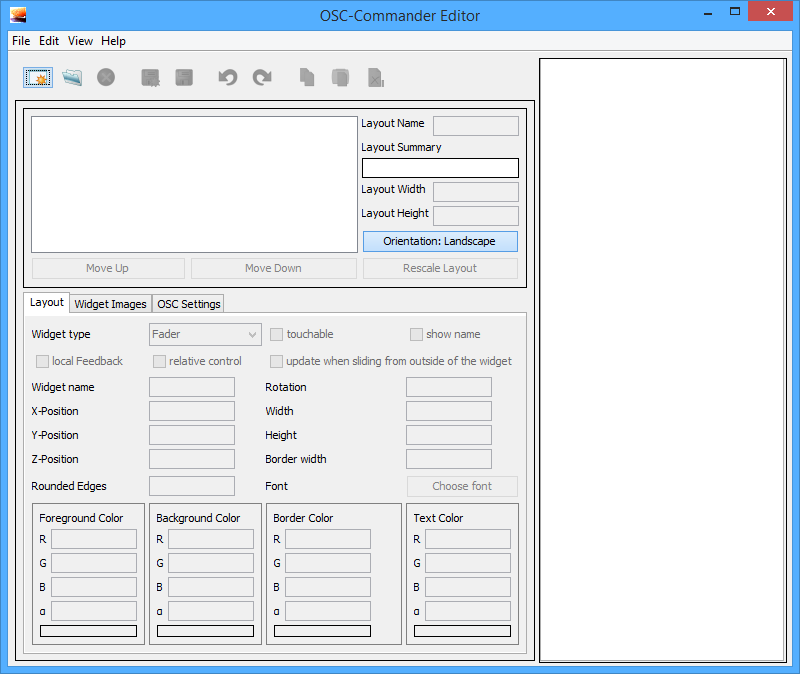
Click on File and then on New File. Right click on the layout surface and add a Knob and a Toggle Button onto it (alternatively, click on the Edit menu, then on the Add widget menu item and then choose the corresponding widgets); name them knob1 and button1 respectively. Be careful – these names are case-sensitive:
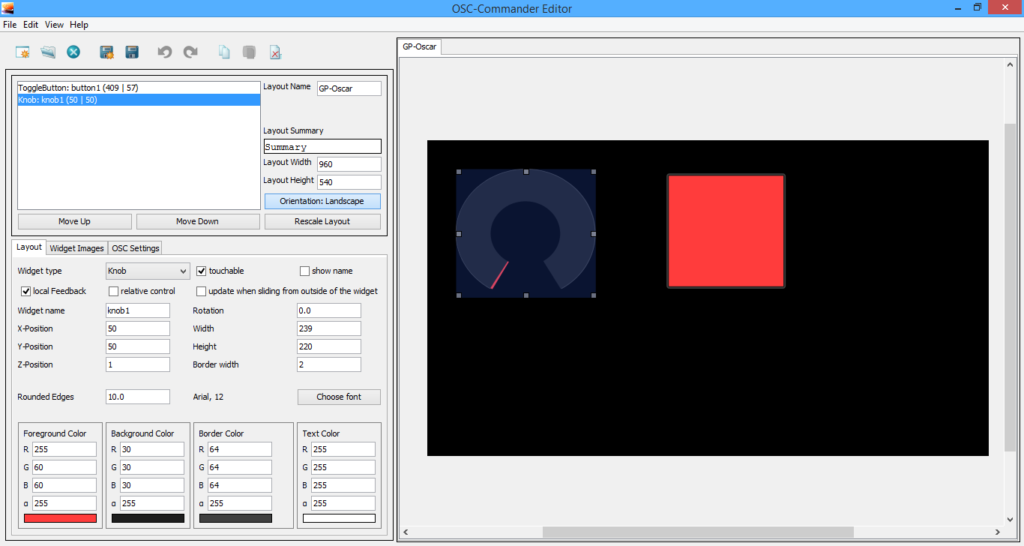
The most important tab here is OSC Settings tab; set the parameters for knob1 and button1 to match the side-by-side picture below:
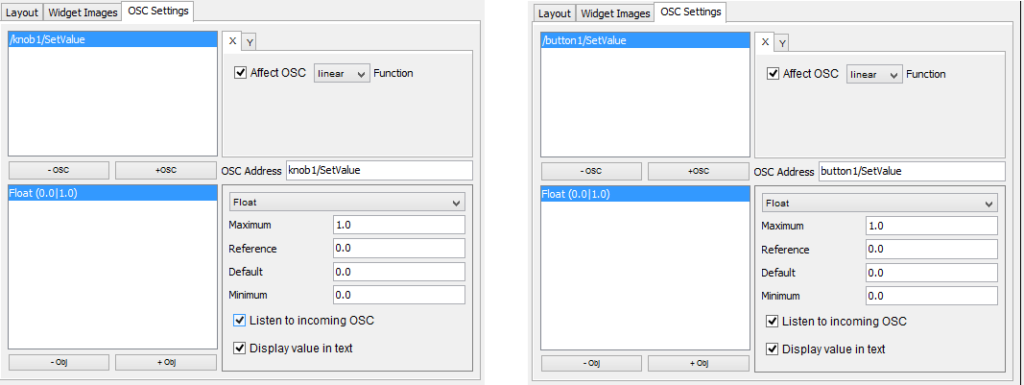
The OSC Address consists of the widget_OSC_name/function (the widget OSC name is an “oscHandle” – the name you assigned to a widget in Gig Performer; you can learn more about functions, such as “SetValue” here).
When defining the +Obj data type, always select Float (or Double). Don’t select Integer (or Int) data type.
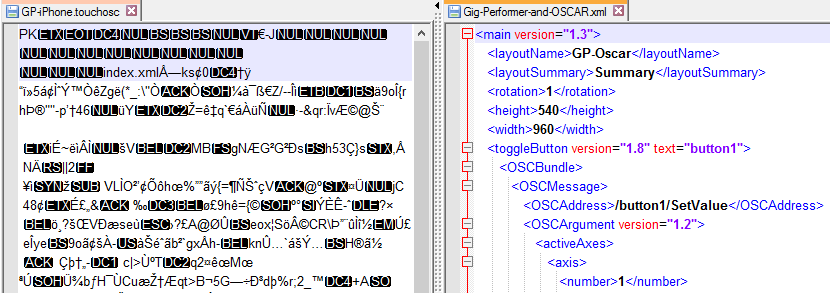
Click on the File menu, and then on Save, to save your layout in the XML file format. I like that the developer decided to store all the parameters in XML, so you can (with care) edit some of the parameters manually, for example in Notepad++ (or on your phone or tablet). You can’t do this with (say) TouchOSC’s layout file. Compare these two:
In the next section, we’ll import this layout to OSCAR.
5. Importing the layout to OSCAR
.
Transfer your layout to your smartphone or tablet (use an SD card, a cloud file service, transfer from the computer via cable, etc.), and start OSCAR; tap on the menu icon and then select Layouts:
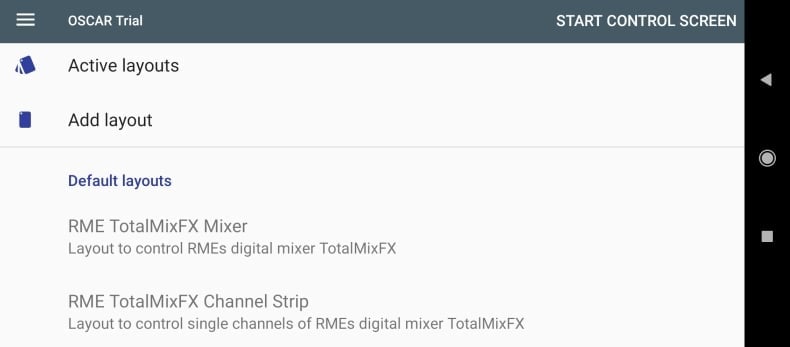
Here you can see a couple of predefined layouts for REAPER and RME TotalMixFX. Additionally, visit OSCAR’s website to check these default layouts, and example layouts. When you’re ready, tap on Add layout:
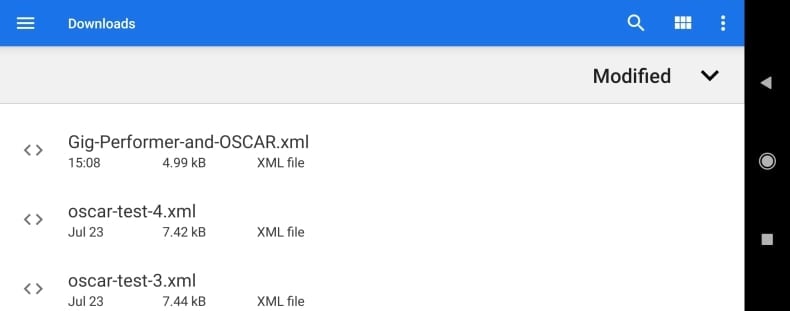
Afterwards, tap on Active Layouts:
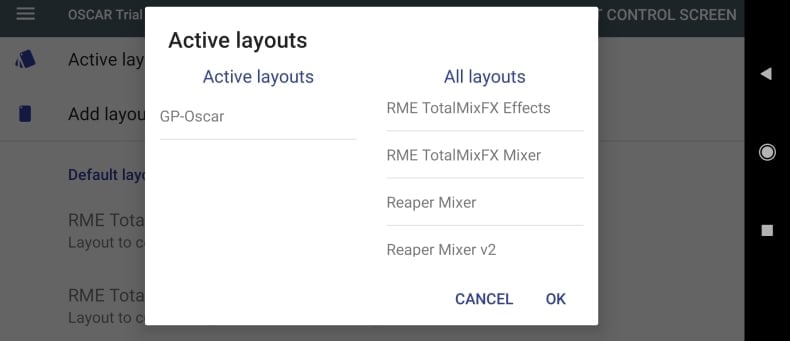
Set your layout to be in the Active layouts list, and then tap OK. Great, all set! Now you’re ready to use your mobile phone to control your guitar or keyboard effects – tap on START CONTROL SCREEN:
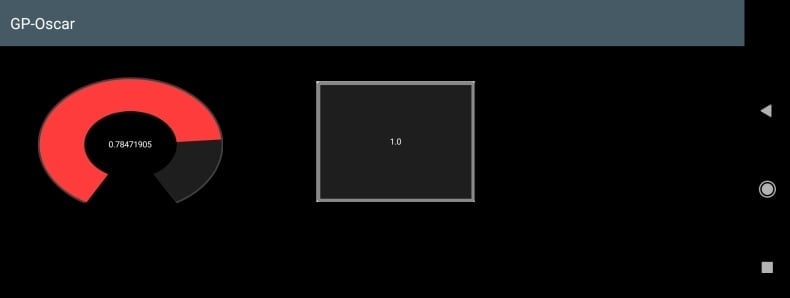
Now you should be able to control widgets in Gig Performer by controlling the widgets on your Android device and vice-versa. Your widget changes in Gig Performer will be reflected on your Android device.
6. Outro
.
I hope you succeeded in configuring Gig Performer and OSCAR without issues.
You can download here the ZIP file which contains my XML layout and the GIG file for Gig Performer. (useful If you got stuck in any of these steps)
If you still can’t manage to get things running, turn off your firewall. If it works, allow ports 6000 and 6001 in your firewall’s settings.
Consider visiting our Community to post screenshots of your layouts, and share your experience with OSCAR and Gig Performer. I’ll post more information there, behind-the-scenes info, tips, etc. I hope this article gives you lots of ideas with which to work.
There are lots of benefits when you can control your computer-based setup using your tablet or smartphone. Besides sheer usefulness, to manipulate widgets with a tap, you can show off a bit on stage – play your guitar or any other instrument and activate phasers, delays, overdrive, and other effects. Make a show your audience will remember!
7. Encore
.
OK, if you got this far, here’s a bonus section – Encore! 😉 You might wonder is it possible to control the same Gig Performer setup with multiple Android or iOS devices? When you perform live, you might want your FoH engineer to have access to your controls, too.
Yes, this is possible with OSC Broadcast mode! Simply open Gig Performer OSC settings and set the last three digits of the Remote Client IP address to 255:
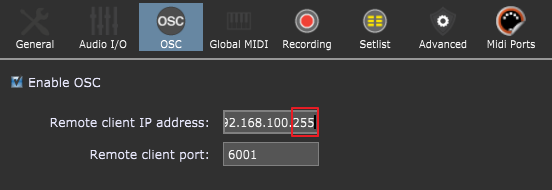
That’s it. Now Gig Performer sends OSC messages to all listening clients on port 6001.
I wanted to test this further. I have a very old Android smartphone Samsung Galaxy S2 (I bought it in 2011, and it initially came with Gingerbread v2.3.4 !) and I wanted to check how it behaves in this configuration. Everything works! Here are the widgets in Gig Performer:

Their state is perfectly in sync with widgets on my two phones:
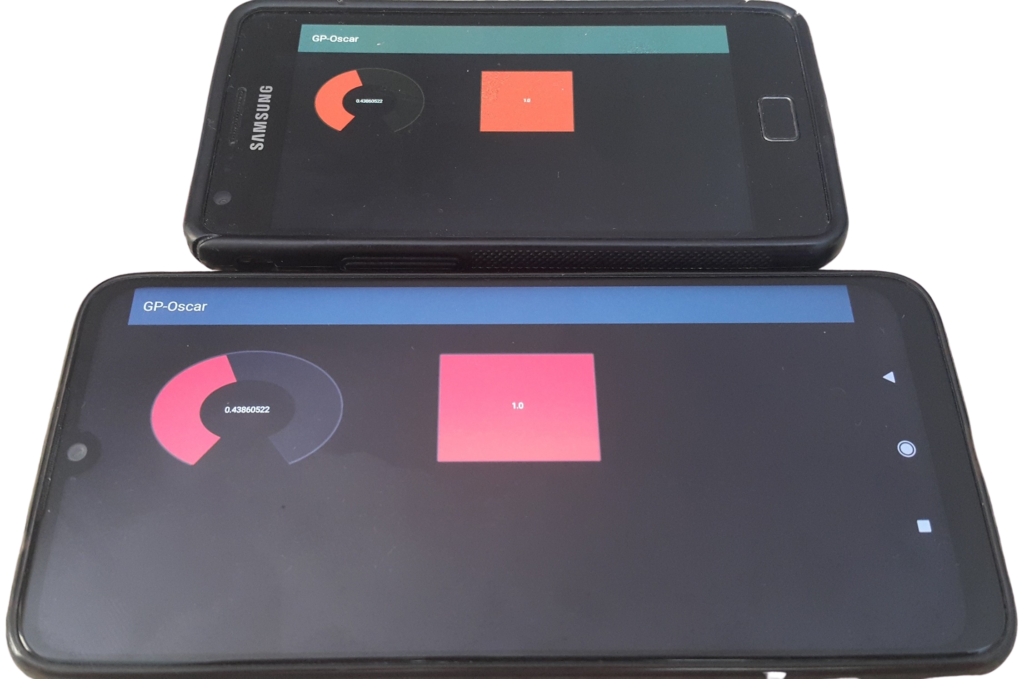
This way I can control effects on my guitar using my phones, and the very best part is that everything is in sync. If I move the knob in Gig Performer, both phones instantly update their knob widget. When I tap on the button on my old phone, both Gig Performer and the new phone instantly pick up the change.
Happy experimenting and visit our community for more tips. If you like this article, please share it.
Own the Stage® and enjoy Gig Performer®!
Nemanja Pudar
.
Related topics:
– Working with TouchOSC and Gig Performer
– How to control your guitar or keyboard effects from a Web browser
– OSC support in Gig Performer
– OSC messages in Gig Performer User Manual


