Scaling Curves – Advanced Usage

Scaling Curves – Advanced Usage

The new scaling curve mechanism in Gig Performer 4 replaces the older linear-only scaling that was available in previous versions of Gig Performer. Scaling curves can be associated with widgets and with the Note Velocity values of MIDI In blocks. NB the same mechanism is also used with the Probabilistic Sound Designer but in that scenario, the curves actually represent probabilities, rather than scaling.

First looks

.
If you select a widget and switch to the Value section of the Widget Properties, you’ll see an area with a shape, by default a simple triangle representing a linear scaling from 0.0 to 100.0

Note a green triangle in widget properties, the widget scaling curves, Gig Performer 4

Before we go any further, take a very careful look at the knob itself. You’ll see that there is a knob pointer on the knob itself which is pointing to about 66. But look carefully at the green ring surrounding the knob. Note that the ring is bright to about 66 and then dark/faded the rest of the way.

Note the pointer and the ring around the knob, Widget scaling in Gig Performer 4

Now let’s reverse the triangle on that scaling curve…

The reverse operation on the knob, widget scaling curves, Gig Performer 4

…and take a closer look at the knob again.

Changes on the knob's ring when the reverse operation is applied to the widget, Widget scaling mechanism, Gig Performer 4

While the knob position has not changed, the green ring surrounding it has. The bright part of the ring only reaches about 33 and the rest is dark/faded.

This is the core concept to understand.

.
The knob pointer will always travel from 0 to 10, matching the position of a physical knob on your keyboard or control surface. But the value that will actually be sent to the parameter is indicated by the “top” of the bright ring around the knob. So if that triangle is reversed so that its highest value is at 0 and its lowest value is at 100, then the value sent out will be the opposite. If you group two widgets together and you reverse the linear curve of one of them, then as you adjust the widgets, the output value of one will increase while the other will decrease. You can use this for effects such as cross-fading.

The Widget Value and the Scaled Value (what gets sent to a plugin parameter) are displayed on the left and right hand side respectively of the curve.

Adjusting the curve

.
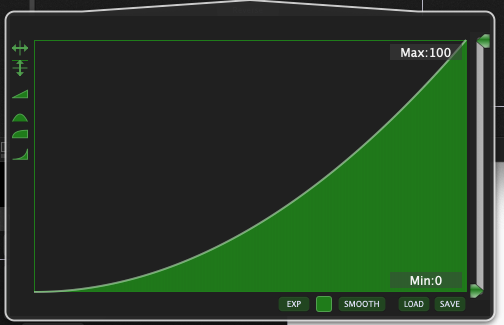
Obviously, there is more to the scaling curve than just that linear triangle and its reverse. You can in fact create all sorts of shapes. To start, click on the small scaling curve and a larger version will appear right underneath.

Click on the triangle to show a larger display, widget scaling mechanism, Gig Performer 4

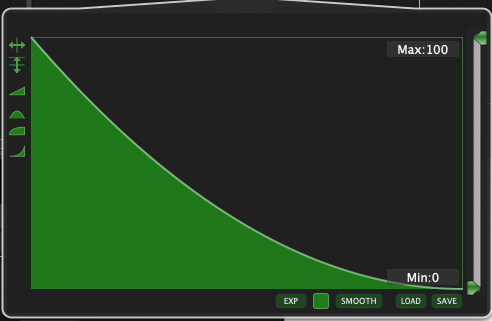
Well, this is a lot more interesting. Lots of controls and icons. The top two icons on the left are used to flip the curve horizontally or vertically. Click the bottom icon and then try flipping it horizontally and/or vertically.

X2 curve, widget scaling, Gig Performer 4  Log curve, widget scaling, Gig Performer 4 X2 reverse curve, widget scaling, Gig Performer 4

Select the half-sin shape and watch how the widget behaves (the green dial around it) as you turn it.

See changes in widget value vs scaled value, widget curve scaling system, Gig Performer 4

You can compress the curve between some minimum and maximum. Watch the green dial around the widget as you move it. Note that the dark part of that dial shows the total range of the output.

See changes in widget value vs scaled value, when max and min are set, widget curve scaling system, Gig Performer 4

You can draw your own shape with the mouse and smooth it…

Draw a curve shape with your mouse, widget scaling system, curves in Gig Performer 4

The Save and Load buttons on the bottom right allow you to save your curves and then load them again later.

You can also Shift+Click to copy a curve to the clipboard and then Shift+Ctrl+Click to replace the curve in another widget.

Copy and paste the scaling curve, widget scaling mechanism in Gig Performer 4

For more details about the scaling curve, including some more advanced options not discussed here, please refer to the online user guide.

If you have any questions or want to see additional tips, please visit this Community thread.

Own the Stage® with Gig Performer®

.

Related topics:
What’s new in Gig Performer 4 (User Manual)
How To Create Custom Velocity Response and Widget Scaling in Gig Performer 4 (Youtube)


Scaling Curves


Scaling curves allow you to control the shape of the output of a widget or convert an incoming note velocity to a new velocity. Various predefined curves are available and they can be tweaked as necessary. You can also just draw your own curve as well to achieve the effect you require.


MIDI File Player Plugin


You can load up to 128 MIDI song files in a single plugin instance. Switch from one song to another, mute tracks and/or change their channel numbers. Tempo can be controlled by individual songs or you can use the global tempo and tap tempo to control the BPM interactively.


Favorites and Presets


Create a sound by placing and interconnecting your desired plugins, such as a synth, some effects and perhaps a mixer. Select them all and then save the selection as a named favorite. The favorite will subsequently show up in all plugin insert menus, making it easy for you to recreate that configuration whenever you need it again. This feature is also very powerful for creating your needed sounds on your studio computer and then transferring them to your touring laptop.


Probabilistic Sound Designer


Parameters you select in an open plugin are captured into the Probabilistic Sound Designer dialog window. When you click Randomize, you're only adjusting those selected parameters. Each entry in the PSD dialog has a curve but unlike widgets where the curve controls scaling, in the PSD the curves are used to define the probability of particular values being selected. Make sure the filter cutoff never gets too slow so as to block all sound. Perhaps adjust the max range of the VCA attack parameter so that the sound doesn't have too much delay. Constrain the octave ranges of the oscillators, perhaps ensuring that 1/3rd of the time we select 8' and 2/3rds of the time we select 4'. The possibilities are endless.


More Widgets


Numerous new widgets are included in Gig Performer - a new sustain pedal, plastic knobs, drum pads and more colored sliders. Shapes can be colored with different borders and fill colors and morphed from rectangular to circular. Your creativity is now the limit to creating fabulous front panels in Gig Performer.


MIDI Message Helper


Select MIDI devices by name. Choose the MIDI message type and adjust the appropriate parameters for the specific type


Layout management


Gig Performer supports arbitrary resizing. Layout your widgets the way you want - resize the main window and the widgets will grow or shrink as necessary to maintain the same interrelationships. No matter what size screen you have, your front panels will still be neat and usable.


Undo Support


If you move your widgets around and/or resize them, or even delete them by mistake, the Undo facility will correct your mistake. Minor moves to a widget by mistake will no longer spoil your design


Plugin Channel Count


Some plugins support a large number of outputs and they depend on the traditional channel strip to control how many ports should be available.   When you only need a stereo pair, it is convenient not to have a large horizontal block. In Gig Performer, the number of available ports  is controlled by the channel count override, which can be applied to individual plugins and will be remembered when the gigfile is reloaded or if the plugin is saved as a favorite.


Input muting and output fading


Rather than a single audio length tail, Gig Performer 4 gives you the ability to control input muting and output fading separately. Input muting controls how much time it takes for audio input to be silenced when you leave the rackspace. Output fading controls how much time will be taken for audio to fade out when you leave the rackspace.


Faster Plugin Finder


Instead of searching through menus of perhaps hundreds of plugins (you know who you are!), the Quick Plugin Finder makes it easy to find the plugin you need by simply typing partial strings. For example, as shown here, to find the Modartt Pianoteq 7 plugins, it's enough to type pia mod 7 (in any order, by the way)  to restrict the list of available plugins to those matching your query. The Quick Plugin Finder also knows about manufacturers, presets and favorites.


Touch Friendly Input


Any entry field can be changed by either dragging your mouse (or finger) up or down, or by using the large popup touchpad where you can just tap on the squares to enter a value. The large popup keypad also does validation so you can't enter an invalid value. You can also just tap the BPM field to pop up a larger view where you can quickly change tempo, tranpose, trigger Tap Tempo and enable Ableton Link, the last allowing you to synchronize Gig Performer with any other application that also supports Ableton Link.


New Tuner Display


The tuner view makes it easy for guitarists to quickly check and adjust their tuning. You can toggle into the tuner view from any other view and toggle right back as soon as you're done. All output will be silenced automatically while you're in tuning mode. You can adjust the concert reference pitch from its default of 440 Hz to suit your own needs. The tuner view fills the entire screen so you can easily see it from a distance.