Thank you for your interest in Gig Performer Essentials.
Please enter your name and email address in the field below. Links for both Windows and macOS downloads will be sent to you.
By providing your email address, you will be subscribed to our newsletter from which you will be able to unsubscribe at any time. Make sure you use a valid e-mail address and if you don't receive our e-mail, please check your spam folder.
Dialog window
Gig Performer® 14-Day Free Trial
Thank you for your interest in Gig Performer.
Please enter your name and email address in the field below. Links for both Windows and macOS downloads will be sent to you.
By providing your email address, you will be subscribed to our newsletter from which you will be able to unsubscribe at any time. Make sure you use a valid e-mail address and if you don't receive our e-mail, please check your spam folder.
Cross-platform usage and moving from one platform to another
Gig Performer is an audio plugin host for live performance available for both Windows and macOS. In this article you will learn about cross-platform usage and some considerations when you are migrating from Windows to macOS or vice-versa.
Gig Performer supports VST and VST3 on both platforms and AudioUnit (AU) plugins on Mac only. You can have Gig Performer project files (gig files) open normally on both platforms.
How to keep gig files cross-platform?
.
If you want to keep gig files cross-platform you must use the VST or VST3 versions of your audio plugins.
All gig files from the Gig and Rackspace Files category in our Community forums are deliberately cross-platform, free of charge, and you can use them seamlessly on both platforms. For example, you can perform with a Mac computer and have a PC as your backup computer. We feature gig files in our newsletters, so make sure to subscribe so as to notified of new gig files that are created by our community members (NB: watch this live stream to learn how to take the full advantage of these gig files).
Note: Gig Performer 4.7 and later allow you to include third-party fonts in your gig files. Any third-party fonts will be listed in the threads in the Gig and Rackspace files forum section if they are used.
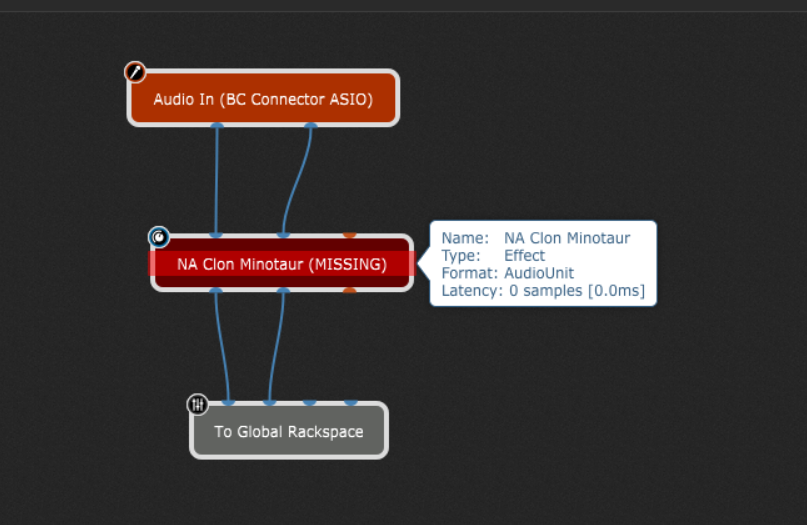
You can easily check the format of your plugin by simply hovering on the plugin. If you you are a Windows user and happen to open a gig file where an AudioUnit plugin is present, Gig Performer will show that plugin as “chameleon” and mark it as “MISSING”:
The “chameleon” plugin mimics all the properties of the original plugin (for example, input and output pins and the plugin state) except the actual processing. You can easily replace the plugin with the VST/VST3 version of the same plugin or use an alternative plugin.
In general, the “chameleon” plugin is useful as it allows you to modify the gig file, save it and later re-open it on a computer that has all of the required plugins installed.
Gig Performer works seamlessly on both platforms
.
In the Gig Performer world, a computer represents a “tool” on which you install Gig Performer, design your gig files, and perform. Nowadays, both Windows and macOS are used both live and in studio, as can be seen from our guests from the Backstage with Gig Performer episodes. For example, Joachim Schäfer, Kevin Fraser, Joe Luca, and Angel von Powerlord are using Windows, while Alistair Begg, Harry Triendl, Joel Brazy and Tony Geballe are using macOS. Make sure to also check the Gig Performer in Action section of our community to see screenshots and photos of various Gig Performer setups.
Needless to say, there are also Gig Performer users that use both platforms, like the author of this article.
Of course, depending on your specific needs, price, and complexity of your setup, you may want to choose one platform over another. Gig Performer works seamlessly on both platforms, but it’s not all about Gig Performer! 🙂 There are also some other considerations, specific to the platform and our insights below may help you with your decision.
If you are considering migrating from macOS to Windows
.
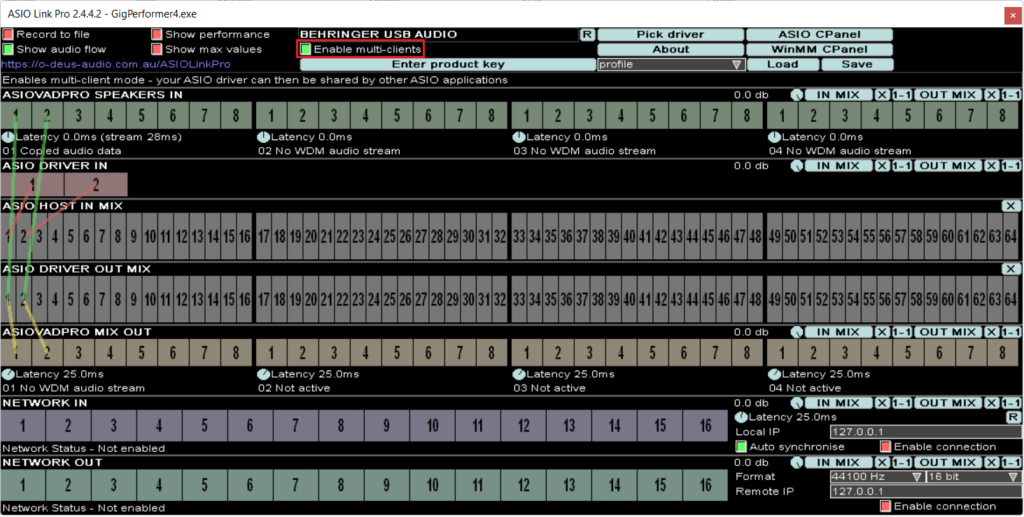
The first thing that you will want to check are drivers for your audio interface and MIDI controllers. If you use simple setups, i.e. you don’t need to route audio and MIDI from different applications to Gig Performer (and vice-versa) that will be using your devices at the same time, you probably don’t need to worry about multi-client drivers – but if you do, make sure to double-check with the hardware manufacturers of your audio interface whether multiple applications can use the same driver at the same time.
While macOS supports multiple audio and MIDI clients running simultaneously, this is not automatically the case on Windows. Still, there are ways to route audio and MIDI with single-client drivers and approaches to this are covered extensively in the article: How to use a single-client ASIO driver with multiple applications on Windows.
If you are used to aggregating your audio devices on your Mac, Windows doesn’t include such a feature and you will need to use ASIO4ALL to aggregate your audio devices, but at the expense of added latency. Check out this article for an example of aggregating an audio interface with the virtual audio cable driver.
Tip: If you are using multiple USB MIDI controllers on Windows, the best practice is to remember to which ports on your computer (or USB hub) each device is connected and always attach them in that exact order. The reason for this is that USB MIDI Port names may keep changing on your Windows computer when you attach your MIDI controller. Visit this KB article to learn more.
Finally, we have compiled the best tips and practices to make your Windows PC a highly stable platform for making music. Download our free e-book at this link.
If you are considering migrating from Windows to macOS
.
If you want to migrate your setup to macOS, the first decision you need to make is whether you want an Intel based Mac or you want to use the new M1 chip or upcoming M2 and M3 processors (Apple Silicon). Needless to say, Gig Performer runs on both processors natively. Unfortunately, there are still many plugins that are not available natively for Apple Silicon, so if you are considering to migrate to the new M1 chip make sure to check whether all your favorite plugins are available natively for this CPU.
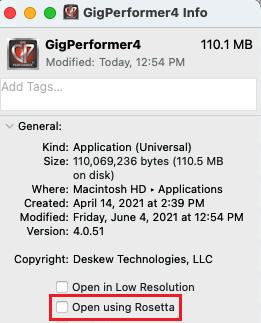
Although these new processors cannot directly run applications developed for older Intel processors, Apple developed an intermediary application called Rosetta that converts (on-the-fly) older Intel programs so that they can run on the new M1 processors.
Important note: if you run the Intel version of Gig Performer 4 under Rosetta you will experience a slight loss of efficiency. Make sure to check out this blog for in-depth explanations.
You can check this comprehensive article for how Gig Performer user Jim Erwin migrated from Windows to Mac, and also check this live stream where he shares his experience with the migration process.
There are also slight differences in Gig Performer Options between Windows and macOS. We will mention them below.
Finally, we have compiled the best tips and practices to prepare your macOS for your live performance: Optimize your Mac for a gig.
Slight differences in Gig Performer on Windows and macOS
.
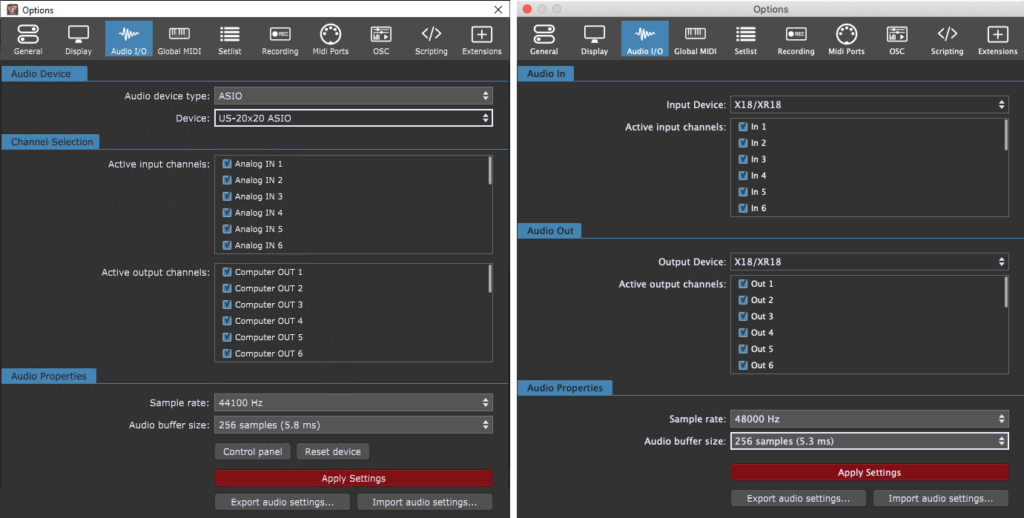
If you click on the Audio setup menu item under the Options menu, you’ll notice that the resulting window is slightly different on Windows and macOS:
On macOS you can separately select the input and output device and there is no device type selector as there is always just one type (Core Audio). Windows includes the audio device type selector and one device must be used for both input and output. Click here to learn more in our user manual.
Note: Similarly, if the audio interface connected to the current system does not have enough inputs or outputs to accommodate the setup utilized by the file, Gig Performer will prompt you to create “Virtual channels” that route all audio to the first two channels but retain all connections. Doing so will allow you to modify the file, save it and later reopen it on a computer that is connected to the original audio interface.
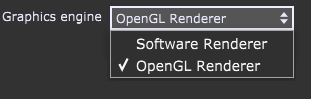
Windows users will also see the Graphics engine section in the Display Options.
This allows you to select the graphics library that Gig Performer uses for its displays: Software Renderer or OpenGL Renderer. Mac users always use the CoreGraphics renderer.
Common applications for Windows and macOS
.
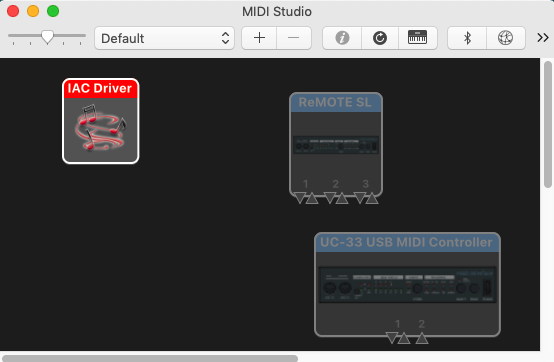
MacOS includes built-in support for virtual MIDI, called the IAC Driver.
Make sure to read this blog article to see how to set it up and use in practice. Windows users will need to install a third-party virtual MIDI driver such as LoopMIDI.
If you are on a Mac, and want to route audio from Gig Performer to other audio applications (or vice versa), you can download the free Blackhole virtual audio driver. Windows users will use an application like the free application VB-Cable. Visit this blog to see how to use virtual audio cables in practice.
You can find and download many cross-platform audio applications, such as Audacity. We tend to describe and use such applications on our blog to provide you with the most streamlined experience.
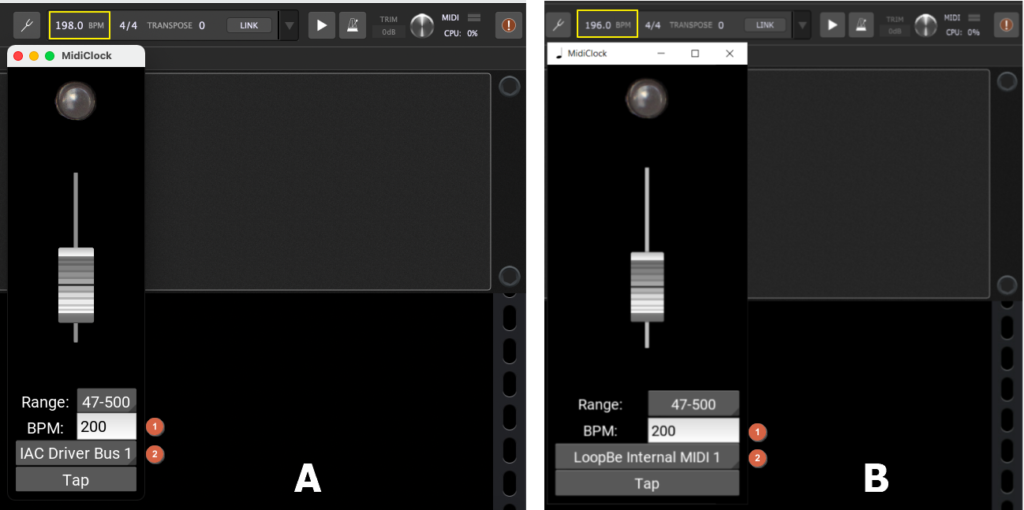
For example, see the free MidiClock application in action in this article.
Note: some technologies such as AVB are natively available on macOS for any audio interface, where on Windows there is no built-in support for AVB. To learn more about the benefits of AVB, check out the YouTube video below.
Can Windows and macOS computers work together?
.
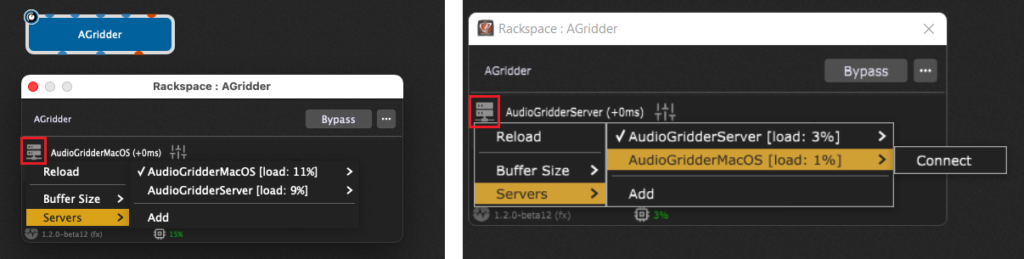
Sure! 🙂 Your band members can have computers with different operating systems in a local network and these computers equipped with Gig Performer can communicate with each other in various ways. For example, you can synchronize the tempo in all Gig Performer instances using Ableton Link, you can use OSCto control other computers, or the processing of audio plugins can be offloaded using AudioGridder:
To share your feedback, see more migration stories or share your own, please visit this Community thread.
.
Share this article it to support Gig Performer and spread the word!
We use cookies to ensure that we give you the best experience on our website. If you continue to use this site we will assume that you are happy with it.

 and Windows (right)")