In this article you will learn how to optimize your Mac computer for a gig.
Apple computers running macOS have great support for real-time audio and MIDI and typically do not require much optimization. However, you may still want to make sure that your performance is neither impacted nor interrupted by other running processes. We have compiled a list of tips to help you get the best experience out of your Mac for your live performance.
All tips and screenshots were made using macOS Monterey 12.1, the latest version of macOS available at the time of writing:

Let’s get started!
Disable unnecessary hardware devices
.
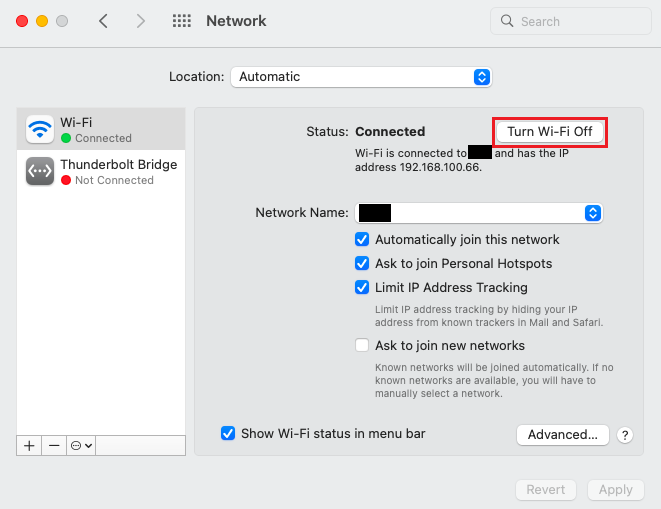
We typically recommend that you to turn off Wi-Fi and Bluetooth connections if you don’t need them for your live performance to free up computer resources.
Note: even if you don’t turn off the Wi-Fi, the real-time audio thread will run at higher priority than most (if not all) other threads. There may not be as much of an impact as one would think.
To turn off Wi-Fi, click on the Apple menu and then on System Preferences… Click on Network and then click on the Turn Wi-Fi Off button:
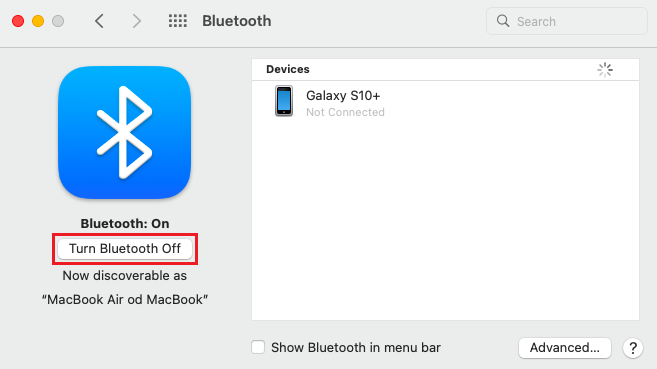
Similarly, to turn off Bluetooth, open System Preferences, click on Bluetooth and then click on the Turn Bluetooth Off button:
Tip: you can quickly disable Wi-Fi and Bluetooth using the Control Center, which has been available since macOS Big Sur.
Another reason to disable network connections is that your computer’s behavior gets more deterministic. If it is connected to the Internet, all sorts of syncing/updating might happen. Read below how to better manage these concerns. Also in a purely local network, things like Bonjour/SMB/mDNS are typically still active (and that’s a good thing). However, if someone is a “bad citizen” in your network, they might cause unexpected load on your computer (using AirDrop, for instance). Therefore, besides freeing computer resources you’ll minimize the potential for unwelcome surprises.
The general advice is to only connect to networks where you know or at least trust all the other participants in the LAN and staying off the Internet in general during your performance.
Power settings configuration
.
One of the the best practices is to configure power settings to prevent your computer from going to sleep or into standby mode.
Click on the Apple menu and then on System Preferences… Then, click on Battery (or Energy Saver on a desktop computer):
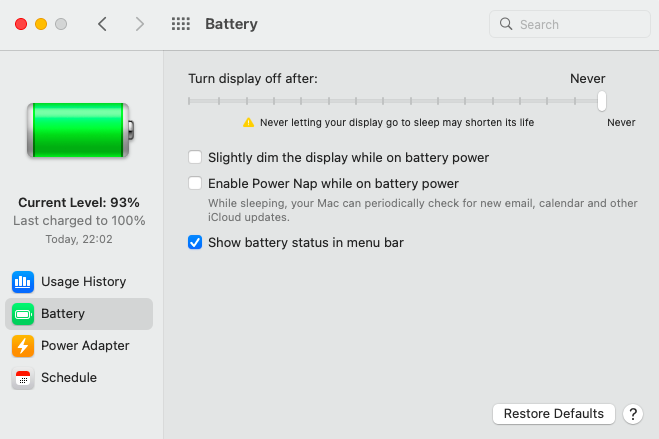
Click on the Battery section and do the following:
– Under the “Turn display off after” move the slider to the far left (Never).
– Uncheck the “Enable Power Nap while on battery power” check box.
Afterwards, click on the Power Adapter section:
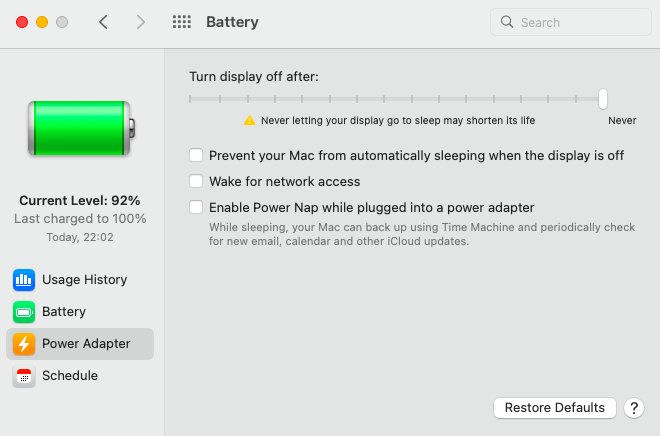
Do the following:
– Under the “Turn display off after” move the slider to the far left (Never).
– Uncheck all three check boxes (like in the screenshot above).
Note: if the “Put hard disks to sleep when possible” setting is available, uncheck it, as well.
Note: Mac laptops that have two graphic cards (an integrated graphics processor and a discrete graphics processor) have an additional setting called “Automatic Graphics Switching” that saves energy. Uncheck this setting, as that automatic switching may introduce errors during your live performance. When this setting is unchecked the higher-performance discrete graphics processor is always used.
Review what is running in the background
.
It’s important to review what applications and features run in the background and use resources on your computer. Shutting down or closing unneeded applications removes them from your computer’s memory thereby leaving more space for your plugins and samples.
Activity Monitor
We recommend that you quit all applications that are not necessary for your live performance, allowing your operating system to allocate more resources to your audio plugin host and plugins. These may include:
– Web browsers (such as Safari, Firefox or Chrome),
– Office applications (such as Microsoft Office Word, Excel, Outlook or PowerPoint),
– Cloud applications (such as iCloud, Dropbox, OneDrive or NextCloud),
– Music and video streaming applications (and other unnecessary applications).
Activity Monitor is a bundled tool that shows how applications are using your CPU, RAM, Disk and Network resources. Click on the Finder and then Applications on the sidebar of the Finder window. Expand Utilities and open the Activity Monitor:
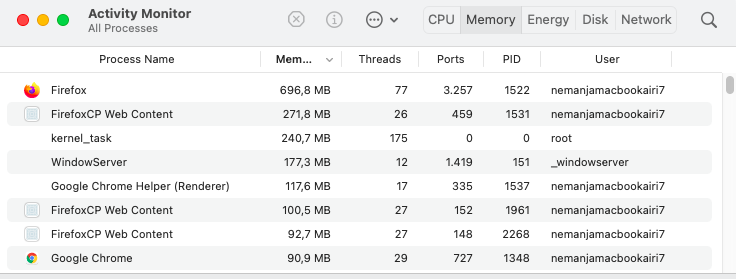
On the screenshot above, all application processes are sorted by their memory consumption. You can sort by other parameters (memory, energy, disk access, etc.) by clicking on the respective column header.
We strongly recommend that you close all running applications the normal way unless they’re hung as terminating them abruptly can cause data loss.
To terminate a non-running or hung process simply click on the desired process and then click on the X button. Check this support page article to learn more about the Activity Monitor and its features.
Review Login items
Login items are applications that automatically start when a user logs in into their account. Every user account has its own login items list. We recommend that you remove unnecessary login items to prevent them from using system resources. Occasionally, a login item may cause a blank blue screen at startup or other problems, according to Apple.
Open System Preferences and then click on Users & Groups:
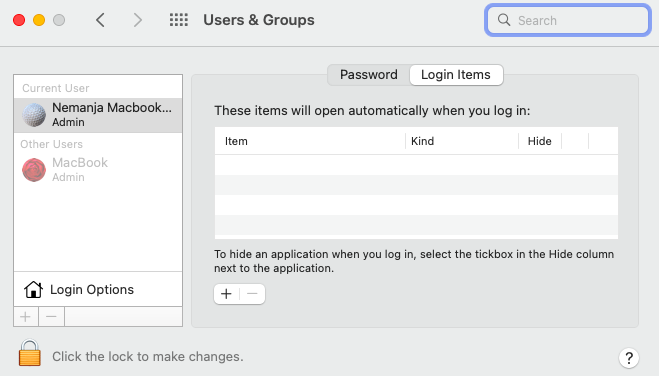
On the left side is pane with the list of users. Click on the Login Items tab and review what applications are in this table. To remove an item, select it and then click on the “–” button.
Tip: you can temporarily prevent items from opening automatically when you log in. To do that, when the login window appears, press and hold the Shift key while you click the Log In button, then release the Shift key when the Dock opens. Click here to learn more.
Time Machine and backup applications
Time Machine is a built-in application that allows you automatically back up your personal data (music, photos, emails, and documents) and applications. Having a backup allows you to recover files that you later delete or can’t access. Time Machine will keep a history of changes to your documents allowing you to revert to earlier versions. Time Machine also allows you to revert to an earlier version of macOS should an update cause you problems.
We recommend that you turn off Time Machine before your gig so that backup operations don’t interfere with your live performance. That said, if Time Machine is not interfering with your audio, it’s worth keeping it running during rehearsals or while you’re designing your Gig Performer rackspaces as it makes it really easy to revert to an earlier version of your gig file if necessary.
Open System Preferences and then click on Time Machine:
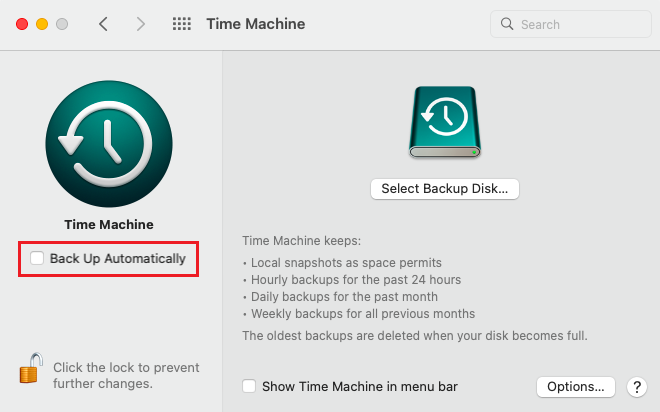
Uncheck the Back Up Automatically check box.
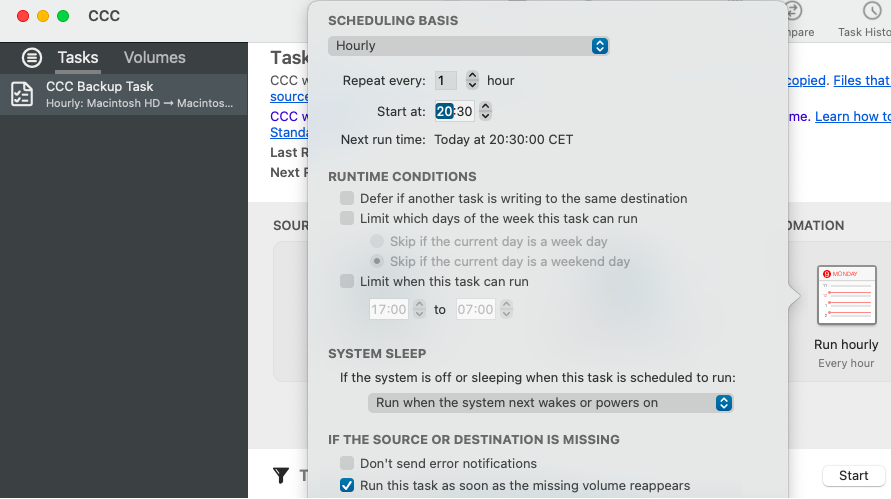
If you are using a third-party backup solution, review its settings so that backup operations are not scheduled when you perform live. For example, you can see the Carbon Copy Copier on the screenshot below:
Note: if you use a cloud application to back your content up to a cloud drive, we recommend that you turn off real-time syncing (or sign out and close the application). Syncing your projects, samples and other content with a cloud drive can cause performance issues. If you are on a tour, the syncing of your projects, samples and other content should only occur after your live performance.
Usage data tracking and Privacy
We recommend that you carefully review Privacy options on your Mac and turn off any usage tracking features both on your computer and your plugins. Open System Preferences and then click on Security & Privacy:
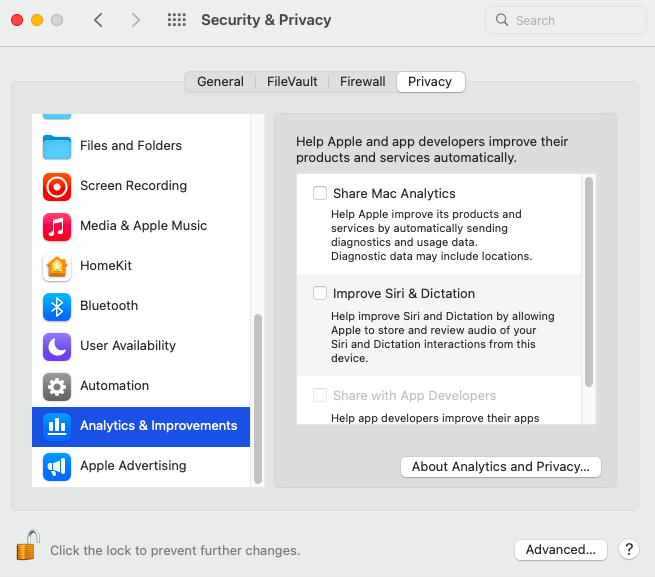
Click on the Privacy tab; we recommend that you:
- Disable Location Services – click on Locations Services and then uncheck the Enable Location Services check box.
- Turn off Analytics & Improvements – click on Analytics & Improvements and uncheck all check boxes as in the screenshot above.
- Disable Personalized Ads – click on Apple Advertising and uncheck the Personalised Ads check box.
Plugin manufacturers may also implement usage data tracking features in their plugins. Under certain conditions the usage data tracking can greatly impact your CPU usage. Please visit this blog article on our website to see such an example.
Therefore, the best practice is to review your plugins and turn off their usage data tracking features.
Turn off update processes
.
Many software updates can occur automatically before your show or during your show, if your computer is connected to the Internet. This can possibly break your setup. While your operating system updates are not frequent, App Store, installed software or your plugins may try to update themselves frequently.
The best practice is to turn off all your update mechanisms before your live performance. This way you make sure automatic updates features do not download new updates and install them in the background. Auto-installation of new updates might significantly interfere with your live performance and cause many unwanted issues.
We recommend that you always perform manual updates and then test your whole setup, including whole gig and plugin setup, preferably many weeks in advance before you go on tour or perform live. This will give you time to address any issues you encounter.
Note: Updating macOS itself may cause Gig Performer to think you are on a different computer and you will have to activate it again (it won’t use up an additional activation).
We strongly recommend that you do not update or upgrade your Mac nor any applications while you are on tour or within a few weeks of your tour to avoid having to deal with unexpected problems.
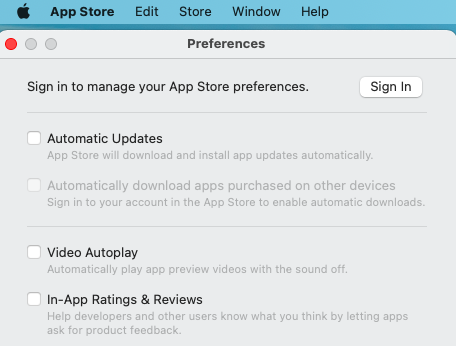
App Store automatic updates
We recommend that you prevent App Store from downloading and installing app updates automatically.
MacOS automatic updates
While not as frequent, automatic update option could come exactly as you are going up on the stage (if you are connected to the Internet). Therefore, we suggest that you disable the automatic update functionality.
The best practice is to update (and especially upgrade) your Mac manually when you have time to test your entire setup, several weeks before your show. To turn off automatic updates, open System Preferences and then click on Software Update:
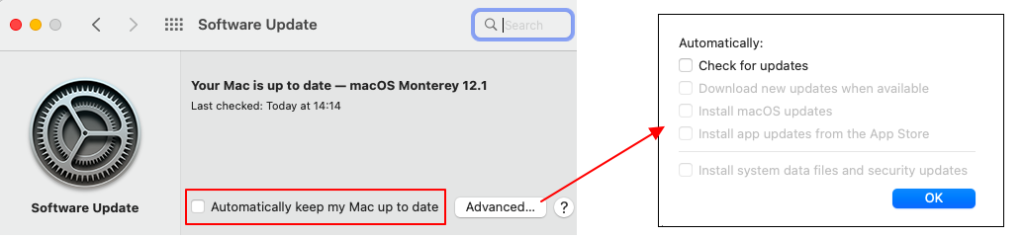
Make sure to uncheck the box labeled “Automatically check for updates“. Additionally, click on the Advanced… button and make sure that all check boxes are unchecked.
Application updaters
Installed applications may have their own individual updaters that run in the background. Get familiar with your installed applications and review their updater settings. Below is an example of Microsoft AutoUpdate which keeps all Microsoft applications up to date:
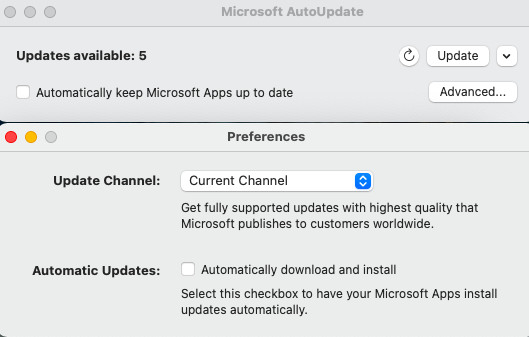
Uncheck any automatic update settings.
Antivirus updates
If you happen to use an antivirus solution for your Mac, turn off automatic updates before your show. Make yourself familiar with the preferences of your antivirus. Below is an example of Avast Security preferences:
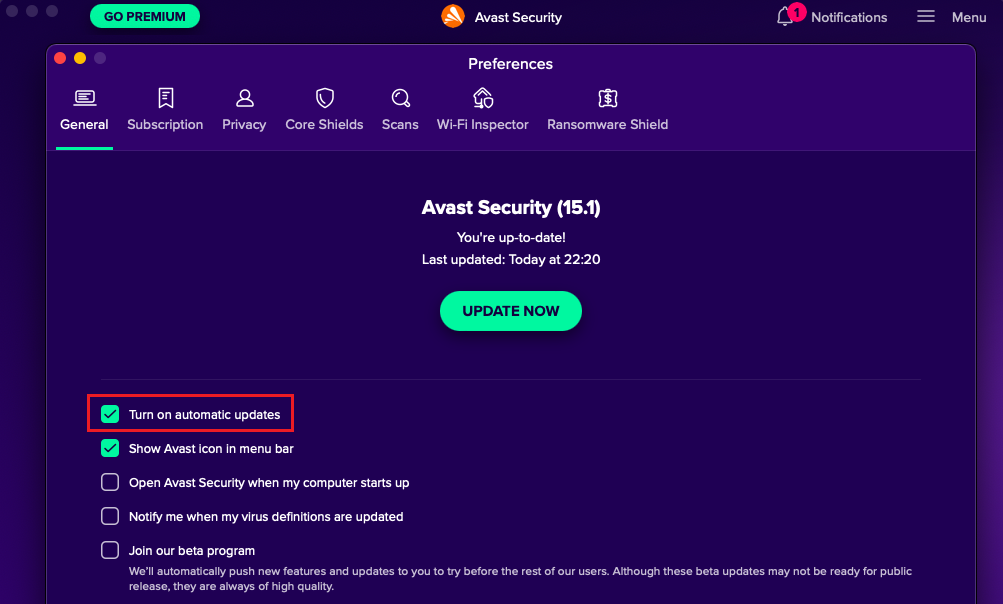
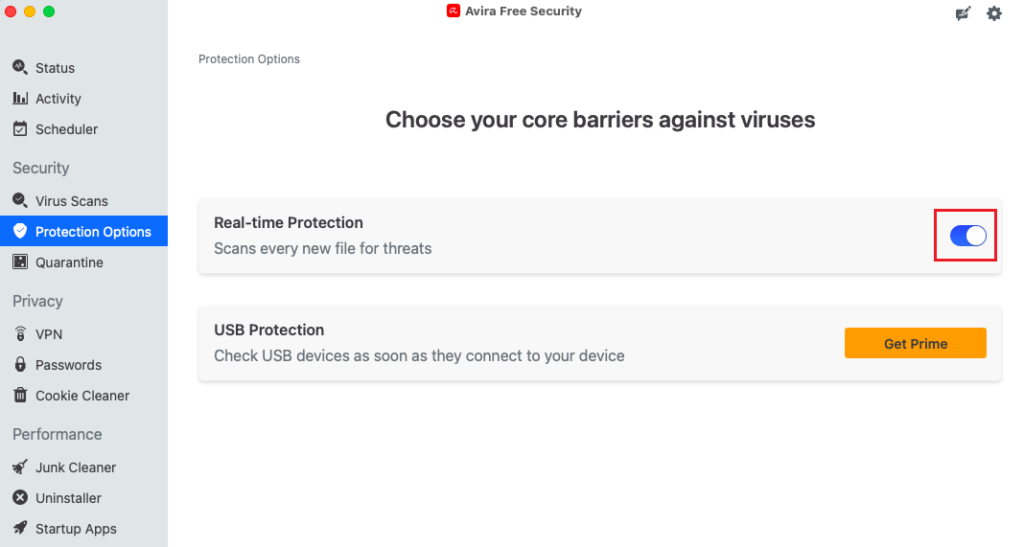
Additionally, best practice is to temporarily disable real-time protection while you are performing live as, beside it is consuming CPU cycles and disk bandwidth, this feature might interfere with your software setup. Below is an example of Avira Antivirus for Mac:
Audio applications and plugin updates
We do not recommend updating your audio software or plugins while you are on tour or if you are about to perform live. The best practice is always to test your audio setup after you update your audio software and allow a few weeks of testing before performing live.
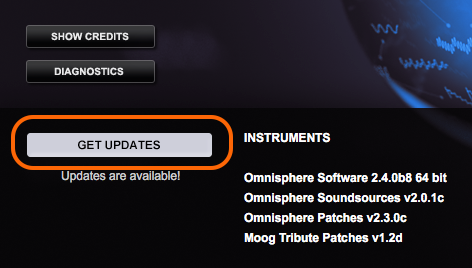
Above is shown the Omnisphere Smart Update system.
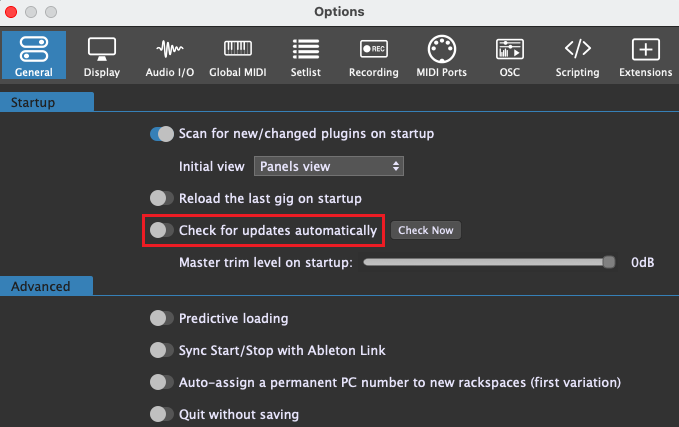
If you are about to perform live and your audio plugin host Gig Performer notifies you that a new version is available, we strongly recommend that you postpone the update until your gig or tour has ended. Gig Performer updates are tested thoroughly before they are released so problems with new releases of Gig Performer are very rare. However, it could be that a plugin that used to work properly with an older version of Gig Performer doesn’t work with a newer version of Gig Performer simply because the plugin itself has a bug that only manifested itself with the newer version. Review the update settings in Gig Performer:
We also recommend that you postpone audio driver or firmware updates for your audio hardware while you are on tour. Check your manufacturer’s documentation to see if there are settings for automatic updates of your audio drivers or firmware.
Configure your macOS features for the best performance
.
Many macOS features and settings can be configured so they don’t consume your resources (CPU cycles, RAM or disk bandwidth). You want your computer resources to be dedicated only for your gig needs.
Configure Spotlight
Spotlight is a selection-based search system, which creates an index of all items and files on the system. We recommend that you disable indexing of your disk before your show as it may introduce heavy CPU usage. You can enable it again when the show is over. The easiest way (as there are different ways to achieve this) to stop the indexing of your disk is to click on the Apple menu and then on System Preferences… Click on Spotlight and then on the Privacy tab:
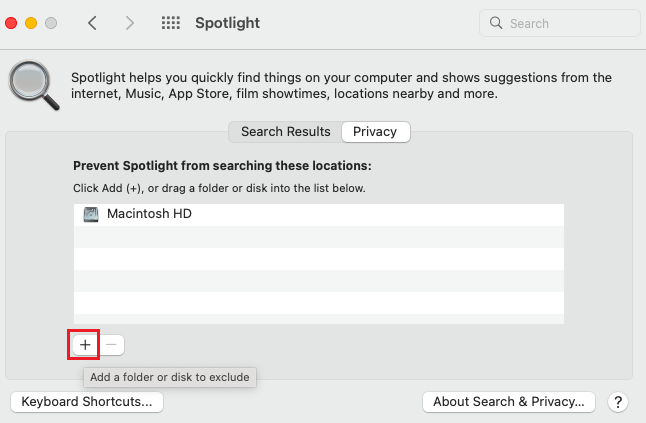
Click on the “+” button (indicated with the red rectangle) and add the desired disks (such as Macintosh HD on the screenshot above). This will prevent indexing from interfering with the performance of audio applications. To enable indexing again for a disk, simply click on the “-” sign to remove that disk from the list.
Configure FileVault
FileVault is a security feature that secures the data on your disk by encrypting its contents automatically. Turning this feature off will stop encrypting files on your disk and allow your disk to work more efficiently. Encryption/decryption processes occur in the background as you use your Mac, and only while your Mac is awake.
FileVault significantly degrades disk performance on all old Mac models (source):
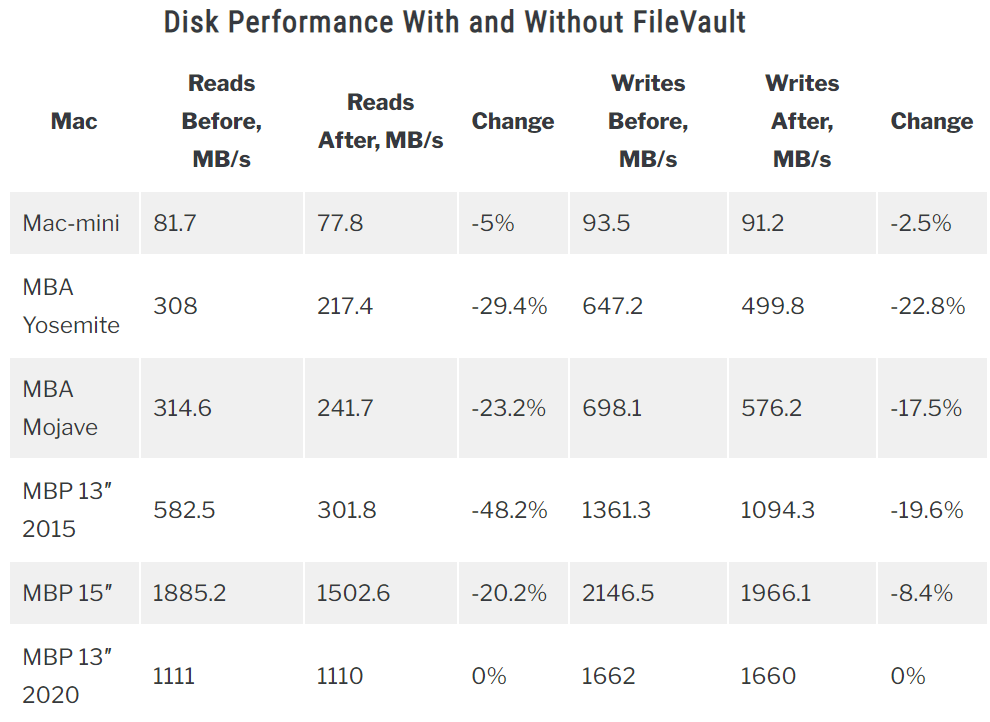
However, the problem was fixed with the introduction of T2 chips where encryption and decryption are happening on the hardware level (you can see that it is 0% change on a 2020 computer). On Apple Silicon (M1 chip and later), no performance degradations due to FileVault are known.
If you want to optimize an older Mac, you may want to turn off this feature; open System Preferences, click on Security & Privacy and then click on the FileVault tab:
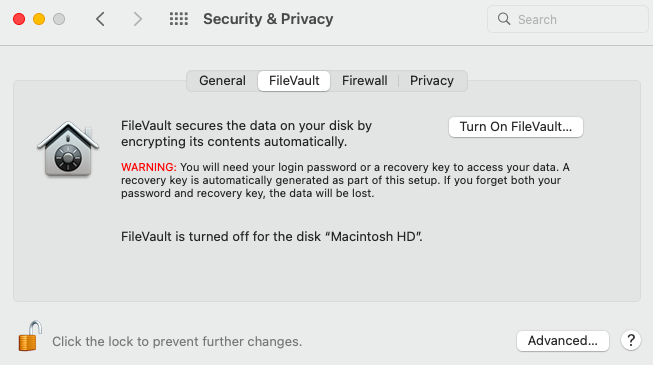
If FileVault is on, click the Turn Off FileVault button.
Important note: don’t change this setting just before your live performance. Turning off File Vault has significant impact because the computer will immediately start decrypting your entire file system and that process will last many hours (or even days).
Configure notifications
Although various notifications from the system or applications may be useful, they might distract your attention from playing or temporarily cover an important area of your screen. We suggest that you review your notification settings; open your System Preferences and then click on Notifications & Focus:
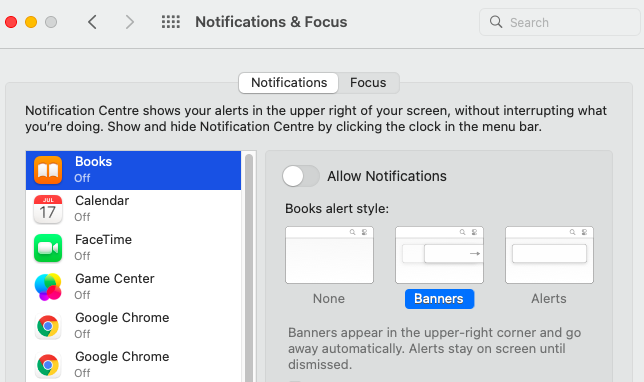
Turn off the notifications from applications for which you don’t want to receive any notifications. Afterward, click on the Focus tab to set up allowed notifications from specific applications and to schedule automatic activation. Visit this Apple support article for detailed guidelines.
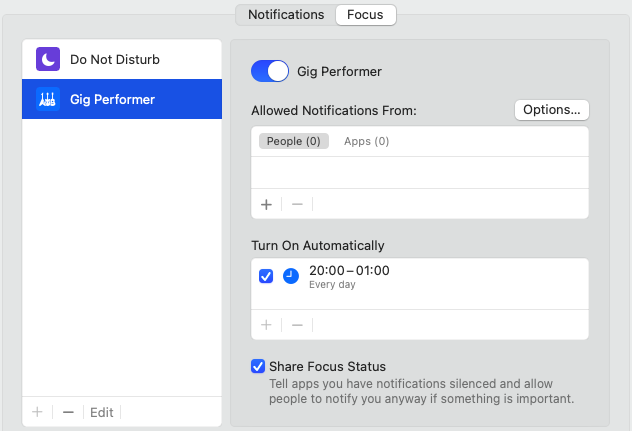
For example, in this Backstage with Gig Performer episode, Matt Vanacoro highlighted why turning off notifications is important for his live setup.
Turn off Siri
Siri is a virtual assistant that can use use voice queries, gesture based control, focus-tracking and a natural-language user interface to answer questions, make recommendations, and perform actions by delegating requests to a set of Internet services.
We recommend that you turn off Siri before your live performance (or permanently if you don’t use this macOS feature).
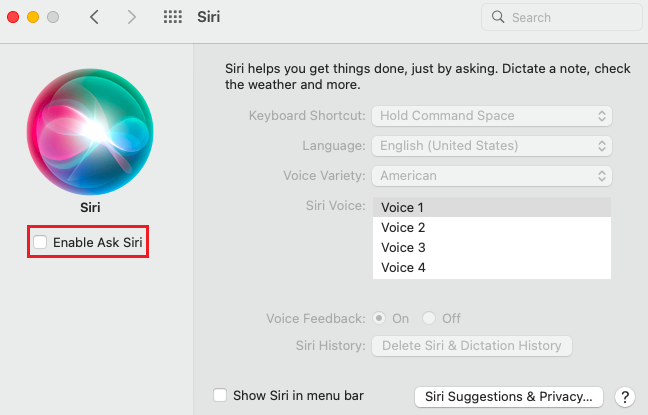
To turn off Siri, open System Preferences and then click on Siri. Uncheck the Enable Ask Siri check box.
Turn off system sounds
When you capture a screenshot, empty your Bin or perform other operations on your Mac, you can hear the corresponding system sounds for these operations. In particular, make sure that you are not using your audio interface as your default output for Sound Effects.
We recommend that you just turn off sound effects in general. Open System Preferences and then click on Sound:
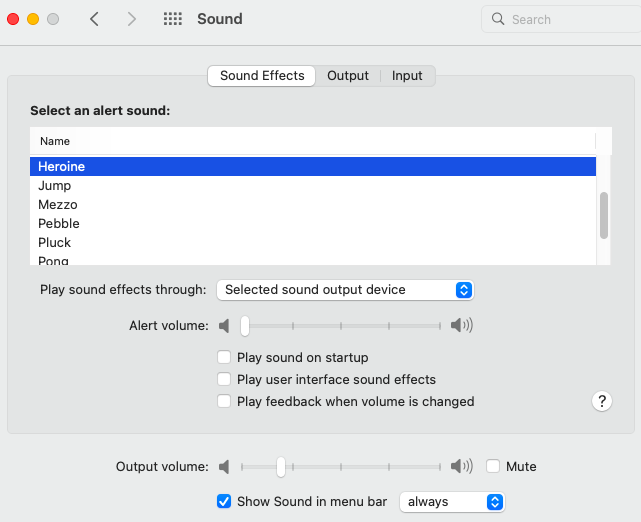
Uncheck all check boxes. Visit this article to learn more about these settings.
Turn off the Screen Saver
The best practice is to turn off your screen saver as you don’t want to see it during your live performance (or have to type in your password to unlock your computer in the middle of the gig). Open System Preferences and then click on Desktop & Screen Saver:
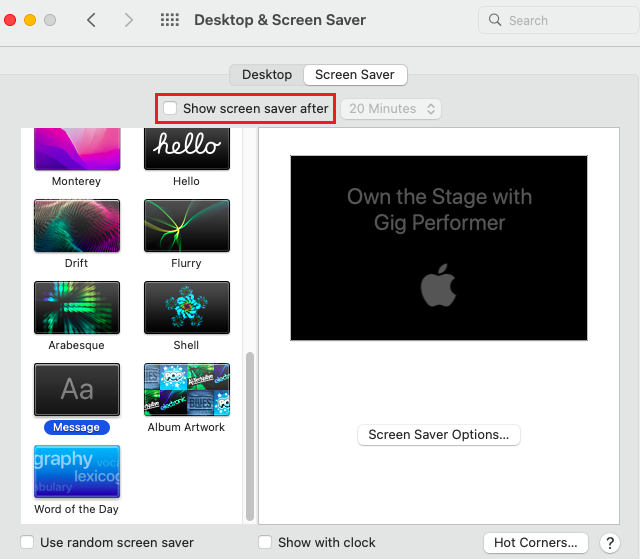
Click on the Screen Saver tab and uncheck Show screen saver after check box.
Other tips
.
Here are listed other best practices and tips that will help you make and keep your Mac a stable platform for your live performance. We invite you to join our Community and see other useful tips from Gig Performer community members.
Keep your driver and firmware of your audio interface up-to-date
Make sure you have updated your drivers and the firmware in your audio interface (but per comments above, do not make such changes within a few weeks of your show).
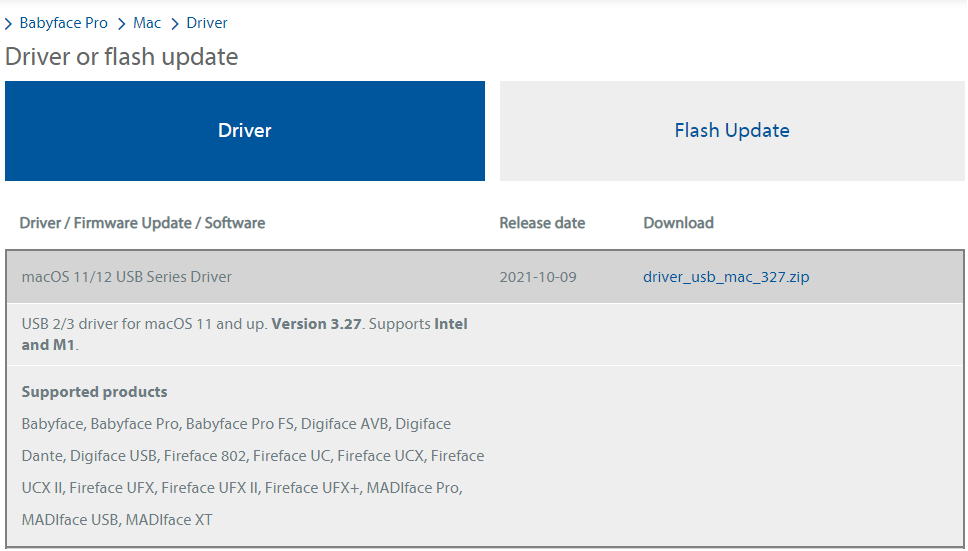
Please visit your audio interface manufacturer’s website and make sure you download and install the latest firmware and the latest driver for your version of macOS.
Refer to the manufacturer’s documentation on how to properly install a driver or firmware.
Choose your buffer size and sample rate
In this section we will introduce some basic terms such as audio latency, buffer size and sample rate and suggest recommendations for live use.
Latency, buffer size and sample sate
Audio latency is simply the amount of time that passes between the sound being generated and then perceived by your brain. Basically, it is a delay.
For example, if you are 10ft away from the speakers, and since the speed of sound is approximately 1,000 ft/s in air it means that it takes 10 ft : 1000 ft/s = 0.01 seconds (or 10 milliseconds) for sound to travel from the speakers to your ears. The latency here is about 10 ms.
Buffer size is basically the number of samples that will be collected before your audio plugins get to process them. Your audio interface is an analog-to-digital as well as digital-to-analog converter. It takes any audio input, converts that into digital form (numbers) and then on the output side – converts those numbers back to analog audio.
Sample rate determines how many samples your audio interface will capture every second and do the above-mentioned conversions. A common sampling frequency for live use is 44.1 KHz.
For example, if your buffer size is 256 and your sampling rate is 44.1 KHz (44,100 times per second, as Hz means cycles per second) then your latency will be 256/44,100 seconds which is 0.0058 seconds or 5.8 ms.
If your buffer size is 256 and the sample rate is 96 KHz you will get 256/96,000 = 2.7 ms latency.
You can experiment with this: If you change the buffer size to 128 and leave the sampling frequency at 44.1 KHz – your latency will be 2.9 ms and so on.
These values directly affect the performance of your PC, as smaller latency values require your computer to respond more quickly to process all those samples in time without producing any glitches.
What latency can you hear
It has been shown that people can perceive differences between 3 ms – 10 ms, and that our brain cannot distinguish anything below 3 ms.
Therefore, for live performance, many musicians use a buffer size of 256 or 128 and a sample rate of 44.1 KHz. We are not discussing here a recording scenario, which should be done slightly differently.
Generally speaking, using higher buffer sizes or lower sample rates lets your computer run at lower temperatures and allows you to run more intensive plugins in parallel without crackles or pops, but the trade-off will be higher latency or lower quality respectively.
Latency Measurement Tool
Another factor is the additional latency introduced by your audio interface. Not all audio interfaces are created equal. Some have low internal latency for both A/D and D/A conversions while others add more latency than perhaps you might like, so you have to lower your buffer size to get the overall desired latency.
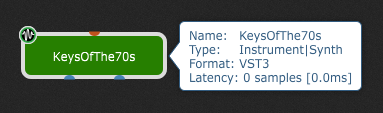
To find out how much extra latency your interface introduces – you can use Gig Performer’s built in Latency Measurement Tool (found under the Window menu):

Make sure you do not use any plugins or connections, and that your input signal is not too low.
The point of this section is to create sufficient CPU headroom to ensure a glitch-free live performance. You can also set smaller buffer sizes if that does not impact your live performance, but at the cost of less CPU capacity for processing more plugins.
Note: Gig Performer provides you with a feature to see how much latency every new plugin adds to your setup. Simply hover over your plugin block to show a tooltip and look for the Latency information.
Use quality USB hubs
When using a USB hub, note that the bandwidth of the computer’s USB port is not increased and stays the same. Moreover, some USB devices may be notably more demanding than others, such as multi-channel USB audio interfaces or external hard drives, so it is crucial to test your USB hub thoroughly if you intend to use it for real-time audio processing.
Note that all USB hubs are not created equally. A quality, self-powered, hub will go a long way. Some interfaces require a good quality self-power hub, otherwise noise and dropout issues may occur.
If you are troubleshooting issues with your USB audio interface, make sure it is not connected to an external USB hub, but directly to a USB port on your PC or laptop. We recommend to always use a spare USB port, not a hub.
If necessary, consider upgrading to a premium USB cable. If you experience hum or noise when using your USB audio interface, you may want to upgrade your USB cable to a premium cable with extra shielding and a Ferrite Bead (it suppresses high-frequency electronic noise in electronic circuits) which can filter out some external noise.
Running plugins under Rosetta
Apple recently released a new line of computers using their new M1 ARM based microprocessors, also known as Apple Silicon. These processors cannot directly run applications developed for older Intel processors.
To address this issue, Apple uses an intermediary application called Rosetta that converts (on-the-fly) older Intel programs so that they can run on the new M1 processors.
Newer programs are often available as “Universal” applications meaning that they contain both Intel and ARM versions of the underlying code. This enables them to run natively (i.e, as fast as possible) on both architectures with the correct version selected automatically.
Gig Performer is available as a Universal application and so can run on both Intel and ARM based Apple computers. Gig Performer runs natively under Apple Silicon.
However, suppose you run Gig Performer on an ARM-based computer but your VST/VST3 plugins are still Intel only. In that case, Gig Performer (or indeed any audio plugin host running natively) will not be able to access those plugins. Visit this blog article to learn how to solve this problem.
We strongly recommend that you use native audio plugins for your computer. If you’re planning to migrate on Apple Silicon, check if your plugins are available for Apple Silicon. Otherwise, running plugins under Rosetta may introduce stability or performance issues.
.
If you like this article, please share it and spread the word. Make sure to visit this Community thread for more tips.
All additional tips are indexed in the first post of that thread.
Own The Stage® with Gig Performer®
Nemanja Pudar
.
Related topics:
– The Ultimate Guide to Optimize your Windows PC for the Stage
– Clever ways to optimize your plugin usage
