Thank you for your interest in Gig Performer Essentials.
Please enter your name and email address in the field below. Links for both Windows and macOS downloads will be sent to you.
By providing your email address, you will be subscribed to our newsletter from which you will be able to unsubscribe at any time. Make sure you use a valid e-mail address and if you don't receive our e-mail, please check your spam folder.
Dialog window
Gig Performer® 14-Day Free Trial
Thank you for your interest in Gig Performer.
Please enter your name and email address in the field below. Links for both Windows and macOS downloads will be sent to you.
By providing your email address, you will be subscribed to our newsletter from which you will be able to unsubscribe at any time. Make sure you use a valid e-mail address and if you don't receive our e-mail, please check your spam folder.
How to improve the sound quality of instruments in your MIDI files
In this article you will learn how to improve the sound quality of instruments in your MIDI files and get some ideas as to what to try further. We will also highlight some caveats.
As members of many forums and Facebook groups, we often see music makers complaining that instruments in their MIDI files sound unsophisticated. That’s the reason why they are looking for ways to improve the sound quality of instruments in their MIDI files. Most of them are solo live performing users – singers, guitarists, keyboardists, or duos – all of who typically use backing tracks and want to make their sound more appealing to their audience.
In the Gig Performer world, this is very easy and straightforward to achieve. In general, you first load the desired MIDI file in a MIDI File Player. Instead of using a basic General MIDI player (aka ROMPLER), you route the individual tracks to high quality audio plugins. As a bonus point, you also get a great visual overview of your setup.
If you already have a decent MIDI file, you can improve the sound quality, sometimes quite dramatically by replacing the default player by individual plugins designed to focus on particular sounds or instruments.
For the purposes of this article, we have built a gig file (i.e. a project file in Gig Performer) using a simple example MIDI file found on the Internet. We used some free VST plugins to demonstrate this concept. You can download this gig file at the end of this article.
MIDI files and Gig Performer’s MIDI File Player
Before we get started, understand that MIDI files themselves don’t produce any sound at all. They don’t contain any audio data and are typically small in size. What they do contain, however, are the MIDI messages. Examples of these messages are Note On/Note Off, pitch bend, aftertouch and CC events. These messages define how the file should be played – what notes are played and possibly on what instrument, etc. Therefore, to be able to hear the sound MIDI files need to be forwarded somewhere, for example, to hardware keyboards or in our case to VST plugins.
The first thing you will need is obviously a MIDI file for the song you are planning to perform. You can of course create one using pretty much any DAW or MIDI sequencer (e.g. Logic Pro, Reaper, Cubase) or even with simple MIDI editors such as MidiEditor (we mentioned it in this article) that can export a standard MIDI file (SMF).
Needless to say, you can probably find a free or commercial MIDI file for a song using your favorite search engine. Alternatively, some music-related applications such as Guitar Pro (mentioned in this article) have the ability to export their project files as MIDI files.
For this example, we’ll use a small MIDI file found on the Internet. You can download it here: Example-MIDI-file
Here is how this MIDI file sounds when it is opened with the Windows Media Player on Windows 11: MIDI-Instruments-audio.zip
Make sure to compare this audio file to the audio file created by plugins, mixed and recorded in Gig Performer that we’ll link further in this article.
Now, start Gig Performer and create a new empty gig.
Double-click on this block and load the example gig file linked above:
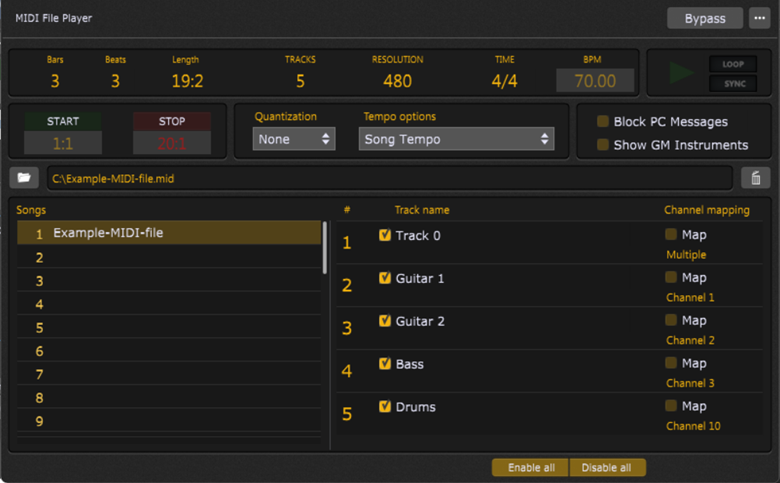
The number of tracks, track names and the respective channel mappings depend on the MIDI file.
Note: there are two main formats for standard MIDI files known as format 0 and format 1. The former has a single track containing all MIDI events for all channels. The latter typically has separate tracks and although there is no rule that MIDI events on specific tracks have to be on the same channel, they generally are. If you see multiple tracks listed in the MIDI File Player, then you are using a format 1 standard MIDI file.
Make sure to note the instruments and their channel mappings. You’ll need this information to route properly these instruments to their corresponding VST plugins.
Routing MIDI tracks to VST plugins
There are many decent-sounding free VST plugins that you can use in your setups. We used free plugins so that you can quickly start experimenting with the supplied gig file. Check out the blog article Top websites for free audio-plugins and how to use them in Gig Performer for more information.
In this example we used the following free plugins: 1. Ample Guitar M Lite -> link 2. 4Front Bass Module -> link 3. Steven Slate Drums Free -> link (note: you’ll need to create an account to be able to access the free version of this plugin)
Of course, you can use your own plugins or download and install other alternatives.
We’ll also need a couple of MIDI Channel Constrainer blocks; here is a dedicated blog article that describes the purpose of this plugin bundled with Gig Performer 4 – LINK.
As you can see in our troubleshooting blog article, there were cases where our forum members didn’t hear any sound from certain plugins because those plugins only respond to messages on channel 1. With the MIDI Channel Constrainer blocks, we’ll make sure that every VST plugin gets the MIDI message on Channel 1.
For example, from the screenshot of the MIDI File Player window you can see that ‘Drums’ are on channel 10, so the MIDI Channel constrainer will have this format “10 > 1” (we’ll remap Channel 10 to channel 1).
Following the same logic, here is how our Wiring view looks:
The MIDI File Player’s MIDI output pin is connected to four MIDI Channel Constrainer blocks which are further connected to our VST plugins.
Although you can feed the VST plugins’ outputs directly to your audio interface, it is generally better to use the bundled Audio Mixer and adjust the volume of each sound to your taste. The outputs of the 8 channel Audio Mixer are connected to the Audio Out block and that’s the end of our signal chain.
Experiment!
At this point, you can click the Play button in the MIDI File Player and hear the results. Feel free to tweak your VST plugins to get the best sounds out of them. For example, add effects such as reverb, delay, and compression. Or try different drum samples and get to know other features of these plugins.
If you like what you hear, you can use Gig Performer’s Recorder to easily capture the outputs. Gig Performer allows you to record not only all your inputs and outputs in mono or stereo, but also to record MIDI. Click here to learn more.
With a little bit of playing with plugins, check out this Community thread to see how the example MIDI file sounds when it is processed with VST plugins and recorded with Gig Performer. You can also download the gig file in that thread.
With some tweaking, you can get remarkable results even with free plugins.
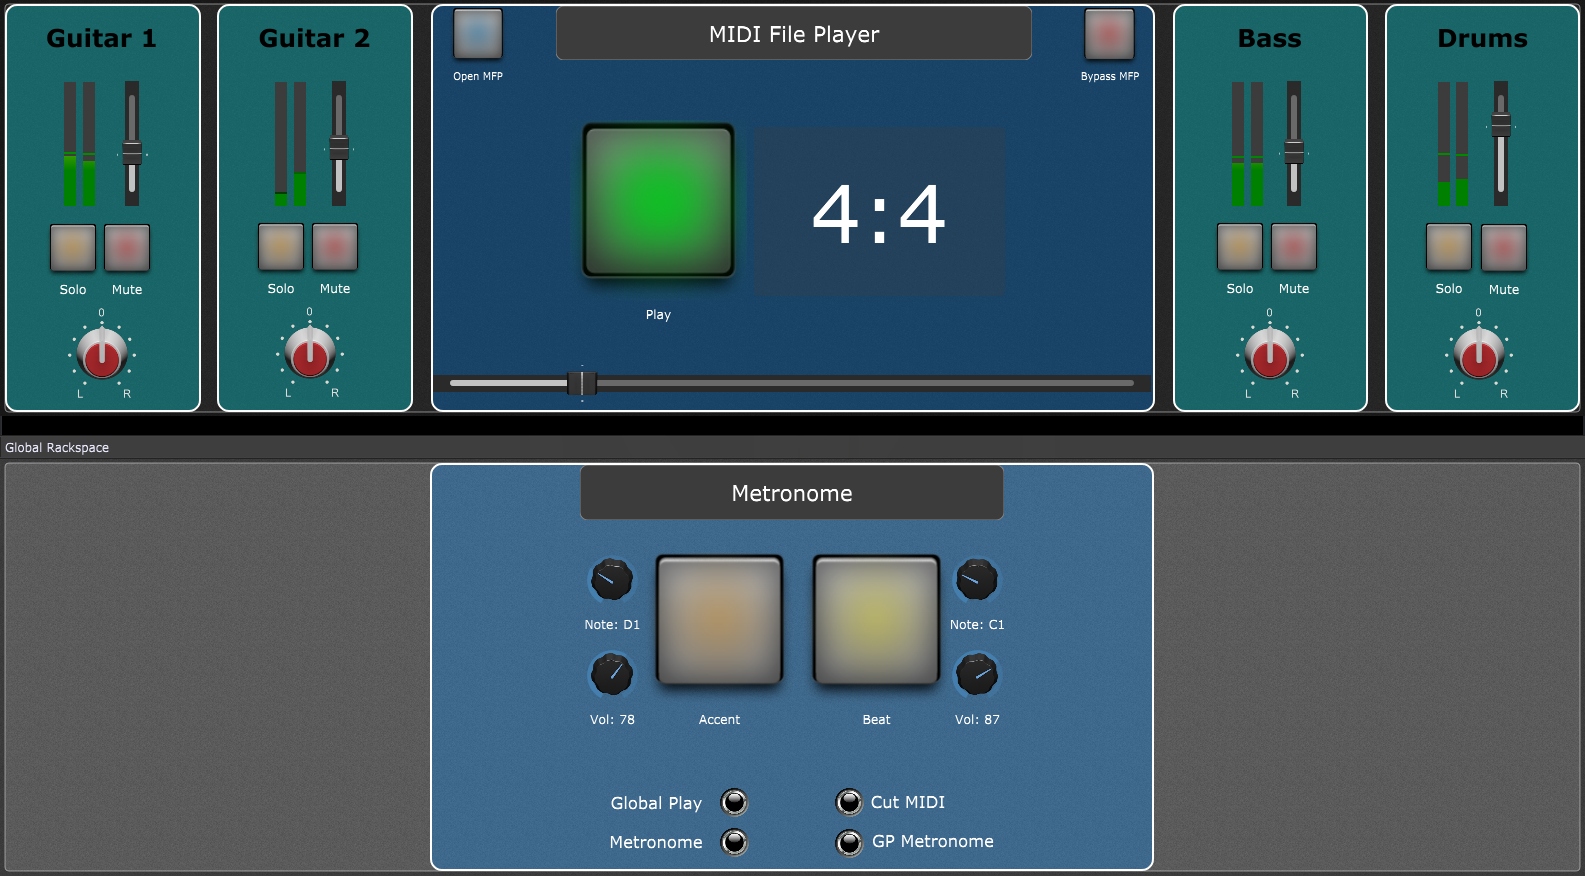
In this gig file, we also laid out some useful widgets so you can have a great overview of frequently used parameters:
As a bonus. we also included the visual Metronome in the Global rackspace. See this article to learn how to build it and what features it includes.
Feel free to experiment with the panel and widget design as well. This blog article will help you in that journey.
Caveats
To have the most streamlined experience with your MIDI files, we must highlight some caveats.
1. If your MIDI file sounds artificial or mechanical – the mechanical aspects cannot be truly addressed without actually editing the MIDI file in a DAW to do such things as humanizing notes starts and durations (essentially the reverse of quantization) and adding volume, expression and other automation parameters to a track. NB: You can usually find multiple MIDI files for the same song on the Internet. Some of these are commercial and quality MIDI files that do not sound too ‘mechanical’.
2. Non-GM plugins – feeding General MIDI files into non General MIDI plugins usually requires more effort than just changing channels. For example, the drum section can sound completely wrong and the kit has to be edited within the plugin. Another common issue is that the MIDI note messages in the file have to be adjusted to match the kit.
3. MIDI file contain program changes or change instruments on the same track – while Gig Performer’s MIDI File Player can block sending out Program Change messages (NB: you can also use Gig Performer’s MIDI Filter plugin to block other MIDI events if necessary), you need to use a DAW to split different instruments to different tracks.
What next?
We’ve barely scratched the surface! 🙂 We’ll mention some other useful Gig Performer features and give you ideas about what else you can do to get the premium sound out of your MIDI files.
1. Use premium plugins – for example, quality piano plugins have sympathetic resonance which gives new life to your piano tracks.
2. Use multi-timbral quality instruments – an alternative approach is to use a multi-timbral high quality instrument like Kontakt and just define each instrument to use its own MIDI channel. With this approach you will not need the channel constrainers.
3. Use your MIDI file to do widget automation – you can do certain automations in Gig Performer by inserting MIDI CC and PC events in a MIDI file itself, such as widget movements. Click this blog article to learn more.
4. Combine with sounds from Audio File Players – for example, check out this gig file, that includes an Audio Player with 8 pads, where you can load a different sound on each pad and then play it as one-shot triggered, loop repeating, and play as long as you press the pad.
5. Use Recorder – you can use Gig Performer’s Recorder to create your own audio backing tracks out of MIDI tracks. You can put these backing tracks into a new Streaming Audio File Player. Additionally, you can define markers in the Streaming Audio File Player to trigger various actions.
6. Layer sounds – you can use complex plugin chains or layer sounds with multiple plugins. Click here to learn more.
7. The Finger Tap feature – you can step through your MIDI file in any tempo you like by simply pressing keys on your keyboard. Click here to learn more.
8. Use widget automation – you can automatically move widgets using Streaming Audio File Player, MIDI File Player or timer-based Scriptlets. For example, you may want to add temporarily wide vibrato on some places or automate cross-fading between two sounds. Check out this thread and also this thread.
9. Add velocity splits – you can add different velocity-based layering. Click here to learn more.
10. Make custom adjustments in real-time – Gig Performer is a VST host with a feature set intended for live sound manipulation. You can MIDI control one or more parameters with your MIDI controller, with different scaling curve, change sounds instantly, route MIDI tracks to your external gear, and much, much more.
If you have any questions or you want to share your feedback, please visit this Community thread.
Share this article to support Gig Performer and spread the word!
We use cookies to ensure that we give you the best experience on our website. If you continue to use this site we will assume that you are happy with it.